Page 108 of 354
∙ Use power outlets with the engine
running to avoid discharging the ve-
hicle battery.
∙ Avoid using power outlets when the
air conditioner, headlights or rear win-
dow defroster is on.
∙ Before inserting or disconnecting a
plug, be sure the electrical accessory
being used is turned off.
∙ Push the plug in as far as it will go. If
good contact is not made, the plug
may overheat or the internal tem-
perature fuse may open.
∙ When not in use, be sure to close the
cap. Do not allow water or any other
liquid to contact the outlet.
FRONT-DOOR POCKETS SEATBACK POCKET (if so
equipped)
The seatback pocket is located on the
back of the passenger’s seat. The pocket
can be used to store maps.
LIC2157LIC1328
STORAGE
Instruments and controls2-27
Page 114 of 354

The map light has a three-position switch
and operates")
CAUTION
Do not use for extended periods of time
with the engine stopped. This could re-
sult in a discharged battery.
MAP LIGHT (if so equipped)
The map light has a three-position switch
and operates regardless of ignition switch
position.
When the switch is in the ON position
�3,
the map light illuminates, regardless of
door position. The light will go off af ter a
period of time unless the ignition switch is
placed in the ACC or ON position.
When the switch is in the DOOR position
�2,
the map light will stay on for a period of
time when:∙ The doors are unlocked by the key fob (if
so equipped), a key or the power door
lock switch while all doors are closed
and the ignition switch is placed in the
OFF position.
∙ The driver’s door is opened and then
closed while the key is removed from
the ignition switch.
∙ The key is removed from the ignition
switch while all doors are closed.
The light will turn off while the timer is acti-
vated when:
∙ The driver’s door is locked by the key fob
(if so equipped), a key, or the power door
lock switch.
∙ The ignition switch is placed in the ON
position.
When the switch is in the OFF position
�1,
the map light does not illuminate, regard-
less of door position.
The light will turn off automatically af ter a
period of time while doors are open to pre-
vent the battery from becoming dis-
charged.
LIC2126
Instruments and controls2-33
Page 115 of 354
CAUTION
Do not use for extended periods of time
with the engine stopped. This could re-
sult in a discharged battery.The light illuminates when the trunk lid is
opened. When the trunk lid is closed, the
light goes off. For additional information,
refer to “Exterior and interior lights” in the
“Do-it-yourself ” section of this manual.
TRUNK LIGHT
2-34Instruments and controls
Page 125 of 354
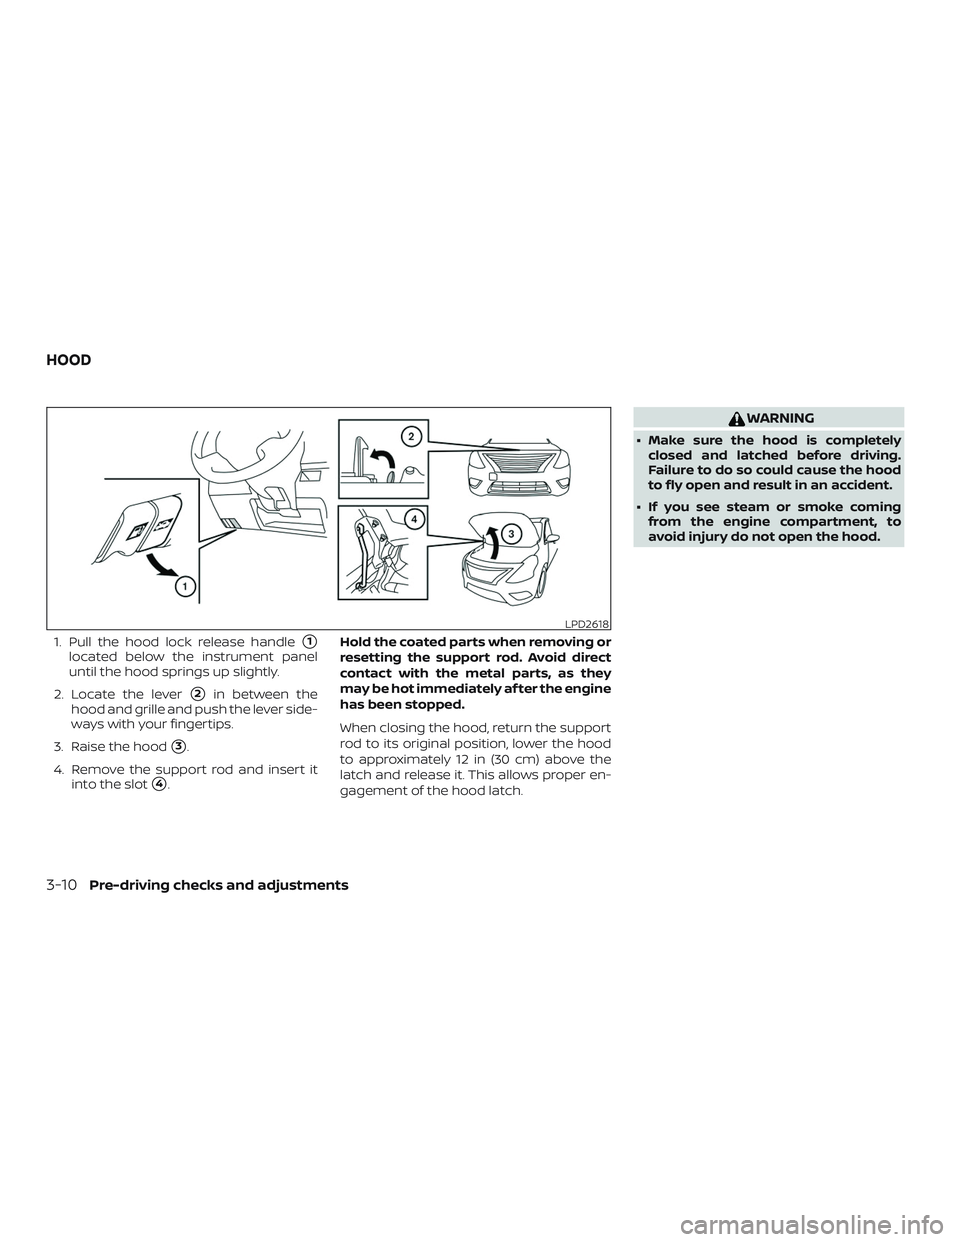
1. Pull the hood lock release handle�1
located below the instrument panel
until the hood springs up slightly.
2. Locate the lever
�2in between the
hood and grille and push the lever side-
ways with your fingertips.
3. Raise the hood
�3.
4. Remove the support rod and insert it
into the slot
�4.Hold the coated parts when removing or
resetting the support rod. Avoid direct
contact with the metal parts, as they
may be hot immediately af ter the engine
has been stopped.
When closing the hood, return the support
rod to its original position, lower the hood
to approximately 12 in (30 cm) above the
latch and release it. This allows proper en-
gagement of the hood latch.
WARNING
∙ Make sure the hood is completely
closed and latched before driving.
Failure to do so could cause the hood
to fly open and result in an accident.
∙ If you see steam or smoke coming
from the engine compartment, to
avoid injury do not open the hood.
LPD2618
HOOD
3-10Pre-driving checks and adjustments
Page 128 of 354

OPENER OPERATION
The fuel-filler door release is located below
the instrument panel. To open the fuel-filler
door, pull the release. To lock, close the fuel-
filler door securely.
FUEL-FILLER CAP
WARNING
∙ Gasoline is extremely flammable and
highly explosive under certain condi-
tions. You could be burned or seri-
ously injured if it is misused or mis-
handled. Always stop the engine and
do not smoke or allow open flames or
sparks near the vehicle when
refueling.∙ Do not attempt to top off the fuel tank
af ter the fuel pump nozzle shuts off
automatically. Continued refueling
may cause fuel overflow, resulting in
fuel spray and possibly a fire.
∙ Use only an original equipment type
fuel-filler cap as a replacement. It has
a built-in safety valve needed for
proper operation of the fuel system
and emission control system. An in-
correct cap can result in a serious mal-
function and possible injury. It could
also cause the
Malfunction Indi-
cator Light (MIL) to come on.
∙ Never pour fuel into the throttle body
to attempt to start your vehicle.
∙ Do not fill a portable fuel container in
the vehicle or trailer. Static electricity
can cause an explosion of flammable
liquid, vapor or gas in any vehicle or
trailer. To reduce the risk of serious
injury or death when filling portable
fuel containers:
– Always place the container on the
ground when filling.
– Do not use electronic devices when
filling.
LPD2371LPD2616
FUEL-FILLER DOOR
Pre-driving checks and adjustments3-13
Page 144 of 354

Adjust the air flow direction of the vents by
opening, closing or rotating.Adjust the air flow direction of the vents by
moving the slide as indicated
�1.
WARNING
∙ The air conditioner cooling function
operates only when the engine is
running.
∙ Do not leave children or adults who
would normally require the assis-
tance of others alone in your vehicle.
Pets should also not be lef t alone.
They could accidentally injure them-
selves or others through inadvertent
operation of the vehicle. Also, on hot,
sunny days, temperatures in a closed
vehicle could quickly become high
enough to cause severe or possibly
fatal injuries to people or animals.
∙ Do not use the recirculation mode for
long periods as it may cause the inte-
rior air to become stale and the win-
dows to fog up.
NOTE:
∙ Odors from inside and outside the ve-
hicle can build up in the air conditioner
unit. Odor can enter the passenger
compartment through the vents.
Side vents
SAA3126
Center vents
LHA2085
VENTSHEATER AND AIR CONDITIONER
(manual)
Display screen, heater, air conditioner, audio and phone systems4-9
Page 146 of 354

Temperature control dial
The temperature control dial allows you to
adjust the temperature of the outlet air. To
lower the temperature, turn the dial to the
lef t. To increase the temperature, turn the
dial to the right.
Fresh air
Move the air intake lever to theposi-
tion. The air flow is drawn from outside the
vehicle.
Air recirculation
Move the air intake lever to theposi-
tion to recirculate air inside the vehicle.
Use the
selection:
∙ when driving on a dusty road.
∙ to prevent traffic fumes from entering
passenger compartment.
∙ for maximum cooling when using the
air conditioner.
Air conditioner button
Start the engine, turn the fan control dial to
the desired position and press the
button to turn on the air conditioner. The
indicator light comes on when the air con-ditioner is operating. To turn off the air con-
ditioner, press the
button again.
The air conditioner cooling function op-
erates only when the engine is running.
Rear window defroster switch
For additional information, refer to “Rear
window defroster switch” in the “Instru-
ments and controls” section of this manual.
HEATER OPERATION
Heating
This mode is used to direct heated air to
the foot outlets. Some air also flows from
the defrost outlets.
1. Move the air intake lever to the
position for normal heating.
2. Turn the air flow control dial to
the
position.
3. Turn the
fan control dial to the
desired position.
4. Turn the temperature control dial to
the desired position between the
middle and the hot position.
Ventilation
This mode directs outside air to the side
and center vents.
1. Move the air intake lever to the
position.
2. Turn the air flow control dial to
the
position.
3. Turn the
fan control dial to the
desired position.
4. Turn the temperature control dial to
the desired position.
Defrosting or defogging
This mode directs the air to the defrost
outlets to defrost/defog the windows.
1. Move the
air intake lever to the
position.
2. Turn the air flow control dial to
the
position.
3. Turn the
fan control dial to the
desired position.
4. Turn the temperature control dial to
the desired position between the
middle and the hot position.
Display screen, heater, air conditioner, audio and phone systems4-11
Page 148 of 354

Operating tips
Clear snow and ice from the wiper blades
and air inlet in front of the windshield.
This improves heater operation.
AIR CONDITIONER OPERATION
Start the engine, turn thefan control
dial to the desired position, and press
the
button to activate the air condi-
tioner. When the air conditioner is on, cool-
ing and dehumidif ying functions are
added to the heater operation.
The air conditioner cooling function op-
erates only when the engine is running.
Cooling
This mode is used to cool and dehumidif y
the air.
1. Move the air intake lever to the
position.
2. Turn the air flow control dial to
the
position.
3. Turn the
fan control dial to the
desired position.
4. Press the
button. The indicator
light comes on.5. Turn the temperature control dial to
the desired position.
∙ For quick cooling when the outside
temperature is high, move the air intake
lever to the
position. Be sure to re-
turn to the
position for normal
cooling.
Dehumidified heating
This mode is used to heat and dehumidif y
the air.
1. Move the air intake lever to the
position.
2. Turn the air flow control dial to
the
position.
3. Turn the
fan control dial to the
desired position.
4. Press the
button. The indicator
light comes on.
5. Turn the temperature control dial to
the desired position.
Dehumidified defogging
This mode is used to defog the windows
and dehumidif y the air.
1. Move the air intake lever to the
position.2. Turn the air flow control dial to
the
position.
3. Turn the
fan control dial to the
desired position.
4. Turn the temperature control dial to
the desired position.
Operating tips
∙ Keep the windows closed while the air
conditioner is in operation.
∙ Af ter parking in the sun, drive for 2 or
3 minutes with the windows open to
vent hot air from the passenger com-
partment. Then, close the windows.
This allows the air conditioner to cool
the interior more quickly.
∙The air conditioning system should
be operated for approximately
10 minutes at least once a month.
This helps prevent damage to the
system due to lack of lubrication.
∙ A visible mist may be seen coming from
the ventilators in hot, humid conditions
as the air is cooled rapidly. This does not
indicate a malfunction.
Display screen, heater, air conditioner, audio and phone systems4-13