Page 8 of 354
Table of
ContentsIllustrated table of contents
Safety—Seats, seat belts and supplemental restraint system
Instruments and controls
Pre-driving checks and adjustments
Display screen, heater, air conditioner, audio and phone systems
Starting and driving
In case of emergency
Appearance and care
Do-it-yourself
Maintenance and schedules
Technical and consumer information
Index
0
1
2
3
4
5
6
7
8
9
10
11
Page 135 of 354
...............4-2
RearView Monitor system operation..........4-3
How to read the displayed lines...")
4 Display screen, heater, air conditioner,
audio and phone systems
RearView Monitor (if so equipped)...............4-2
RearView Monitor system operation..........4-3
How to read the displayed lines...............4-3
Difference between predicted and
actual distances..............................4-4
Adjusting the screen.........................4-6
RearView Monitor system limitations.........4-7
System maintenance.........................4-8
Vents............................................4-9
Heater and air conditioner (manual).............4-9
Controls.....................................4-10
Heater operation.............................4-11
Air conditioner operation....................4-13
Air flow charts...............................4-14
Servicing air conditioner........................4-17
Audio system...................................4-17
Radio........................................4-17
FM radio reception..........................4-17
AM radio reception..........................4-18
Satellite radio reception (if so equipped).....4-18
Audio operation precautions................4-19
FM/AM radio with compact disc (CD)
player (Type A) (if so equipped)...............4-27FM/AM radio with compact disc (CD)
player (Type B) (if so equipped)...............4-31
FM/AM/SAT radio with compact disc
(CD) player (if so equipped)..................4-36
USB (Universal Serial Bus) connection
port (if so equipped).........................4-42
iPod®* player operation (if so equipped)......4-44
Bluetooth® streaming audio
(if so equipped)..............................4-46
CD care and cleaning........................4-47
Steering wheel switch for audio control......4-48
Antenna.....................................4-49
Car phone or CB radio..........................4-49
Bluetooth® Hands-Free Phone System
(Type A) (if so equipped)........................4-50
Regulatory Information......................4-52
Using the system............................4-52
Control buttons.............................4-55
Getting started..............................
4-55
List of voice commands.....................4-57
Voice Adaptation (VA) mode.................4-62
Manual control..............................4-63
Troubleshooting guide......................4-64
Page 137 of 354
WARNING
∙ Failure to follow the warnings and in-
structions for proper use of the Rear-
View Monitor system could result in
serious injury or death.∙
RearView Monitor is a convenience fea-
ture and is not a substitute for proper
backing. Always turn and look out the
windows and check mirrors to be sure
that it is safe to move before operating
the vehicle. Always back up slowly.∙ The system is designed as an aid to
the driver in showing large stationary
objects directly behind the vehicle, to
help avoid damaging the vehicle.
LHA4456
REARVIEW MONITOR (if so
equipped)
4-2Display screen, heater, air conditioner, audio and phone systems
Page 138 of 354

∙ The distance guide line and the ve-
hicle width line should be used as a
reference only when the vehicle is on a
level paved surface. The distance
viewed on the monitor is for reference
only and may be different than the
actual distance between the vehicle
and displayed objects.
CAUTION
Do not scratch the camera lens when
cleaning dirt or snow from the front of
the camera.
The RearView Monitor system automati-
cally shows a rear view of the vehicle when
the shif t lever is shif ted into the R (Reverse)
position. The radio can still be heard while
the RearView Monitor is active.To display the rear view, the RearView Moni-
tor system uses a camera located next to
the trunk handle
�1.
REARVIEW MONITOR SYSTEM
OPERATION
With the ignition switch in the ON position,
move the shif t lever to the R (Reverse) po-
sition to operate the RearView Monitor.
HOW TO READ THE DISPLAYED
LINES
Guiding lines which indicate the vehicle
width and distances to objects with refer-
ence to the vehicle body line
�Aare dis-
played on the monitor.
Distance guide lines
Indicate distances from the vehicle body.
∙ Red line
�1: approx. 1.5 f t (0.5 m)
∙ Yellow line
�2: approx. 3 f t (1 m)
∙ Green line
�3: approx. 7 f t (2 m)
∙ Green line
�4: approx. 10 f t (3 m)
LHA3768LHA2944
Display screen, heater, air conditioner, audio and phone systems4-3
Page 139 of 354
Vehicle width guide lines�5
Indicate the vehicle width when backing
up.
DIFFERENCE BETWEEN PREDICTED
AND ACTUAL DISTANCES
The distance guide line and the vehicle
width guide line should be used as a refer-
ence only when the vehicle is on a level,
paved surface. The distance viewed on the
monitor is for reference only and may be
different than the actual distance between
the vehicle and displayed objects.
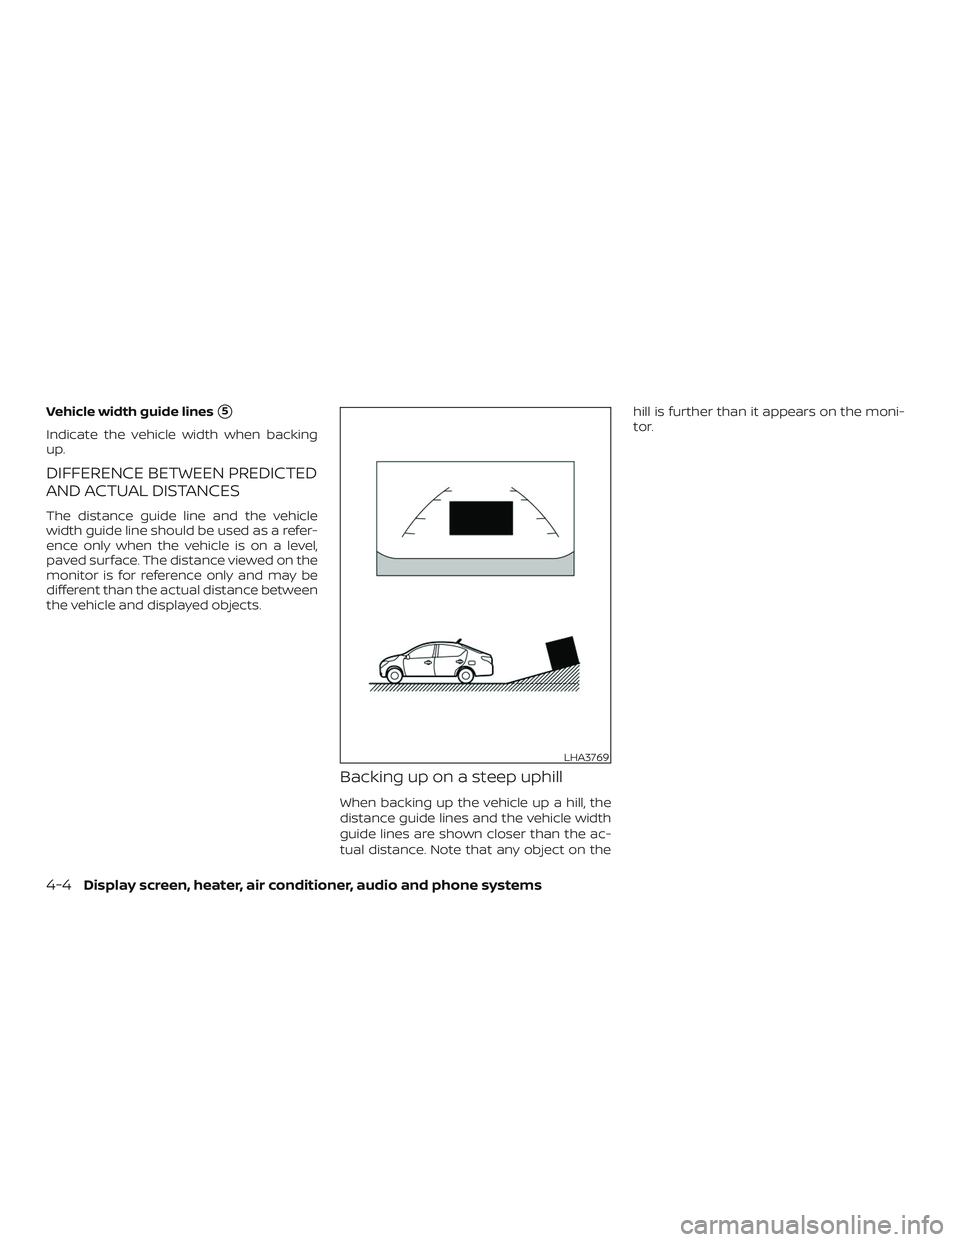
Backing up on a steep uphill
When backing up the vehicle up a hill, the
distance guide lines and the vehicle width
guide lines are shown closer than the ac-
tual distance. Note that any object on thehill is further than it appears on the moni-
tor.
LHA3769
4-4Display screen, heater, air conditioner, audio and phone systems
Page 140 of 354
Backing up on a steep downhill
When backing up the vehicle down a hill,
the distance guide lines and the vehicle
width guide lines are shown farther than
the actual distance. Note that any objecton the hill is closer than it appears on the
monitor.
Backing up near a projecting
object
The vehicle may seem to nearly clear the
object in the display. However, the vehicle
may hit the object if it projects over the
actual backing up course.
LHA3770LHA2946
Display screen, heater, air conditioner, audio and phone systems4-5
Page 141 of 354
Backing up behind a projecting
object
The position�Cis shown farther than the
position
�Bin the display. However, the po-
sition
�Cis actually at the same distance as
the position
�A. The vehicle may hit theobject when backing up to the position
�A
if the object projects over the actual back-
ing up course.
ADJUSTING THE SCREEN
1. Firmly apply the brake and place the
shif t lever in R (reverse)
2. Press the ENTER/SETTING button.
3. The screen will display the Brightness
settings.
4. Turn the TUNE/SCROLL knob to adjust
the setting up or down.
5. Press the ENTER/SETTING button
again to display the Contrast settings.
6. Turn the TUNE/SCROLL knob to adjust
the setting up or down.
LHA3619
LHA3639
4-6Display screen, heater, air conditioner, audio and phone systems
Page 142 of 354

7. Press the ENTER/SETTING button to
complete the adjustment.
∙ Do not adjust the display settings of the
RearView Monitor while the vehicle is
moving.
REARVIEW MONITOR SYSTEM
LIMITATIONS
WARNING
Listed below are the system limitations
for RearView Monitor. Failure to operate
the vehicle in accordance with these
system limitations could result in seri-
ous injury or death.
∙ The system cannot completely elimi-
nate blind spots and may not show
every object.
∙ Underneath the bumper and the cor-
ner areas of the bumper cannot be
viewed on the RearView Monitor be-
cause of its monitoring range limita-
tion. The system will not show small
objects below the bumper, and may
not show objects close to the bumper
or on the ground.∙ Objects viewed in the RearView Moni-
tor differ from actual distance be-
cause a wide-angle lens is used.
∙ Objects in the RearView Monitor will
appear visually opposite compared to
when viewed in the rearview and out-
side mirrors.
∙ Use the displayed lines as a reference.
The lines are highly affected by the
number of occupants, fuel level, ve-
hicle position, road conditions and
road grade.
∙ Make sure that the trunk is securely
closed when backing up.
∙ Do not put anything on the rearview
camera. The rearview camera is in-
stalled above the license plate.
∙ When washing the vehicle with high
pressure water, be sure not to spray it
around the camera. Otherwise, water
may enter the camera unit causing
water condensation on the lens, a
malfunction, fire or an electric shock.
∙ Do not strike the camera. It is a preci-
sion instrument. Otherwise, it may
malfunction or cause damage result-
ing in a fire or an electric shock.The following are operating limitations and
do not represent a system malfunction:
∙ When the temperature is extremely
high or low, the screen may not clearly
display objects.
∙ When strong light directly shines on the
camera, objects may not be displayed
clearly.
∙ Vertical lines may be seen in objects on
the screen. This is due to strong re-
flected light from the bumper.
∙ The screen may flicker under fluores-
cent light.
∙ The colors of objects on the RearView
Monitor may differ somewhat from the
actual color of objects.
∙ Objects on the monitor may not be
clear in a dark environment.
∙ There may be a delay when switching
between views.
∙ If dirt, rain or snow accumulate on the
camera, RearView Monitor may not dis-
play objects clearly. Clean the camera.
Display screen, heater, air conditioner, audio and phone systems4-7