2018 NISSAN SENTRA light
[x] Cancel search: lightPage 225 of 507

3. Turn thefan control dial to the
desired position.
4. Press the
button.
5. Turn the temperature control dial to the desired position.
Dehumidified defogging
This mode is used to defog the windows
and dehumidif y the air.
1. Press the
air flow control button.
2. Turn the
fan control dial to the
desired position.
∙ When the
orare selected,
the air conditioner automatically turns
on if the outside temperature is more
than 36°F (2°C). This dehumidifies the air
which helps defog the windshield.
The
mode automatically turns off,
allowing outside air to be drawn into the
passenger compartment to further im-
prove the defogging performance.
∙ The air conditioner is always on in
mode, regardless of whether the indica-
tor light is on or off.
3. Turn the temperature control dial to the desired position.
Operating tips
∙ Keep the windows and moonroofclosed while the air conditioner is in op-
eration.
∙ Af ter parking in the sun, drive for 2 or 3 minutes with the windows open to
vent hot air from the passenger com-
partment. Then, close the windows.
This allows the air conditioner to cool
the interior more quickly.
∙ The air conditioning system should
be operated for approximately
10 minutes at least once a month.
This helps prevent damage to the
system due to lack of lubrication.
∙ A visible mist may be seen coming from the ventilators in hot, humid conditions
as the air is cooled rapidly. This does not
indicate a malfunction.
∙ If the engine coolant temperature
gauge indicates engine coolant tem-
perature over the normal range, turn
the air conditioner off. For additional
information, refer to “If your vehicle
overheats” in the “In case of emer-
gency ” section of this manual.
AIR FLOW CHARTS
The following charts show the button and
dial positions for MAXIMUM AND QUICK
heating, cooling or defrosting. The air re-
circulation button should always be in
the OFF position for heating and defrost-
ing.
Monitor, climate, audio, phone and voice recognition systems4-27
Page 231 of 507
∙ When thefront defroster button is
pressed, the air conditioner will auto-
matically be turned on at outside tem-
peratures above 36°F (2°C). The air recir-
culate mode automatically turns off,
allowing outside air to be drawn into the
passenger compartment to further im-
prove the defogging performance.
MANUAL OPERATION
Fan speed control
Press thefan control buttons to
manually control the fan speed.
Press the AUTO button to return to auto-
matic control of the fan speed.
Temperature control
Press the temperature control
buttons
,to set the desired
temperature.
Air recirculation
Press the air recirculation buttonto
recirculate interior air inside the vehicle.
Press the AUTO button to return to auto-
matic mode.
The air recirculation cannot be activated
when the air conditioner is in the
front defrosting mode.
Fresh air intake
Press thefresh air intake button to
draw outside air into the passenger com-
partment.
Automatic intake air control
In the AUTO mode, the intake air will be
controlled automatically. To manually con-
trol the intake air, press the
air recir-
culation button. To return to the automatic
control mode, press and hold the
air
recirculation button or press and hold
the
fresh air intake button for about
2 seconds. The indicator lights (both air re-
circulation and fresh air intake buttons) will
flash twice and then the intake air will be
controlled automatically.
Air conditioner button
Start the engine, press thefan control
buttons to the desired position and press
the
button to turn on the air condi-
tioner. To turn off the air conditioner, press
the
button again.
The air conditioner cooling function op-
erates only when the engine is running.
Air flow control
Pressing the MODE button manually con-
trols air flow and selects the air outlet:
— Air flows from center and side vents.
— Air flows from center and sidevents and foot outlets.
— Air flows mainly from footoutlets.
— Air flows from defroster andfoot outlets.
To turn system off
Press the ON-OFF button.
Rear window and outside mirror
(if so equipped) defroster switch
For additional information, refer to “Rear
window and outside mirror (if so equipped)
defroster switch” in the “Instruments and
controls” section of this manual.
Monitor, climate, audio, phone and voice recognition systems4-33
Page 233 of 507
area and do not indicate any malfunction
in your NISSAN radio system.
Reception conditions will constantly
change because of vehicle movement.
Buildings, terrain, signal distance and inter-
ference from other vehicles can work
against ideal reception. Described below
are some of the factors that can affect your
radio reception.
Some cellular phones or other devices may
cause interference or a buzzing noise to
come from the audio system speakers.
Storing the device in a different location
may reduce or eliminate the noise.
FM RADIO RECEPTION
Range: FM range is normally limited to 25 –
30 mi (40 – 48 km), with monaural (single
channel) FM having slightly more range
than stereo FM. External influences may
sometimes interfere with FM station re-
ception even if the FM station is within 25
mi (40 km). The strength of the FM signal is
directly related to the distance between
the transmitter and receiver. FM signals fol-
low a line-of-sight path, exhibiting many of
the same characteristics as light. For ex-
ample, they will reflect off objects.Fade and drif t: As your vehicle moves away
from a station transmitter, the signals will
tend to fade and/or drif t.
Static and flutter: During signal interfer-
ence from buildings, large hills or due to
antenna position (usually in conjunction
with increased distance from the station
transmitter), static or flutter can be heard.
This can be reduced by adjusting the treble
control to reduce treble response.
Multipath reception: Because of the reflec-
tive characteristics of FM signals, direct and
reflected signals reach the receiver at the
same time. The signals may cancel each
other, resulting in momentary flutter or loss
of sound.AM RADIO RECEPTION
AM signals, because of their low frequency,
can bend around objects and skip along
the ground. In addition, the signals can be
bounced off the ionosphere and bent back
to earth. Because of these characteristics,
AM signals are also subject to interference
as they travel from transmitter to receiver.
Fading: Occurs while the vehicle is passing
through freeway underpasses or in areas
with many tall buildings. It can also occurfor several seconds during ionospheric tur-
bulence even in areas where no obstacles
exist.
Static: Caused by thunderstorms, electrical
power lines, electric signs and even traffic
lights.
SATELLITE RADIO RECEPTION (if so
equipped)
When the satellite radio is used for the first
time or the battery has been replaced, the
satellite radio may not work properly. This
is not a malfunction. Wait more than
10 minutes with satellite radio ON and the
vehicle outside of any metal or large build-
ing for satellite radio to receive all of the
necessary data.
No satellite radio reception is available and
“NO SAT” or “No Signal” is displayed when
the SAT band option is selected unless op-
tional satellite receiver and antenna are in-
stalled and a SiriusXM® Satellite Radio ser-
vice subscription is active. Satellite radio is
not available in Alaska, Hawaii and Guam.
Satellite radio performance may be af-
fected if cargo carried on the roof blocks
the satellite radio signal.
Monitor, climate, audio, phone and voice recognition systems4-35
Page 235 of 507

∙Do not expose the CD to direct sun-
light.
∙ CDs that are in poor condition or are
dirty, scratched or covered with fin-
gerprints may not work properly.
∙ The following CDs may not work
properly:
∙ Copy control compact discs (CCCD)
∙ Recordable compact discs (CD-R)
∙ Rewritable compact discs (CD-RW)
∙ Do not use the following CDs as they
may cause the CD player to malfunc-
tion:
∙ 3.1 in (8 cm) discs with an adapter
∙ CDs that are not round
∙ CDs with a paper label
∙ CDs that are warped, scratched, or
have abnormal edges
∙ This audio system can only play pre-
recorded CDs. It has no capability to
record or burn CDs.
∙ If the CD cannot be played, one of the
following messages will be displayed. CHECK DISC
∙
Confirm that the CD is inserted cor-
rectly (the label side is facing up,
etc.).
∙ Confirm that the CD is not bent or
warped and it is free of scratches.
PRESS EJECT
This is an error due to excessive tem-
perature inside the player. Remove
the CD by pressing the EJECT button.
Af ter a short time, reinsert the CD.
The CD can be played when the tem-
perature of the player returns to nor-
mal.
UNPLAYABLE
The file is unplayable in this audio
system (only MP3 or WMA CD).Compact disc with MP3 or WMA
Terms ∙ MP3 — MP3 is short for Moving Pictures Experts Group Audio Layer 3. MP3 is the
most well-known compressed digital
audio file format. This format allows for
near “CD quality” sound, but at a fraction
of the size of normal audio files. MP3
conversion of an audio track from CD-
ROM can reduce the file size by approxi-
mately a 10:1 ratio with virtually no per-
ceptible loss in quality. MP3
compression removes the redundant
and irrelevant parts of a sound signal
that the human ear doesn’t hear.
∙ WMA — Windows Media Audio (WMA)* is a compressed audio format created by
Microsof t as an alternative to MP3. The
WMA codec offers greater file compres-
sion than the MP3 codec, enabling stor-
age of more digital audio tracks in the
same amount of space when com-
pared to MP3s at the same level of qual-
ity.
Monitor, climate, audio, phone and voice recognition systems4-37
Page 256 of 507
PAUSETo pause a track, press
the
pause key.
REWIND/
FA ST
FORWARD To rewind/ fast forward a
track, hold the
orseek key.
Compact disc (CD) player
operation
If the radio is already operating, it automati-
cally turns off and the compact disc begins
to play. CD button
When the CD button is pressed with the
system off and the compact disc loaded,
the system will turn on and the compact
disc will start to play.
When the CD button is pressed with a com-
pact disc loaded and the radio playing, the
radio will automatically be turned off and
the compact disc will start to play.
CD/MP3 display mode
Menu item
CD/MP3 While listening to a CD or an MP3/WMA CD, certain text may be displayed (when a CD encoded
with text is being used). Depending on how the CD or MP3/WMA CD is encoded, the text is dis-
played listing the artist, album and song title. There are other keys displayed on the screen when
aCDisplaying.
Random Touch the “Random” key to apply a random play pattern to the CD. If an MP3 CD is playing, touch-
ing “Random” or alternates between Random Folder, and Random All. This text will appear on the
display. To cancel Random mode, touch the “Random” key until the key is no longer highlighted.
Repeat Touch the “Repeat” key to apply a repeat play pattern to the CD. If an MP3 CD is playing, touching
“Repeat” alternates between repeating the current song and repeating the current folder. This text
will appear on the display. To cancel Repeat mode, touch the “Repeat” key until the key is no longer
highlighted
Browse Touch the “Browse” key to display the titles on the CD in list format. Touch the title of a song in the
list to begin playing that song. If an MP3 CD is playing, touching the “Browse” key will also list the
folders on the disc. Follow the procedure for selecting a song with the touch-screen to choose a
folder.
4-58Monitor, climate, audio, phone and voice recognition systems
Page 271 of 507
SOURCE switch
Press the SOURCE switch to change the
mode in the following sequence:
AM→FM1 →FM2 →(XM1 →XM2 →XM3
(satellite radio, if so
equipped))→(SXM1→SXM2→SXM3 (satellite,
if so equipped))→ CD*→USB/iPod®* →
Bluetooth® Audio* (if so equipped) →AUX*
→ AM.
* These modes are only available when
compatible media storage is inserted into
the device or connected to the system.
Volume control switch
Push the volume control switch to increase
or decrease the volume.
Tuning switch
While the display is showing a map or audio
screen, tilt the Tuning switch upward or
downward to select a station, track, CD or
folder. For most audio sources, tilting the
switch up/down for more than 1.5 seconds
provides a different function than a tilting
up/down for less than 1.5 seconds. AM and FM
∙ Tilt up/down for less than 1.5 seconds to increase or decrease the preset station.
∙ Tilt up/down for more than 1.5 seconds to seek up or down to the next station.
XM/SXM (if so equipped) ∙ Tilt up/down for less than 1.5 seconds to increase or decrease the preset station.
∙ Tilt up/down for more than 1.5 seconds to go to the next or previous category.
iPod® ∙ Tilt up/down for less than 1.5 seconds to increase or decrease the track number.
∙ Tilt up/down for more than 1.5 seconds to fast forward or rewind the current
track.
CD ∙ Tilt up/down for less than 1.5 seconds to increase or decrease the track number.
∙ Tilt up/down for more than 1.5 seconds to increase or decrease the folder num-
ber (if playing compressed audio files)
or to fast forward or rewind the current
track. USB
∙ Tilt up/down for less than 1.5 seconds to increase or decrease the track number.
∙ Tilt up/down for more than 1.5 seconds to fast forward or rewind the current
track.
Bluetooth® Audio (if so equipped) ∙ Tilt up/down for less than 1.5 seconds to skip ahead or back to the next song.
ANTENNA
The antenna pattern is printed inside the
rear window.
CAUTION
∙ Do not place metalized film near therear window glass or attach any metal
parts to it. This may cause poor recep-
tion or noise.
∙ When cleaning the inside of the rear window, be careful not to scratch or
damage the rear window antenna.
Lightly wipe along the antenna with a
dampened sof t cloth.
Monitor, climate, audio, phone and voice recognition systems4-73
Page 310 of 507
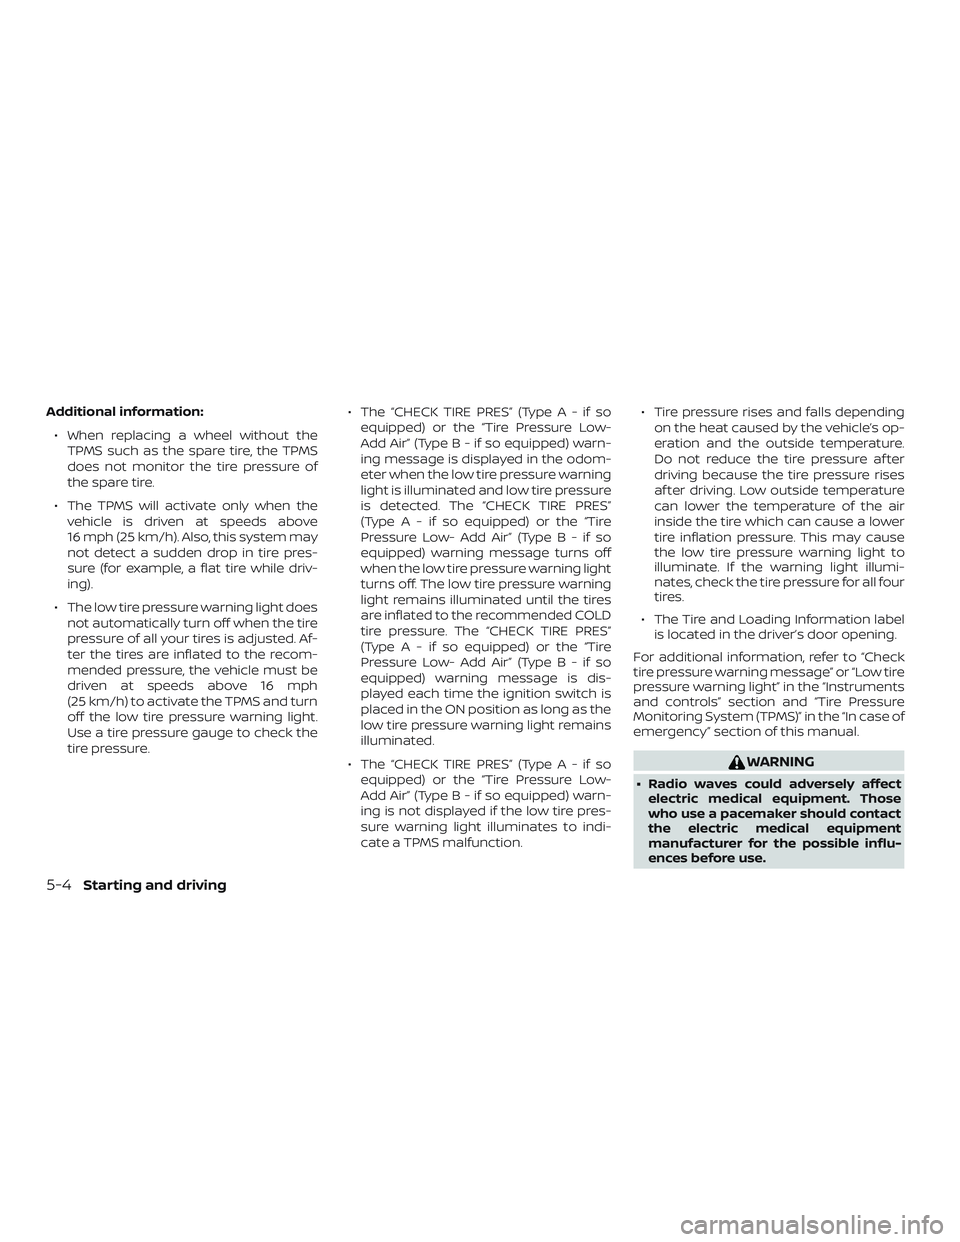
Additional information:∙ When replacing a wheel without the TPMS such as the spare tire, the TPMS
does not monitor the tire pressure of
the spare tire.
∙ The TPMS will activate only when the vehicle is driven at speeds above
16 mph (25 km/h). Also, this system may
not detect a sudden drop in tire pres-
sure (for example, a flat tire while driv-
ing).
∙ The low tire pressure warning light does not automatically turn off when the tire
pressure of all your tires is adjusted. Af-
ter the tires are inflated to the recom-
mended pressure, the vehicle must be
driven at speeds above 16 mph
(25 km/h) to activate the TPMS and turn
off the low tire pressure warning light.
Use a tire pressure gauge to check the
tire pressure. ∙ The “CHECK TIRE PRES” (TypeA-ifso
equipped) or the “Tire Pressure Low-
AddAir”(TypeB-ifsoequipped) warn-
ing message is displayed in the odom-
eter when the low tire pressure warning
light is illuminated and low tire pressure
is detected. The “CHECK TIRE PRES”
(TypeA-ifsoequipped) or the “Tire
Pressure Low- Add Air” (Typ eB-ifso
equipped) warning message turns off
when the low tire pressure warning light
turns off. The low tire pressure warning
light remains illuminated until the tires
are inflated to the recommended COLD
tire pressure. The “CHECK TIRE PRES”
(TypeA-ifsoequipped) or the “Tire
Pressure Low- Add Air” (Typ eB-ifso
equipped) warning message is dis-
played each time the ignition switch is
placed in the ON position as long as the
low tire pressure warning light remains
illuminated.
∙ The “CHECK TIRE PRES” (TypeA-ifso equipped) or the “Tire Pressure Low-
AddAir”(TypeB-ifsoequipped) warn-
ing is not displayed if the low tire pres-
sure warning light illuminates to indi-
cate a TPMS malfunction. ∙ Tire pressure rises and falls depending
on the heat caused by the vehicle’s op-
eration and the outside temperature.
Do not reduce the tire pressure af ter
driving because the tire pressure rises
af ter driving. Low outside temperature
can lower the temperature of the air
inside the tire which can cause a lower
tire inflation pressure. This may cause
the low tire pressure warning light to
illuminate. If the warning light illumi-
nates, check the tire pressure for all four
tires.
∙ The Tire and Loading Information label is located in the driver’s door opening.
For additional information, refer to “Check
tire pressure warning message” or “Low tire
pressure warning light” in the “Instruments
and controls” section and “Tire Pressure
Monitoring System (TPMS)” in the “In case of
emergency” section of this manual.
WARNING
∙ Radio waves could adversely affect electric medical equipment. Those
who use a pacemaker should contact
the electric medical equipment
manufacturer for the possible influ-
ences before use.
5-4Starting and driving
Page 311 of 507
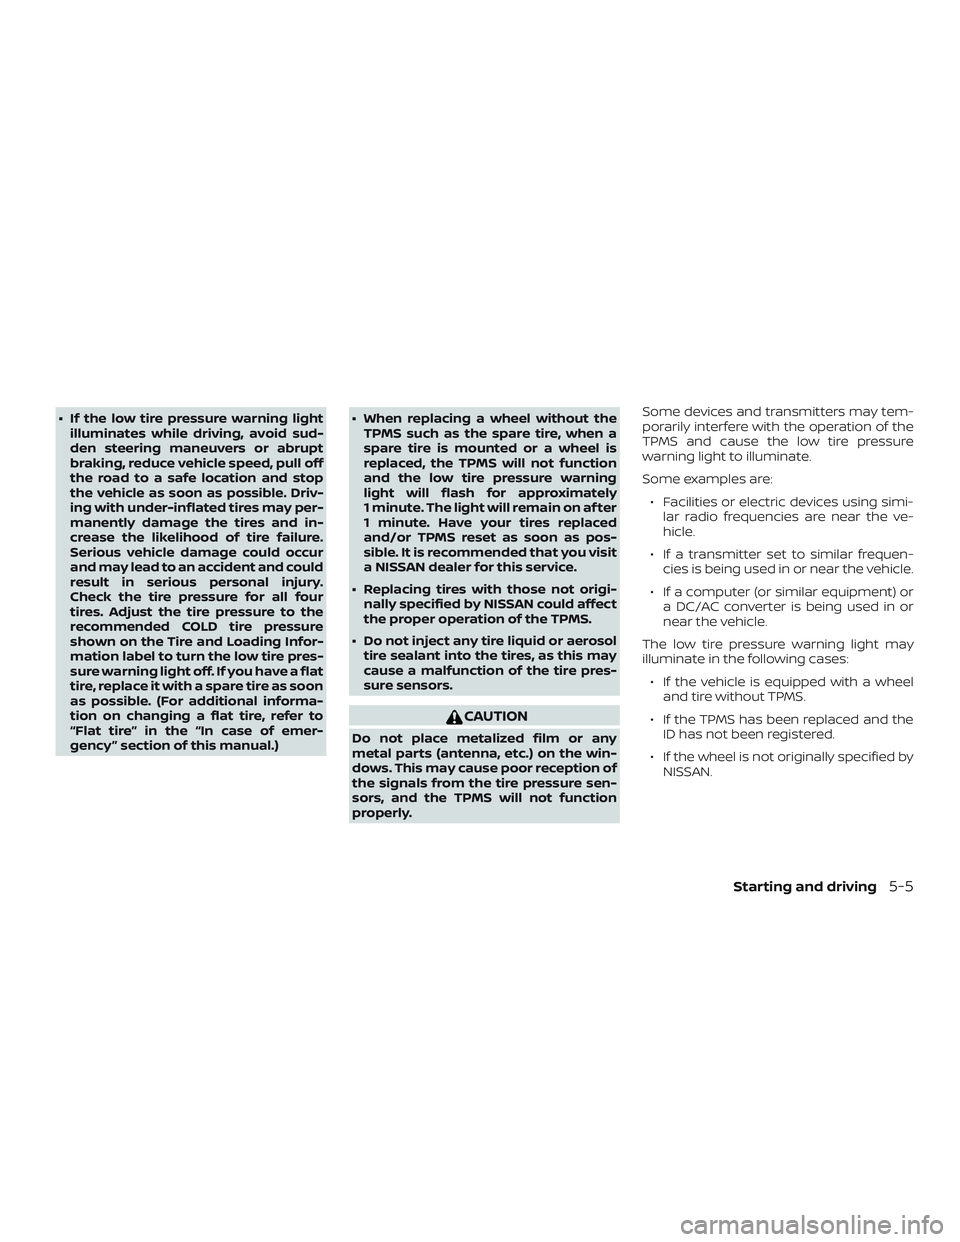
∙ If the low tire pressure warning lightilluminates while driving, avoid sud-
den steering maneuvers or abrupt
braking, reduce vehicle speed, pull off
the road to a safe location and stop
the vehicle as soon as possible. Driv-
ing with under-inflated tires may per-
manently damage the tires and in-
crease the likelihood of tire failure.
Serious vehicle damage could occur
and may lead to an accident and could
result in serious personal injury.
Check the tire pressure for all four
tires. Adjust the tire pressure to the
recommended COLD tire pressure
shown on the Tire and Loading Infor-
mation label to turn the low tire pres-
sure warning light off. If you have a flat
tire, replace it with a spare tire as soon
as possible. (For additional informa-
tion on changing a flat tire, refer to
“Flat tire” in the “In case of emer-
gency ” section of this manual.) ∙ When replacing a wheel without the
TPMS such as the spare tire, when a
spare tire is mounted or a wheel is
replaced, the TPMS will not function
and the low tire pressure warning
light will flash for approximately
1 minute. The light will remain on af ter
1 minute. Have your tires replaced
and/or TPMS reset as soon as pos-
sible. It is recommended that you visit
a NISSAN dealer for this service.
∙ Replacing tires with those not origi- nally specified by NISSAN could affect
the proper operation of the TPMS.
∙ Do not inject any tire liquid or aerosol tire sealant into the tires, as this may
cause a malfunction of the tire pres-
sure sensors.
CAUTION
Do not place metalized film or any
metal parts (antenna, etc.) on the win-
dows. This may cause poor reception of
the signals from the tire pressure sen-
sors, and the TPMS will not function
properly. Some devices and transmitters may tem-
porarily interfere with the operation of the
TPMS and cause the low tire pressure
warning light to illuminate.
Some examples are:
∙ Facilities or electric devices using simi- lar radio frequencies are near the ve-
hicle.
∙ If a transmitter set to similar frequen- cies is being used in or near the vehicle.
∙ If a computer (or similar equipment) or a DC/AC converter is being used in or
near the vehicle.
The low tire pressure warning light may
illuminate in the following cases: ∙ If the vehicle is equipped with a wheel and tire without TPMS.
∙ If the TPMS has been replaced and the ID has not been registered.
∙ If the wheel is not originally specified by NISSAN.
Starting and driving5-5