Page 167 of 474
CONSOLE LIGHT
The console light will turn on whenever the
parking lights or headlights are illuminated.
The console light brightness can be ad-
justed with the illumination brightness
control.
MAP LIGHTS
Press the button to turn the map lights on.
To turn them off, press the button again.
Page 168 of 474
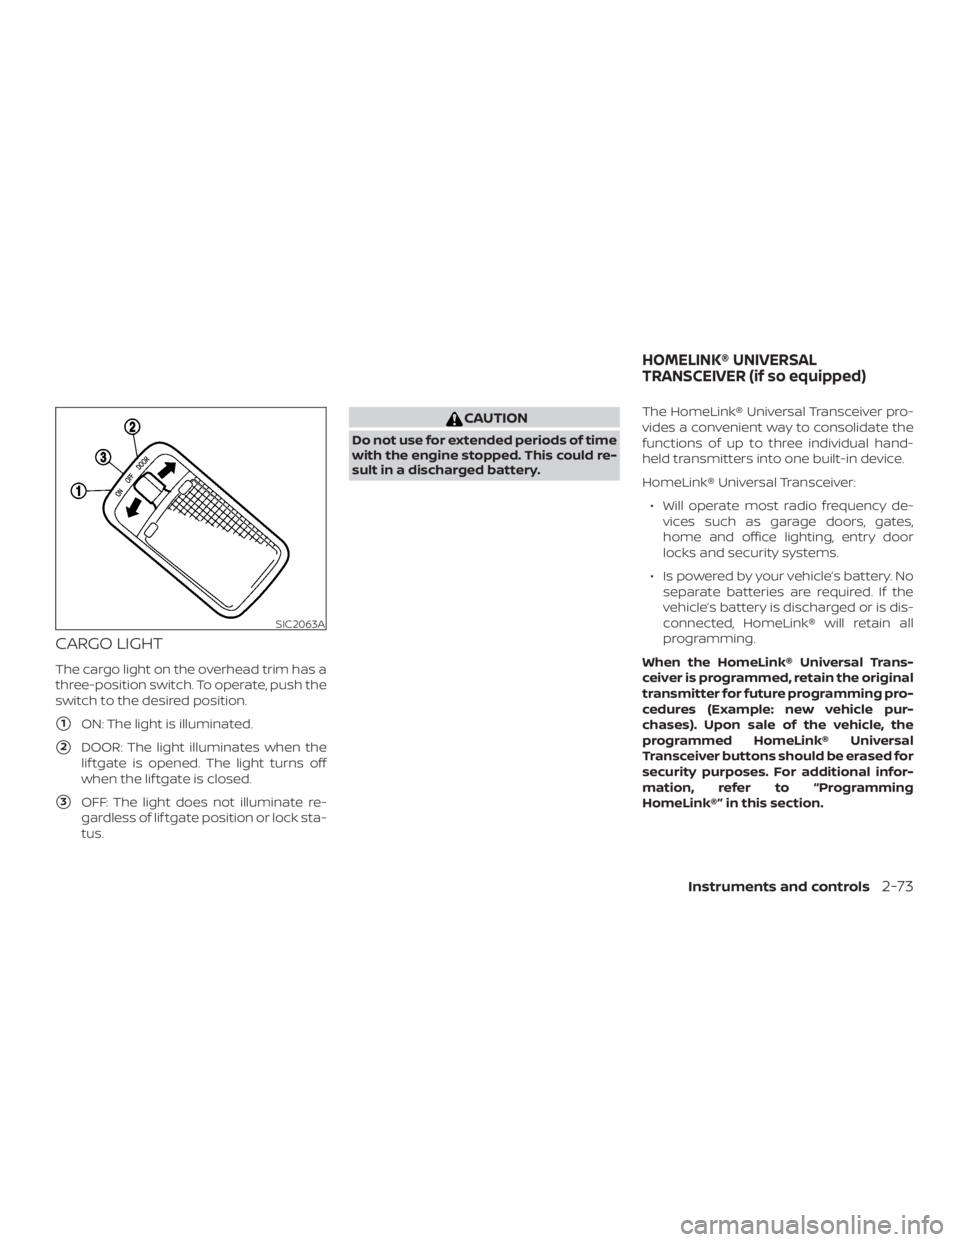
CARGO LIGHT
The cargo light on the overhead trim has a
three-position switch. To operate, push the
switch to the desired position.
�1ON: The light is illuminated.
�2DOOR: The light illuminates when the
lif tgate is opened. The light turns off
when the lif tgate is closed.
�3OFF: The light does not illuminate re-
gardless of lif tgate position or lock sta-
tus.
Page 169 of 474

WARNING
∙ Do not use the HomeLink® UniversalTransceiver with any garage door
opener that lacks safety stop and re-
verse features as required by federal
safety standards. (These standards
became effective for opener models
manufactured af ter April 1, 1982). A
garage door opener which cannot de-
tect an object in the path of a closing
garage door and then automatically
stop and reverse, does not meet cur-
rent federal safety standards. Using a
garage door opener without these
features increases the risk of serious
injury or death.
∙ During the programming procedure your garage door or security gate will
open and close (if the transmitter is
within range). Make sure that people
or objects are clear of the garage door,
gate, etc. that you are programming. ∙ Your vehicle’s engine should be
turned off while programming the
HomeLink® Universal Transceiver. Do
not breathe exhaust gases; they con-
tain colorless and odorless carbon
monoxide. Carbon monoxide is dan-
gerous. It can cause unconsciousness
or death.
PROGRAMMING HOMELINK®
If you have any questions or are having
difficulty programming your HomeLink®
buttons, refer to the HomeLink® web site at:
www.homelink.com or call 1-800-355-3515.
NOTE:
Place the ignition switch in the ACC posi-
tion when programming HomeLink®. It is
also recommended that a new battery
be placed in the hand-held transmitter
of the device being programmed to
HomeLink® for quicker programming
and accurate transmission of the radio
frequency. 1. Position the end of your hand-held
transmitter 1–3 in (2–8 cm) away from
the HomeLink® surface, keeping the
HomeLink® indicator light
�1in view.
Page 184 of 474

1. Move the shif t lever to the P (Park) posi-tion, place the ignition switch in the
LOCK position and make sure you carry
the Intelligent Key with you.
2. Cl")
Locking doors — Type A (if so
equipped)
1. Move the shif t lever to the P (Park) posi-tion, place the ignition switch in the
LOCK position and make sure you carry
the Intelligent Key with you.
2. Close all doors.
3. Push any door handle request switch while carrying the Intelligent Key with
you.
4. All doors and the rear lif tgate will lock.
5. The hazard warning lights flash twice and the outside chime sounds twice. NOTE:
∙ Request switches for all doors and
lif tgate can be deactivated when the
I-Key Door Lock setting is switched to
OFF in the vehicle settings of the ve-
hicle information display. For addi-
tional information, refer to “Vehicle
information display ” in the “Instru-
ments and controls” section of this
manual.
∙ Doors lock with the door handle re-
quest switch while the ignition switch
is not in the LOCK position. ∙
Doors do not lock by pushing the door
handle request switch while any door
is open. However, doors lock with the
mechanical key even if any door is
open.
∙ Doors do not lock with the door
handle request switch with the Intel-
ligent Key inside the vehicle and a
beep sounds to warn you. However,
when an Intelligent Key is inside the
vehicle, doors can be locked with an-
other Intelligent Key.
Page 185 of 474

1. Move the shif t lever to the P (Park) posi-tion, place the ignition switch in the
LOCK position and make sure you carry
the Intelligent Key with you.
2. Cl")
Locking doors — Type B (if so
equipped)
1. Move the shif t lever to the P (Park) posi-tion, place the ignition switch in the
LOCK position and make sure you carry
the Intelligent Key with you.
2. Close the driver’s door and press the driver’s door request switch OR close
all doors and press any door request
switch while carrying the Intelligent Key
with you.
3. All doors and the rear lif tgate will lock. 4. The hazard warning lights flash twice
and the outside chime sounds twice.
NOTE: ∙ Request switches for all doors and
lif tgate can be deactivated when the
I-Key Door Lock setting is switched to
OFF in the vehicle settings of the ve-
hicle information display. For addi-
tional information, refer to “Vehicle
information display ” in the “Instru-
ments and controls” section of this
manual. ∙
Doors lock with the door handle re-
quest switch while the ignition switch
is not in the LOCK position.
∙ Doors do not lock by pushing the door
handle request switch while the driv-
er’s door is open. However, doors lock
with the mechanical key even if any
door is open.
∙ Doors do not lock with the door
handle request switch with the Intel-
ligent Key inside the vehicle and a
beep sounds to warn you. However,
when an Intelligent Key is inside the
vehicle, doors can be locked with an-
other Intelligent Key.
Page 187 of 474

NOTE:
Request switches for all doors and lif t-
gate can be deactivated when the I-Key
Door Lock setting is switched to OFF in
the “Vehicle Settings” of the vehicle in-
formation display. For additional infor-
mation, refer to “Vehicle information dis-
play ” in the “Instruments and controls”
section of this manual.
If a door handle is pulled while unlocking
the doors, that door may not be unlocked.
Returning the door handle to its original
position will unlock the door. If the door
does not unlock af ter returning the doorhandle, push the door handle request
switch to unlock the door.
All doors will be locked automatically un-
less one of the following operations is per-
formed within 1 minute af ter pushing the
request switch.
∙ Opening any door.
∙ Pushing the ignition switch.
The interior light timer illuminates for a pe-
riod of time when a door is unlocked and the
room light switch is in the DOOR position.
The interior light can be turned off without
waiting by performing one of the following
operations:∙ Placing the ignition switch in the ON po- sition.
∙ Locking the doors with the remote con- trol.
∙ Switching the room light switch to the OFF position.
∙ Switching the Auto Room Lamp to the OFF position in “Vehicle Settings” of the
vehicle information display. For addi-
tional information, refer to “Vehicle in-
formation display” in the “Instruments
and controls” section of this manual.
HOW TO USE THE REMOTE
KEYLESS ENTRY FUNCTION
The remote keyless entry function can op-
erate all door locks using the remote key-
less function of the Intelligent Key. The re-
mote keyless function can operate at a
distance of 33 f t (10 m) away from the ve-
hicle. The operating distance depends
upon the conditions around the vehicle.
The remote keyless entry function will not
function under the following conditions:
∙ When the Intelligent Key is not within the operational range.
∙ When the doors or the rear lif tgate are open or not closed securely.
∙ When the Intelligent Key battery is dis- charged.
Page 194 of 474
WARNING
∙ Radio waves could adversely affectelectric medical equipment. Those
who use a pacemaker should contact
the electric medical equipment
manufacturer for the possible influ-
ences before use.
∙ The Intelligent Key transmits radio waves when the buttons are pressed.
The FAA advises the radio waves may
affect aircraf t navigation and com-
munication systems. Do not operate
the Intelligent Key while on an air-
plane. Make sure the buttons are not
operated unintentionally when the
unit is stored for a flight.
The Intelligent Key can operate all the door
locks using the remote control function. The
operating environment and/or conditions
may affect the Intelligent Key operation.
Be sure to read the following before using
the Intelligent Key.
Page 204 of 474
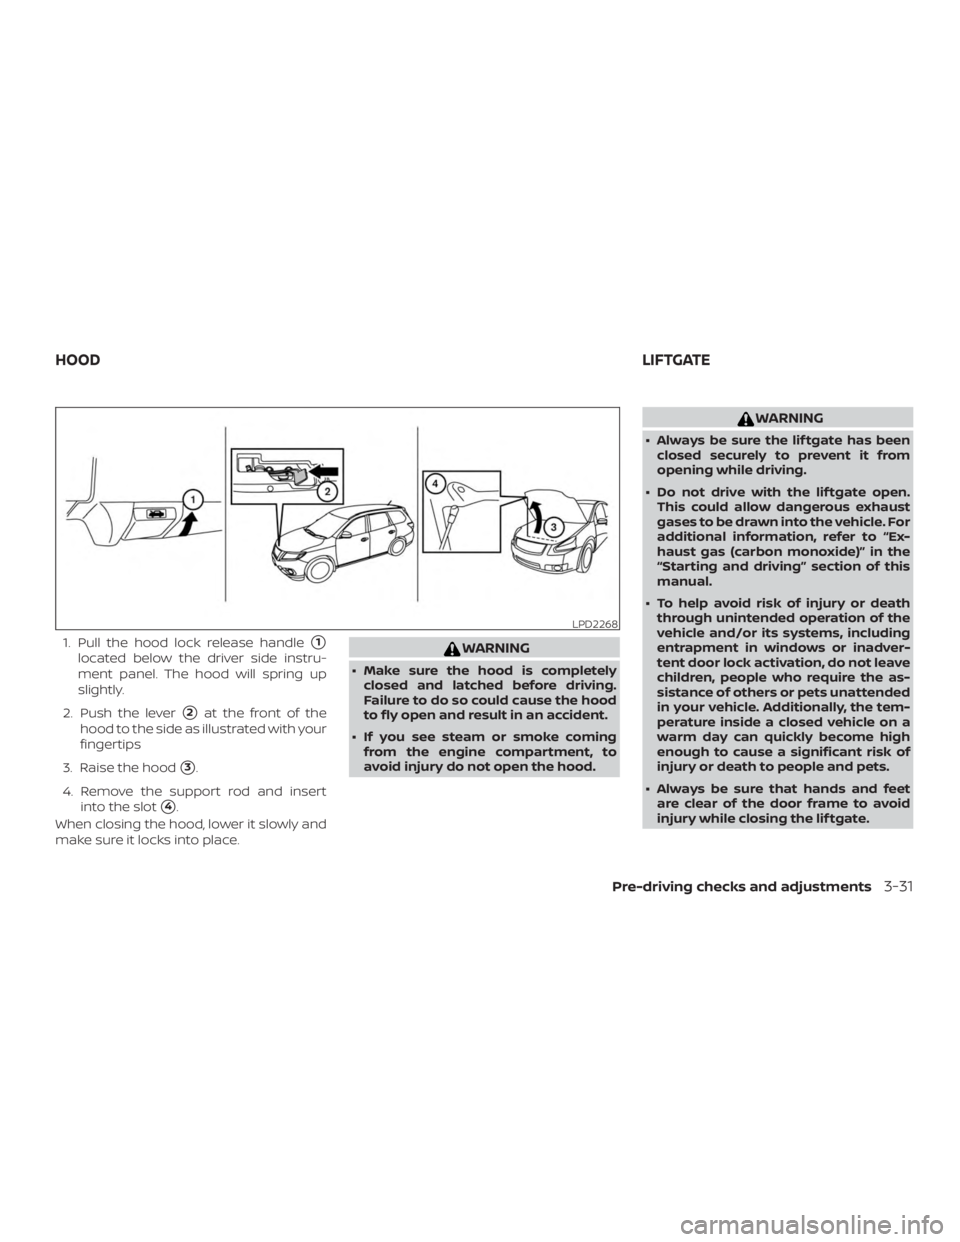
1. Pull the hood lock release handle�1
located below the driver side instru-
ment panel. The hood will spring up
slightly.
2. Push the lever
�2at the front of the
hood to the side as illustrated with your
fingertips
3. Raise the hood
�3.
4. Remove the support rod and insert into the slot
�4.
When closing the hood, lower it slowly and
make sure it locks into place.