Page 133 of 426
CONSOLE BOX (if so equipped)
The front of the console box lid�1has a
place for securing items with metal clips. The tray located in the front of the console
box is for storing binders.
LIC2086
Binder storage tray
LIC2115
2-44Instruments and controls
Page 135 of 426
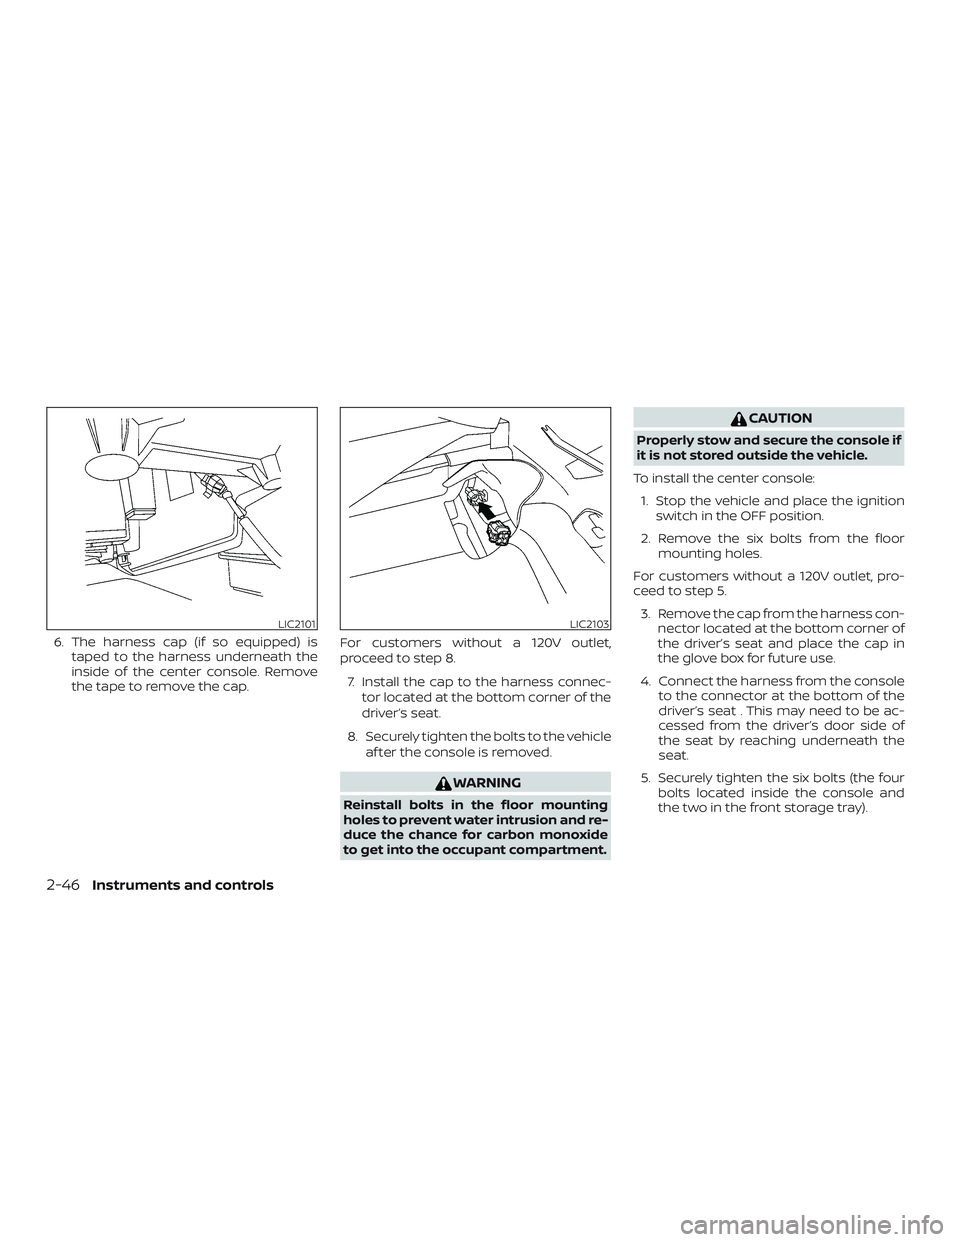
6. The harness cap (if so equipped) istaped to the harness underneath the
inside of the center console. Remove
the tape to remove the cap. For customers without a 120V outlet,
proceed to step 8.
7. Install the cap to the harness connec- tor located at the bottom corner of the
driver’s seat.
8. Securely tighten the bolts to the vehicle af ter the console is removed.
WARNING
Reinstall bolts in the floor mounting
holes to prevent water intrusion and re-
duce the chance for carbon monoxide
to get into the occupant compartment.
CAUTION
Properly stow and secure the console if
it is not stored outside the vehicle.
To install the center console: 1. Stop the vehicle and place the ignition switch in the OFF position.
2. Remove the six bolts from the floor mounting holes.
For customers without a 120V outlet, pro-
ceed to step 5. 3. Remove the cap from the harness con- nector located at the bottom corner of
the driver’s seat and place the cap in
the glove box for future use.
4. Connect the harness from the console to the connector at the bottom of the
driver’s seat . This may need to be ac-
cessed from the driver’s door side of
the seat by reaching underneath the
seat.
5. Securely tighten the six bolts (the four bolts located inside the console and
the two in the front storage tray).
LIC2101LIC2103
2-46Instruments and controls
Page 146 of 426
When the doors are locked using one of the
following methods, the doors cannot be
opened using the inside or outside door
handles. The doors must be unlocked to
open the doors.
WARNING
∙ Always have the doors locked whiledriving. Along with the use of seat
belts, this provides greater safety in
the event of an accident by helping to
prevent persons from being thrown
from the vehicle. This also helps keep
children and others from unintention-
ally opening the doors, and will help
keep out intruders.
∙ Before opening any door, always look for and avoid oncoming traffic. ∙ To help avoid risk of injury or death
through unintended operation of the
vehicle and/or its systems, including
entrapment in windows and/or inad-
vertent door lock activation, do not
leave children, people who require the
assistance of others and/or pets un-
attended in your vehicle. Additionally,
the temperature inside a closed ve-
hicle on a warm day can quickly be-
come high enough to cause a signifi-
cant risk of injury or death to people
and/or pets.
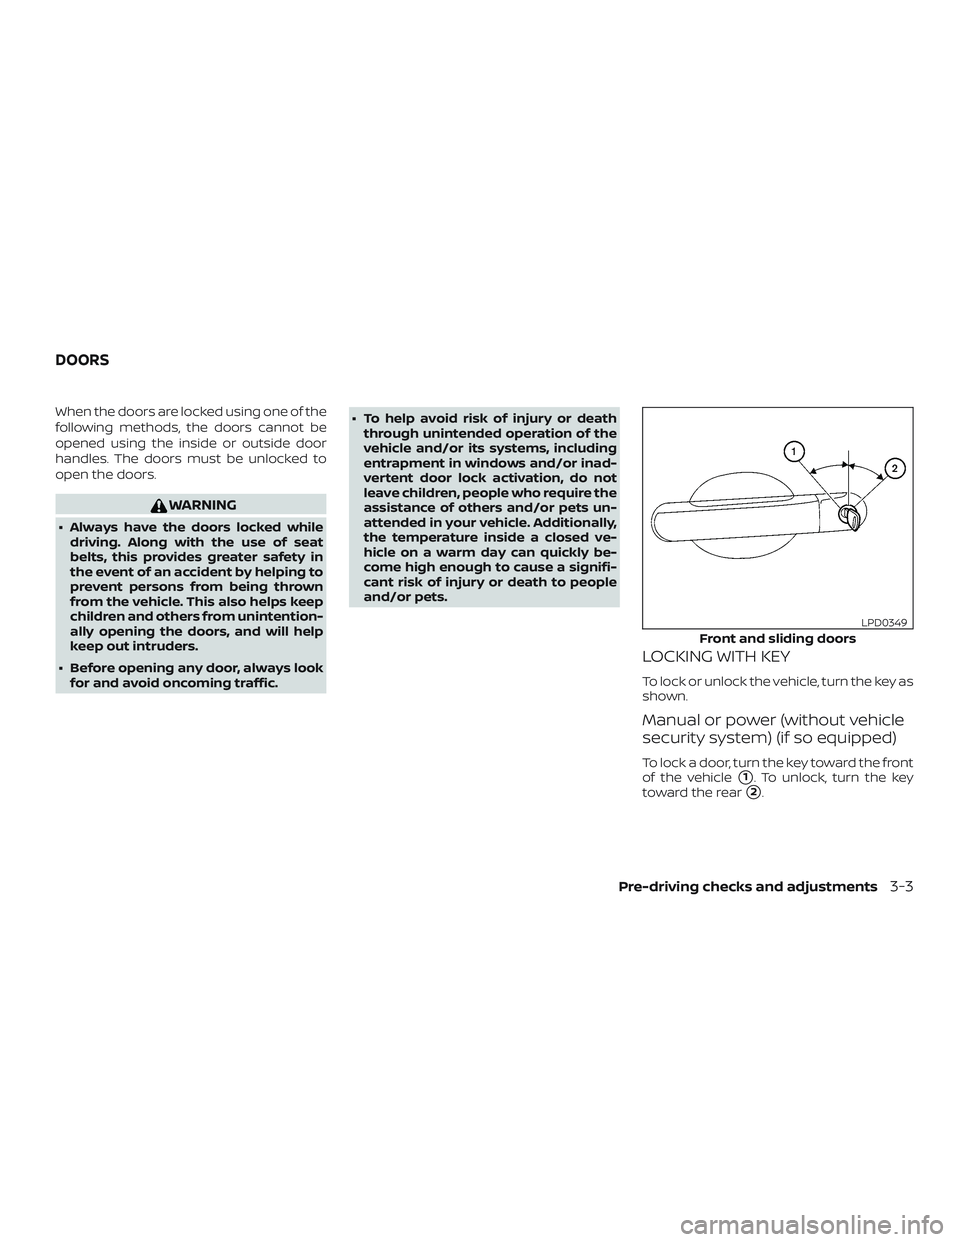
LOCKING WITH KEY
To lock or unlock the vehicle, turn the key as
shown.
Manual or power (without vehicle
security system) (if so equipped)
To lock a door, turn the key toward the front
of the vehicle
�1. To unlock, turn the key
toward the rear
�2.
Front and sliding doors
LPD0349
DOORS
Pre-driving checks and adjustments3-3
Page 147 of 426
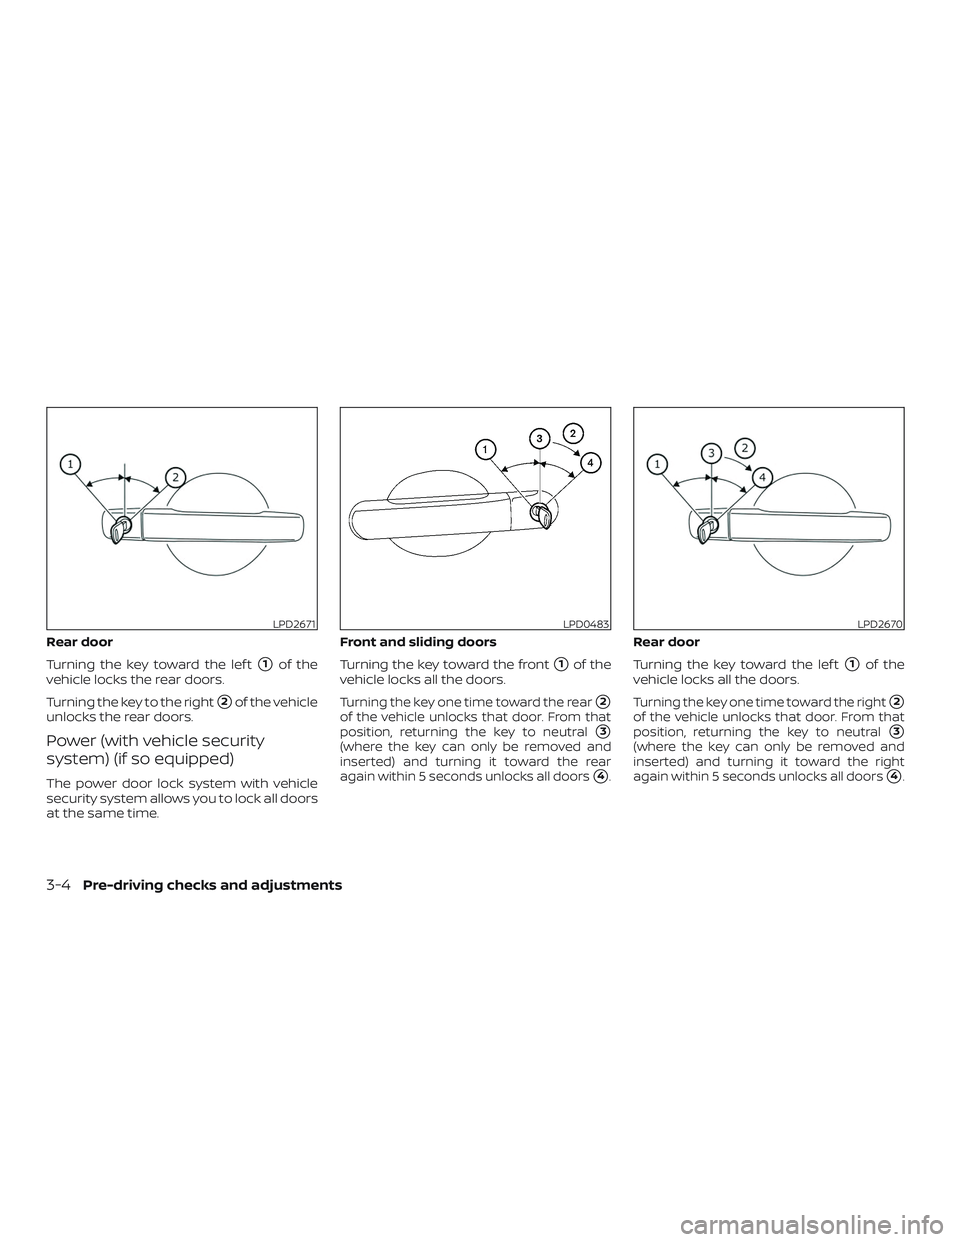
Rear door
Turning the key toward the lef t
�1of the
vehicle locks the rear doors.
Turning the key to the right
�2of the vehicle
unlocks the rear doors.
Power (with vehicle security
system) (if so equipped)
The power door lock system with vehicle
security system allows you to lock all doors
at the same time. Front and sliding doors
Turning the key toward the front
�1of the
vehicle locks all the doors.
Turning the key one time toward the rear�2
of the vehicle unlocks that door. From that
position, returning the key to neutral
�3
(where the key can only be removed and
inserted) and turning it toward the rear
again within 5 seconds unlocks all doors
�4.
Rear door
Turning the key toward the lef t
�1of the
vehicle locks all the doors.
Turning the key one time toward the right�2
of the vehicle unlocks that door. From that
position, returning the key to neutral
�3
(where the key can only be removed and
inserted) and turning it toward the right
again within 5 seconds unlocks all doors
�4.
LPD2671LPD0483LPD2670
3-4Pre-driving checks and adjustments
Page 265 of 426
WARNING
∙ Do not leave children or adults whowould normally require the assis-
tance of others alone in your vehicle.
Pets should also not be lef t alone.
They could accidentally injure them-
selves or others through inadvertent
operation of the vehicle. Also, on hot,
sunny days, temperatures in a closed
vehicle could quickly become high
enough to cause severe or possibly
fatal injuries to people or animals.
∙ Properly secure all cargo with ropes or straps to help prevent it from sliding
or shif ting. Do not place cargo higher
than the seatbacks. In a sudden stop
or collision, unsecured cargo could
cause personal injury.
EXHAUST GAS (carbon monoxide)
WARNING
∙ Do not breathe exhaust gases; theycontain colorless and odorless carbon
monoxide. Carbon monoxide is dan-
gerous. It can cause unconsciousness
or death. ∙ Always keep the doors closed when
driving the vehicle. Do not drive with
the doors open and do not attempt to
transport long cargo by driving with
the doors open. Doing so can damage
the doors and door hinges. Cargo may
also fall out of the vehicle which may
cause serious personal injury or
death.
∙ If you suspect that exhaust fumes are entering the vehicle, drive with all
windows fully open, and have the ve-
hicle inspected immediately.
∙ Do not run the engine in closed spaces such as a garage.
∙ Do not park the vehicle with the en- gine running for any extended length
of time.
∙ Keep the doors closed while driving, otherwise exhaust gases could be
drawn into the passenger compart-
ment. If you must drive with this open,
follow these precautions:
1. Open all the windows.
2. Set the
air recirculation but-
ton to off and the fan control dial to
high to circulate the air. ∙ If electrical wiring or other cable con-
nections must pass to a trailer
through the seal on the body, follow
the manufacturer’s recommendation
to prevent carbon monoxide entry
into the vehicle.
∙ The exhaust system and body should be inspected by a qualified mechanic
whenever:
a. The vehicle is raised for service.
b. You suspect that exhaust fumes are entering into the passenger
compartment.
c. You notice a change in the sound of the exhaust system.
d. You have had an accident involving damage to the exhaust system,
underbody, or rear of the vehicle.
THREE-WAY CATALYST
The three-way catalyst is an emission con-
trol device installed in the exhaust system.
Exhaust gases in the three-way catalyst
are burned at high temperatures to help
reduce pollutants.
PRECAUTIONS WHEN STARTING AND
DRIVING
5-2Starting and driving
Page 303 of 426
10. To reinstall the wheel, insert the tirechain through the wheel. Be sure the
rubber spacer is centered on the wheel
before lif ting. Use the assembled jack
rod and slowly rotate the winch clock-
wise to raise the wheel to the vehicle.
NOTE:
Inspect the spacer every six years and
replace as necessary. Contact a NISSAN
dealer for replacement parts if neces-
sary.
CAUTION
∙ Be sure to center the spare tire sus- pending plate on the wheel and then
lif t the spare tire.
∙ Failure to use the spacer may allow the chain to get stuck on the wheel
nut holes.
Removing bolt-on wheel caps
CAUTION
Do not use your hands to pry off wheel
caps or wheel covers. Doing so could
result in personal injury.
The wheel cap�1is only attached with the
wheel nuts and is separate from the wheel
�2.
To remove the wheel cap, remove the
wheel nuts af ter the jack is securely sup-
porting the vehicle and the tire clears the
ground.
LCE2017LCE2367
6-6In case of emergency
Page 305 of 426
2. Place the jack directly under thejack-up point so the top of the jack
contacts the vehicle at the jack-up
point. The jack-up points are indicated
by stamped arrows on the side of the
frame or the rear. The jack should be used on firm and
level ground.
3. Install the assembled jacking rod into
the jack.
4. To lif t the vehicle, securely hold the jack lever and rod. Carefully raise the vehicle
until the tire clears the ground.
LCE2026LCE2008
6-8In case of emergency
Page 306 of 426
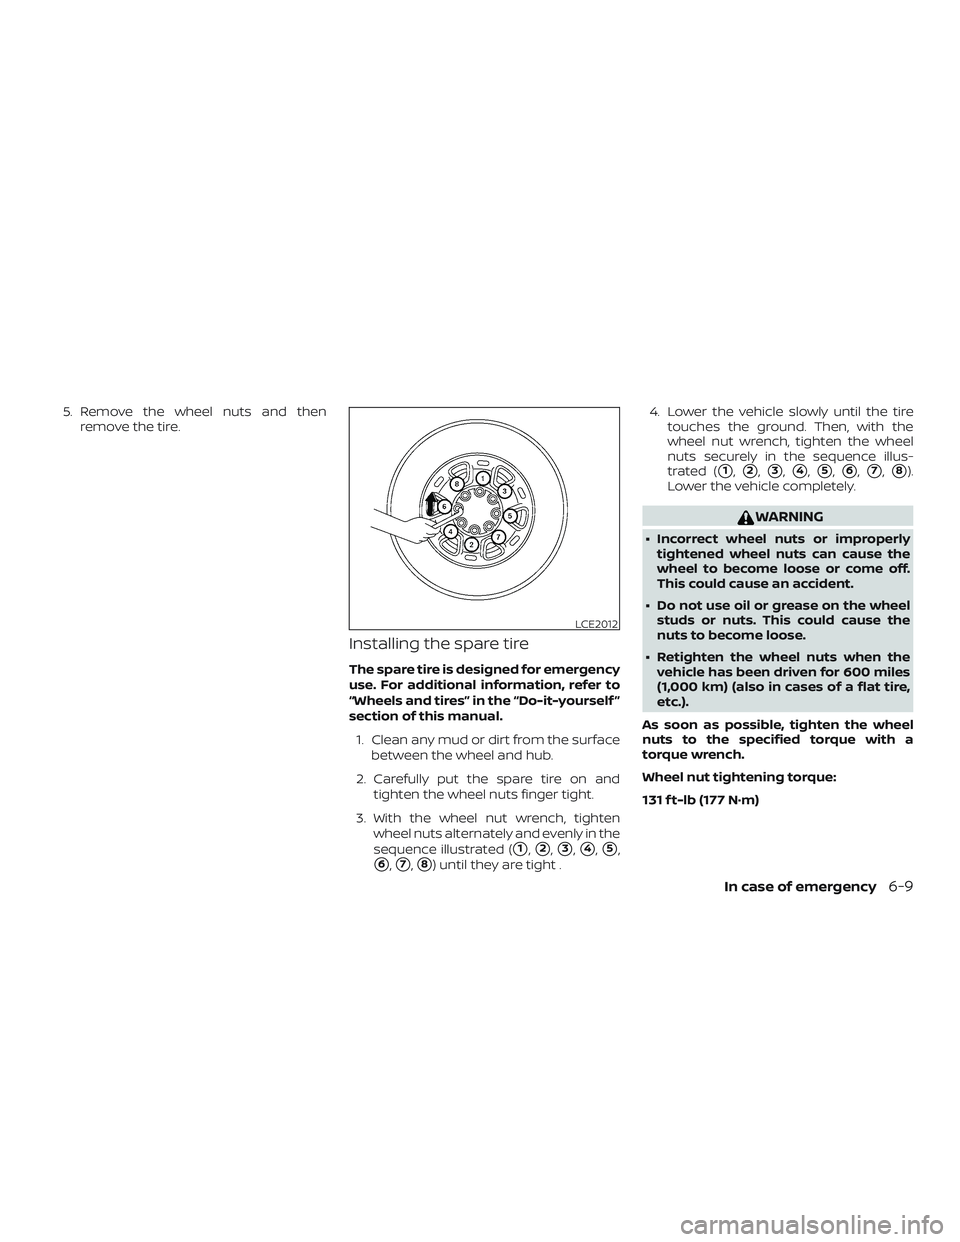
5. Remove the wheel nuts and thenremove the tire.
Installing the spare tire
The spare tire is designed for emergency
use. For additional information, refer to
“Wheels and tires” in the “Do-it-yourself ”
section of this manual.
1. Clean any mud or dirt from the surface between the wheel and hub.
2. Carefully put the spare tire on and tighten the wheel nuts finger tight.
3. With the wheel nut wrench, tighten wheel nuts alternately and evenly in the
sequence illustrated (
�1,�2,�3,�4,�5,
�6,�7,�8) until they are tight . 4. Lower the vehicle slowly until the tire
touches the ground. Then, with the
wheel nut wrench, tighten the wheel
nuts securely in the sequence illus-
trated (
�1,�2,�3,�4,�5,�6,�7,�8).
Lower the vehicle completely.
WARNING
∙ Incorrect wheel nuts or improperly tightened wheel nuts can cause the
wheel to become loose or come off.
This could cause an accident.
∙ Do not use oil or grease on the wheel studs or nuts. This could cause the
nuts to become loose.
∙ Retighten the wheel nuts when the vehicle has been driven for 600 miles
(1,000 km) (also in cases of a flat tire,
etc.).
As soon as possible, tighten the wheel
nuts to the specified torque with a
torque wrench.
Wheel nut tightening torque:
131 f t-lb (177 N·m)
LCE2012
In case of emergency6-9