Page 119 of 426

∙ Do not operate the washer if thewindshield-washer fluid reservoir is
empty.
∙ Do not fill the windshield-washer fluid reservoir with windshield-washer
fluid concentrates at full strength.
Some methyl alcohol based
windshield-washer fluid concen-
trates may permanently stain the
grille if spilled while filling the
windshield-washer fluid reservoir.
∙ Pre-mix windshield-washer fluid con- centrates with water to the manufac-
turer’s recommended levels before
pouring the fluid into the windshield-
washer fluid reservoir. Do not use the
windshield-washer fluid reservoir to
mix the windshield-washer fluid con-
centrate and water.
The windshield wiper and washer operates
when the ignition switch is in the ON posi-
tion. Rotate the end of the lever to operate the
wiper at the following speed:
�1Intermittent (INT) — intermittent op-
eration can be adjusted by turning the
knob toward
�A(Slower) or�B(Faster).
�2Low (LO) — continuous low speed op-
eration
�3High (HI) — continuous high speed op-
eration
Rotate the lever the opposite direction
�4
to have one sweep operation (MIST) of the
wiper.
Press the button on the end of the lever
�5
to operate the washer. The wiper will also
operate several times. To defrost the rear window glass, place the
ignition switch in the ON position and push
the rear window defroster switch on. The
rear window defroster indicator light
comes on. Push the switch again to turn
the defroster off.
To defrost the outside mirrors (if so
equipped), start the engine and push the
outside mirror defroster switch on. The
outside mirror defroster indicator light on
the switch comes on. Push the switch
again to turn the defroster off.
The rear window defroster automatically
turns off af ter approximately 15 minutes.
LIC2061
REAR WINDOW AND OUTSIDE
MIRROR (if so equipped)
DEFROSTER SWITCH
2-30Instruments and controls
Page 144 of 426
 ..........................3-2
Doors ...................")
3 Pre-driving checks and adjustments
Keys.............................................3-2NISSAN Vehicle Immobilizer System
keys (if so equipped) ..........................3-2
Doors ...........................................3-3
Locking with key ..............................3-3
Locking with inside lock knob .................3-5
Locking with power door lock switch .........3-6
Operating the sliding door ....................3-6
Back doors ................................... 3-7
Automatic door locks (if so equipped) ........3-8
Child safety sliding door lock .................3-8
Remote keyless entry system ...................3-9
How to use remote keyless entry
system ...................................... 3-10Hood
........................................... 3-13
Fuel-filler door .................................. 3-13
Opening the fuel-filler door ..................3-13
Fuel-filler cap ................................ 3-14
Steering wheel ................................. 3-16
Tilt operation ................................ 3-16
Sun visors ...................................... 3-17
Storage clip ................................. 3-17
Mirrors ......................................... 3-17
Manual anti-glare rearview mirror
(if so equipped) .............................. 3-17
Automatic anti-glare rearview mirror
(if so equipped) .............................. 3-18
Outside mirrors ............................. 3-19
Page 160 of 426
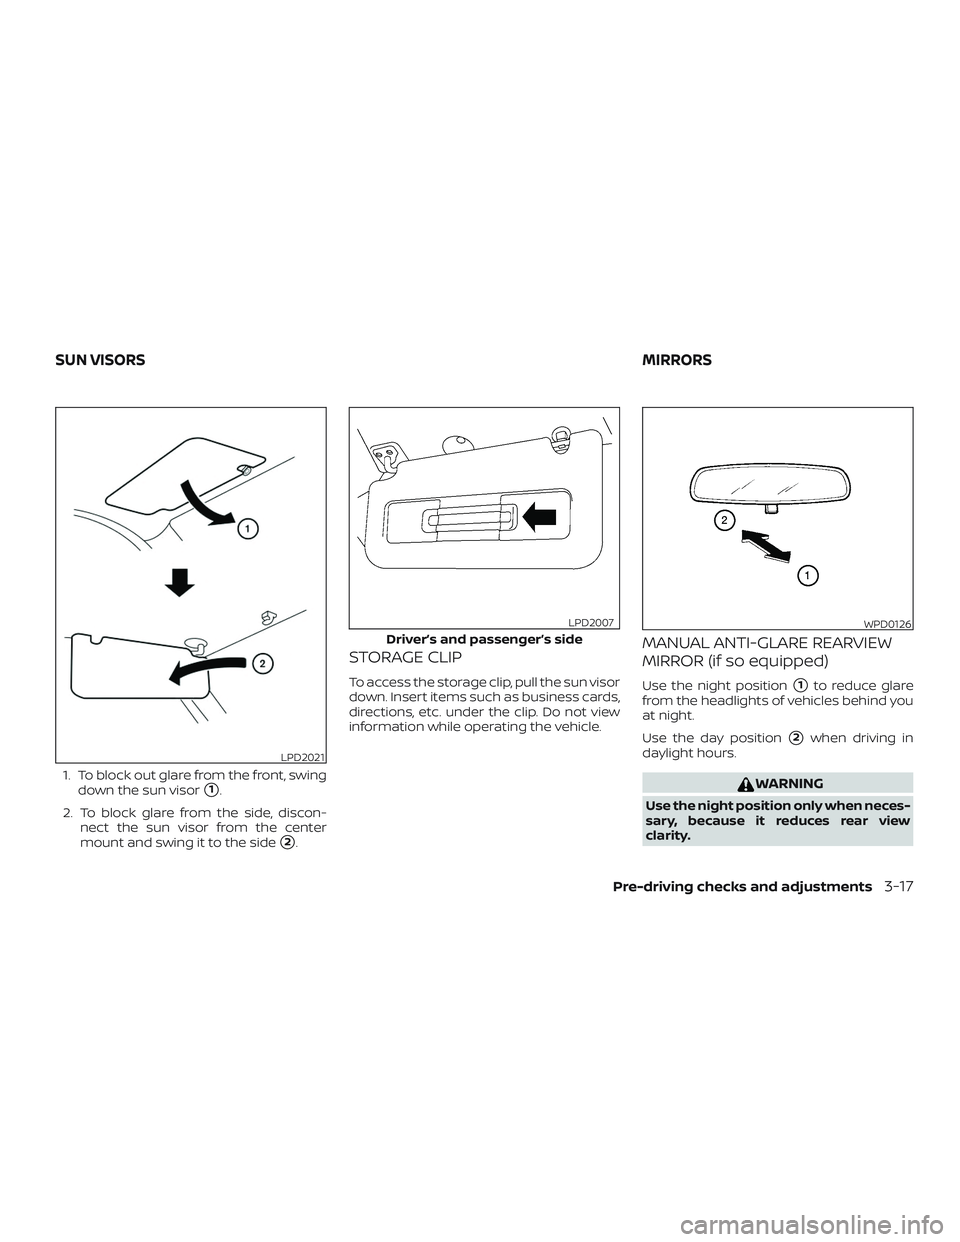
1. To block out glare from the front, swingdown the sun visor
�1.
2. To block glare from the side, discon- nect the sun visor from the center
mount and swing it to the side
�2.
STORAGE CLIP
To access the storage clip, pull the sun visor
down. Insert items such as business cards,
directions, etc. under the clip. Do not view
information while operating the vehicle.
MANUAL ANTI-GLARE REARVIEW
MIRROR (if so equipped)
Use the night position�1to reduce glare
from the headlights of vehicles behind you
at night.
Use the day position
�2when driving in
daylight hours.
WARNING
Use the night position only when neces-
sary, because it reduces rear view
clarity.
LPD2021
Driver’s and passenger’s side
LPD2007WPD0126
SUN VISORS MIRRORS
Pre-driving checks and adjustments3-17
Page 161 of 426

The inside mirror is designed so that it au-
tomatically dims during night time condi-
tions and according to the intensity of the
headlights of t")
AUTOMATIC ANTI-GLARE
REARVIEW MIRROR (if so equipped)
The inside mirror is designed so that it au-
tomatically dims during night time condi-
tions and according to the intensity of the
headlights of the vehicle following you. The
automatic anti-glare feature is activated
when the ignition switch is placed in the ON
position.
NOTE:
Do not hang any objects over the sen-
sors
�1or apply glass cleaner to the sen-
sors. Doing so will reduce the sensitivity
of the sensors, resulting in improper op-
eration. The indicator light
�2will illuminate when
the automatic anti-glare feature is operat-
ing.
With the ignition switch placed in the ON
position, press the
button as de-
scribed:
∙ To turn off the anti-glare feature, press and hold the
button for 8 sec-
onds. The indicator light will turn off.
∙ To turn on the anti-glare feature, press and hold the
button again for
8 seconds. The indicator light will turn
on. For information on the compass display
�3
(if so equipped), refer to “Compass display”
in the “Instruments and controls” section of
this manual.
LPD2315
3-18Pre-driving checks and adjustments
Page 162 of 426
OUTSIDE MIRRORS
WARNING
Objects viewed in the convex portion of
the mirror are closer than they appear.
Be careful when changing lanes or turn-
ing. Using only the convex mirror could
cause an accident. Use the other mir-
rors or glance over your shoulder to
properly judge distances to other
objects.Use the outside mirror remote control to
adjust the top portion of the mirror.
The lower portion of the mirror can be
moved manually in any direction for a bet-
ter rear view.
Pull the trailer tow mirror outward to ex-
tend it to the desired position for better
visibility while towing a trailer.WARNING
Do not extend or retract mirrors while
driving. You may lose control of your ve-
hicle and cause an accident.
CAUTION
Driving in tight spaces with mirrors ex-
tended may cause damage to the
vehicle.
Type A (if so equipped)
LPD2017
Type B (Trailer tow) (if so equipped)
LPD0279
Trailer tow extension
LPD0268
Pre-driving checks and adjustments3-19
Page 163 of 426
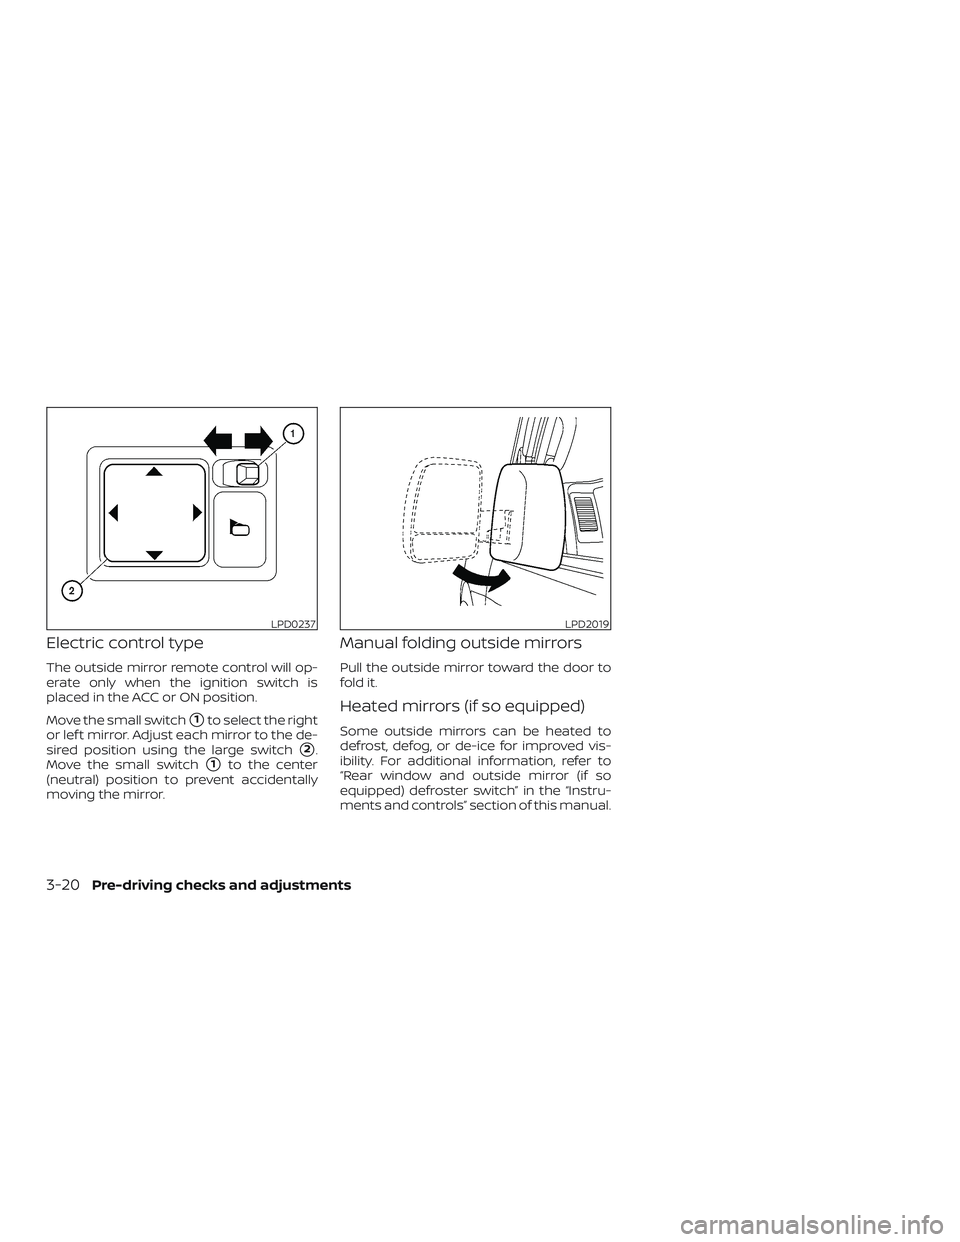
Electric control type
The outside mirror remote control will op-
erate only when the ignition switch is
placed in the ACC or ON position.
Move the small switch
�1to select the right
or lef t mirror. Adjust each mirror to the de-
sired position using the large switch
�2.
Move the small switch
�1to the center
(neutral) position to prevent accidentally
moving the mirror.
Manual folding outside mirrors
Pull the outside mirror toward the door to
fold it.
Heated mirrors (if so equipped)
Some outside mirrors can be heated to
defrost, defog, or de-ice for improved vis-
ibility. For additional information, refer to
“Rear window and outside mirror (if so
equipped) defroster switch” in the “Instru-
ments and controls” section of this manual.
LPD0237LPD2019
3-20Pre-driving checks and adjustments
Page 175 of 426

WARNING
Failure to follow the warnings and in-
structions for proper use of the Rear-
View Monitor system could result in se-
rious injury or death.
∙ RearView Monitor is a conveniencefeature and is not a substitute for
proper backing. Always turn and look
out the windows and check mirrors to
be sure that it is safe to move before
operating the vehicle. Always back up
slowly.
∙ The system is designed as an aid to the driver in showing large stationary
objects directly behind the vehicle, to
help avoid damaging the vehicle.
∙ The distance guide line and the ve- hicle width line should be used as a
reference only when the vehicle is on a
level paved surface. The distance
viewed on the monitor is for reference
only and may be different than the
actual distance between the vehicle
and displayed objects.
CAUTION
Do not scratch the camera lens when
cleaning dirt or snow from the front of
the camera.
The RearView Monitor system automati-
cally shows a rear view of the vehicle when
the shif t lever is shif ted into the R (Reverse)
position. While in R (Reverse), pressing the
CAMERA button (if so equipped) will cycle
through guideline options. The radio can
still be heard while the RearView Monitor is
active.
To display the rear view, the RearView Moni-
tor system uses a camera located just
above the vehicle’s license plate
�1.
REARVIEW MONITOR SYSTEM
OPERATION
With the ignition switch in the ON position,
move the shif t lever to the R (Reverse) po-
sition to operate the RearView Monitor.
LHA3686
4-12Monitor, climate, audio, phone and voice recognition systems
Page 179 of 426

4. Turn the TUNE/FOLDER orTUNE/SCROLL knob to adjust the set-
ting up or down.
5. Press the ENTER/SETTING button again to display the Contrast settings.
6. Turn the TUNE/FOLDER or TUNE/SCROLL knob to adjust the set-
ting up or down.
7. Press the ENTER/SETTING button to complete the adjustment. ∙ Do not adjust the display settings of the
RearView Monitor while the vehicle is
moving.
For vehicles with navigation system 1. Firmly apply the brake and place the shif t lever in R (Reverse)
2. Press the
button on the control
panel.
3. The screen will display the Night set- tings.
4. Turn the TUNE knob to adjust the set- ting up or down.
5. Press the
button again to access
the Auto settings.
6. Turn the TUNE knob to adjust the set- ting up or down.
∙ Do not adjust the display settings of the RearView Monitor while the vehicle is
moving.
REARVIEW MONITOR SYSTEM
LIMITATIONS
WARNING
Listed below are the system limitations
for RearView Monitor. Failure to operate
the vehicle in accordance with these
system limitations could result in seri-
ous injury or death.
∙ The system cannot completely elimi-nate blind spots and may not show
every object.
∙ Underneath the bumper and the cor- ner areas of the bumper cannot be
viewed on the RearView Monitor be-
cause of its monitoring range limita-
tion. The system will not show small
objects below the bumper, and may
not show objects close to the bumper
or on the ground.
∙ Objects viewed in the RearView Moni- tor differ from actual distance be-
cause a wide-angle lens is used.
∙ Objects in the RearView Monitor will appear visually opposite compared to
when viewed in the rearview and out-
side mirrors.
Models with navigation system
LHA3679
4-16Monitor, climate, audio, phone and voice recognition systems