Page 128 of 460
∙ Pre-mix windshield-washer fluid con-centrates with water to the manufac-
turer’s recommended levels before
pouring the fluid into the windshield-
washer fluid reservoir. Do not use the
windshield-washer fluid reservoir to
mix the windshield-washer fluid con-
centrate and water.
To defrost the rear window glass and out-
side mirrors (if so equipped), place the igni-
tion switch in the ON position and push the
rear window defroster switch on. The rear
window defroster indicator light on the
switch comes on. Push the switch again to
turn the defroster off.
The rear window defroster automatically
turns off af ter approximately 15 minutes.
Page 198 of 460
VANITY MIRRORS
To access the vanity mirror, pull the sun
visor down and flip open the mirror cover.
The vanity mirror will illuminate when the
mirror cover is open.CARD HOLDER
To use the card holder, slide card into the
clip. Do not view information while operat-
ing the vehicle.
MANUAL ANTI-GLARE REARVIEW
MIRROR (if so equipped)
Use the night position�1to reduce glare
from the headlights of vehicles behind you
at night.
Use the day position
�2when driving in
daylight hours.
Page 199 of 460
AUTOMATIC ANTI-GLARE
REARVIEW MIRROR (if so equipped)
The inside mirror is designed so that it au-
tomatically dims during night time condi-
tions and according to the intensity of the
headlights of the vehicle following you. The
automatic anti-glare feature is activated
when the ignition switch is in the ON posi-
tion.NOTE:
Do not hang any objects over the sen-
sors
�1or apply glass cleaner to the sen-
sors. Doing so will reduce the sensitivity
of the sensors, resulting in improper op-
eration.
The indicator light
�2will illuminate when
the automatic anti-glare feature is operat-
ing.
∙ To turn off the anti-glare feature, press the O button. The indicator light will
turn off.
∙ To turn on the anti-glare feature, press the | button. The indicator light will turn
on.
For information on HomeLink® Universal
Transceiver operation, refer to the
“HomeLink® Universal Transceiver” in the
“Instruments and controls” section of this
manual.
OUTSIDE MIRRORS
Page 208 of 460
WARNING
∙ Failure to follow the warnings and in-structions for proper use of the Rear-
View Monitor system could result in
serious injury or death.
∙ RearView Monitor is a convenience feature and is not a substitute for
proper backing. Always turn and look
out the windows and check mirrors to
be sure that it is safe to move before
operating the vehicle. Always back up
slowly.
∙ The system is designed as an aid to the driver in showing large stationary
objects directly behind the vehicle, to
help avoid damaging the vehicle.
∙ The distance guide line and the ve- hicle width line should be used as a
reference only when the vehicle is on a
level paved surface. The distance
viewed on the monitor is for reference
only and may be different than the
actual distance between the vehicle
and displayed objects.
Page 227 of 460

WARNING
∙ Failure to follow the warnings and in-structions for proper use of the Mov-
ing Object Detection (MOD) system
could result in serious injury or death.
∙ The MOD system is not a substitute for proper vehicle operation and is not
designed to prevent contact with ob-
jects surrounding the vehicle. When
maneuvering, always use the outside
mirrors and rearview mirror and turn
and check the surroundings to ensure
it is safe to maneuver.
∙ The system is deactivated at speeds above 6 mph (10 km/h). It is reacti-
vated at lower speeds.
∙ The MOD system is not designed to detect surrounding stationary
objects.
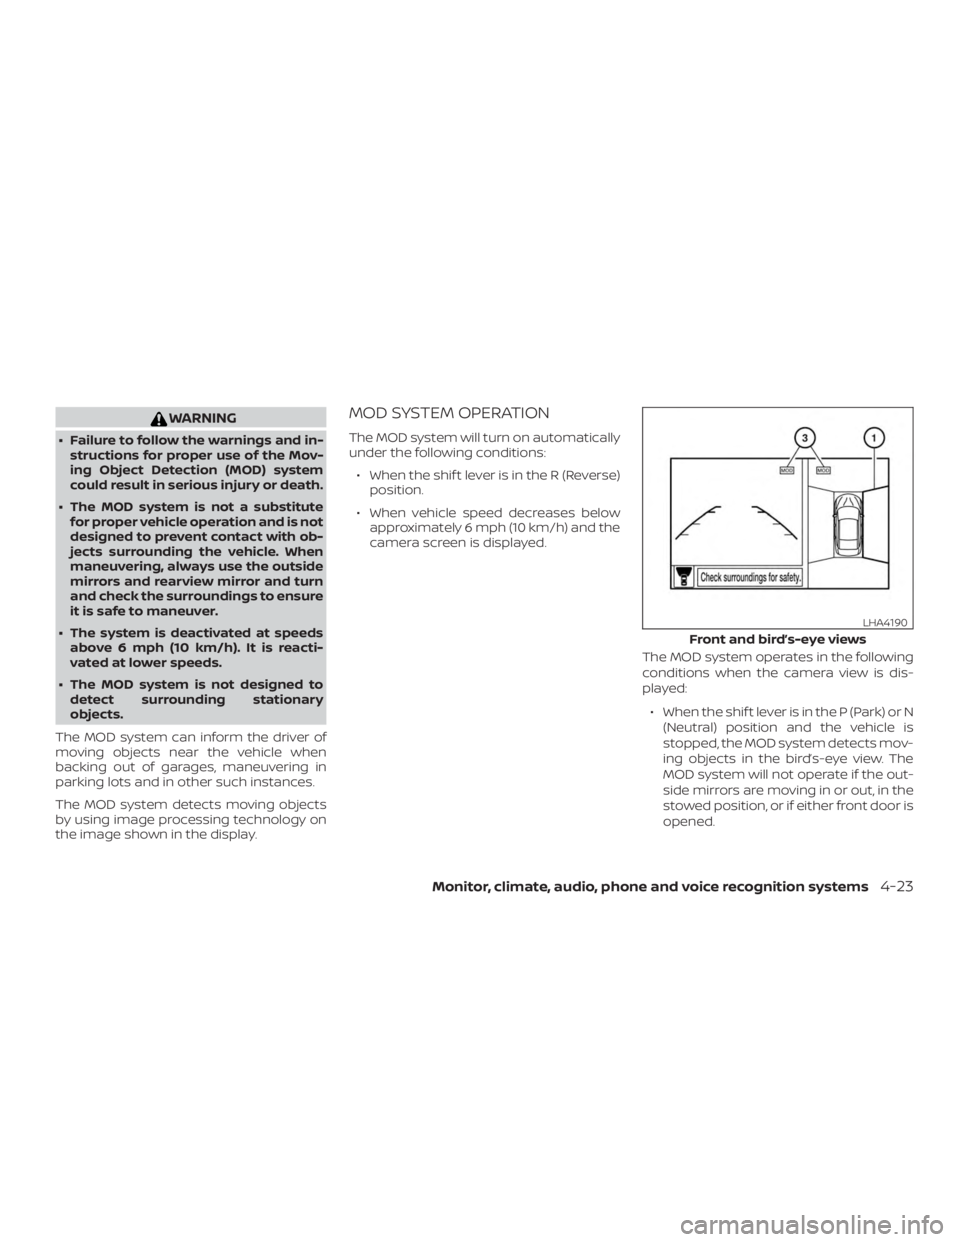
The MOD system can inform the driver of
moving objects near the vehicle when
backing out of garages, maneuvering in
parking lots and in other such instances.
The MOD system detects moving objects
by using image processing technology on
the image shown in the display.
MOD SYSTEM OPERATION
The MOD system will turn on automatically
under the following conditions: ∙ When the shif t lever is in the R (Reverse) position.
∙ When vehicle speed decreases below approximately 6 mph (10 km/h) and the
camera screen is displayed.
The MOD system operates in the following
conditions when the camera view is dis-
played:∙ When the shif t lever is in the P (Park) or N (Neutral) position and the vehicle is
stopped, the MOD system detects mov-
ing objects in the bird’s-eye view. The
MOD system will not operate if the out-
side mirrors are moving in or out, in the
stowed position, or if either front door is
opened.
Page 229 of 460

∙ Do not use the MOD system whentowing a trailer. The system may not
function properly.
∙ Excessive noise (for example, audio system volume or open vehicle win-
dow) will interfere with the chime
sound, and it may not be heard.
∙ The MOD system performance will be limited according to environmental
conditions and surrounding objects
such as:
– When there is low contrast be- tween background and the moving
objects.
– When there is a blinking source of light.
– When strong light such as another vehicle’s headlight or sunlight is
present.
– When camera orientation is not in its usual position, such as when a
mirror is folded.
– When there is dirt, water drops or snow on the camera lens. – When the position of the moving
objects in the display is not
changed.
∙ The MOD system might detect flowing water droplets on the camera lens,
white smoke from the muffler, mov-
ing shadows, etc.
∙ The MOD system may not function properly depending on the speed, di-
rection, distance or shape of the mov-
ing objects.
∙ If your vehicle sustains damage to the parts where the camera is installed,
leaving it misaligned or bent, the
sensing zone may be altered and the
MOD system may not detect objects
properly.
∙ When the temperature is extremely high or low, the screen may not dis-
play objects clearly. This is not a
malfunction. NOTE:
The blue MOD icon will change to orange
if one of the following has occurred:
∙ When the system is malfunctioning.
∙ When the component temperature reaches a high level (icon will blink).
∙ When the Rear View camera has de- tected a blockage (icon will blink).
If the icon light continues to illuminate
orange, have the MOD system checked. It
is recommended that you visit a NISSAN
dealer for this service.
Monitor, climate, audio, phone and voice recognition systems4-25
Page 255 of 460

∙ Make sure the area around the vehicle isclear.
∙ Check fluid levels such as engine oil, coolant, brake fluid, and windshield-
washer fluid as frequently as possible,
or at least whenever you refuel.
∙ Check that all windows and lights are clean.
∙ Visually inspect tires for their appear- ance and condition. Also check tires for
proper inflation.
∙ Check that all doors are closed.
∙ Position seat and adjust head restraints/headrests.
∙ Adjust inside and outside mirrors.
∙ Fasten seat belts and ask all passen- gers to do likewise.
∙ Check the operation of warning lights when the ignition switch is placed in the
ON position. For additional information,
refer to “Warning lights, indicator lights
and audible reminders” in the “Instru-
ments and controls” section of this
manual. 1. Apply the parking brake.
2. Move the shif t lever to P (Park) or N
(Neutral). P (Park) is recommended.
The starter is designed not to oper-
ate unless the shif t lever is in either P
(Park) or N (Neutral).
3. Push the ignition switch to the ON po- sition. Depress the brake pedal and
push the ignition switch to start the
engine.
To start the engine immediately, push
and release the ignition switch while
depressing the brake pedal with the
ignition switch in any position.
∙ If the engine is very hard to start in extremely cold weather or when re-
starting, depress the accelerator
pedal a little (approximately 1/3 to the
floor) and while holding, crank the en-
gine. Release the accelerator pedal
when the engine starts.
∙ If the engine is very hard to start be- cause it is flooded, depress the accel-
erator pedal all the way to the floor
and hold it. Push the ignition switch
to the ON position to start cranking
the engine. Af ter 5 or 6 seconds, stop
cranking by pushing the ignition switch to the LOCK position. Af ter
cranking the engine, release the ac-
celerator pedal. Crank the engine
with your foot off the accelerator
pedal by depressing the brake pedal
and pushing the ignition switch to
start the engine. If the engine starts,
but fails to run, repeat the above pro-
cedure.
Page 436 of 460

∙ Check your hitch, trailer tire pressure,vehicle tire pressure, trailer light opera-
tion, and trailer wheel lug nuts every
time you attach a trailer to the vehicle.
∙ Be certain your rearview mirrors con- form to all federal, state or local regula-
tions. If not, install any mirrors required
for towing before driving the vehicle.
∙ Determine the overall height of the ve- hicle and trailer so the required clear-
ance is known.
Trailer towing tips
In order to gain skill and an understanding
of the vehicle’s behavior, you should prac-
tice turning, stopping and backing up in an
area which is free from traffic. Steering sta-
bility and braking performance will be
somewhat different than under normal
driving conditions.
∙ Always secure items in the trailer to pre- vent load shif t while driving.
∙ Lock the trailer hitch coupler with a pin or lock to prevent the coupler from in-
advertently becoming unlatched.
∙ Avoid abrupt starts, acceleration or stops.
∙ Avoid sharp turns or lane changes. ∙ Always drive your vehicle at a moderate
speed.
∙ When backing up, hold the bottom of the steering wheel with one hand. Move
your hand in the direction in which you
want the trailer to go. Make small cor-
rections and back up slowly. If possible,
have someone guide you when you are
backing up.
Always block the wheels on both vehicle
and trailer when parking. Parking on a
slope is not recommended; however, if you
must do so: