Page 17 of 460
16. Push-button ignition switch(P. 5-13)
17. Cruise control switches
(if so equipped) (P. 5-43)
Intelligent Cruise Control (ICC)
switches (if so equipped) (P. 5-44)
18. Driver supplemental knee air bag
(P. 1-49)
19. Bluetooth® Hands-Free Phone
System/Audio control switches
(P. 4-2)
20. Hood release (P. 3-22) Fuel door release (P. 3-31)
Powered rear seatback switch
(P. 1-2)
21. Fuse box (P. 8-20)
22. Power lif tgate main switch
(if so equipped) (P. 3-22)
Heated steering wheel switch
(if so equipped) (P. 2-45)
Vehicle Dynamic Control (VDC) OFF
switch (P. 2-46)
23. Instrument brightness control
(P. 2-37)
Twin trip odometer reset switch
(P. 2-4)*: Refer to the separate NissanConnect®
Owner’s Manual.
Refer to the page number indicated in
parentheses for operating details.
Illustrated table of contents0-7
Page 24 of 460
Seat lif ter (driver’s seat)
Pull up or push down the adjusting lever to
adjust the seat height until the desired po-
sition is achieved.
FRONT POWER SEAT ADJUSTMENT
(if so equipped)
Operating tips
∙ The power seat motor has an auto-reset overload protection circuit. If the
motor stops during operation, wait
30 seconds then reactivate the switch.
∙ Do not operate the power seat switch for a long period of time when the en-
gine is off. This will discharge the bat-
tery. For additional information, refer to “Auto-
matic drive positioner” in the “Pre-driving
checks and adjustments” section of this
manual.Forward and backward
Moving the switch as shown will slide the
seat forward or backward to the desired
position.
LRS2202LRS2662
1-4Safety—Seats, seat belts and supplemental restraint system
Page 95 of 460
16. Push-button ignition switch(P. 5-13)
17. Cruise control switches
(if so equipped) (P. 5-43)
Intelligent Cruise Control (ICC)
switches (if so equipped) (P. 5-44)
18. Driver supplemental knee air bag
(P. 1-49)
19. Bluetooth® Hands-Free Phone
System/Audio control switches
(P. 4-2)
20. Hood release (P. 3-22) Fuel door release (P. 3-31)
Powered rear seatback switch
(P. 1-2)
21. Fuse box (P. 8-20)
22. Power lif tgate main switch
(if so equipped) (P. 3-22)
Heated steering wheel switch
(if so equipped) (P. 2-45)
Vehicle Dynamic Control (VDC) OFF
switch (P. 2-46)
23. Instrument brightness control
(P. 2-37)
Twin trip odometer reset switch
(P. 2-4)*: Refer to the separate NissanConnect®
Owner’s Manual.
Refer to the page number indicated in
parentheses for operating details.
Instruments and controls2-3
Page 97 of 460
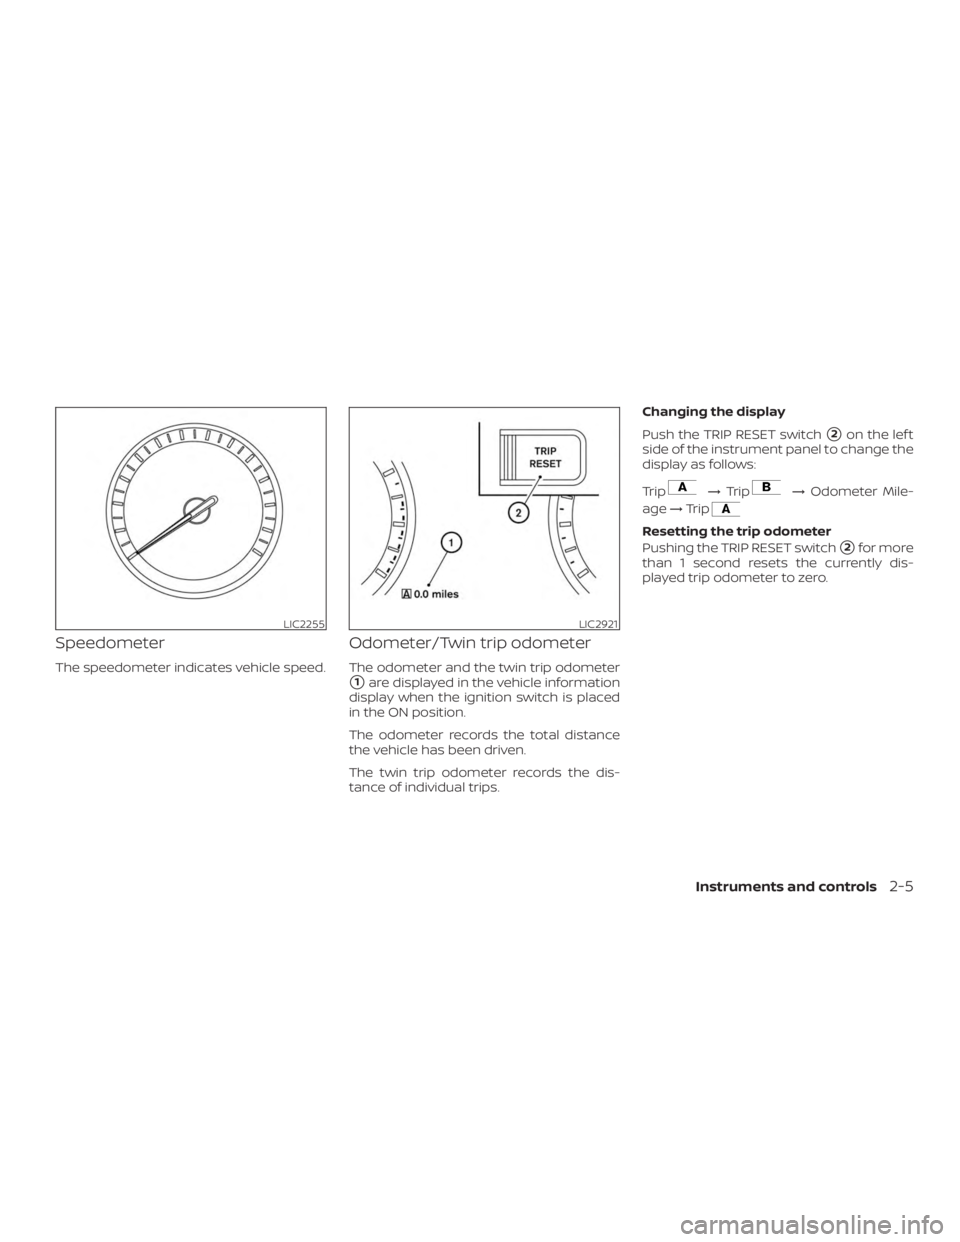
Speedometer
The speedometer indicates vehicle speed.
Odometer/Twin trip odometer
The odometer and the twin trip odometer
�1are displayed in the vehicle information
display when the ignition switch is placed
in the ON position.
The odometer records the total distance
the vehicle has been driven.
The twin trip odometer records the dis-
tance of individual trips. Changing the display
Push the TRIP RESET switch
�2on the lef t
side of the instrument panel to change the
display as follows:
Trip
→ Trip→ Odometer Mile-
age →Trip
Resetting the trip odometer
Pushing the TRIP RESET switch
�2for more
than 1 second resets the currently dis-
played trip odometer to zero.
LIC2255LIC2921
Instruments and controls2-5
Page 104 of 460

∙ When replacing a wheel without theTPMS such as the spare tire, the TPMS
will not function and the low tire pres-
sure warning light will flash for ap-
proximately 1 minute. The light will re-
main on af ter 1 minute. Have your
tires replaced and/or TPMS system
reset as soon as possible. It is recom-
mended that you visit a NISSAN dealer
for these services.
∙ Replacing tires with those not origi- nally specified by NISSAN could affect
the proper operation of the TPMS.
CAUTION
∙ The TPMS is not a substitute for theregular tire pressure check. Be sure to
check the tire pressure regularly.
∙ If the vehicle is being driven at speeds of less than 16 mph (25 km/h), the
TPMS may not operate correctly.
∙ Be sure to install the specified size of tires to the four wheels correctly.
Master warning light
When the ignition switch is in the ON posi-
tion, the master warning light illuminates if
any of the following are displayed on the
vehicle information display:
∙ No key warning
∙ Low fuel warning
∙ Low washer fluid warning
∙ Parking brake release warning
∙ Door open warning
∙ Loose fuel cap warning (if so equipped)
∙ Check tire pressure warning
For additional information, refer to “Vehicle
information display” in this section.
Power steering warning light
WARNING
∙ If the engine is not running or is turned off while driving, the power as-
sist for the steering will not work.
Steering will be harder to operate. ∙ When the power steering warning
light illuminates with the engine run-
ning, there will be no power assist for
the steering. You will still have control
of the vehicle, but the steering will be
harder to operate. Have the power
steering system checked. It is recom-
mended that you visit a NISSAN dealer
for this service.
When the ignition switch is placed in the ON
position, the power steering warning light
illuminates. Af ter starting the engine, the
power steering warning light turns off. This
indicates the power steering is operational.
If the power steering warning light illumi-
nates while the engine is running, it may
indicate the power steering is not function-
ing properly and may need servicing. Have
the power steering checked. It is recom-
mended that you visit a NISSAN dealer for
this service.
When the power steering warning light illu-
minates with the engine running, there will
be no power assist for the steering, but you
will still have control of the vehicle. At this
time, greater steering effort is required to
operate the steering wheel, especially in
sharp turns and at low speeds.
2-12Instruments and controls
Page 109 of 460

∙ Distance To Empty and fuel indicator
The display will be")
∙ Vehicle and meter display settings
∙ Cruise control status
∙ Odometer/twin trip odometer
∙ Gear position information (P, R, N, D)
∙ Distance To Empty and fuel indicator
The display will be interrupted when a
phone call is received. Phone calls can be
answered or rejected through the steering
wheel controls.
HOW TO USE THE VEHICLE
INFORMATION DISPLAY
The vehicle information display can be
changed using the OK
and
buttons located on
the steering wheel.
1. OK — change or select an item in the vehicle information display.
— scroll up or down the vehicle
information menu items. If the vehicle
information display is not showing a
menu with the
buttons, pressing
the
will change to the
previous/next audio preset. 2.
— go back or forward
through the vehicle information menu
items or to change from one display
screen to the next (i.e. trip, TPMS, fuel
economy).
The OK and
buttons also
control audio and control panel functions
in some conditions. Most screens and
menus offer instruction prompts of the
steering switch buttons to indicate how to
control the vehicle information display. An
orange cursor is shown to indicate where
you are in the available menu items. A scroll
bar with up and down arrows will appear if
there is more than one page of menu
items. For additional information, refer to
the separate NissanConnect® Owner’s
Manual.
LIC3778
Instruments and controls2-17
Page 110 of 460
STARTUP DISPLAY
When the vehicle in placed in the ON or ACC
position the screens that display in the ve-
hicle information display include:∙ Home
∙ Audio
∙ Navigation (if so equipped)
∙ Drive computer
∙ Fuel economy
∙ Driving aids (if so equipped)
∙ Tire pressure information
∙ Warning review
∙ Settings
The warnings review title screen will show
how many active warnings exist, or 0 in the
event that no warnings are active. For ad-
ditional information on warnings and indi-
cators, refer to “Vehicle information display
warnings and indicators” in this section.
To control what items display in the vehicle
information display, refer to “Main menu se-
lection” in this section.
SETTINGS
The setting mode allows you to change the
information displayed in the vehicle infor-
mation display: ∙ Driver Assistance
∙ Customize Display
∙ Vehicle Settings
∙ Maintenance
∙ Clock
∙ TPMS Settings
∙ Unit / Language
∙ Key-Linked Settings
∙ Factory Reset
2-18Instruments and controls
Page 115 of 460

Maintenance
The maintenance menu allows the user to
set reminders for various vehicle mainte-
nance items.
WARNING
The tire replacement indicator is not a
substitute for regular tire checks, in-
cluding tire pressure checks. For addi-
tional information, refer to “Changing
wheels and tires” in the “Do-it-yourself ”
section of this manual. Many factors in-
cluding tire inflation, alignment, driving
habits and road conditions affect tire
wear and when tires should be re-
placed. Setting the tire replacement in-
dicator for a certain driving distance
does not mean your tires will last that
long. Use the tire replacement indicator
as a guide only and always perform
regular tire checks. Failure to perform
regular tire checks, including tire pres-
sure checks could result in tire failure.
Serious vehicle damage could occur
and may lead to a collision, which could
result in serious personal injury or
death.
Menu itemResult
Maintenance Displays various maintenance reminder options.
Oil and Filter Allows user to set a reminder at a specific interval or reset the current one.
Tire Allows user to set a reminder at a specific interval or reset the current one.
Other Allows user to set a reminder at a specific interval or reset the current one.
Instruments and controls2-23

17. Cruise control switches
(if so equipped) (P. 5-43)
Intelligent Cruise Control (ICC)
switches (if so equipped) (P. 5-44)
18. Driver supplemental knee air ba")

Pull up or push down the adjusting lever to
adjust the seat height until the desired po-
sition is achieved.
FRONT POWER SEAT ADJUSTMENT
(if so equipped)
Operating tips")

17. Cruise control switches
(if so equipped) (P. 5-43)
Intelligent Cruise Control (ICC)
switches (if so equipped) (P. 5-44)
18. Driver supplemental knee air ba")

∙ Drive")