Page 337 of 460
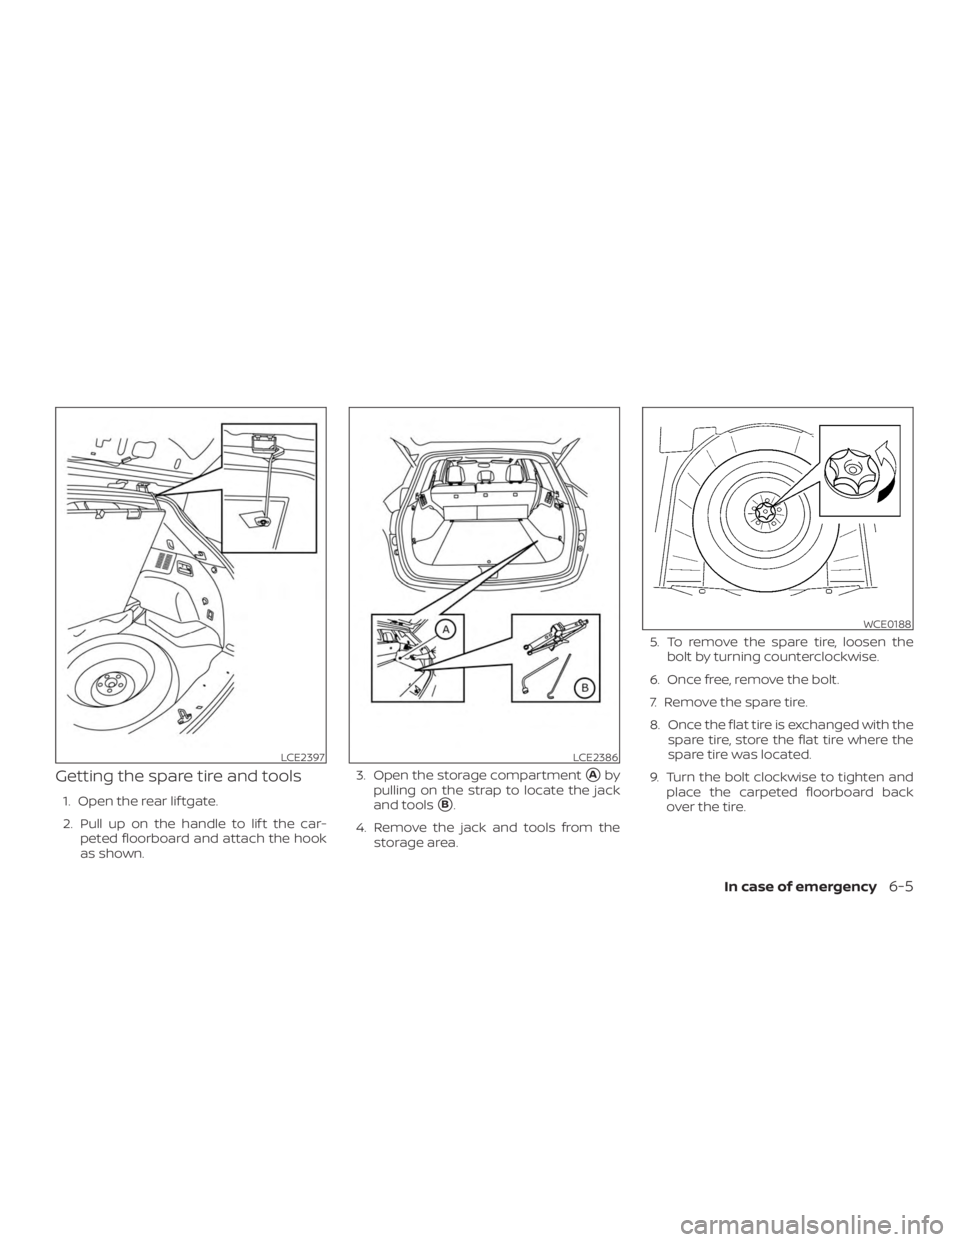
Getting the spare tire and tools
1. Open the rear lif tgate.
2. Pull up on the handle to lif t the car-peted floorboard and attach the hook
as shown. 3. Open the storage compartment
�Aby
pulling on the strap to locate the jack
and tools
�B.
4. Remove the jack and tools from the storage area. 5. To remove the spare tire, loosen the
bolt by turning counterclockwise.
6. Once free, remove the bolt.
7. Remove the spare tire.
8. Once the flat tire is exchanged with the spare tire, store the flat tire where the
spare tire was located.
9. Turn the bolt clockwise to tighten and place the carpeted floorboard back
over the tire.
LCE2397LCE2386
WCE0188
In case of emergency6-5
Page 338 of 460
Changing the spare tire with
BOSE® sub-woofer (if so
equipped)
1. To loosen the bolt, turn counterclock-wise.
2. Once free, remove the bolt. 3. Place the sub-woofer in the lower lef t
corner of the cargo area, leaning
against the driver side wall.
4. Remove the spare tire.
5. Once the flat tire is exchanged with the spare tire, store the flat tire where the
spare was located.
NOTE:
You may need to remove the wheel cap
in order to secure the damaged tire us-
ing the spare tire clamp. 6. Place the sub-woofer inside the flat tire.
7. Turn the bolt clockwise to tighten and
place the carpeted floorboard back
over the tire.
LCE2109LCE2398
6-6In case of emergency
Page 341 of 460

Installing the spare tire
The spare tire is designed for emergency
use. For additional information, refer to
“Wheels and tires” in the “Do-it-yourself ”
section of this manual.1. Clean any mud or dirt from the surface between the wheel and hub.
2. Carefully put the spare tire on and tighten the wheel nuts finger tight.
3. With the wheel nut wrench, tighten wheel nuts alternately and evenly in the
sequence illustrated (
�A,�B,�C,�D,�E)
until they are tight. 4. Lower the vehicle slowly until the tire
touches the ground. Then, with the
wheel nut wrench, tighten the wheel
nuts securely in the sequence illus-
trated (
�A,�B,�C,�D,�E). Lower the ve-
hicle completely.
5. Securely store the jack and tools back in their storage compartment. Ensure
the jack is expanded and tools
snapped into place to prevent rattle
noise from happening while driving.
WARNING
∙ Incorrect wheel nuts or improperlytightened wheel nuts can cause the
wheel to become loose or come off.
This could cause an accident.
∙ Do not use oil or grease on the wheel studs or nuts. This could cause the
nuts to become loose.
∙ Retighten the wheel nuts when the vehicle has been driven for 621 miles
(1,000 km) (also in cases of a flat tire,
etc.). As soon as possible, tighten the wheel
nuts to the specified torque with a
torque wrench.
Wheel nut tightening torque:
83 f t-lb (113 N·m)
The wheel nuts must be kept tightened
to specification at all times. It is recom-
mended that wheel nuts be tightened to
specifications at each lubrication inter-
val.
Adjust tire pressure to the COLD pres-
sure.
COLD pressure: Af ter vehicle has been
parked for 3 hours or more or driven less
than 1 mile (1.6 km).
COLD tire pressures are shown on the tire
and loading information label affixed to
the driver side center pillar.WCE0056
In case of emergency6-9
Page 385 of 460

WARNING
Radio waves could adversely af-
fect electric med")
If you have a flat tire, refer to the “In case
of emergency ” section of this manual.
TIRE PRESSURE
Tire Pressure Monitoring System
(TPMS)
WARNING
Radio waves could adversely af-
fect electric medical equipment.
Those who use a pacemaker
should contact the electric medi-
cal equipment manufacturer for
the possible influences before
use.
This vehicle is equipped with the Tire
Pressure Monitoring System (TPMS).
It monitors tire pressure of all tires
except the spare. When the low tire
pressure warning light is lit and the
“Tire Pressure Low - Add Air” warning
appears in the vehicle information
display, one or more of your tires is
significantly under-inflated. If
equipped, the system also displays
pressure of all tires (except the spare
tire) on the display screen by send- ing a signal from a sensor that is
installed in each wheel.
The TPMS will activate only when the
vehicle is driven at speeds above
16 mph (25 km/h). Also, this system
may not detect a sudden drop in tire
pressure (for example a flat tire while
driving).
For additional information, refer to
“Low tire pressure warning light” in
the “Instruments and controls” sec-
tion, “Tire Pressure Monitoring Sys-
tem (TPMS)” in the “Starting and driv-
ing” section and “Flat tire” in the “In
case of emergency” section of this
manual.
Tire inflation pressure
Check the tire pressures (including
the spare) of ten and always prior to
long distance trips. The recom-
mended tire pressure specifications
are shown on the F.M.V.S.S./C.M.V.S.S.
certification label or the Tire and
Loading Information label under the
“Cold Tire Pressure” heading. The Tireand Loading Information label is af-
fixed to the driver side center pillar.
Tire pressures should be checked
regularly because:
∙ Most tires naturally lose air over time.
∙ Tires can lose air suddenly when driven over potholes or other ob-
jects or if the vehicle strikes a
curb while parking.
The tire pressures should be
checked when the tires are cold. The
tires are considered COLD af ter the
vehicle has been parked for 3 or
more hours, or driven less than 1 mile
(1.6 km) at moderate speeds.
The TPMS with Easy-Fill Tire Alert
provides visual and audible signals
outside the vehicle for inflating tires
to the recommended COLD tire
pressure. For additional information,
refer to “TPMS with Easy-Fill Tire
Alert” in the “Starting and driving”
section of this manual.
WHEELS AND TIRES
Do-it-yourself8-29
Page 386 of 460

Incorrect tire pressure, including
under inflation, may adversely af-
fect tire life and vehicle handling.
WARNING
∙ Improperly inflated tires can fail suddenly and cause an
accident.
∙ The Gross Vehicle Weight Rating (GVWR) is located on the
F.M.V.S.S./C.M.V.S.S. certifica-
tion label. The vehicle weight
capacity is indicated on the Tire
and Loading Information label.
Do not load your vehicle beyond
this capacity. Overloading your
vehicle may result in reduced
tire life, unsafe operating condi-
tions due to premature tire fail-
ure, or unfavorable handling
characteristics and could also
lead to a serious accident. Load-
ing beyond the specified capac-
ity may also result in failure of
other vehicle components. ∙ Before taking a long trip, or
whenever you heavily load your
vehicle, use a tire pressure
gauge to ensure that the tire
pressures are at the specified
level.
∙ For additional information re- garding tires, refer to “Impor-
tant Tire Safety Information”
(US) or “Tire Safety Information”
(Canada) in the Warranty Infor-
mation Booklet.
8-30
Do-it-yourself
Page 387 of 460
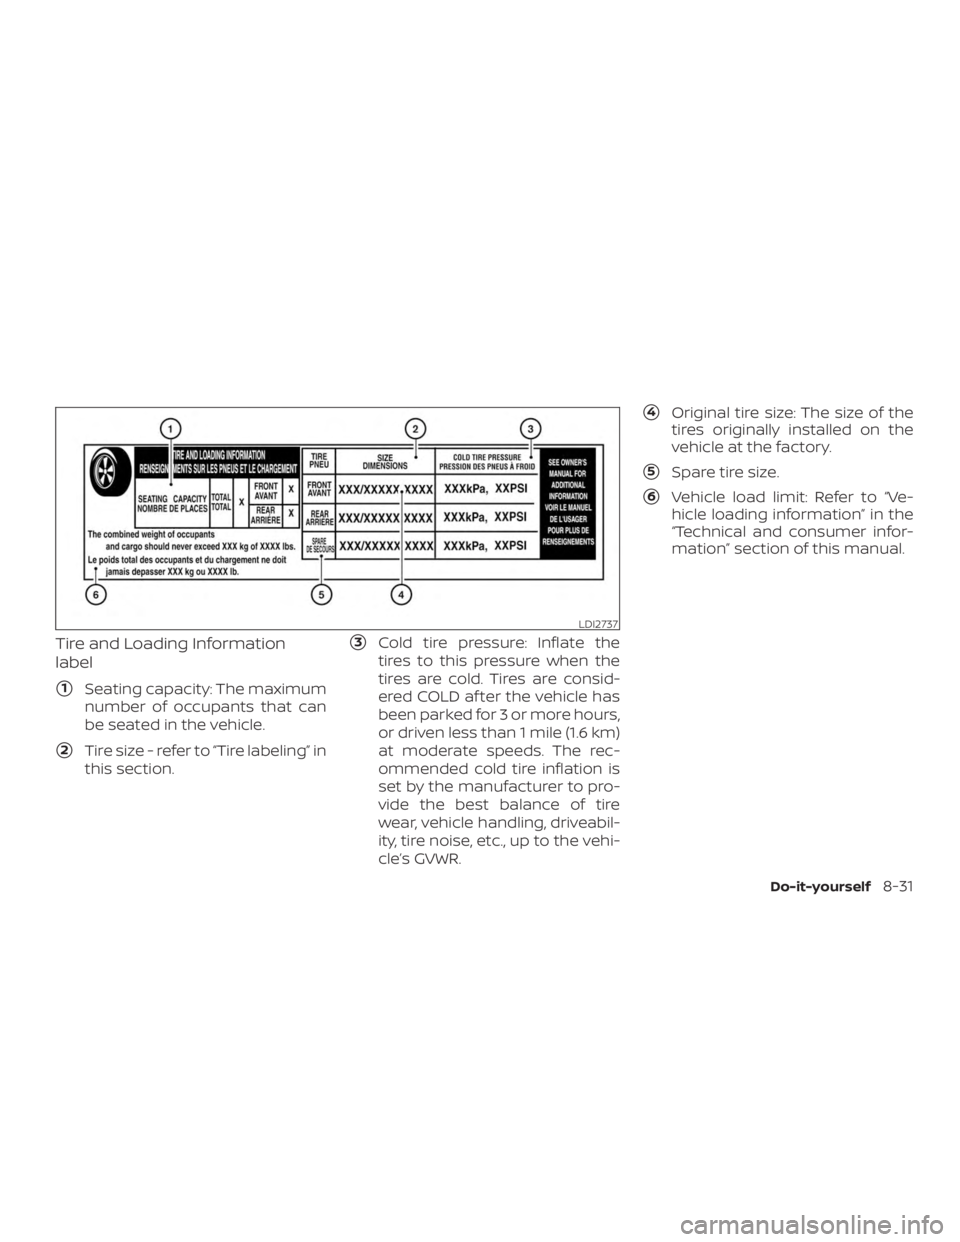
Tire and Loading Information
label
�1Seating capacity: The maximum
number of occupants that can
be seated in the vehicle.
�2Tire size - refer to “Tire labeling” in
this section.
�3Cold tire pressure: Inflate the
tires to this pressure when the
tires are cold. Tires are consid-
ered COLD af ter the vehicle has
been parked for 3 or more hours,
or driven less than 1 mile (1.6 km)
at moderate speeds. The rec-
ommended cold tire inflation is
set by the manufacturer to pro-
vide the best balance of tire
wear, vehicle handling, driveabil-
ity, tire noise, etc., up to the vehi-
cle’s GVWR.
�4Original tire size: The size of the
tires originally installed on the
vehicle at the factory.
�5Spare tire size.
�6Vehicle load limit: Refer to “Ve-
hicle loading information” in the
“Technical and consumer infor-
mation” section of this manual.
LDI2737
Do-it-yourself8-31
Page 390 of 460

for a new tire (example: DOT XX XX
XXX XXXX)
1. DOT: Abbreviation for the “De- partment Of Transportation”.
The symbol can be placed
above, below or to the lef t")
�2TIN (Tire Identification Number)
for a new tire (example: DOT XX XX
XXX XXXX)
1. DOT: Abbreviation for the “De- partment Of Transportation”.
The symbol can be placed
above, below or to the lef t or
right of the Tire Identification
Number.
2. Two-digit code: Manufacturer’s identification mark. 3. Two-digit code: Tire size.
4. Three-digit code: Tire type code
(Optional).
5. Four numbers represent the week and year the tire was built.
For example, the numbers 3103
means the 31st week of 2003. If
these numbers are missing then
look on the other sidewall of the
tire.
�3Tire ply composition and material
The number of layers or plies of
rubber-coated fabric in the tire. Tire
manufacturers also must indicate
the materials in the tire, which include
steel, nylon, polyester and others.
�4Maximum permissible inflation
pressure
This number is the greatest amount
of air pressure that should be put in
the tire. Do not exceed the maximum
permissible inflation pressure.
�5Maximum load rating
This number indicates the maximum
load in kilograms and pounds that
can be carried by the tire. When re-
placing the tires on the vehicle, always
use a tire that has the same load rat-
ing as the factory installed tire.
Example
LDI2786
8-34Do-it-yourself
Page 393 of 460

tight fit. Loose end links of the tire chain
must be secured or removed to prevent
the possibility of whipping action damage
to the fenders or underbody. If possible,
avoid fully loading your vehicle when using
tire chains. In addition, drive at a reduced
speed. Otherwise, your vehicle may be
damaged and/or vehicle handling and
performance may be adversely affected.
Do not use tire chains on dry roads. Driving
with chains in such conditions can cause
damage to the various mechanisms of the
vehicle due to some overstress.
CHANGING WHEELS AND TIRES
Tire rotation
NISSAN recommends rotating the
tires every 5,000 miles (8,000 km).
For additional information on tire re-
placing procedures, refer to “Flat tire”
in the “In case of emergency” section
of this manual.
As soon as possible, tighten the
wheel nuts to the specified torque
with a torque wrench.Wheel nut tightening torque:
83 f t-lb (113 N·m)
The wheel nuts must be kept tight-
ened to specifications at all times.
It is recommended that wheel nuts
be tightened to specification at
each tire rotation interval.
WARNING
∙ Af ter rotating the tires, check and adjust the tire pressure.
∙ Retighten the wheel nuts when the vehicle has been driven for
600 miles (1,000 km) (also in
cases of a flat tire, etc.).
∙ Do not include the spare tire in the tire rotation.
∙ For additional information re- garding tires, refer to “Impor-
tant Tire Safety Information”
(US) or “Tire Safety Information”
(Canada) in the Warranty Infor-
mation Booklet.
WDI0258
Do-it-yourself8-37

1. To loosen the bolt, turn counterclock-wise.
2. Once free, remove the bolt. 3. Place the sub-woofer in the lower lef t
corner of the c")