Page 48 of 428

3. For child restraints that are equippedwith webbing-mounted attachments,
remove any additional slack from the
anchor attachments. Press downward
and rearward firmly in the center of the
child restraint with your hand to com-
press the vehicle seat cushion and
seatback while tightening the webbing
of the anchor attachments. 4. Af ter attaching the child restraint, test
it before you place the child in it. Push it
from side to side while holding the child
restraint near the LATCH attachment
path. The child restraint should not
move more than 1 inch (25 mm), from
side to side. Try to tug it forward and
check to see if the LATCH attachment
holds the restraint in place. If the re-
straint is not secure, tighten the LATCH
attachment as necessary, or put the
restraint in another seat and test it
again. You may need to try a different
child restraint or try installing by using the vehicle seat belt (if applicable). Not
all child restraints fit in all types of ve-
hicles.
5. Check to make sure the child restraint is properly secured prior to each use. If
the child restraint is loose, repeat
steps 1 through 4.
REAR-FACING CHILD RESTRAINT
INSTALLATION USING THE SEAT
BELTS
Page 54 of 428
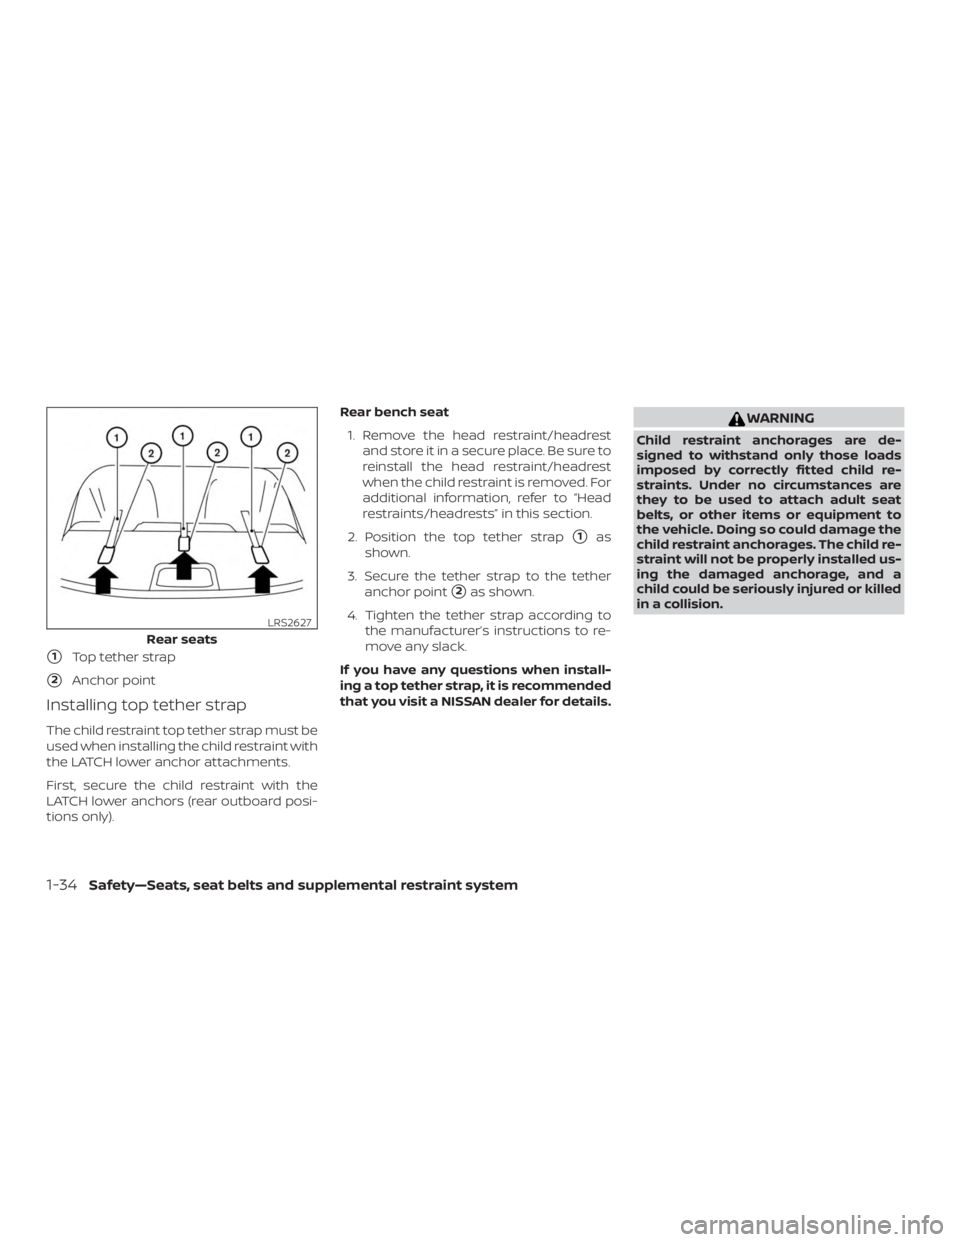
�1Top tether strap
�2Anchor point
Installing top tether strap
The child restraint top tether strap must be
used when installing the child restraint with
the LATCH lower anchor attachments.
First, secure the child restraint with the
LATCH lower anchors (rear outboard posi-
tions only).Rear bench seat
1. Remove the head restraint/headrest and store it in a secure place. Be sure to
reinstall the head restraint/headrest
when the child restraint is removed. For
additional information, refer to “Head
restraints/headrests” in this section.
2. Position the top tether strap
�1as
shown.
3. Secure the tether strap to the tether anchor point
�2as shown.
4. Tighten the tether strap according to the manufacturer’s instructions to re-
move any slack.
If you have any questions when install-
ing a top tether strap, it is recommended
that you visit a NISSAN dealer for details.
Page 55 of 428
FORWARD-FACING CHILD
RESTRAINT INSTALLATION USING
THE SEAT BELTS
Page 59 of 428
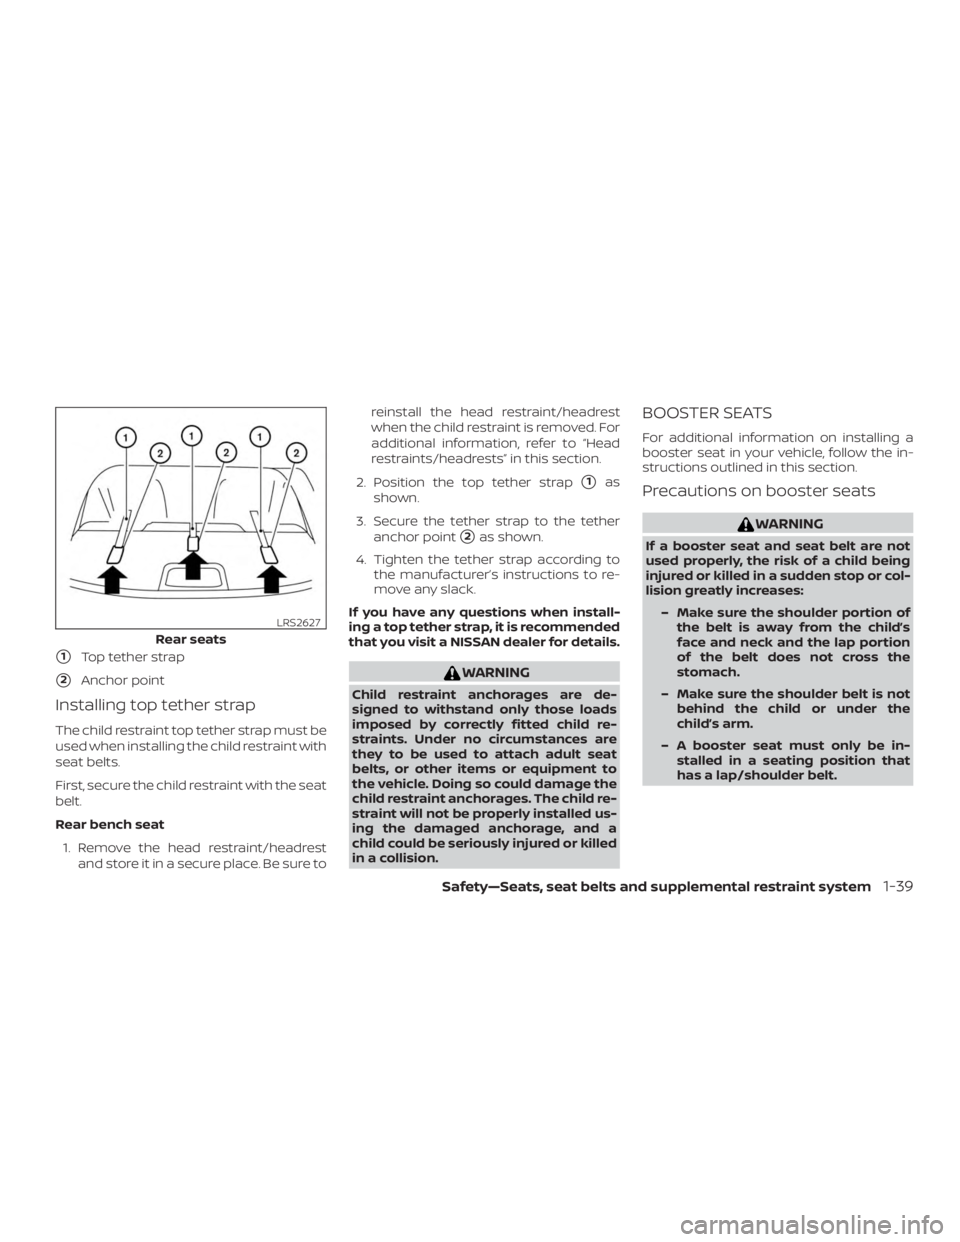
�1Top tether strap
�2Anchor point
Installing top tether strap
The child restraint top tether strap must be
used when installing the child restraint with
seat belts.
First, secure the child restraint with the seat
belt.
Rear bench seat1. Remove the head restraint/headrest and store it in a secure place. Be sure to reinstall the head restraint/headrest
when the child restraint is removed. For
additional information, refer to “Head
restraints/headrests” in this section.
2. Position the top tether strap
�1as
shown.
3. Secure the tether strap to the tether anchor point
�2as shown.
4. Tighten the tether strap according to the manufacturer’s instructions to re-
move any slack.
If you have any questions when install-
ing a top tether strap, it is recommended
that you visit a NISSAN dealer for details.
Page 61 of 428
∙ If the booster seat is compatible withyour vehicle, place the child in the
booster seat and check the various ad-
justments to be sure the booster seat is
compatible with the child. Always follow
all recommended procedures.
All U.S. states and Canadian provinces or
territories require that infants and small
children be restrained in an approved
child restraint at all times while the ve-
hicle is being operated.
The instructions in this section apply to
booster seat installation in the rear seats
or the front passenger seat.
Booster seat installation
Page 67 of 428
WARNING
∙ Even with the NISSAN Advanced AirBag System, never install a rear-
facing child restraint in the front seat.
An inflating front air bag could seri-
ously injure or kill your child. For addi-
tional information, refer to “Child re-
straints” in this section.
Page 76 of 428

∙ A child restraint or other object pressingagainst the rear of the seatback.
∙ A rear passenger pushing or pulling on the back of the front passenger seat.
∙ Forcing the front seat or seatback against an object on the seat or floor
behind it.
∙ An object placed under the front pas- senger seat.
∙ An object placed between the seat cushion and center console.
If the vehicle is moving, please come to a
stop when it is safe to do so. Check and
correct any of the above conditions. Re-
start the vehicle and wait 1 minute.
NOTE:
A system check will be performed during
which the front passenger air bag status
light will remain lit for about 7 seconds
initially.
If the light is still OFF af ter this, the small
adult, child or child restraint should be re-
positioned in the rear seat and the vehicle
should be checked as soon as possible. It is
recommended that you visit a NISSAN
dealer for this service. 3. If the light is OFF with no front passen-
ger and no objects on the front pas-
senger seat, the vehicle should be
checked. It is recommended that you
visit a NISSAN dealer as soon as pos-
sible.
Other supplemental front-impact air
bag precautions
Page 179 of 428

WARNING
∙ Never allow anyone to ride in thecargo area or on the rear seat when it
is in the fold-down position. Use of
these areas by passengers without
proper restraints could result in seri-
ous injury or death in an accident or
sudden stop.
∙ Properly secure all cargo with ropes or straps to help prevent it from sliding
or shif ting. Do not place cargo higher
than the seatbacks. In a sudden stop
or collision, unsecured cargo could
cause personal injury.
∙ When returning the seatbacks to the upright position, be certain they are
completely secured in the latched po-
sition. If they are not completely se-
cured, passengers may be injured in
an accident or sudden stop.
∙ Closely supervise children when they are around cars to prevent them from
playing and becoming locked in the
trunk where they could be seriously
injured. Keep the car locked, with the
rear seatback and trunk lid securely
latched when not in use, and prevent
children’s access to car keys.
OPENING THE FUEL-FILLER DOOR
The fuel-filler door automatically unlocks
when the driver’s door is unlocked.
1. Unlock the fuel-filler door using one of the following operations.
∙ Unlock the driver’s door with the In- telligent Key.
∙ Push the power door lock switch to the unlock position.
∙ Push the door handle request switch. 2. To open the fuel-filler door, push the
right side of the fuel-filler door to re-
lease.
To lock, close the fuel-filler door securely
and lock the doors.
NOTE:
The fuel-filler door will unlock using the
key only when all doors are unlocked.
Unlocking the driver’s door will not un-
lock the fuel-filler door.
FUEL-FILLER CAP