Page 42 of 592
The trunk can be accessed from the driver
side and passenger side of the rear seat for
loading and unloading, as shown.1. Move the front passenger seat to the most forward position. 2. Open the access cover on the rear par-
cel shelf.
3. Insert a key or another suitable tool (such as a pen or a screw driver) into
the slot, then slide the recessed lever in
the direction of the arrow
�1.
4. Fold down the passenger’s side seat- back
�2.
NOTE:
To access the trunk in case of a dead
battery, use a key or another suitable
tool (such as a pen or screw driver), to
slide recessed lever in the direction of
the arrow.
Page 150 of 592

CAUTION
Use the headlights with the engine run-
ning to avoid discharging the vehicle
battery.
Autolight system (if so equipped)
The autolight system allows the headlights
to turn on and off automatically. The auto-
light system can:∙ Turn on the headlights, front parking, tail, license plate and instrument panel
lights automatically when it is dark.
∙ Turn off all the lights when it is light.
∙ Keep all the lights on for a period of time af ter you place the ignition switch in the
OFF position and all doors are closed. NOTE:
Autolight activation sensitivity and the
time delay for autolight shutoff can be
adjusted. For additional information, re-
fer to “Vehicle information display ” in
this section.
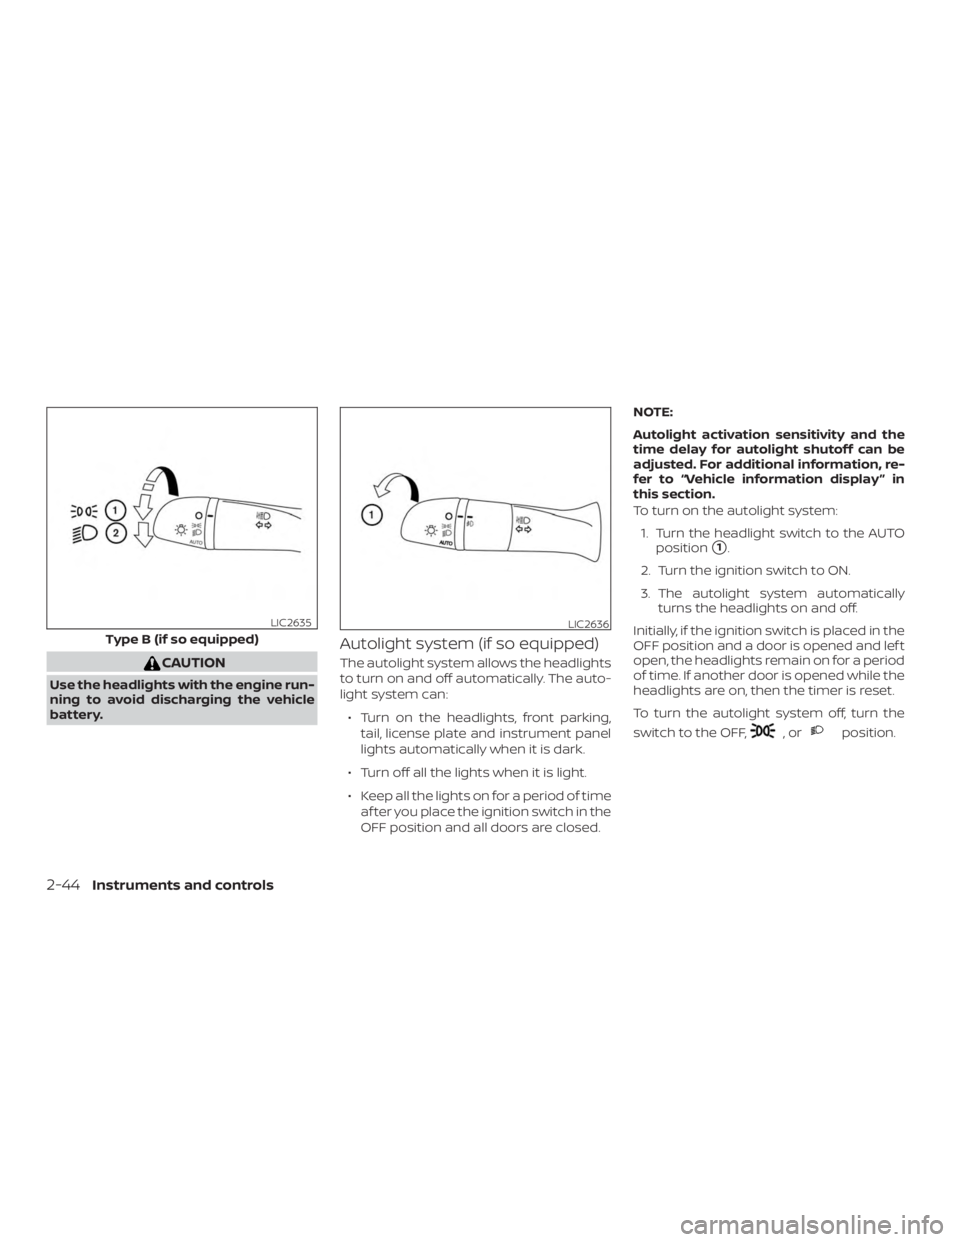
To turn on the autolight system:
1. Turn the headlight switch to the AUTO position
�1.
2. Turn the ignition switch to ON.
3. The autolight system automatically turns the headlights on and off.
Initially, if the ignition switch is placed in the
OFF position and a door is opened and lef t
open, the headlights remain on for a period
of time. If another door is opened while the
headlights are on, then the timer is reset.
To turn the autolight system off, turn the
switch to the OFF,
Page 151 of 592
Be sure you do not put anything on top
of the autolight sensor located in the top
side
�1of the instrument panel. The au-
tolight sensor controls the autolight; if it
is covered, the autolight sensor reacts as
if it is dark out and the headlights will
illuminate. If this occurs while parked
with the engine off and the ignition
switch placed in the ON position, your
vehicle’s battery could become dis-
charged.
Headlight beam select
�1To select the high beam function, push
the lever forward. The high beam lights
come on and the
Page 161 of 592
∙ Only certain power outlets are de-signed for use with a cigarette lighter
unit. Do not use any other power out-
let for an accessory lighter. For addi-
tional information, it is recommended
that you visit a NISSAN dealer.
∙ Do not use with accessories that ex- ceed a 12 volt, 120W (10A) power draw.
∙ Do not use double adapters or more than one electrical accessory.
∙ Use power outlets with the engine running to avoid discharging the ve-
hicle battery.
∙ Avoid using power outlets when the air conditioner, headlights, or rear
window defroster is on.
∙ Before inserting or disconnecting a plug, be sure the electrical accessory
being used is turned OFF.
∙ Push the plug in as far as it will go. If good contact is not made, the plug
may overheat or the internal tem-
perature fuse may open.
∙ When not in use, be sure to close the cap. Do not allow water or any other
liquid to contact the outlet.
Page 170 of 592

CAUTION
∙ Remove water drops, snow, ice orsand from the moonroof before
opening.
∙ Do not place heavy objects on the moonroof or surrounding area.
Sunshade
Open and close the sunshade by sliding it
forward or backward.
If the moonroof does not close
Have your moonroof checked and re-
paired. It is recommended that you visit a
NISSAN dealer for this service.
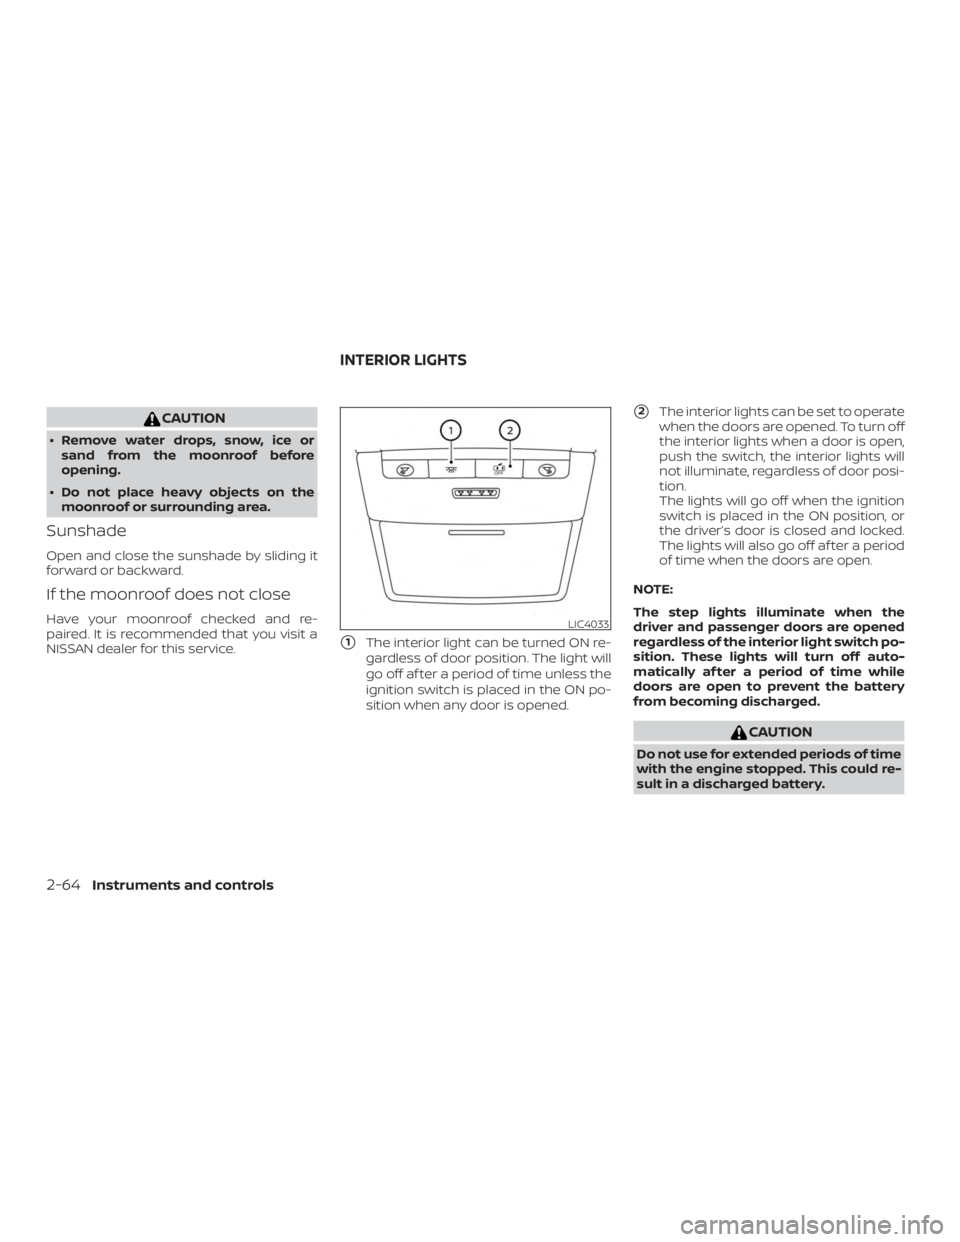
�1The interior light can be turned ON re-
gardless of door position. The light will
go off af ter a period of time unless the
ignition switch is placed in the ON po-
sition when any door is opened.
�2The interior lights can be set to operate
when the doors are opened. To turn off
the interior lights when a door is open,
push the switch, the interior lights will
not illuminate, regardless of door posi-
tion.
The lights will go off when the ignition
switch is placed in the ON position, or
the driver’s door is closed and locked.
The lights will also go off af ter a period
of time when the doors are open.
NOTE:
The step lights illuminate when the
driver and passenger doors are opened
regardless of the interior light switch po-
sition. These lights will turn off auto-
matically af ter a period of time while
doors are open to prevent the battery
from becoming discharged.
Page 172 of 592
The HomeLink® Universal Transceiver pro-
vides a convenient way to consolidate the
functions of up to three individual hand-
held transmitters into one built-in device.
HomeLink® Universal Transceiver:∙ Will operate most radio frequency de- vices such as garage doors, gates,
home and office lighting, entry door
locks and security systems.
∙ Is powered by your vehicle’s battery. No separate batteries are required. If the
vehicle’s battery is discharged or is dis-
connected, HomeLink® will retain all
programming.
When the HomeLink® Universal Trans-
ceiver is programmed, retain the original
transmitter for future programming pro-
cedures (Example: new vehicle pur-
chases). Upon sale of the vehicle, the
programmed HomeLink® Universal
Transceiver buttons should be erased
for security purposes. For additional
information, refer to “Programming
HomeLink®” in this section.
Page 186 of 592

CAUTION
∙ Be sure to carry the Intelligent Keywith you when operating the vehicle.
∙ Never leave the Intelligent Key in the vehicle when you leave the vehicle.
The Intelligent Key is always communicat-
ing with the vehicle as it receives radio
waves. The Intelligent Key transmits weak
radio waves. Environmental conditions
may interfere with the operation of the In-
telligent Key under the following operating
conditions: ∙ When operating near a location where strong radio waves are transmitted,
such as a TV tower, power station and
broadcasting station.
∙ When in possession of wireless equip- ment, such as a cellular telephone,
transceiver or a CB radio.
∙ When the Intelligent Key is in contact with or covered by metallic materials.
∙ When any type of radio wave remote control is used nearby.
∙ When the Intelligent Key is placed near an electric appliance such as a personal
computer. ∙ When the vehicle is parked near a park-
ing meter.
In such cases, correct the operating condi-
tions before using the Intelligent Key func-
tion or use the mechanical key.
Although the life of the battery varies de-
pending on the operating conditions, the
battery’s life is approximately two years. If
the battery is discharged, replace it with a
new one.
When the Intelligent Key battery is low, an
indicator illuminates in the vehicle informa-
tion display. For additional information, re-
fer to “Vehicle information display” in the
“Instruments and controls” section of this
manual.
Since the Intelligent Key is continuously re-
ceiving radio waves, if the key is lef t near
equipment which transmits strong radio
waves, such as signals from a TV and per-
sonal computer, the battery life may be-
come shorter.
For additional information, refer to “Battery
replacement” in the “Do-it-yourself ” section
of this manual. As many as four Intelligent Keys can be
registered and used with one vehicle. For
information about the purchase and use of
additional Intelligent Keys, it is recom-
mended that you visit a NISSAN dealer.
Page 187 of 592

∙ Do not attach the Intelligent Key witha key holder that contains a magnet.
∙ Do not place the Intelligent Key near equipment that produces a magnetic
field, such as a TV, audio equipment
and personal computers.
If an Intelligent Key is lost or stolen, NISSAN
recommends erasing the ID code of that
Intelligent Key from the vehicle. This may
prevent the unauthorized use of the Intelli-
gent Key to operate the vehicle. For infor-
mation regarding the erasing procedure, it
is recommended that you visit a NISSAN
dealer.
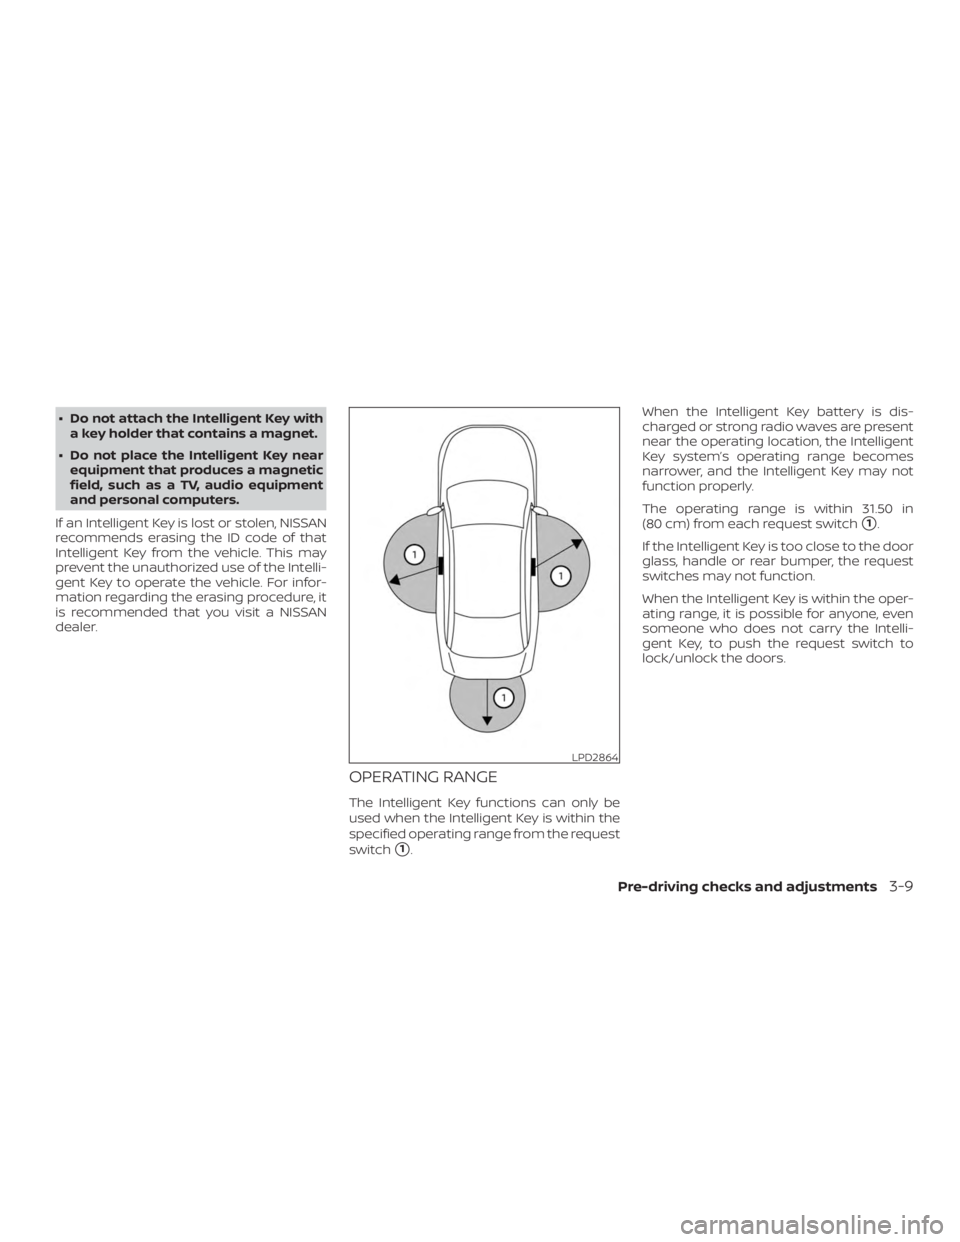
OPERATING RANGE
The Intelligent Key functions can only be
used when the Intelligent Key is within the
specified operating range from the request
switch
�1. When the Intelligent Key battery is dis-
charged or strong radio waves are present
near the operating location, the Intelligent
Key system’s operating range becomes
narrower, and the Intelligent Key may not
function properly.
The operating range is within 31.50 in
(80 cm) from each request switch
�1.
If the Intelligent Key is too close to the door
glass, handle or rear bumper, the request
switches may not function.
When the Intelligent Key is within the oper-
ating range, it is possible for anyone, even
someone who does not carry the Intelli-
gent Key, to push the request switch to
lock/unlock the doors.