Page 256 of 467

WARNING
∙ Do not leave children or adults whowould normally require the assis-
tance of others alone in your vehicle.
Pets should also not be lef t alone.
They could accidentally injure them-
selves or others through inadvertent
operation of the vehicle. Also, on hot,
sunny days, temperatures in a closed
vehicle could quickly become high
enough to cause severe or possibly
fatal injuries to people or animals.
∙ Closely supervise children when they are around cars to prevent them from
playing and becoming locked in the
trunk where they could be seriously
injured. Keep the car locked, with the
rear seatback and trunk lid securely
latched when not in use, and prevent
children’s access to car keys.
EXHAUST GAS (carbon monoxide)
WARNING
∙ Do not breathe exhaust gases; theycontain colorless and odorless carbon
monoxide. Carbon monoxide is dan-
gerous. It can cause unconsciousness
or death. ∙ If you suspect that exhaust fumes are
entering the vehicle, drive with all
windows fully open, and have the ve-
hicle inspected immediately.
∙ Do not run the engine in closed spaces such as a garage.
∙ Do not park the vehicle with the en- gine running for any extended length
of time.
∙ Keep the rear vent windows, lif tgates, doors and trunk lids (if so equipped)
closed while driving, otherwise ex-
haust gases could be drawn into the
passenger compartment. If you must
drive with one of these open, follow
these precautions:
1. Open all the windows.
2. Set the
air recirculation but-
ton to off and the fan control dial to
high to circulate the air.
∙ If electrical wiring or other cable con- nections must pass to a trailer
through the seal on the trunk lid or the
body, follow the manufacturer’s rec-
ommendation to prevent carbon
monoxide entry into the vehicle. ∙ The exhaust system and body should
be inspected by a qualified mechanic
whenever:
a. The vehicle is raised for service.
b. You suspect that exhaust fumes are entering into the passenger
compartment.
c. You notice a change in the sound of the exhaust system.
d. You have had an accident involving damage to the exhaust system,
underbody, or rear of the vehicle.
THREE-WAY CATALYST
The three-way catalyst is an emission con-
trol device installed in the exhaust system.
Exhaust gases in the three-way catalyst
are burned at high temperatures to help
reduce pollutants.
WARNING
∙ The exhaust gas and the exhaust sys-tem are very hot. Keep people, ani-
mals or flammable materials away
from the exhaust system
components.
PRECAUTIONS WHEN STARTING AND
DRIVING
5-2Starting and driving
Page 307 of 467

∙ The system may not detect the ve-hicle in front of you in certain road or
weather conditions. To avoid acci-
dents, never use the ICC system under
the following conditions:
– On roads where the traffic is heavy or there are sharp curves
– On slippery road surfaces such as on ice or snow, etc.
– During bad weather (rain, fog, snow, etc.)
– When rain, snow or dirt adhere to the bumper around the distance
sensor
– On steep downhill roads (the ve- hicle may go beyond the set ve-
hicle speed and frequent braking
may result in overheating the
brakes)
– On repeated uphill and downhill roads
– When traffic conditions make it dif- ficult to keep a proper distance be-
tween vehicles because of fre-
quent acceleration or deceleration – Interference by other radar
sources.
∙ Do not use the ICC system if you are towing a trailer. The system may not
detect a vehicle ahead.
∙ In some road or traffic conditions, a vehicle or object can unexpectedly
come into the sensor detection zone
and cause automatic braking. Always
stay alert and avoid using the ICC sys-
tem where not recommended in this
warning section.
The radar sensor will not detect the follow-
ing objects: ∙ Stationary and slow moving vehicles
∙ Pedestrians or objects in the roadway
∙ Oncoming vehicles in the same lane
∙ Motorcycles traveling offset in the travel lane
The following are some conditions in which
the sensor cannot properly detect a ve-
hicle ahead and the system may not oper-
ate properly: ∙ When snow or road spray from traveling vehicles reduces the sensor’s detection. ∙ When excessively heavy baggage is
loaded in the rear seat or the trunk of
your vehicle.
The ICC system is designed to automati-
cally check the sensor’s operation within
the limitations of the system.
The detection zone of the ICC sensor is
limited. A vehicle ahead must be in the de-
tection zone for the vehicle-to-vehicle dis-
tance detection mode to maintain the se-
lected distance from the vehicle ahead.
A vehicle ahead may move outside of the
detection zone due to its position within
the same lane of travel. Motorcycles may
not be detected in the same lane ahead if
they are traveling offset from the centerline
of the lane. A vehicle that is entering the
lane ahead may not be detected until the
vehicle has completely moved into the
lane.
If this occurs, the ICC system may warn
you by blinking the system indicator and
sounding the chime. The driver may
have to manually control the proper dis-
tance away from the vehicle traveling
ahead.
Starting and driving5-53
Page 350 of 467
Push the switch on to warn other drivers
when you must stop or park under emer-
gency conditions. All turn signal lights flash.
WARNING
∙ If stopping for an emergency, be sureto move the vehicle well off the road.
∙ Do not use the hazard warning flash- ers while moving on the highway un-
less unusual circumstances force you
to drive so slowly that your vehicle
might become a hazard to other
traffic. ∙ Turn signals do not work when the
hazard warning flasher lights are on.
The flashers will operate with the ignition
switch placed in any position.
Some jurisdictions may prohibit the use
of the hazard warning flasher switch
while driving.
A first aid kit is located in the trunk. To re-
move the first aid kit:
Open the trunk. Lif t the luggage floor. The
first aid kit
�1is located in the storage
cover
�2.
LIC0394LCE2131
HAZARD WARNING FLASHER SWITCH FIRST AID KIT (if so equipped)
6-2In case of emergency
Page 353 of 467
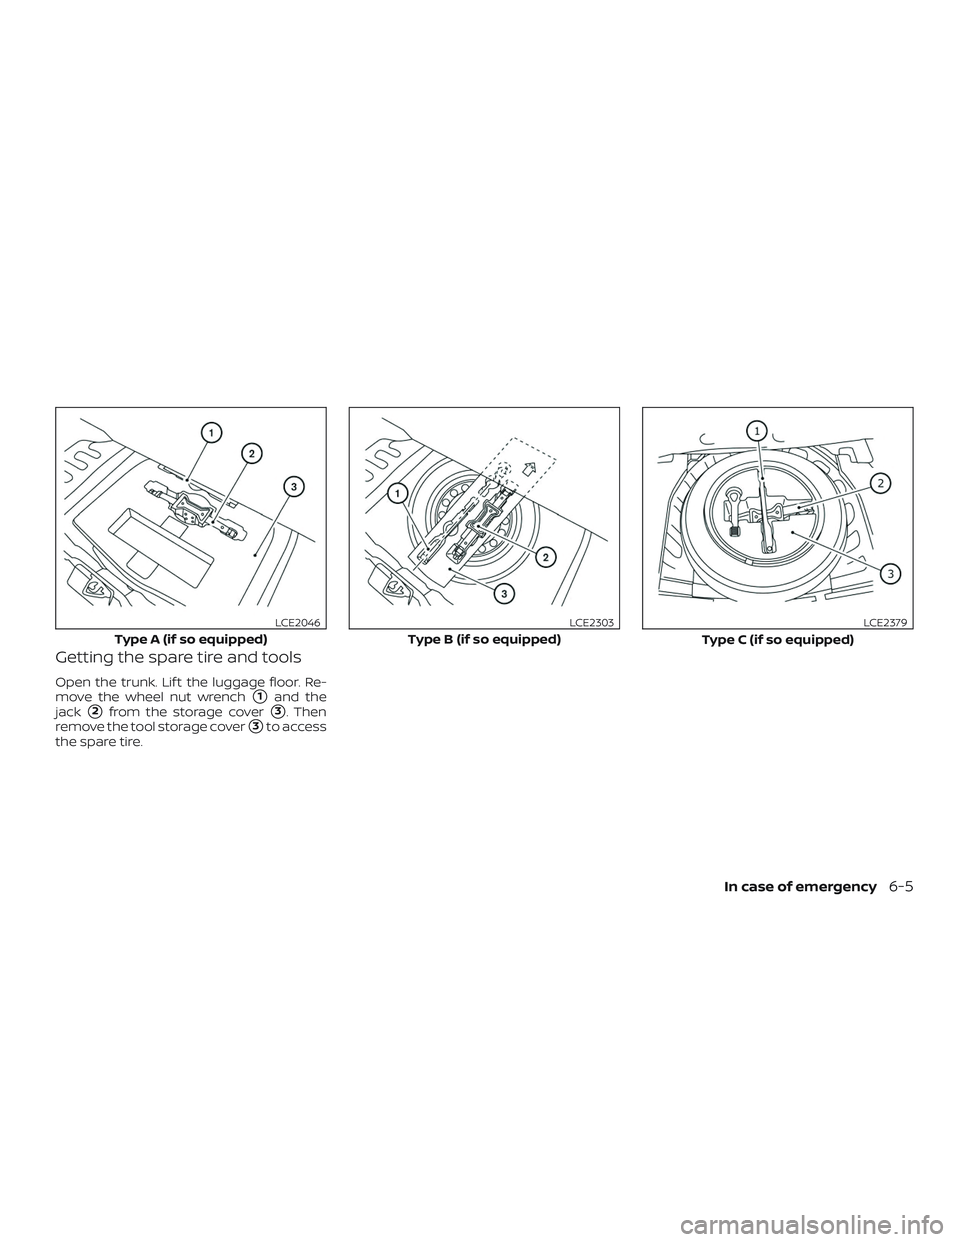
Getting the spare tire and tools
Open the trunk. Lif t the luggage floor. Re-
move the wheel nut wrench
�1and the
jack
�2from the storage cover�3. Then
remove the tool storage cover
�3to access
the spare tire.
Type A (if so equipped)
LCE2046
Type B (if so equipped)
LCE2303
Type C (if so equipped)
LCE2379
In case of emergency6-5
Page 357 of 467
. Lower the ve-
hicle comp")
4. Lower the vehicle slowly until the tiretouches the ground. Then, with the
wheel nut wrench, tighten the wheel
nuts securely in the sequence illus-
trated (
�A,�B,�C,�D,�E). Lower the ve-
hicle completely.
WARNING
∙ Incorrect wheel nuts or improperly tightened wheel nuts can cause the
wheel to become loose or come off.
This could cause an accident.
∙ Do not use oil or grease on the wheel studs or nuts. This could cause the
nuts to become loose.
∙ Retighten the wheel nuts when the vehicle has been driven for 600 miles
(1,000 km) (also in cases of a flat tire,
etc.)
As soon as possible, tighten the wheel
nuts to the specified torque with a
torque wrench.
Wheel nut tightening torque: 83 f t-lb (113 N·m) The wheel nuts must be kept tightened
to specification at all times. It is recom-
mended that wheel nuts be tightened to
specifications at each lubrication inter-
val.
Adjust tire pressure to the COLD pres-
sure.
COLD pressure: Af ter vehicle has been
parked for 3 hours or more or driven less
than 1 mile (1.6 km).
COLD tire pressures are shown on the
Tire Load and Information label affixed
to the driver side center pillar.
5. Securely store the flat tire and jacking equipment in the vehicle.
6. Place the spare tire cover and the trunk floor carpeting over the damaged tire. NOTE:
You may need to remove the wheel cap
in order to secure the damaged tire us-
ing the spare tire clamp.
7. Close the trunk.
WARNING
∙ Always make sure that the spare tire and jacking equipment are properly
secured af ter use. Such items can be-
come dangerous projectiles in an ac-
cident or sudden stop.
∙ The spare tire is designed for emer- gency use. For additional information,
refer to “Wheels and tires” in the “Do-
it-yourself ” section of this manual.
In case of emergency6-9
Page 372 of 467

CAUTION
∙ NEVER remove dirt, sand or other de-bris from the passenger compart-
ment by washing it out with a hose.
Remove dirt with a vacuum cleaner or
broom.
∙ Never allow water or other liquids to come in contact with electronic com-
ponents inside the vehicle as this may
damage them.
Chemicals used for road surface de-icing
are extremely corrosive. They accelerate
corrosion and deterioration of underbody
components such as the exhaust system,
fuel and brake lines, brake cables, floor pan
and fenders.
In winter, the underbody must be
cleaned periodically.
For additional protection against rust and
corrosion, which may be required in some
areas, it is recommended that you visit a
NISSAN dealer.
License plate bracket padding
1. License plate
2. Trunk
3. License plate frame
4. Padding
CAUTION
A license plate frame could vibrate and
cause noise or paint damage. To avoid
damage or noise, add a sof t adhesive
pad with a maximum thickness of 1/8 in
(4 mm) to the back lower edge of the
license plate frame.
LAI2001
7-8Appearance and care
Page 400 of 467
Bulb No.*
Headlight assembly (Type A) (if so equipped)* Low (Halogen) 55H11
High (Halogen) 65H9
Turn/Park 28/87444NA
Side marker 5W5W
Headlight assembly (Ty")
EXTERIOR AND INTERIOR LIGHTS
ItemWattage (W)Bulb No.*
Headlight assembly (Type A) (if so equipped)* Low (Halogen) 55H11
High (Halogen) 65H9
Turn/Park 28/87444NA
Side marker 5W5W
Headlight assembly (Type B) (if so equipped)* Low ——
High (Halogen) 65H9
Daytime running ——
Turn/Park 28/87444NA
Side marker 5W5W
Fog light assembly (Type A) (if so equipped) Fog 55H11
Daytime running* 19PS19W
Fog light assembly (Type B) (if so equipped) 55H11
Door mirror turn signal light (if so equipped)* ——
Map light* ——
Courtesy light ——
Vanity mirror light* 1.8—
Glove box light* 1.4—
Step light (if so equipped) 3.8194
Personal light* 8—
Trunk light 3.4158
High-mounted stop light* Inside (if so equipped) ——
Spoiler (if so equipped) ——
Rear combination light* Stop/Tail 21/5W21/5W
Turn 21WY21W
Tail 5W5W
Side marker 5W5W
Backup (reversing)* 18921
License plate light* 5W5W
* Always check with the Parts Department at a NISSAN dealer for the latest parts informa-
tion.
* It is recommended that you visit a NISSAN dealer for assistance.
8-28Do-it-yourself
Page 402 of 467
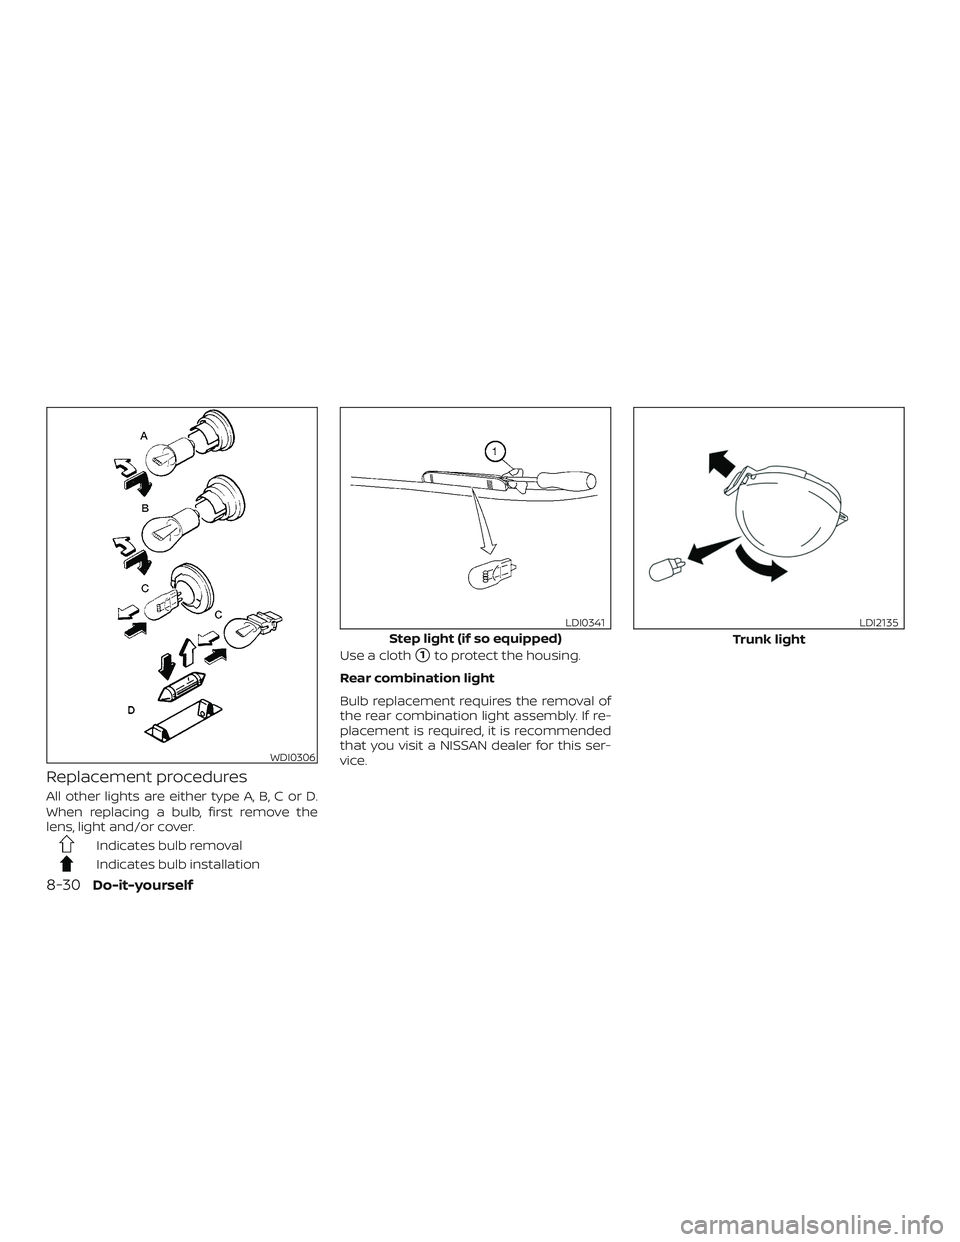
Replacement procedures
All other lights are either type A, B, C or D.
When replacing a bulb, first remove the
lens, light and/or cover.
Indicates bulb removal
Indicates bulb installationUse a cloth
�1to protect the housing.
Rear combination light
Bulb replacement requires the removal of
the rear combination light assembly. If re-
placement is required, it is recommended
that you visit a NISSAN dealer for this ser-
vice.
WDI0306
Step light (if so equipped)
LDI0341
Trunk light
LDI2135
8-30Do-it-yourself