Page 376 of 467
VQ35DE engine
1. Power steering fluid reservoir
2. Engine coolant reservoir
3. Engine oil filler cap
4. Brake fluid reservoir
5. Air cleaner
6. Fuse/Fusible link box
7. Battery
8. Engine oil dipstick
9. Radiator cap
10. Drive belt location
11. Windshield-washer fluid reservoir
LDI2112
8-4Do-it-yourself
Page 379 of 467
CHECKING ENGINE OIL LEVEL
1. Park the vehicle on a level surface andapply the parking brake.
2. Start the engine and let it idle until it reaches operating temperature.
3. Turn off the engine. Wait more than
10 minutes for the oil to drain back
into the oil pan.
4. Remove the dipstick and wipe it clean. Reinsert it all the way. 5. Remove the dipstick again and check
the oil level. It should be between the H
(High) and L (Low) marks�B. This is the
normal operating oil level range. If the
oil level is below the L (Low) mark
�A,
remove the oil filler cap and pour rec-
ommended oil through the opening.
Do not overfill
�C.
6. Recheck oil level with the dipstick.
It is normal to add some oil between oil
maintenance intervals or during the
break-in period, depending on the sever-
ity of operating conditions.
QR25DE engine
LDI2120
VQ35DE engine
LDI2121
QR25DE engine
LDI2812
ENGINE OIL
Do-it-yourself8-7
Page 380 of 467
CAUTION
∙ Oil level should be checked regularly.Operating the engine with an insuffi-
cient amount of oil can damage the
engine, and such damage is not cov-
ered by warranty.
∙ It is normal to add some oil between oil maintenance intervals or during
the break-in period, depending on the
severity of operating conditions.
CHANGING ENGINE OIL
1. Park the vehicle on a level surface and apply the parking brake.
2. Start the engine and let it idle until it reaches operating temperature, then
turn it off.
3. Remove the oil filler cap
�Aby turning it
counterclockwise. 4. Remove the pins
�Bfrom the under-
cover. Gently pull the undercover to
gain access to the drain plug. (VQ35DE
engine only)
VQ35DE engine
WDI0214LDI2866
VQ35DE engine only
LDI2558
8-8Do-it-yourself
Page 381 of 467

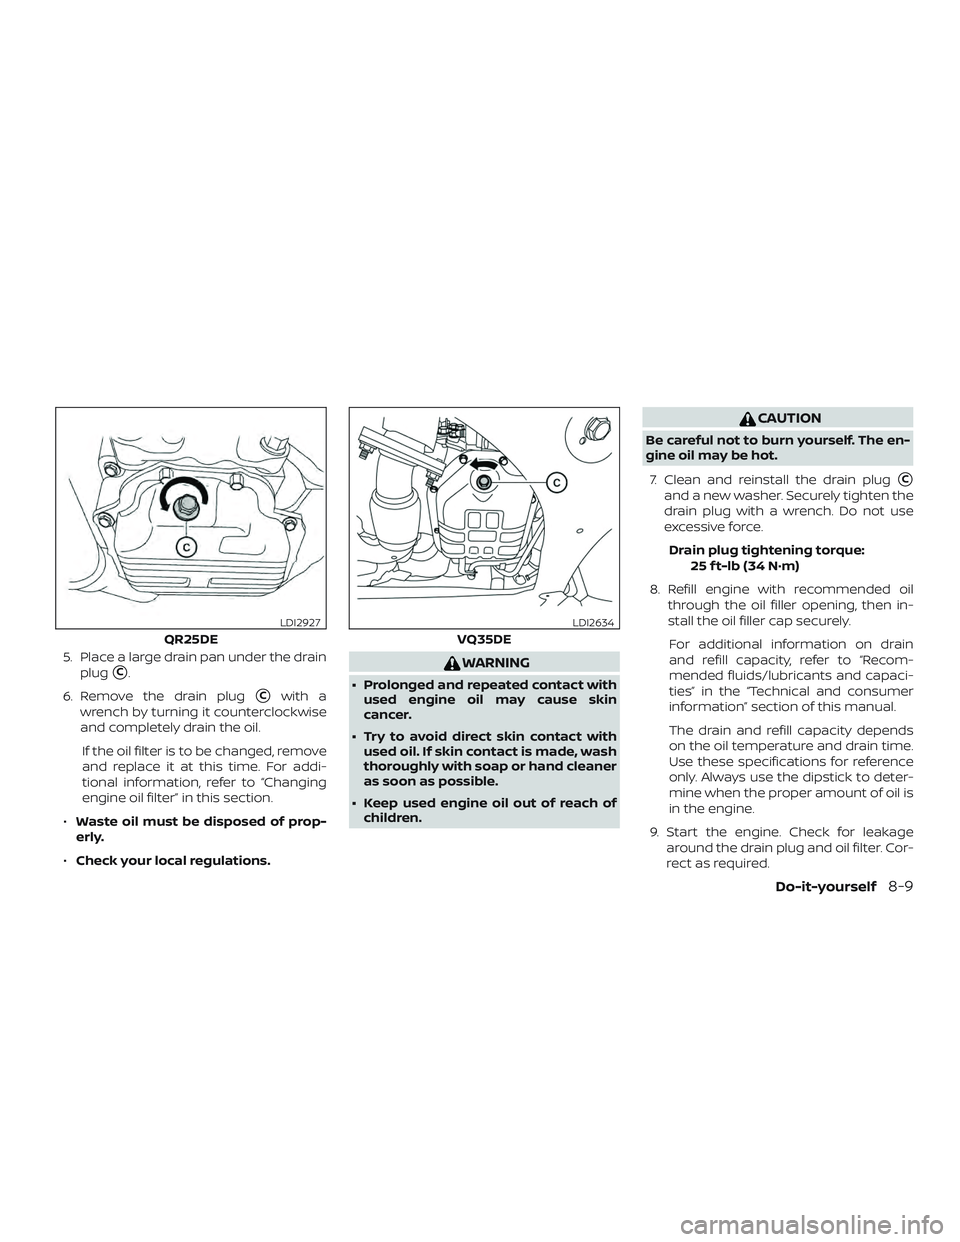
5. Place a large drain pan under the drainplug
�C.
6. Remove the drain plug
�Cwith a
wrench by turning it counterclockwise
and completely drain the oil.
If the oil filter is to be changed, remove
and replace it at this time. For addi-
tional information, refer to “Changing
engine oil filter” in this section.
∙ Waste oil must be disposed of prop-
erly.
∙ Check your local regulations.
WARNING
∙ Prolonged and repeated contact with
used engine oil may cause skin
cancer.
∙ Try to avoid direct skin contact with used oil. If skin contact is made, wash
thoroughly with soap or hand cleaner
as soon as possible.
∙ Keep used engine oil out of reach of children.
CAUTION
Be careful not to burn yourself. The en-
gine oil may be hot.
7. Clean and reinstall the drain plug
�C
and a new washer. Securely tighten the
drain plug with a wrench. Do not use
excessive force. Drain plug tightening torque: 25 f t-lb (34 N·m)
8. Refill engine with recommended oil through the oil filler opening, then in-
stall the oil filler cap securely.
For additional information on drain
and refill capacity, refer to “Recom-
mended fluids/lubricants and capaci-
ties” in the “Technical and consumer
information” section of this manual.
The drain and refill capacity depends
on the oil temperature and drain time.
Use these specifications for reference
only. Always use the dipstick to deter-
mine when the proper amount of oil is
in the engine.
9. Start the engine. Check for leakage around the drain plug and oil filter. Cor-
rect as required.
QR25DE
LDI2927
VQ35DE
LDI2634
Do-it-yourself8-9
Page 382 of 467

10. Turn the engine off and wait more than10 minutes. Check the oil level with the
dipstick. Add engine oil if necessary.
CHANGING ENGINE OIL FILTER
1. Park the vehicle on a level surface and
apply the parking brake.
2. Turn the engine off. 3. Place a large drain pan under the oil
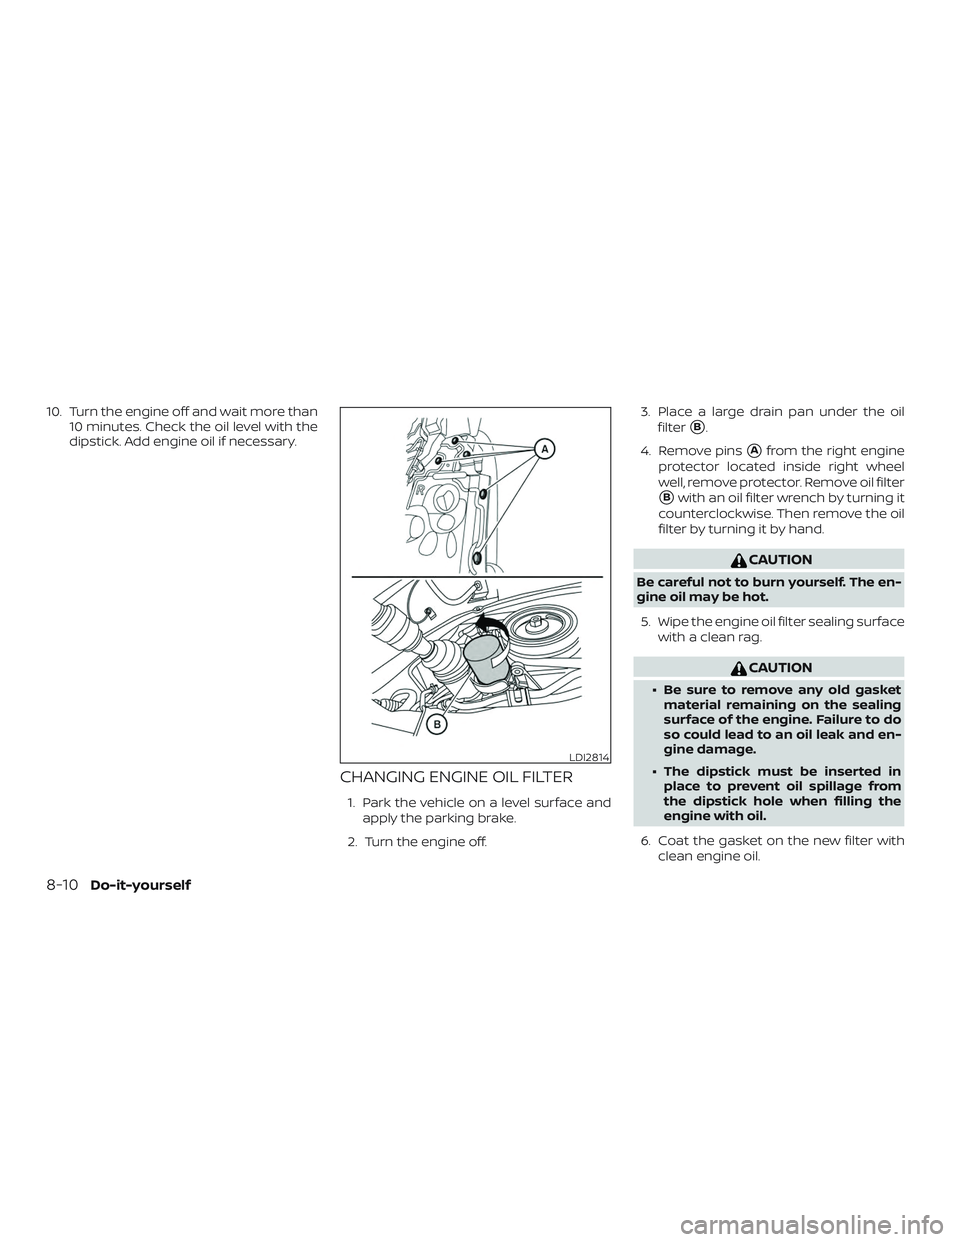
filter
�B.
4. Remove pins
�Afrom the right engine
protector located inside right wheel
well, remove protector. Remove oil filter
�Bwith an oil filter wrench by turning it
counterclockwise. Then remove the oil
filter by turning it by hand.
CAUTION
Be careful not to burn yourself. The en-
gine oil may be hot.
5. Wipe the engine oil filter sealing surface with a clean rag.
CAUTION
∙ Be sure to remove any old gasketmaterial remaining on the sealing
surface of the engine. Failure to do
so could lead to an oil leak and en-
gine damage.
∙ The dipstick must be inserted in place to prevent oil spillage from
the dipstick hole when filling the
engine with oil.
6. Coat the gasket on the new filter with clean engine oil.
LDI2814
8-10Do-it-yourself
Page 383 of 467

7. Screw on the oil filter until a slight resis-tance is felt, then tighten an additional
2/3 turn.
8. Start the engine and check for leakage around the oil filter. Correct as required.
9. Turn the engine off and wait more than 10 minutes. Check the oil level. Add en-
gine oil if necessary.CAUTION
∙ NISSAN recommends using GenuineNISSAN CVT Fluid NS-3 (or equivalent)
ONLY in NISSAN CVTs. Do not mix with
other fluids.
∙ Do not use Automatic Transmission Fluid (ATF) or manual transmission
fluid in a NISSAN CVT, as it may dam-
age the CVT. Damage caused by the
use of fluids other than as recom-
mended is not covered under
NISSAN’s New Vehicle Limited
Warranty.
∙ Using fluids that are not equivalent to Genuine NISSAN CVT Fluid NS-3 may
also damage the CVT. Damage caused
by the use of fluids other than as rec-
ommended is not covered under
NISSAN’s New Vehicle Limited
Warranty.
When checking or replacement of CVT fluid
is required, it is recommended that you visit
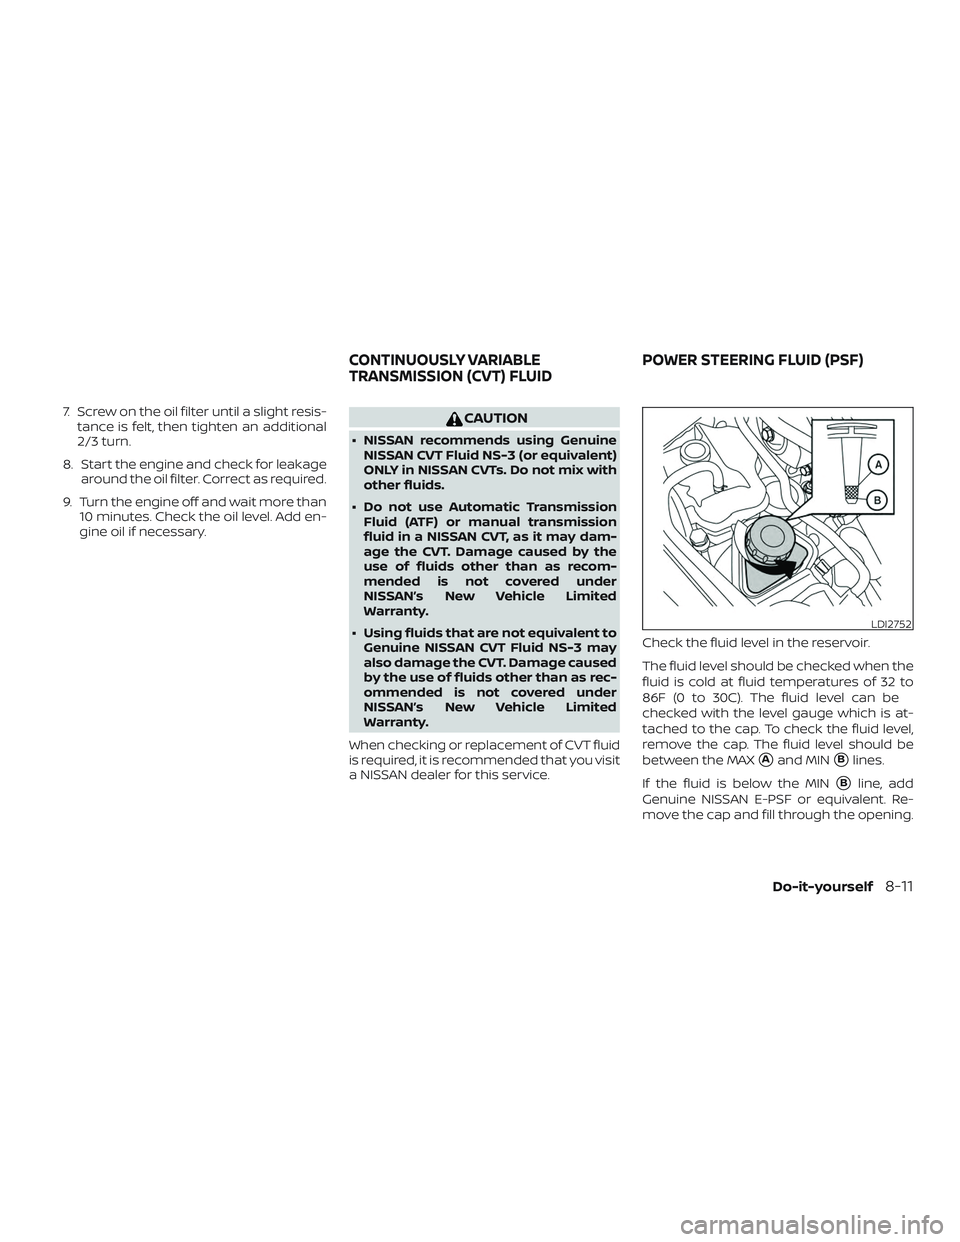
a NISSAN dealer for this service. Check the fluid level in the reservoir.
The fluid level should be checked when the
fluid is cold at fluid temperatures of 32 to
86F (0 to 30C). The fluid level can be
checked with the level gauge which is at-
tached to the cap. To check the fluid level,
remove the cap. The fluid level should be
between the MAX
�Aand MIN�Blines.
If the fluid is below the MIN
�Bline, add
Genuine NISSAN E-PSF or equivalent. Re-
move the cap and fill through the opening.
LDI2752
CONTINUOUSLY VARIABLE
TRANSMISSION (CVT) FLUID POWER STEERING FLUID (PSF)
Do-it-yourself8-11
Page 400 of 467

EXTERIOR AND INTERIOR LIGHTS
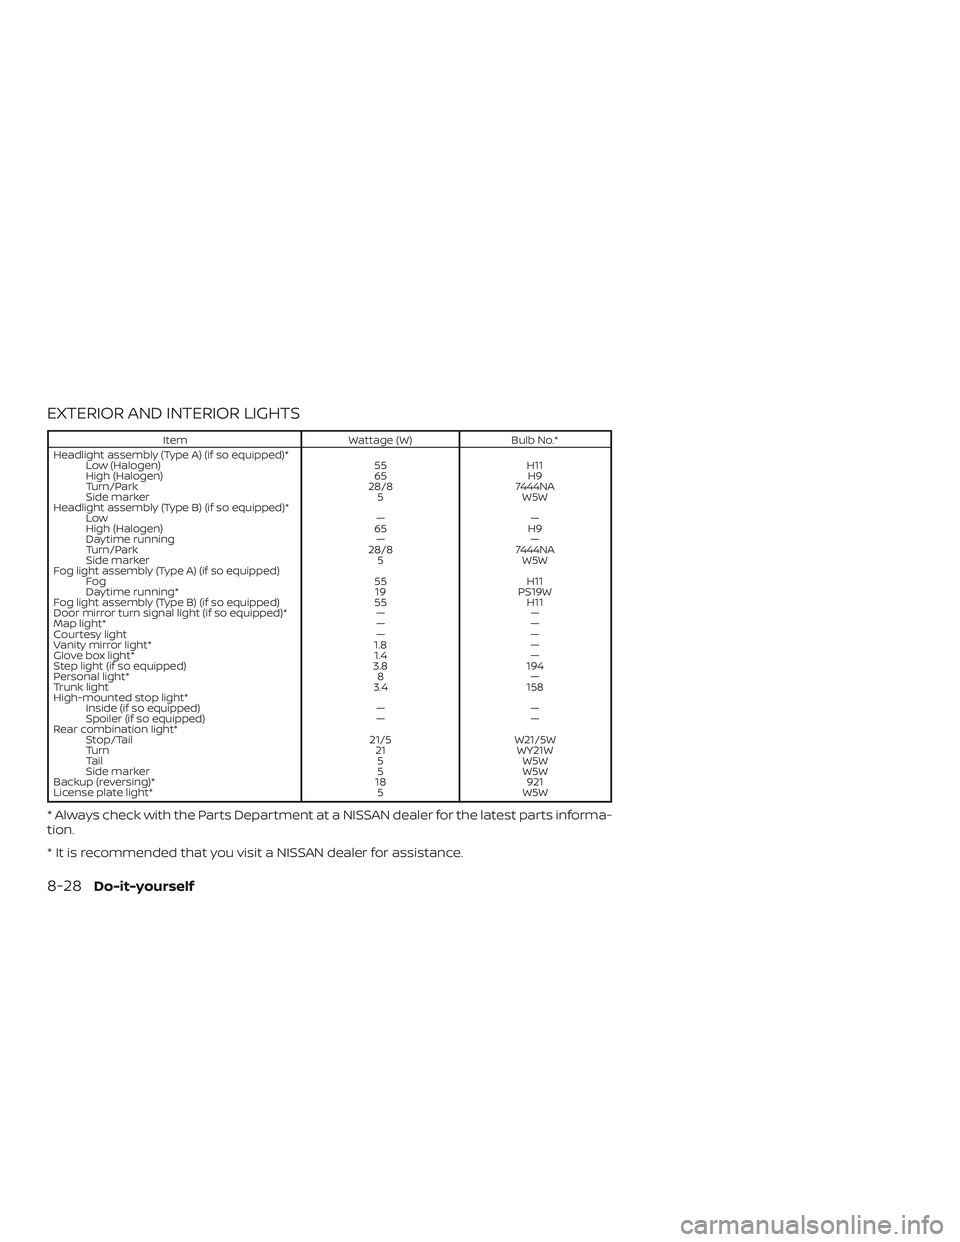
ItemWattage (W)Bulb No.*
Headlight assembly (Type A) (if so equipped)* Low (Halogen) 55H11
High (Halogen) 65H9
Turn/Park 28/87444NA
Side marker 5W5W
Headlight assembly (Type B) (if so equipped)* Low ——
High (Halogen) 65H9
Daytime running ——
Turn/Park 28/87444NA
Side marker 5W5W
Fog light assembly (Type A) (if so equipped) Fog 55H11
Daytime running* 19PS19W
Fog light assembly (Type B) (if so equipped) 55H11
Door mirror turn signal light (if so equipped)* ——
Map light* ——
Courtesy light ——
Vanity mirror light* 1.8—
Glove box light* 1.4—
Step light (if so equipped) 3.8194
Personal light* 8—
Trunk light 3.4158
High-mounted stop light* Inside (if so equipped) ——
Spoiler (if so equipped) ——
Rear combination light* Stop/Tail 21/5W21/5W
Turn 21WY21W
Tail 5W5W
Side marker 5W5W
Backup (reversing)* 18921
License plate light* 5W5W
* Always check with the Parts Department at a NISSAN dealer for the latest parts informa-
tion.
* It is recommended that you visit a NISSAN dealer for assistance.
8-28Do-it-yourself
Page 401 of 467
1. Door mirror turn signal light (if soequipped)
2. Headlamp assembly
3. Front map light
4. Fog light assembly (if so equipped)
5. High-mount stop light (spoiler)
(if so equipped)
6. High-mount stop light (inside)
(if so equipped)
7. Personal light
8. Step light (if so equipped)
9. Rear combination light
10. Backup (reverse) light
11. License plate light
LDI2906
Do-it-yourself8-29