2018 NISSAN 370Z tow
[x] Cancel search: towPage 28 of 453

1-4Safety — Seats, seat belts and supplemental restraint system
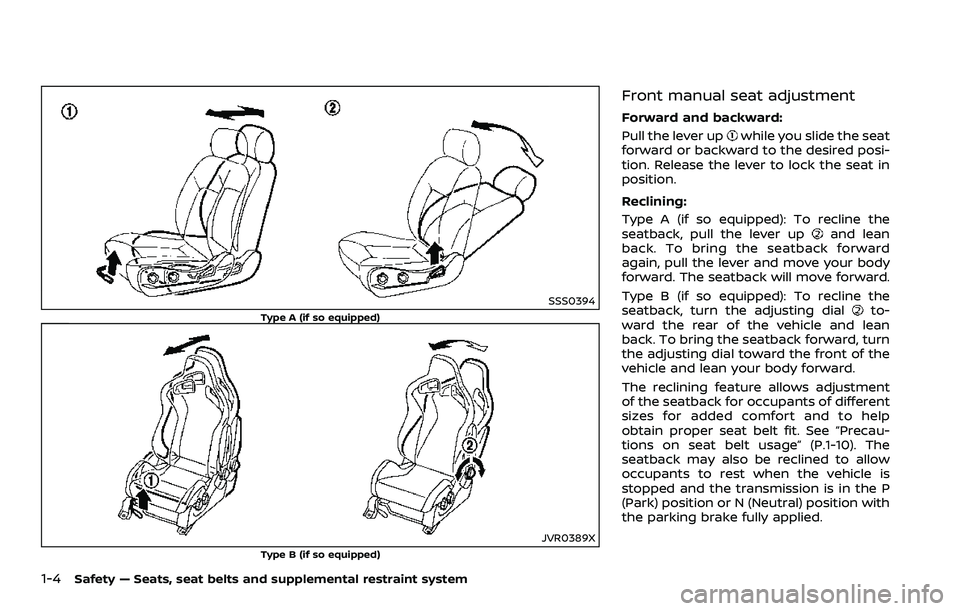
SSS0394
Type A (if so equipped)
JVR0389X
Type B (if so equipped)
Front manual seat adjustment
Forward and backward:
Pull the lever up
while you slide the seat
forward or backward to the desired posi-
tion. Release the lever to lock the seat in
position.
Reclining:
Type A (if so equipped): To recline the
seatback, pull the lever up
and lean
back. To bring the seatback forward
again, pull the lever and move your body
forward. The seatback will move forward.
Type B (if so equipped): To recline the
seatback, turn the adjusting dial
to-
ward the rear of the vehicle and lean
back. To bring the seatback forward, turn
the adjusting dial toward the front of the
vehicle and lean your body forward.
The reclining feature allows adjustment
of the seatback for occupants of different
sizes for added comfort and to help
obtain proper seat belt fit. See “Precau-
tions on seat belt usage” (P.1-10). The
seatback may also be reclined to allow
occupants to rest when the vehicle is
stopped and the transmission is in the P
(Park) position or N (Neutral) position with
the parking brake fully applied.
Page 37 of 453

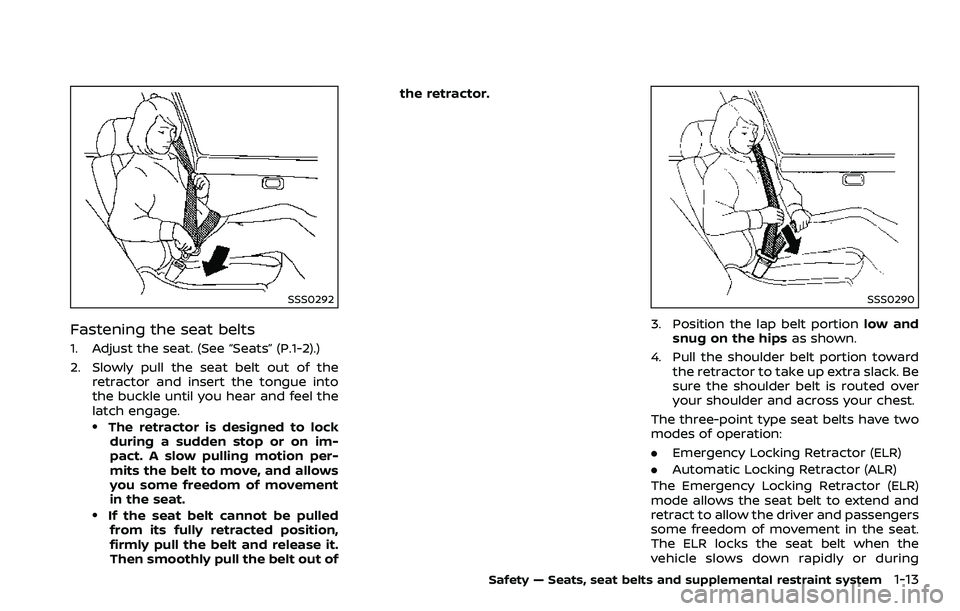
SSS0292
Fastening the seat belts
1. Adjust the seat. (See “Seats” (P.1-2).)
2. Slowly pull the seat belt out of theretractor and insert the tongue into
the buckle until you hear and feel the
latch engage.
.The retractor is designed to lockduring a sudden stop or on im-
pact. A slow pulling motion per-
mits the belt to move, and allows
you some freedom of movement
in the seat.
.If the seat belt cannot be pulledfrom its fully retracted position,
firmly pull the belt and release it.
Then smoothly pull the belt out of the retractor.
SSS0290
3. Position the lap belt portion
low and
snug on the hips as shown.
4. Pull the shoulder belt portion toward the retractor to take up extra slack. Be
sure the shoulder belt is routed over
your shoulder and across your chest.
The three-point type seat belts have two
modes of operation:
. Emergency Locking Retractor (ELR)
. Automatic Locking Retractor (ALR)
The Emergency Locking Retractor (ELR)
mode allows the seat belt to extend and
retract to allow the driver and passengers
some freedom of movement in the seat.
The ELR locks the seat belt when the
vehicle slows down rapidly or during
Safety — Seats, seat belts and supplemental restraint system1-13
Page 53 of 453

seat.
4. Position the lap portion of the seat belt low and snug on the child’s hips.
Be sure to follow the booster seat
manufacturer’s instructions for ad-
justing the belt routing.
5. Pull the shoulder belt portion of the seat belt toward the retractor to take
up extra slack. Be sure the shoulder
belt is positioned across the top,
middle portion of the child’s shoulder.
Be sure to follow the booster seat
manufacturer’s instructions for ad-
justing the belt routing.
6. Follow the warnings, cautions and instructions for properly fastening a
seat belt shown in the “Three-point
type seat belt” (P.1-12).
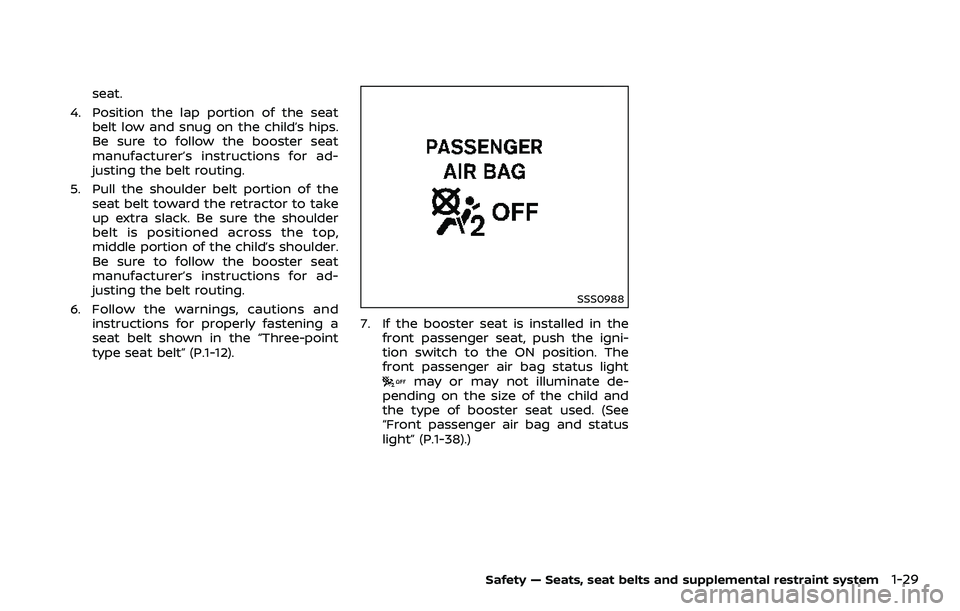
SSS0988
7. If the booster seat is installed in thefront passenger seat, push the igni-
tion switch to the ON position. The
front passenger air bag status light
may or may not illuminate de-
pending on the size of the child and
the type of booster seat used. (See
“Front passenger air bag and status
light” (P.1-38).)
Safety — Seats, seat belts and supplemental restraint system1-29
Page 64 of 453

1-40Safety — Seats, seat belts and supplemental restraint system
Other supplemental front-impact
air bag precautions
WARNING
.Do not place any objects on the
steering wheel pad or on the
instrument panel. Also, do not
place any objects between any
occupant and the steering wheel
or instrument panel. Such objects
may become dangerous projec-
tiles and cause injury if the front
air bag inflates.
. Do not place objects with sharp
edges on the seat. Also, do not
place heavy objects on the seat
that will leave permanent impres-
sions in the seat. Such objects
can damage the seat or occupant
classification sensor (pattern
sensor). This can affect the op-
eration of the air bag system and
result in serious personal injury.
. Do not use water or acidic clea-
ners (hot steam cleaners) on the
seat. This can damage the seat or
occupant classification sensor.
This can also affect the operation
of the air bag system and result in
serious personal injury. .
Immediately after inflation, sev-
eral front air bag system compo-
nents will be hot. Do not touch
them; you may severely burn
yourself.
. No unauthorized changes should
be made to any components or
wiring of the air bag system. This
is to prevent accidental inflation
of the supplemental air bag or
damage to the supplemental air
bag system.
. Do not make unauthorized
changes to your vehicle’s electri-
cal system, suspension system or
front end structure. This could
affect proper operation of the
front air bag system.
. Tampering with the front air bag
system may result in serious per-
sonal injury. Tampering includes
changes to the steering wheel
and the instrument panel assem-
bly by placing material over the
steering wheel pad and above the
instrument panel or by installing
additional trim material around
the air bag system.
. Modifying or tampering with the
front passenger seat may result
in serious personal injury. For example, do not change the front
seats by placing material on the
seat cushion or by installing ad-
ditional trim material, such as
seat covers, on the seat that is
not specifically designed to as-
sure proper air bag operation.
Additionally, do not stow any
objects under the front passen-
ger seat or the seat cushion and
seatback. Such objects may inter-
fere with the proper operation of
the occupant classification sen-
sor.
. No unauthorized changes should
be made to any components or
wiring of the seat belt system.
This may affect the front air bag
system. Tampering with the seat
belt system may result in serious
personal injury.
. It is recommended you visit a
NISSAN dealer for work on and
around the front air bag. It is also
recommended you visit a NISSAN
dealer for installation of electrical
equipment. The Supplemental
Restraint System (SRS) wiring
harnesses* should not be modi-
fied or disconnected. Unauthor-
ized electrical test equipment
and probing devices should not
Page 75 of 453

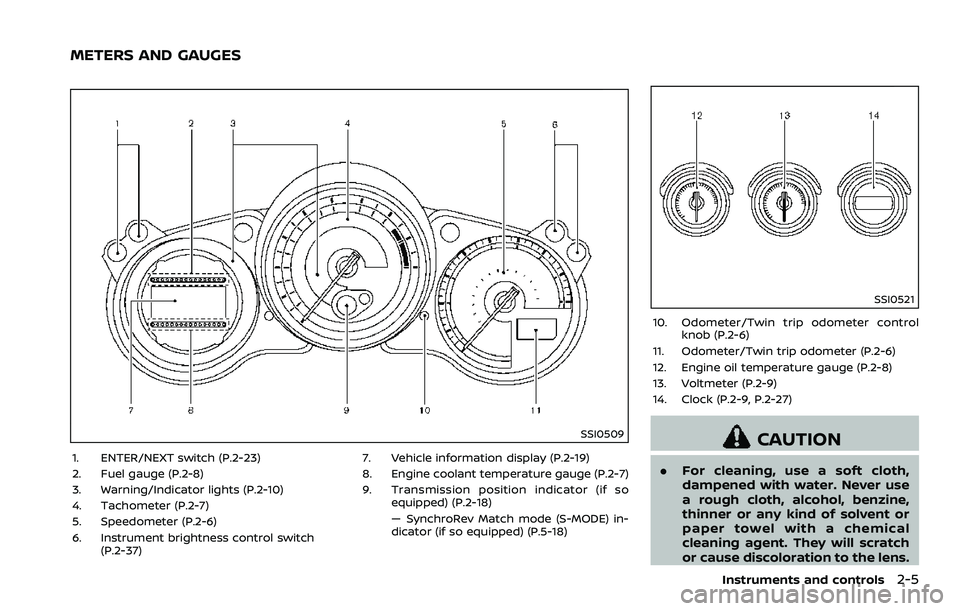
SSI0509
1. ENTER/NEXT switch (P.2-23)
2. Fuel gauge (P.2-8)
3. Warning/Indicator lights (P.2-10)
4. Tachometer (P.2-7)
5. Speedometer (P.2-6)
6. Instrument brightness control switch(P.2-37) 7. Vehicle information display (P.2-19)
8. Engine coolant temperature gauge (P.2-7)
9. Transmission position indicator (if so
equipped) (P.2-18)
— SynchroRev Match mode (S-MODE) in-
dicator (if so equipped) (P.5-18)
SSI0521
10. Odometer/Twin trip odometer controlknob (P.2-6)
11. Odometer/Twin trip odometer (P.2-6)
12. Engine oil temperature gauge (P.2-8)
13. Voltmeter (P.2-9)
14. Clock (P.2-9, P.2-27)
CAUTION
. For cleaning, use a soft cloth,
dampened with water. Never use
a rough cloth, alcohol, benzine,
thinner or any kind of solvent or
paper towel with a chemical
cleaning agent. They will scratch
or cause discoloration to the lens.
Instruments and controls2-5
METERS AND GAUGES
Page 82 of 453

2-12Instruments and controls
system checked, and if necessary re-
paired. It is recommended you visit a
NISSAN dealer for this service. (See “Anti-
lock Braking System (ABS) warning light”
(P.2-11).)
WARNING
.Your brake system may not be
working properly if the warning
light is on. Driving could be dan-
gerous. If you judge it to be safe,
drive carefully to the nearest
service station for repairs. Other-
wise, have your vehicle towed
because driving it could be dan-
gerous.
. Pressing the brake pedal with the
engine stopped and/or low brake
fluid level may increase your
stopping distance and braking
will require greater pedal effort
as well as pedal travel.
. If the brake fluid level is below the
minimum or MIN mark on the
brake fluid reservoir, do not drive
until the brake system has been
checked. It is recommended you
visit a NISSAN dealer for this
service.
Charge warning light
If the light comes on while the engine is
running, it may indicate the charging
system is not functioning properly. Turn
the engine off and check the alternator
belt. If the belt is loose, broken, missing or
if the light remains on, have your vehicle
serviced immediately. It is recommended
you visit a NISSAN dealer for this service.
CAUTION
Do not continue driving if the alter-
nator belt is loose, broken or miss-
ing.
Engine oil pressure warning
light
This light warns of low engine oil pres-
sure. If the light flickers or comes on
during normal driving, pull off the road in
a safe area, stop the engine immediately
and call a NISSAN dealer or other author-
ized repair shop.
The engine oil pressure warning light is
not designed to indicate a low oil level.
Use the dipstick to check the oil level.
(See “Engine oil” (P.8-6).)
CAUTION
Running the engine with the engine
oil pressure warning light on could
cause serious damage to the engine
almost immediately. Such damage is
not covered by warranty. Turn off the
engine as soon as it is safe to do so.
Intelligent Key system warn-
ing light
After the ignition switch is pushed to the
ON position, this light comes on for about
2 seconds and then turns off.
This light warns of a malfunction with the
Intelligent Key system.
If the light comes on while the engine is
stopped, it may be impossible to start the
engine. If the light comes on while the
engine is running, you can drive the
vehicle. However in these cases, it is
recommended you visit a NISSAN dealer
for repair as soon as possible.
Page 86 of 453

2-16Instruments and controls
Front passenger air bag sta-
tus light
The front passenger air bag status light
(), located on the center of the instru-
ment panel, will be lit and the passenger
front air bag will be OFF depending on
how the front passenger seat is being
used.
For front passenger air bag status light
operation, see “NISSAN Advanced Air Bag
System (front seats)” (P.1-36) of this man-
ual.
High beam indicator light
This light comes on when the headlight
high beam is on and goes out when the
low beam is selected.
Malfunction Indicator Light
(MIL)
If the malfunction indicator light comes
on steady or blinks while the engine is
running, it may indicate a potential emis-
sion control malfunction.
The malfunction indicator light may also
come on steady if the fuel-filler cap is
loose or missing, or if the vehicle runs out
of fuel. Check to make sure the fuel-filler
cap is installed and closed tightly, and
that the vehicle has at least 3 US gallons (11.4 liters) of fuel in the fuel tank.
After a few driving trips, the
light
should turn off if no other potential
emission control system malfunction ex-
ists.
If this indicator light remains on for 20
seconds and then blinks for 10 seconds
when the engine is not running, it indi-
cates that the vehicle is not ready for an
emission control system inspection/
maintenance test. (See “Readiness for
Inspection/Maintenance (I/M) test” (P.10-
25).)
Operation:
The malfunction indicator light will come
on in one of two ways:
. Malfunction indicator light on steady
— An emission control system mal-
function has been detected. Check
the fuel-filler cap if the LOOSE FUEL
CAP warning appears in the vehicle
information display. If the fuel-filler
cap is loose or missing, tighten or
install the cap and continue to drive
the vehicle. The
light should turn
off after a few driving trips. If the
light does not turn off after a few
driving trips, have the vehicle in-
spected. It is recommended you visit
a NISSAN dealer for this service. You
do not need to have your vehicle towed to the dealer.
. Malfunction indicator light blinking —
An engine misfire has been detected
which may damage the emission
control system.
To reduce or avoid emission control
system damage:
1) Do not drive at speeds above 45
MPH (72 km/h).
2) Avoid hard acceleration or decel- eration.
3) Avoid steep uphill grades.
4) If possible, reduce the amount of cargo being hauled or towed.
The malfunction indicator light may
stop blinking and remain on.
Have the vehicle inspected. It is re-
commended you visit a NISSAN dealer
for this service. You do not need to
have your vehicle towed to the dealer.
CAUTION
Continued vehicle operation without
having the emission control system
checked and repaired as necessary
could lead to poor driveability, re-
duced fuel economy, and possible
damage to the emission control sys-
tem.
Page 102 of 453

2-32Instruments and controls
WARNING
In freezing temperatures the washer
solution may freeze on the wind-
shield and obscure your vision which
may lead to an accident. Warm wind-
shield with the defroster before you
wash the windshield.
CAUTION
.Do not operate the washer con-
tinuously for more than 30 sec-
onds.
. Do not operate the washer if the
reservoir tank is empty.
. Do not fill the window washer
reservoir tank with washer fluid
concentrates at full strength.
Some methyl alcohol based
washer fluid concentrates may
permanently stain the grille if
spilled while filling the window
washer reservoir tank.
. Pre-mix washer fluid concen-
trates with water to the manu-
facturer’s recommended levels
before pouring the fluid into the
window washer reservoir tank. Do not use the window washer re-
servoir tank to mix the washer
fluid concentrate and water.JVI1012X
The windshield wiper and washer oper-
ates when the ignition switch is in the ON
position.
Push the lever down to operate the wiper
at the following speed:
Intermittent — intermittent operation can
be adjusted by turning the knob toward
(Slower) or(Faster).
When the speed sensing wiper interval
function (for models with navigation sys-
tem) is turned on, the intermittent opera-
tion speed varies in accordance with the
vehicle speed. (For example, when the
vehicle speed is high, the intermittent
operation speed will be faster.)
Models with navigation system:
Note that the function is set to disabled
WIPER AND WASHER SWITCH