2018 NISSAN 370Z ECO mode
[x] Cancel search: ECO modePage 184 of 453

4-16Center display, heater, air conditioner, audio, phone and voice recognition systems
Select Units:
Select the “Select Units” key. Choose “US”
(Mile, °F, MPG) or “Metric” (km, °C, L/100
km) for your favorite display appearance.
Voice Recognition settings
For details about the “Voice Recognition”
settings, see “NISSAN Voice Recognition
System (models with navigation system)”
(P.4-99).
Camera settings
The “Camera” screen will appear when
selecting the “Camera” key.
For details about the camera system
operation, see “RearView Monitor (models
with navigation system)” (P.4-17).
SAA2491
Image Viewer
The image files in the USB memory will be
displayed. To display the Image Viewer,
push the SETTING button, select the
“Other” key and then select the “Image
Viewer” key. The image of the selected file
is displayed on the right side of the
screen.
When a number of folders are included in
the USB memory, select a folder from the
list to display the file list.
Images will not be shown on the display
while the vehicle is in any drive position to
reduce driver distraction. To view images,
stop the vehicle in a safe location and
apply the parking brake.
SAA2492
Full Screen Display:
The full screen display will appear when
selecting the “Full Screen Display” key.
To operate the Image Viewer or to
change the settings, select the desired
key using the multi-function controller.
.
(Start)
Select the “
” key to start playing
the slideshow.
.
(Stop)
Select the “
” key to stop the
slideshow.
.
(Next)
Select the “
” key to display the next
file.
Page 185 of 453
.(Previous)
Select the “
” key to display the
previous file.
Setting the Image Viewer:
The Image Viewer setting display will
appear when selecting the “Settings” key
on the full screen display. The following
settings are available for the full screen
display.
. Slideshow Speed
Select the “Slideshow Speed” key.
From the following display, select the
changing time from 5, 10, 30, 60
seconds or “No Auto Change”.
. Slideshow Order
Select the “Slideshow Order” key. From
the following display, select “Random”
or “Order List”. For “Order List”, the
image order is the order of the files as
stored on the USB memory.
Operating tips:
. Only files that meet the following
conditions will be displayed.
— Image type: JPEG
— File Extensions: *.jpg, *jpeg
— Maximum Resolution: 2048 × 1536
pixels
— Maximum Size: 2-MB — Colors: 32768 (15-bit)
— Maximum File Name lengths: 253-
Bytes
— Maximum Folders: 500
— Maximum Images per Folder: 1024
. If an electronic device (such as a
digital camera) is directly connected
to the vehicle using a USB cable, no
image will be displayed on the screen.
. If the file name is too long, some file
names may not be entirely displayed.
. When the total number of characters
in the file name exceeds 100 or if 1 file
name in a directory exceeds 100
characters, all files will show a shor-
tened 8-character version. The image
will still be displayed when selected.
WARNING
Failure to follow the warnings and
instructions for proper use of the
RearView Monitor system could re-
sult in serious injury or death.
.The RearView Monitor is a conve-
nience but it is not a substitute
for proper backing. Always turn
and look out the windows, and
check mirrors to be sure that it is
safe to move before operating
the vehicle. Always back up
slowly.
. The system is designed as an aid
to the driver in showing large
stationary objects directly behind
the vehicle, to help avoid dama-
ging the vehicle.
. The distance guide line and the
vehicle width line should be used
as a reference only when the
vehicle is on a level paved sur-
face. The distance viewed on the
monitor is for reference only and
may be different than the actual
distance between the vehicle and
displayed objects.
Center display, heater, air conditioner, audio, phone and voice recognition systems4-17
REARVIEW MONITOR (models with
navigation system)
Page 188 of 453
4-20Center display, heater, air conditioner, audio, phone and voice recognition systems
SAA1898
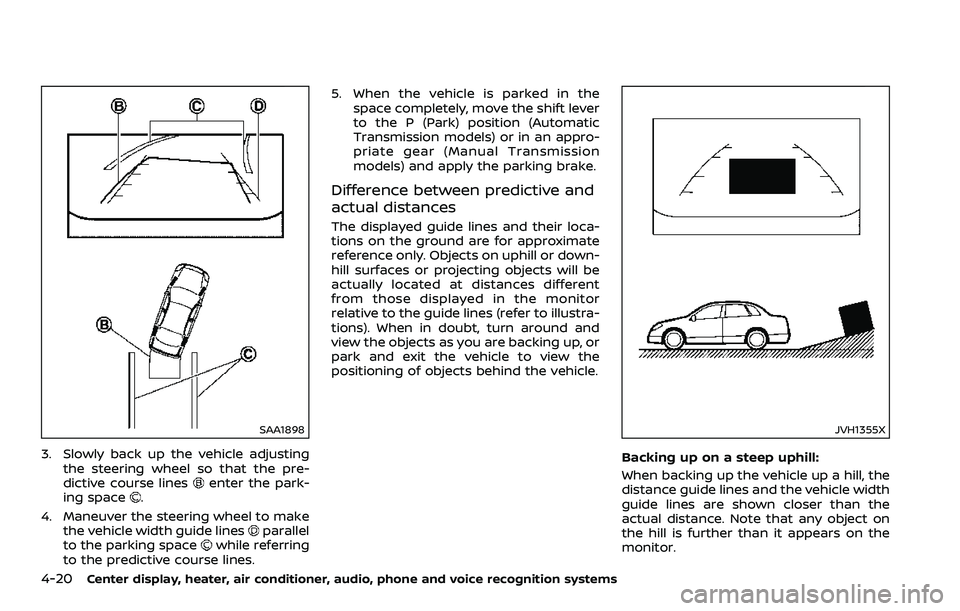
3. Slowly back up the vehicle adjustingthe steering wheel so that the pre-
dictive course lines
enter the park-
ing space.
4. Maneuver the steering wheel to make the vehicle width guide lines
parallel
to the parking spacewhile referring
to the predictive course lines. 5. When the vehicle is parked in the
space completely, move the shift lever
to the P (Park) position (Automatic
Transmission models) or in an appro-
priate gear (Manual Transmission
models) and apply the parking brake.
Difference between predictive and
actual distances
The displayed guide lines and their loca-
tions on the ground are for approximate
reference only. Objects on uphill or down-
hill surfaces or projecting objects will be
actually located at distances different
from those displayed in the monitor
relative to the guide lines (refer to illustra-
tions). When in doubt, turn around and
view the objects as you are backing up, or
park and exit the vehicle to view the
positioning of objects behind the vehicle.
JVH1355X
Backing up on a steep uphill:
When backing up the vehicle up a hill, the
distance guide lines and the vehicle width
guide lines are shown closer than the
actual distance. Note that any object on
the hill is further than it appears on the
monitor.
Page 193 of 453
WARNING
.The air conditioner cooling func-
tion operates only when the en-
gine is running.
. Do not leave children or adults
who would normally require the
support of others alone in your
vehicle. Pets should not be left
alone either. On hot, sunny days,
temperatures in a closed vehicle
could quickly become high en-
ough to cause severe or possibly
fatal injuries to people or animals.
. Do not use the recirculation mode
for long periods as it may cause
the interior air to become stale
and the windows to fog up.
Start the engine and operate the heater
and air conditioner system.
NOTE:
. Odors from inside and outside the
vehicle can build up in the air condi-
tioner unit. Odor can enter the pas-
senger compartment through the
vents.
. When parking, set the heater and air
conditioner controls to turn off air
recirculation to allow fresh air into the passenger compartment. This
should help reduce odors inside the
vehicle.
SAA2493
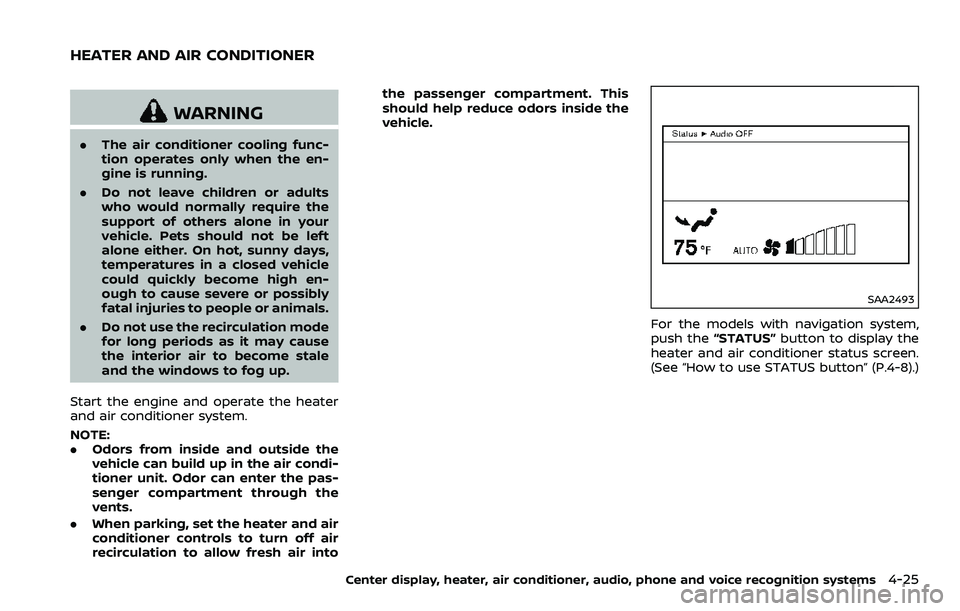
For the models with navigation system,
push the
“STATUS” button to display the
heater and air conditioner status screen.
(See “How to use STATUS button” (P.4-8).)
Center display, heater, air conditioner, audio, phone and voice recognition systems4-25
HEATER AND AIR CONDITIONER
Page 194 of 453
4-26Center display, heater, air conditioner, audio, phone and voice recognition systems
SAA2277
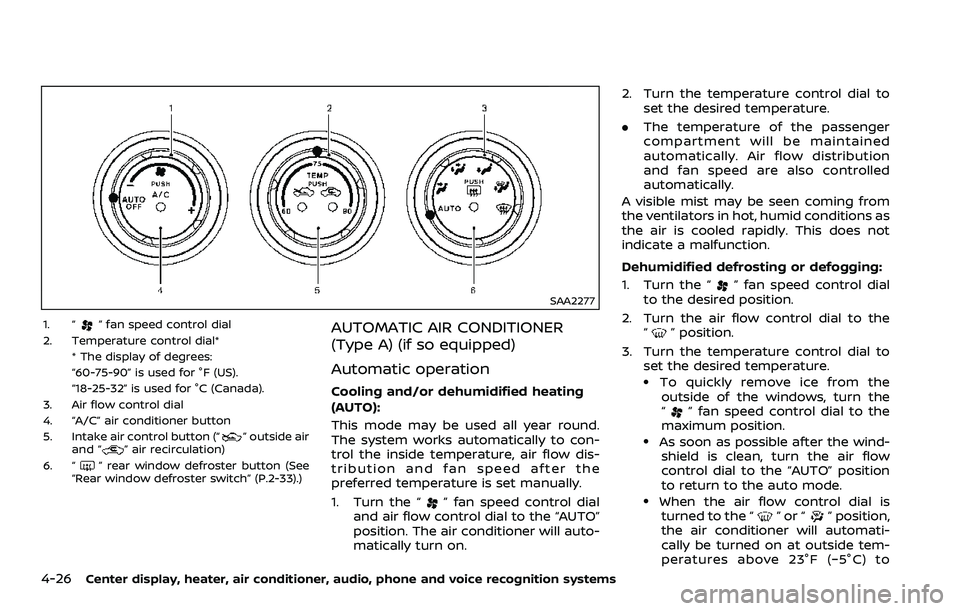
1. “” fan speed control dial
2. Temperature control dial* * The display of degrees:
“60-75-90” is used for °F (US).
“18-25-32” is used for °C (Canada).
3. Air flow control dial
4. “A/C” air conditioner button
5. Intake air control button (“
” outside air
and “” air recirculation)
6. “
” rear window defroster button (See
“Rear window defroster switch” (P.2-33).)
AUTOMATIC AIR CONDITIONER
(Type A) (if so equipped)
Automatic operation
Cooling and/or dehumidified heating
(AUTO):
This mode may be used all year round.
The system works automatically to con-
trol the inside temperature, air flow dis-
tribution and fan speed after the
preferred temperature is set manually.
1. Turn the “
” fan speed control dial
and air flow control dial to the “AUTO”
position. The air conditioner will auto-
matically turn on. 2. Turn the temperature control dial to
set the desired temperature.
. The temperature of the passenger
compartment will be maintained
automatically. Air flow distribution
and fan speed are also controlled
automatically.
A visible mist may be seen coming from
the ventilators in hot, humid conditions as
the air is cooled rapidly. This does not
indicate a malfunction.
Dehumidified defrosting or defogging:
1. Turn the “
” fan speed control dial
to the desired position.
2. Turn the air flow control dial to the “
” position.
3. Turn the temperature control dial to set the desired temperature.
.To quickly remove ice from theoutside of the windows, turn the
“
” fan speed control dial to the
maximum position.
.As soon as possible after the wind- shield is clean, turn the air flow
control dial to the “AUTO” position
to return to the auto mode.
.When the air flow control dial isturned to the “”or“” position,
the air conditioner will automati-
cally be turned on at outside tem-
peratures above 23°F (−5°C) to
Page 195 of 453
defog the windshield, and the air
recirculation mode will automati-
cally be turned off.
Outside air is drawn into the pas-
senger compartment to improve
the defogging performance.
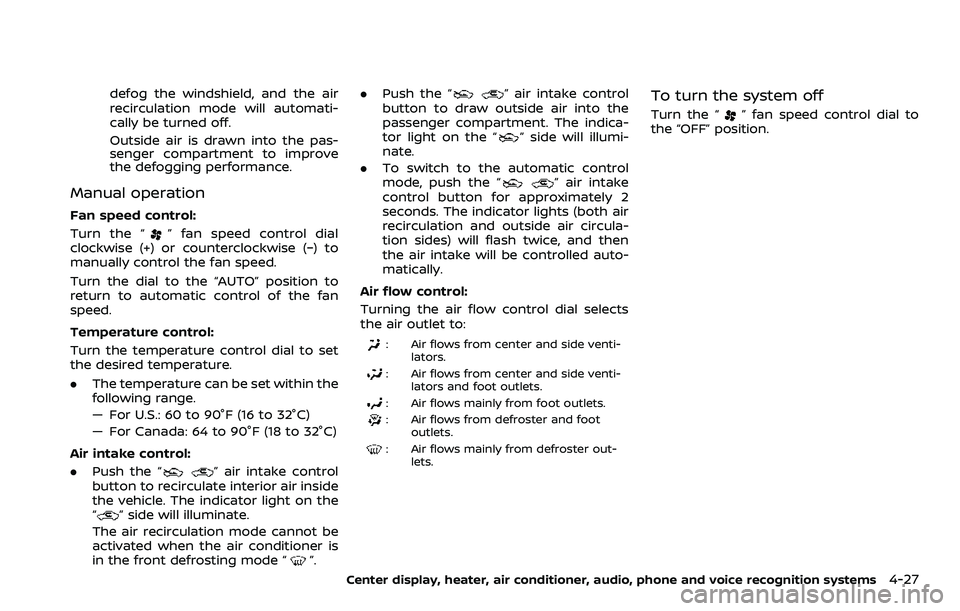
Manual operation
Fan speed control:
Turn the “
” fan speed control dial
clockwise (+) or counterclockwise (−) to
manually control the fan speed.
Turn the dial to the “AUTO” position to
return to automatic control of the fan
speed.
Temperature control:
Turn the temperature control dial to set
the desired temperature.
. The temperature can be set within the
following range.
— For U.S.: 60 to 90°F (16 to 32°C)
— For Canada: 64 to 90°F (18 to 32°C)
Air intake control:
. Push the “
” air intake control
button to recirculate interior air inside
the vehicle. The indicator light on the
“
” side will illuminate.
The air recirculation mode cannot be
activated when the air conditioner is
in the front defrosting mode “
”. .
Push the “
” air intake control
button to draw outside air into the
passenger compartment. The indica-
tor light on the “
” side will illumi-
nate.
. To switch to the automatic control
mode, push the “
” air intake
control button for approximately 2
seconds. The indicator lights (both air
recirculation and outside air circula-
tion sides) will flash twice, and then
the air intake will be controlled auto-
matically.
Air flow control:
Turning the air flow control dial selects
the air outlet to:
: Air flows from center and side venti- lators.
: Air flows from center and side venti-lators and foot outlets.
: Air flows mainly from foot outlets.
: Air flows from defroster and footoutlets.
: Air flows mainly from defroster out-lets.
To turn the system off
Turn the “” fan speed control dial to
the “OFF” position.
Center display, heater, air conditioner, audio, phone and voice recognition systems4-27
Page 196 of 453
4-28Center display, heater, air conditioner, audio, phone and voice recognition systems
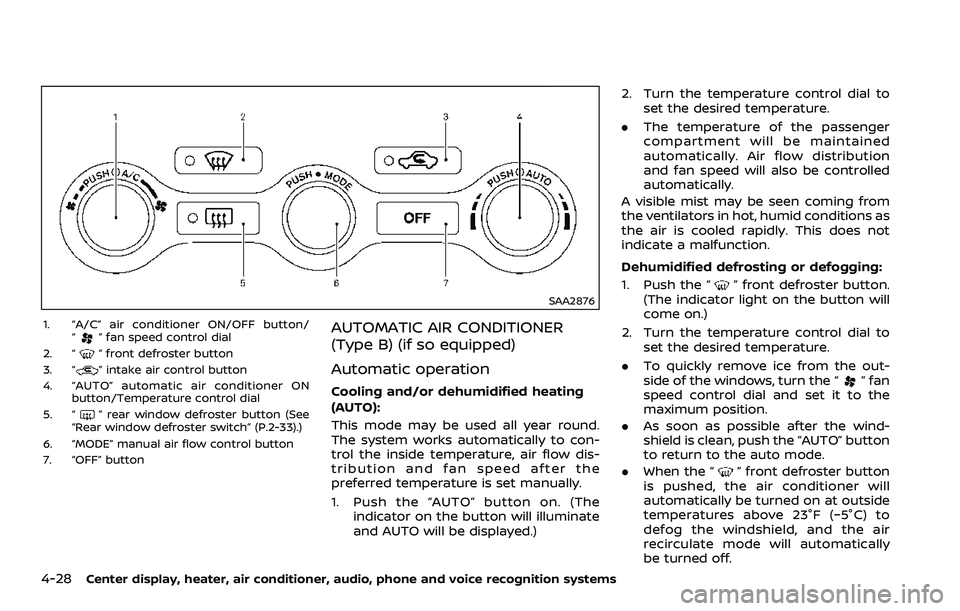
SAA2876
1. “A/C” air conditioner ON/OFF button/“” fan speed control dial
2. “
” front defroster button
3. “” intake air control button
4. “AUTO” automatic air conditioner ON button/Temperature control dial
5. “
” rear window defroster button (See
“Rear window defroster switch” (P.2-33).)
6. “MODE” manual air flow control button
7. “OFF” button
AUTOMATIC AIR CONDITIONER
(Type B) (if so equipped)
Automatic operation
Cooling and/or dehumidified heating
(AUTO):
This mode may be used all year round.
The system works automatically to con-
trol the inside temperature, air flow dis-
tribution and fan speed after the
preferred temperature is set manually.
1. Push the “AUTO” button on. (The indicator on the button will illuminate
and AUTO will be displayed.) 2. Turn the temperature control dial to
set the desired temperature.
. The temperature of the passenger
compartment will be maintained
automatically. Air flow distribution
and fan speed will also be controlled
automatically.
A visible mist may be seen coming from
the ventilators in hot, humid conditions as
the air is cooled rapidly. This does not
indicate a malfunction.
Dehumidified defrosting or defogging:
1. Push the “
” front defroster button.
(The indicator light on the button will
come on.)
2. Turn the temperature control dial to set the desired temperature.
. To quickly remove ice from the out-
side of the windows, turn the “
” fan
speed control dial and set it to the
maximum position.
. As soon as possible after the wind-
shield is clean, push the “AUTO” button
to return to the auto mode.
. When the “
” front defroster button
is pushed, the air conditioner will
automatically be turned on at outside
temperatures above 23°F (−5°C) to
defog the windshield, and the air
recirculate mode will automatically
be turned off.
Page 197 of 453
Outside air is drawn into the passen-
ger compartment to improve the
defogging performance.
Manual operation
Fan speed control:
Turn the “
” fan speed control dial to
manually control the fan speed.
Push the “AUTO” button to return to
automatic control of the fan speed.
Temperature control:
Turn the temperature control dial to set
the desired temperature.
. The temperature can be set within the
following range.
— For U.S.: 60 to 90°F (16 to 32°C)
— For Canada: 64 to 90°F (18 to 32°C)
Air intake control:
. Push the “
” air intake control
button to recirculate interior air inside
the vehicle. The indicator light “
”
will come on.
The air recirculation mode cannot be
activated when the air conditioner is
in the front defrosting mode “
”.
. Push the “
” air intake control
button to switch to the outside air
intake mode. The indicator light “
”
will turn off. .
To switch to the automatic control
mode, push the “
” air intake control
button for approximately 2 seconds.
The indicator light will flash, and then
the air intake will be controlled auto-
matically.
Air flow control:
Pushing the “MODE” manual air flow
control button selects the air outlet to:
: Air flows from center and side venti- lators.
: Air flows from center and side venti-lators and foot outlets.
: Air flows mainly from foot outlets.
: Air flows from defroster and footoutlets.
To turn the system off
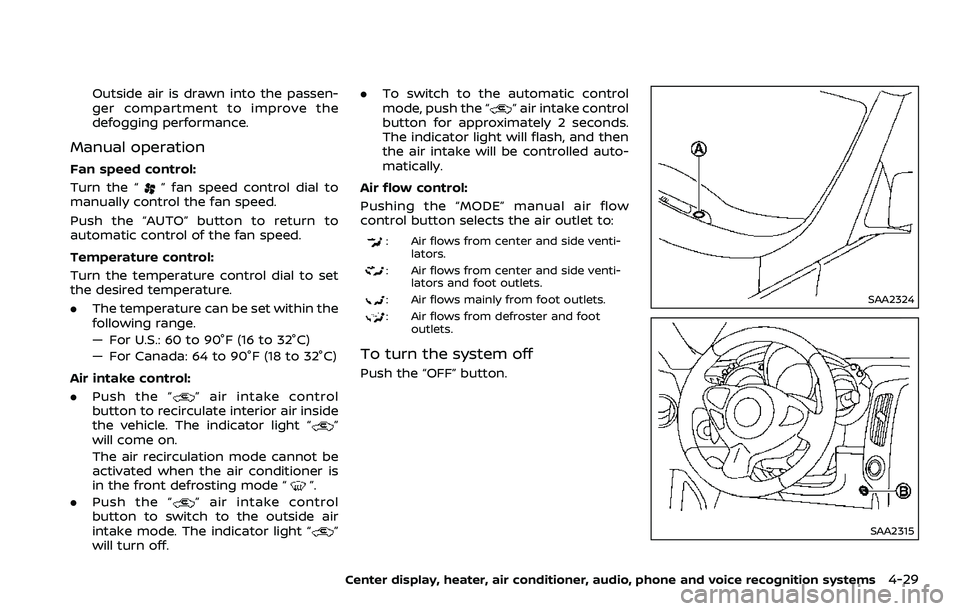
Push the “OFF” button.
SAA2324
SAA2315
Center display, heater, air conditioner, audio, phone and voice recognition systems4-29