2018 NISSAN 370Z light
[x] Cancel search: lightPage 160 of 453
3-34Pre-driving checks and adjustments
instructions.
.A protective clear tape is applied to
the top storage lid painted surface
where the soft top contacts the sur-
face. When the top is fully closed, the
tape may transmit some light, visible
from the inside of the vehicle. This
does not affect the water and air
tightness of the seal.
. The inner surface of the trunk and top
storage lids may show a fibrous, or
marbled pattern. This is the normal
appearance of the material used in
these parts.
JVP0315X
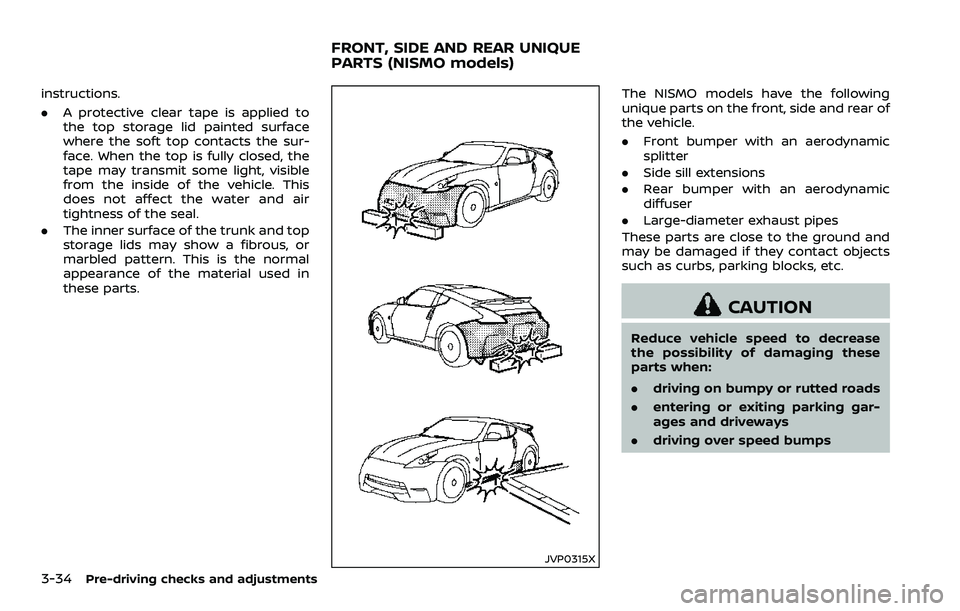
The NISMO models have the following
unique parts on the front, side and rear of
the vehicle.
.Front bumper with an aerodynamic
splitter
. Side sill extensions
. Rear bumper with an aerodynamic
diffuser
. Large-diameter exhaust pipes
These parts are close to the ground and
may be damaged if they contact objects
such as curbs, parking blocks, etc.
CAUTION
Reduce vehicle speed to decrease
the possibility of damaging these
parts when:
. driving on bumpy or rutted roads
. entering or exiting parking gar-
ages and driveways
. driving over speed bumps
FRONT, SIDE AND REAR UNIQUE
PARTS (NISMO models)
Page 162 of 453
3-36Pre-driving checks and adjustments
To lock, close the fuel-filler door securely
and lock all doors by operating the door
handle request switch, the LOCK button
on the Intelligent Key, the mechanical key
or the power door lock switch.
FUEL-FILLER CAP
WARNING
.Gasoline is extremely flammable
and highly explosive under cer-
tain conditions. You could be
burned or seriously injured if it is
misused or mishandled. Always
stop engine and do not smoke or
allow open flames or sparks near
the vehicle when refueling.
. Do not attempt to top off the fuel
tank after the fuel pump nozzle
shuts off automatically. Contin-
ued refueling may cause fuel
overflow, resulting in fuel spray
and possibly a fire.
. Use only an original equipment
type fuel-filler cap as a replace-
ment. It has a built-in safety valve
needed for proper operation of
the fuel system and emission
control system. An incorrect cap
can result in a serious malfunc-
tion and possible injury. It could also cause the malfunction indi-
cator light to come on.
. Never pour fuel into the throttle
body to attempt to start your
vehicle.
. Do not fill a portable fuel contain-
er in the vehicle or trailer. Static
electricity can cause an explosion
of flammable liquid, vapor or gas
in any vehicle or trailer. To reduce
the risk of serious injury or death
when filling portable fuel contain-
ers:
— Always place the container on
the ground when filling.
— Do not use electronic devices when filling.
— Keep the pump nozzle in con- tact with the container while
you are filling it.
— Use only approved portable fuel containers for flammable
liquid.
CAUTION
. If fuel is spilled on the vehicle
body, flush it away with water to avoid paint damage.
. Insert the cap straight into the
fuel-filler tube, then tighten until
the fuel-filler cap clicks. Failure to
tighten the fuel-filler cap properly
may cause the
malfunction
indicator light (MIL) to illuminate.
If the
light illuminates be-
cause the fuel-filler cap is loose
or missing, tighten or install the
cap and continue to drive the
vehicle. The
light should turn
off after a few driving trips. If the
light does not turn off after a
few driving trips, have the vehicle
inspected. It is recommended you
visit a NISSAN dealer for this
service.
. The LOOSE FUEL CAP warning will
appear if the fuel-filler cap is not
properly tightened. It may take a
few driving trips for the message
to be displayed. Failure to tighten
the fuel-filler cap properly after
the LOOSE FUEL CAP warning
appears may cause the
Mal-
function Indicator Light (MIL) to
illuminate.
Page 165 of 453
CAUTION
.Do not store the main sun visor
before storing the extension sun
visor.
. Do not pull the extension sun
visor forcedly downwards.
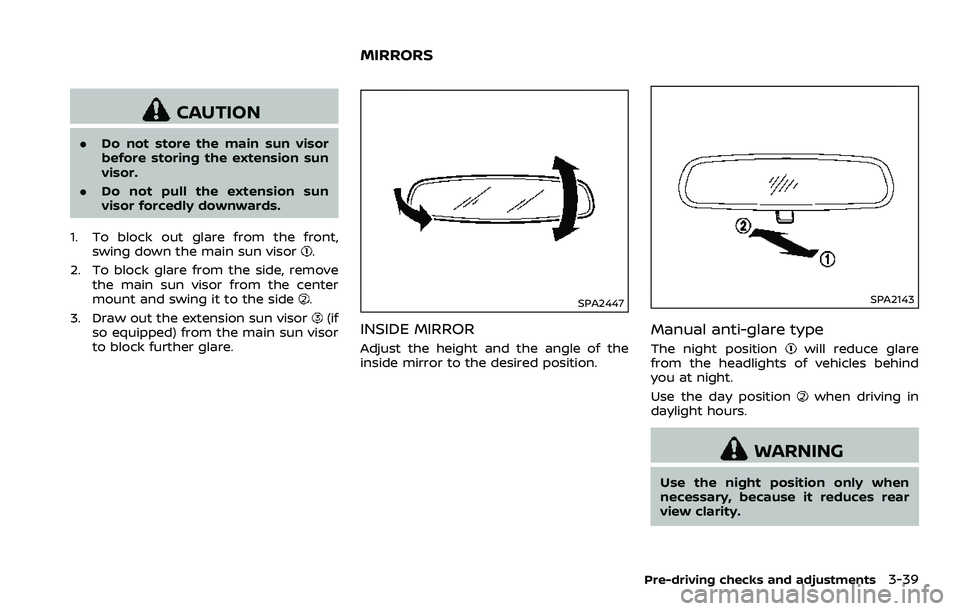
1. To block out glare from the front, swing down the main sun visor
.
2. To block glare from the side, remove the main sun visor from the center
mount and swing it to the side
.
3. Draw out the extension sun visor
(if
so equipped) from the main sun visor
to block further glare.SPA2447
INSIDE MIRROR
Adjust the height and the angle of the
inside mirror to the desired position.
SPA2143
Manual anti-glare type
The night positionwill reduce glare
from the headlights of vehicles behind
you at night.
Use the day position
when driving in
daylight hours.
WARNING
Use the night position only when
necessary, because it reduces rear
view clarity.
Pre-driving checks and adjustments3-39
MIRRORS
Page 166 of 453
3-40Pre-driving checks and adjustments
SPA2450
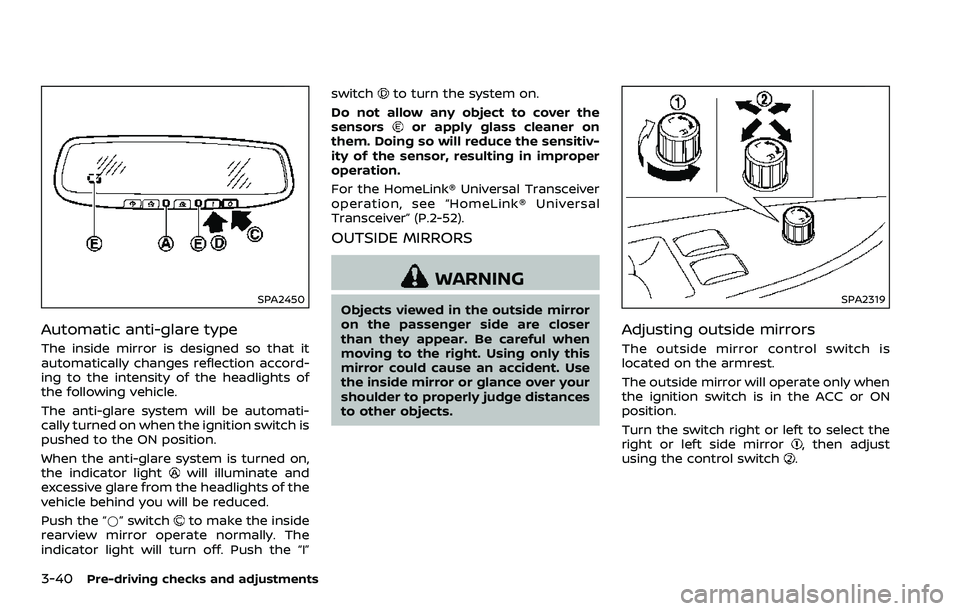
Automatic anti-glare type
The inside mirror is designed so that it
automatically changes reflection accord-
ing to the intensity of the headlights of
the following vehicle.
The anti-glare system will be automati-
cally turned on when the ignition switch is
pushed to the ON position.
When the anti-glare system is turned on,
the indicator light
will illuminate and
excessive glare from the headlights of the
vehicle behind you will be reduced.
Push the “*” switch
to make the inside
rearview mirror operate normally. The
indicator light will turn off. Push the “I” switch
to turn the system on.
Do not allow any object to cover the
sensors
or apply glass cleaner on
them. Doing so will reduce the sensitiv-
ity of the sensor, resulting in improper
operation.
For the HomeLink® Universal Transceiver
operation, see “HomeLink® Universal
Transceiver” (P.2-52).
OUTSIDE MIRRORS
WARNING
Objects viewed in the outside mirror
on the passenger side are closer
than they appear. Be careful when
moving to the right. Using only this
mirror could cause an accident. Use
the inside mirror or glance over your
shoulder to properly judge distances
to other objects.SPA2319
Adjusting outside mirrors
The outside mirror control switch is
located on the armrest.
The outside mirror will operate only when
the ignition switch is in the ACC or ON
position.
Turn the switch right or left to select the
right or left side mirror
, then adjust
using the control switch.
Page 175 of 453
SAA2143
MENU OPTIONS
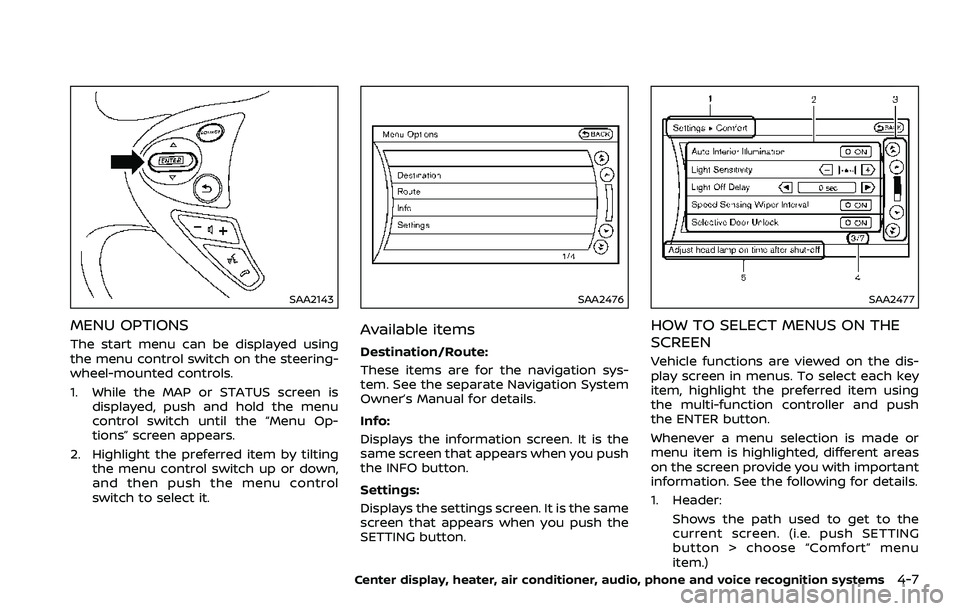
The start menu can be displayed using
the menu control switch on the steering-
wheel-mounted controls.
1. While the MAP or STATUS screen isdisplayed, push and hold the menu
control switch until the “Menu Op-
tions” screen appears.
2. Highlight the preferred item by tilting the menu control switch up or down,
and then push the menu control
switch to select it.
SAA2476
Available items
Destination/Route:
These items are for the navigation sys-
tem. See the separate Navigation System
Owner’s Manual for details.
Info:
Displays the information screen. It is the
same screen that appears when you push
the INFO button.
Settings:
Displays the settings screen. It is the same
screen that appears when you push the
SETTING button.
SAA2477
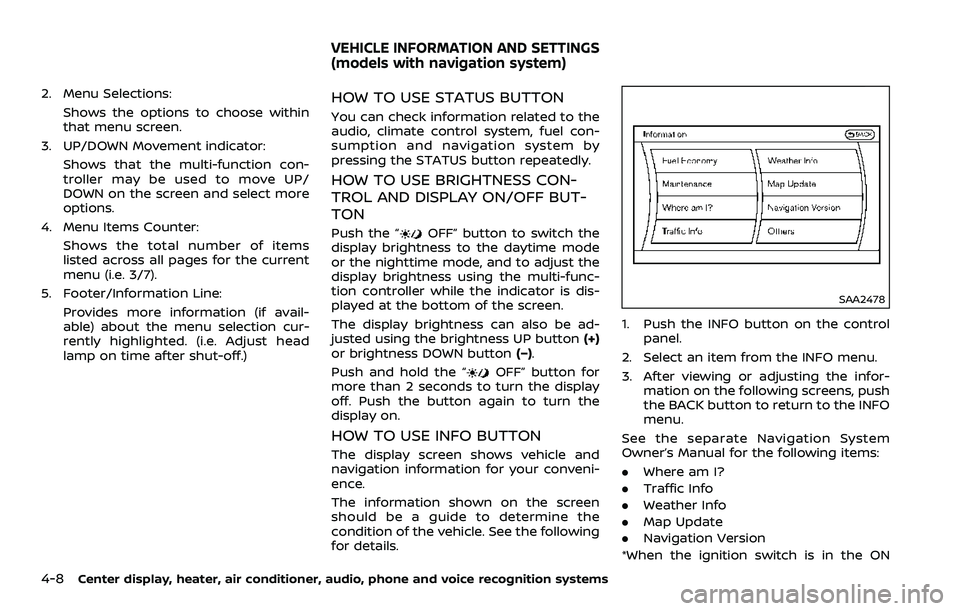
HOW TO SELECT MENUS ON THE
SCREEN
Vehicle functions are viewed on the dis-
play screen in menus. To select each key
item, highlight the preferred item using
the multi-function controller and push
the ENTER button.
Whenever a menu selection is made or
menu item is highlighted, different areas
on the screen provide you with important
information. See the following for details.
1. Header:
Shows the path used to get to the
current screen. (i.e. push SETTING
button > choose “Comfort” menu
item.)
Center display, heater, air conditioner, audio, phone and voice recognition systems4-7
Page 176 of 453
4-8Center display, heater, air conditioner, audio, phone and voice recognition systems
2. Menu Selections:Shows the options to choose within
that menu screen.
3. UP/DOWN Movement indicator:
Shows that the multi-function con-
troller may be used to move UP/
DOWN on the screen and select more
options.
4. Menu Items Counter: Shows the total number of items
listed across all pages for the current
menu (i.e. 3/7).
5. Footer/Information Line: Provides more information (if avail-
able) about the menu selection cur-
rently highlighted. (i.e. Adjust head
lamp on time after shut-off.)HOW TO USE STATUS BUTTON
You can check information related to the
audio, climate control system, fuel con-
sumption and navigation system by
pressing the STATUS button repeatedly.
HOW TO USE BRIGHTNESS CON-
TROL AND DISPLAY ON/OFF BUT-
TON
Push the “OFF” button to switch the
display brightness to the daytime mode
or the nighttime mode, and to adjust the
display brightness using the multi-func-
tion controller while the indicator is dis-
played at the bottom of the screen.
The display brightness can also be ad-
justed using the brightness UP button (+)
or brightness DOWN button (−).
Push and hold the “
OFF” button for
more than 2 seconds to turn the display
off. Push the button again to turn the
display on.
HOW TO USE INFO BUTTON
The display screen shows vehicle and
navigation information for your conveni-
ence.
The information shown on the screen
should be a guide to determine the
condition of the vehicle. See the following
for details.
SAA2478
1. Push the INFO button on the control
panel.
2. Select an item from the INFO menu.
3. After viewing or adjusting the infor- mation on the following screens, push
the BACK button to return to the INFO
menu.
See the separate Navigation System
Owner’s Manual for the following items:
. Where am I?
. Traffic Info
. Weather Info
. Map Update
. Navigation Version
*When the ignition switch is in the ON
VEHICLE INFORMATION AND SETTINGS
(models with navigation system)
Page 182 of 453
4-14Center display, heater, air conditioner, audio, phone and voice recognition systems
SAA2487
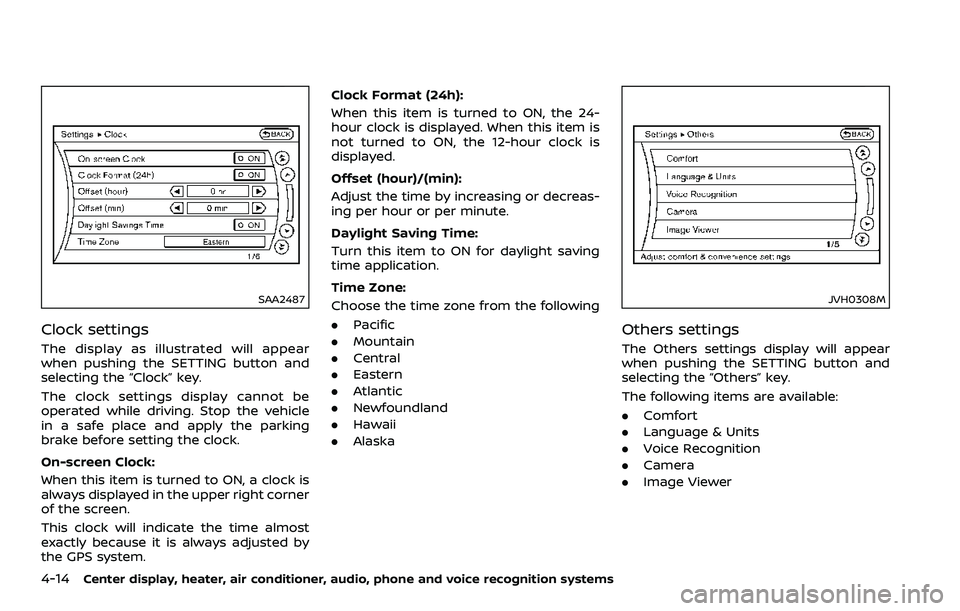
Clock settings
The display as illustrated will appear
when pushing the SETTING button and
selecting the “Clock” key.
The clock settings display cannot be
operated while driving. Stop the vehicle
in a safe place and apply the parking
brake before setting the clock.
On-screen Clock:
When this item is turned to ON, a clock is
always displayed in the upper right corner
of the screen.
This clock will indicate the time almost
exactly because it is always adjusted by
the GPS system.Clock Format (24h):
When this item is turned to ON, the 24-
hour clock is displayed. When this item is
not turned to ON, the 12-hour clock is
displayed.
Offset (hour)/(min):
Adjust the time by increasing or decreas-
ing per hour or per minute.
Daylight Saving Time:
Turn this item to ON for daylight saving
time application.
Time Zone:
Choose the time zone from the following
. Pacific
. Mountain
. Central
. Eastern
. Atlantic
. Newfoundland
. Hawaii
. Alaska
JVH0308M
Others settings
The Others settings display will appear
when pushing the SETTING button and
selecting the “Others” key.
The following items are available:
.Comfort
. Language & Units
. Voice Recognition
. Camera
. Image Viewer
Page 183 of 453
SAA2488
Example
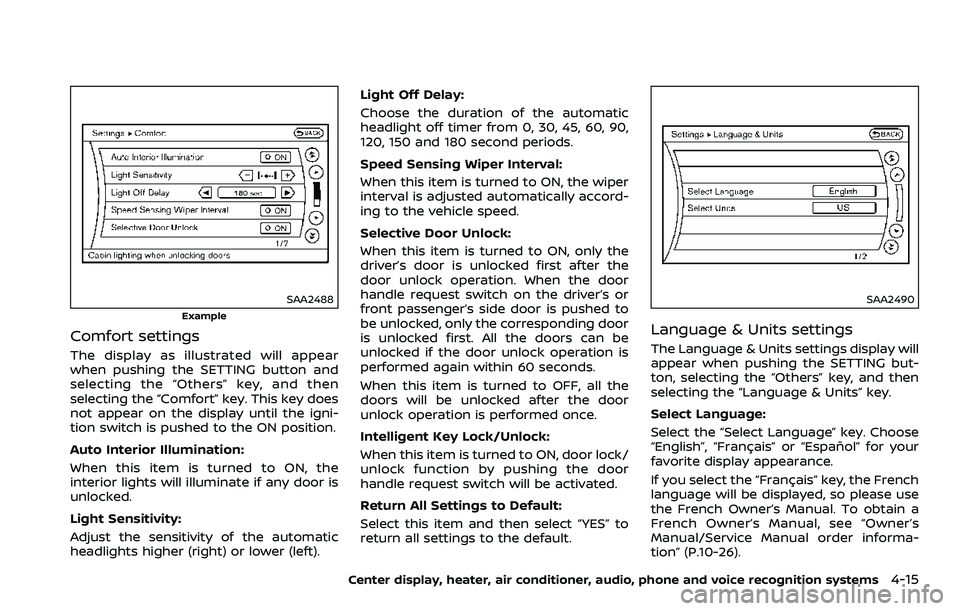
Comfort settings
The display as illustrated will appear
when pushing the SETTING button and
selecting the “Others” key, and then
selecting the “Comfort” key. This key does
not appear on the display until the igni-
tion switch is pushed to the ON position.
Auto Interior Illumination:
When this item is turned to ON, the
interior lights will illuminate if any door is
unlocked.
Light Sensitivity:
Adjust the sensitivity of the automatic
headlights higher (right) or lower (left).Light Off Delay:
Choose the duration of the automatic
headlight off timer from 0, 30, 45, 60, 90,
120, 150 and 180 second periods.
Speed Sensing Wiper Interval:
When this item is turned to ON, the wiper
interval is adjusted automatically accord-
ing to the vehicle speed.
Selective Door Unlock:
When this item is turned to ON, only the
driver’s door is unlocked first after the
door unlock operation. When the door
handle request switch on the driver’s or
front passenger’s side door is pushed to
be unlocked, only the corresponding door
is unlocked first. All the doors can be
unlocked if the door unlock operation is
performed again within 60 seconds.
When this item is turned to OFF, all the
doors will be unlocked after the door
unlock operation is performed once.
Intelligent Key Lock/Unlock:
When this item is turned to ON, door lock/
unlock function by pushing the door
handle request switch will be activated.
Return All Settings to Default:
Select this item and then select “YES” to
return all settings to the default.
SAA2490
Language & Units settings
The Language & Units settings display will
appear when pushing the SETTING but-
ton, selecting the “Others” key, and then
selecting the “Language & Units” key.
Select Language:
Select the “Select Language” key. Choose
“English”, “Français” or “Español” for your
favorite display appearance.
If you select the “Français” key, the French
language will be displayed, so please use
the French Owner’s Manual. To obtain a
French Owner’s Manual, see “Owner’s
Manual/Service Manual order informa-
tion” (P.10-26).
Center display, heater, air conditioner, audio, phone and voice recognition systems4-15