2018 NISSAN 370Z audio
[x] Cancel search: audioPage 236 of 453
4-68Center display, heater, air conditioner, audio, phone and voice recognition systems
Connected Devices:
Registered devices are shown on the list.
Select a Bluetooth® device from the list,
the following options will be available.
.Select
Select “Select” to connect the selected
device to the vehicle. If there is a
different device currently connected,
the selected device will replace the
current device.
. Edit
Rename the selected Bluetooth® de-
vice using the keypad displayed on
the screen. (See “How to use touch
screen” (P.4-5).)
. Delete
Delete the selected Bluetooth® device.
Edit Bluetooth Info:
Change the name broadcasted by this
system over Bluetooth®. Change the PIN
code that is entered when connecting a
hands free device to this system.
Replace Connected Phone:
Replace the Bluetooth® connection with a
connected Bluetooth® cellular phone. For
details about Hands-Free Phone System,
see “Bluetooth® hands-free phone system
(models with navigation system)” (P.4-76).iPod® PLAYER OPERATION (models
with navigation system)
Connecting iPod®
WARNING
Do not connect, disconnect or oper-
ate the USB device while driving.
Doing so can be a distraction. If
distracted you could lose control of
your vehicle and cause an accident
or serious injury.
CAUTION
. Do not force the USB device into
the USB connection port. Insert-
ing the USB device tilted or up-
side-down into the port may da-
mage the port. Make sure that
the USB device is connected cor-
rectly into the USB connection
port.
. Do not grab the USB connection
port cover (if so equipped) when
pulling the USB device out of the
port. This could damage the port
and the cover. .
Do not leave the USB cable in a
place where it can be pulled
unintentionally. Pulling the cable
may damage the port.
Refer to your device manufacturer’s own-
er information regarding the proper use
and care of the device.
Page 237 of 453
SAA2512
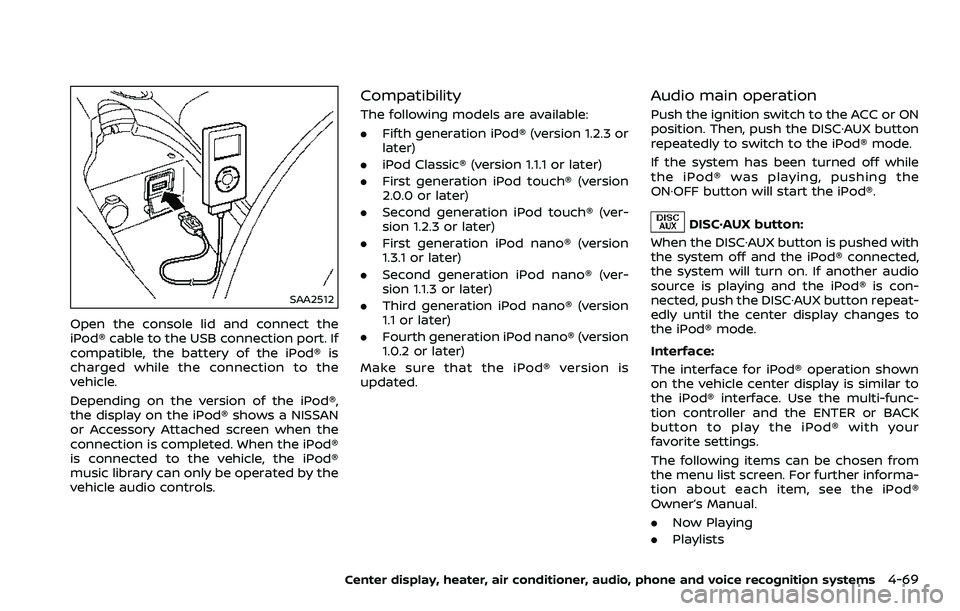
Open the console lid and connect the
iPod® cable to the USB connection port. If
compatible, the battery of the iPod® is
charged while the connection to the
vehicle.
Depending on the version of the iPod®,
the display on the iPod® shows a NISSAN
or Accessory Attached screen when the
connection is completed. When the iPod®
is connected to the vehicle, the iPod®
music library can only be operated by the
vehicle audio controls.
Compatibility
The following models are available:
.Fifth generation iPod® (version 1.2.3 or
later)
. iPod Classic® (version 1.1.1 or later)
. First generation iPod touch® (version
2.0.0 or later)
. Second generation iPod touch® (ver-
sion 1.2.3 or later)
. First generation iPod nano® (version
1.3.1 or later)
. Second generation iPod nano® (ver-
sion 1.1.3 or later)
. Third generation iPod nano® (version
1.1 or later)
. Fourth generation iPod nano® (version
1.0.2 or later)
Make sure that the iPod® version is
updated.
Audio main operation
Push the ignition switch to the ACC or ON
position. Then, push the DISC·AUX button
repeatedly to switch to the iPod® mode.
If the system has been turned off while
the iPod® was playing, pushing the
ON·OFF button will start the iPod®.
DISC·AUX button:
When the DISC·AUX button is pushed with
the system off and the iPod® connected,
the system will turn on. If another audio
source is playing and the iPod® is con-
nected, push the DISC·AUX button repeat-
edly until the center display changes to
the iPod® mode.
Interface:
The interface for iPod® operation shown
on the vehicle center display is similar to
the iPod® interface. Use the multi-func-
tion controller and the ENTER or BACK
button to play the iPod® with your
favorite settings.
The following items can be chosen from
the menu list screen. For further informa-
tion about each item, see the iPod®
Owner’s Manual.
. Now Playing
. Playlists
Center display, heater, air conditioner, audio, phone and voice recognition systems4-69
Page 238 of 453
4-70Center display, heater, air conditioner, audio, phone and voice recognition systems
.Artists
. Albums
. Songs
. Podcasts
. Genres
. Composers
. Audiobooks
. Shuffle Songs
. Play mode
The following touch-panel buttons
shown on the screen are also available:
.
: returns to the previous screen.
.
: plays/pauses the music selected.
Next/Previous Track and
Fast Forward/Rewind:
When the
orbutton is pushed for
more than 1.5 seconds while the iPod® is
playing, the iPod® will play while fast
forwarding or rewinding. When the but-
ton is released, the iPod® will return to the
normal play speed.
When the
orbutton is pushed for
less than 1.5 seconds while the iPod® is
playing, the next track or the beginning of
the current track on the iPod® will be
played.
When the rewind button is pushed for less
than 1.5 seconds within 3 seconds after
the current track starts playing, the pre- vious track will be played.
The multi-function controller can also be
used to select tracks when the iPod® is
playing.
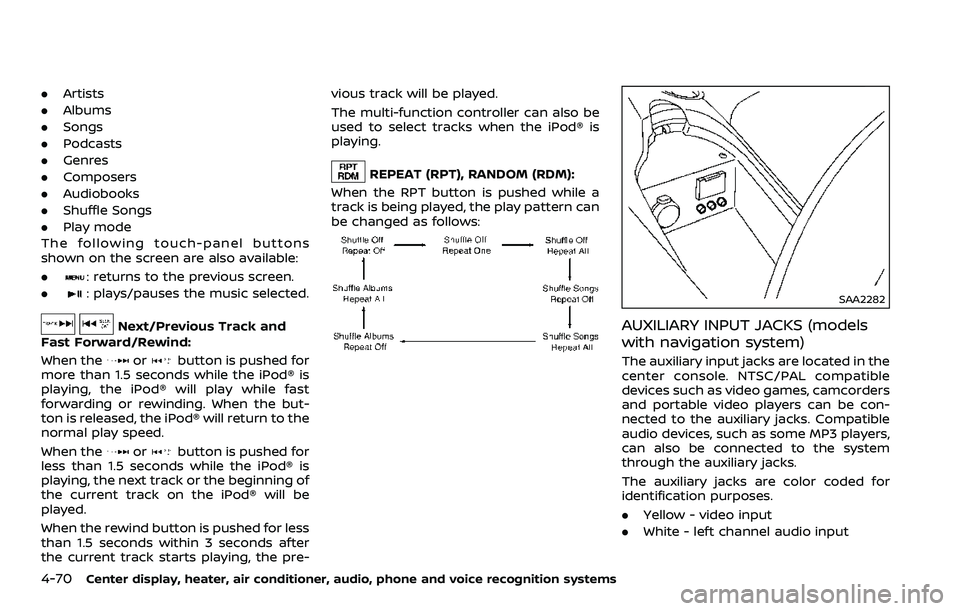
REPEAT (RPT), RANDOM (RDM):
When the RPT button is pushed while a
track is being played, the play pattern can
be changed as follows:
SAA2282
AUXILIARY INPUT JACKS (models
with navigation system)
The auxiliary input jacks are located in the
center console. NTSC/PAL compatible
devices such as video games, camcorders
and portable video players can be con-
nected to the auxiliary jacks. Compatible
audio devices, such as some MP3 players,
can also be connected to the system
through the auxiliary jacks.
The auxiliary jacks are color coded for
identification purposes.
. Yellow - video input
. White - left channel audio input
Page 239 of 453
.Red - right channel audio input
Before connecting a device to a jack, turn
off the power of the portable device.
With a compatible device connected to
the jacks, push the DISC·AUX button
repeatedly until the display switches to
the AUX mode. The output from the
device will be played through the monitor
and audio system.
SAA2496
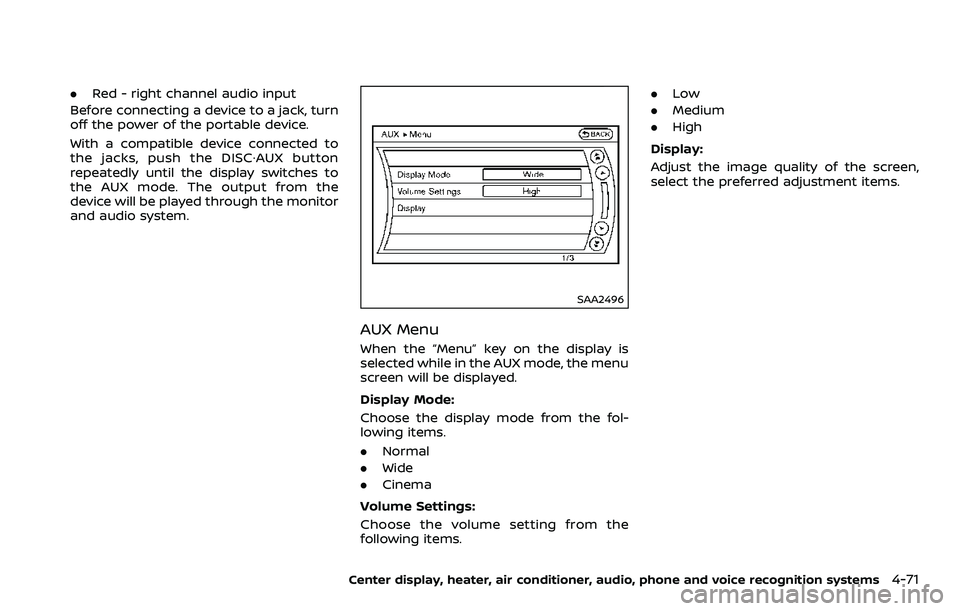
AUX Menu
When the “Menu” key on the display is
selected while in the AUX mode, the menu
screen will be displayed.
Display Mode:
Choose the display mode from the fol-
lowing items.
. Normal
. Wide
. Cinema
Volume Settings:
Choose the volume setting from the
following items. .
Low
. Medium
. High
Display:
Adjust the image quality of the screen,
select the preferred adjustment items.
Center display, heater, air conditioner, audio, phone and voice recognition systems4-71
Page 240 of 453
4-72Center display, heater, air conditioner, audio, phone and voice recognition systems
SAA0451
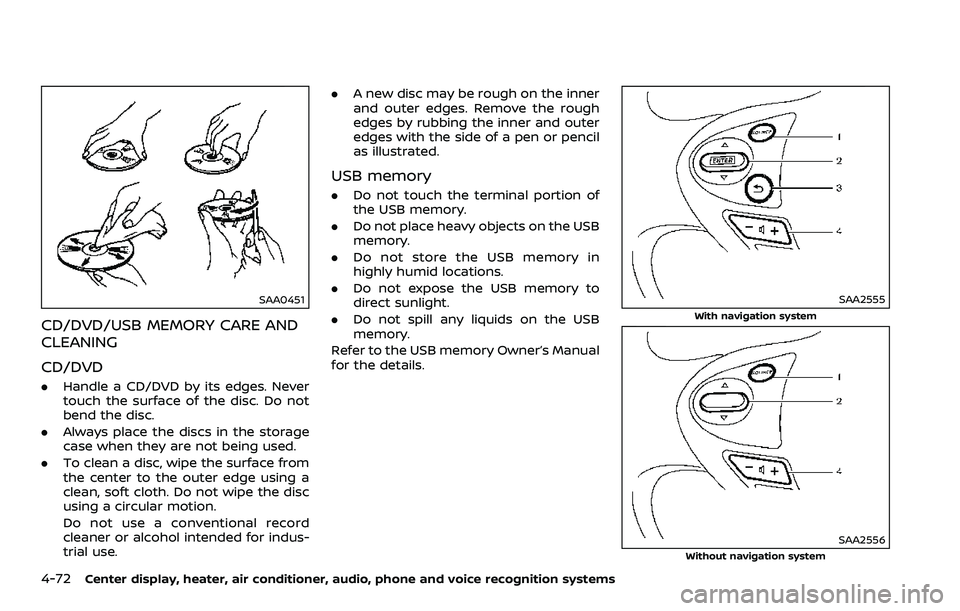
CD/DVD/USB MEMORY CARE AND
CLEANING
CD/DVD
.Handle a CD/DVD by its edges. Never
touch the surface of the disc. Do not
bend the disc.
. Always place the discs in the storage
case when they are not being used.
. To clean a disc, wipe the surface from
the center to the outer edge using a
clean, soft cloth. Do not wipe the disc
using a circular motion.
Do not use a conventional record
cleaner or alcohol intended for indus-
trial use. .
A new disc may be rough on the inner
and outer edges. Remove the rough
edges by rubbing the inner and outer
edges with the side of a pen or pencil
as illustrated.
USB memory
.Do not touch the terminal portion of
the USB memory.
. Do not place heavy objects on the USB
memory.
. Do not store the USB memory in
highly humid locations.
. Do not expose the USB memory to
direct sunlight.
. Do not spill any liquids on the USB
memory.
Refer to the USB memory Owner’s Manual
for the details.
SAA2555
With navigation system
SAA2556Without navigation system
Page 241 of 453
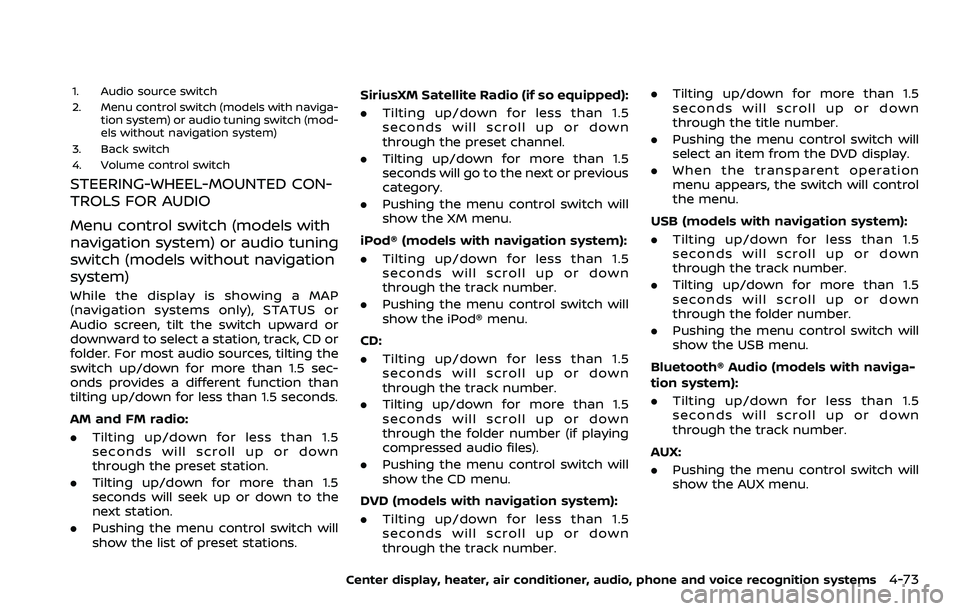
1. Audio source switch
2. Menu control switch (models with naviga-tion system) or audio tuning switch (mod-
els without navigation system)
3. Back switch
4. Volume control switch
STEERING-WHEEL-MOUNTED CON-
TROLS FOR AUDIO
Menu control switch (models with
navigation system) or audio tuning
switch (models without navigation
system)
While the display is showing a MAP
(navigation systems only), STATUS or
Audio screen, tilt the switch upward or
downward to select a station, track, CD or
folder. For most audio sources, tilting the
switch up/down for more than 1.5 sec-
onds provides a different function than
tilting up/down for less than 1.5 seconds.
AM and FM radio:
. Tilting up/down for less than 1.5
seconds will scroll up or down
through the preset station.
. Tilting up/down for more than 1.5
seconds will seek up or down to the
next station.
. Pushing the menu control switch will
show the list of preset stations. SiriusXM Satellite Radio (if so equipped):
. Tilting up/down for less than 1.5
seconds will scroll up or down
through the preset channel.
. Tilting up/down for more than 1.5
seconds will go to the next or previous
category.
. Pushing the menu control switch will
show the XM menu.
iPod® (models with navigation system):
. Tilting up/down for less than 1.5
seconds will scroll up or down
through the track number.
. Pushing the menu control switch will
show the iPod® menu.
CD:
. Tilting up/down for less than 1.5
seconds will scroll up or down
through the track number.
. Tilting up/down for more than 1.5
seconds will scroll up or down
through the folder number (if playing
compressed audio files).
. Pushing the menu control switch will
show the CD menu.
DVD (models with navigation system):
. Tilting up/down for less than 1.5
seconds will scroll up or down
through the track number. .
Tilting up/down for more than 1.5
seconds will scroll up or down
through the title number.
. Pushing the menu control switch will
select an item from the DVD display.
. When the transparent operation
menu appears, the switch will control
the menu.
USB (models with navigation system):
. Tilting up/down for less than 1.5
seconds will scroll up or down
through the track number.
. Tilting up/down for more than 1.5
seconds will scroll up or down
through the folder number.
. Pushing the menu control switch will
show the USB menu.
Bluetooth® Audio (models with naviga-
tion system):
. Tilting up/down for less than 1.5
seconds will scroll up or down
through the track number.
AUX:
. Pushing the menu control switch will
show the AUX menu.
Center display, heater, air conditioner, audio, phone and voice recognition systems4-73
Page 242 of 453
4-74Center display, heater, air conditioner, audio, phone and voice recognition systems
BACK switch (models with
navigation system)
Push this switch to go back to the
previous screen or cancel the selection if
it is not completed.
Volume control switches
Push the upper (+) or lower (−) side switch
to increase or decrease the volume.
Audio source switch
Push the audio source switch to change
the mode to available audio source.
ANTENNA
Window antenna (for Coupe mod-
els)
The antenna pattern is printed inside the
rear window.
CAUTION
. Do not place metalized film near
the rear window glass or attach
any metal parts to it. This may
cause poor reception or noise.
. When cleaning the inside of the
rear window, be careful not to
scratch or damage the rear win-
dow antenna. Lightly wipe along
the antenna with a dampened
soft cloth.
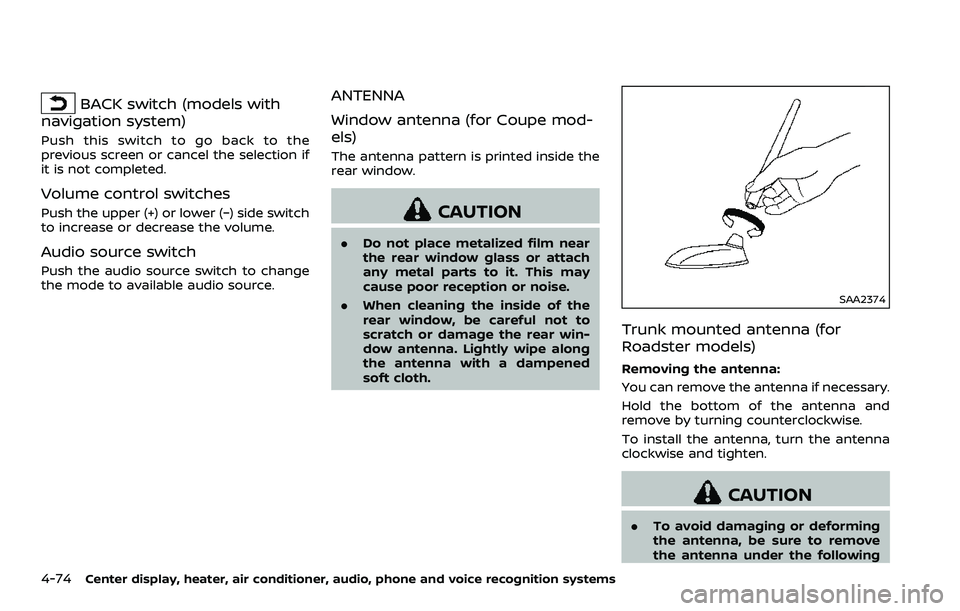
SAA2374
Trunk mounted antenna (for
Roadster models)
Removing the antenna:
You can remove the antenna if necessary.
Hold the bottom of the antenna and
remove by turning counterclockwise.
To install the antenna, turn the antenna
clockwise and tighten.
CAUTION
.To avoid damaging or deforming
the antenna, be sure to remove
the antenna under the following
Page 243 of 453
conditions.
— The vehicle enters an auto-matic car wash.
— The vehicle enters a garage with a low ceiling.
— The vehicle is covered with a car cover.
. Always properly tighten the an-
tenna rod during installation.
Otherwise, the antenna rod may
break during vehicle operation. When installing a car phone or a CB radio
in your vehicle, be sure to observe the
following cautions, otherwise the new
equipment may adversely affect the elec-
tronic control modules and electronic
control system harness.
WARNING
.
A cellular phone should not be
used for any purpose while driv-
ing so full attention may be given
to vehicle operation. Some juris-
dictions prohibit the use of cellu-
lar phones while driving.
. If you must make a call while your
vehicle is in motion, the hands-
free cellular phone operational
mode (if so equipped) is highly
recommended. Exercise extreme
caution at all times so full atten-
tion may be given to vehicle
operation.
. If a conversation in a moving
vehicle requires you to take
notes, pull off the road to a safe
location and stop your vehicle
before doing so.
CAUTION
.Keep the antenna as far away as
possible from the electronic con-
trol modules.
. Keep the antenna wire more than
8 in (20 cm) away from the
electronic control system har-
ness. Do not route the antenna
wire next to any harness.
. Adjust the antenna standing-
wave ratio as recommended by
the manufacturer.
. Connect the ground wire from the
CB radio chassis to the body.
. For details, it is recommended
you visit a NISSAN dealer.
Center display, heater, air conditioner, audio, phone and voice recognition systems4-75
CAR PHONE OR CB RADIO