2018 NISSAN 370Z traction control
[x] Cancel search: traction controlPage 85 of 453

If any of the following conditions occur,
the front air bag, side air bag and curtain
air bag systems and/or pretensioner
system need servicing.
.The supplemental air bag warning
light remains on after approximately
7 seconds.
. The supplemental air bag warning
light flashes intermittently.
. The supplemental air bag warning
light does not come on at all.
It is recommended you visit a NISSAN
dealer for these services.
Unless checked and repaired, the Supple-
mental Restraint Systems and/or the
pretensioner seat belt may not function
properly.
For additional information, see “Supple-
mental restraint system” (P.1-30).
WARNING
If the supplemental air bag warning
light is on, it could mean that the
front air bag, side air bag and curtain
air bag systems and/or pretensioner
system will not operate in an acci-
dent. To help avoid injury to yourself
or others, have your vehicle checked.
It is recommended you visit a NISSAN
dealer for this service.
Vehicle Dynamic Control (VDC)
warning light
When the ignition switch is in the ON
position, the Vehicle Dynamic Control
(VDC) warning light illuminates and then
turns off.
The light will blink when the VDC system
or the traction control system is operat-
ing, thus alerting the driver that the
vehicle is nearing its traction limits. The
road surface may be slippery.
When the VDC warning light illuminates
when the VDC system is turned on, this
light alerts the driver to the fact that the
VDC system’s fail-safe mode is operating,
for example the VDC system may not be
functioning properly. Have the system
checked. It is recommended you visit a
NISSAN dealer for this service. If a mal-
function occurs in the system, the VDC
system function will be canceled but the
vehicle is still driveable. For additional
information, see “Vehicle Dynamic Control
(VDC) system” (P.5-30) of this manual.
INDICATOR LIGHTS
Cruise indicator light
Cruise main switch indicator:
This light illuminates when the cruise
control main switch is pushed. The light
turns off when the main switch is pushed
again. When the cruise main switch in-
dicator light illuminates, the cruise control
system is operational. (See “Cruise con-
trol” (P.5-22).)
Cruise malfunction:
If the cruise indicator light blinks while the
engine is running, it may indicate the
cruise control system is not functioning
properly. Have the system checked. It is
recommended you visit a NISSAN dealer
for this service. (See “Cruise control” (P.5-
22).)
Exterior light indicator
This indicator illuminates when the head-
light switch is turned to the AUTO,orposition and the front parking lights,
instrument panel lights, rear combination
lights, license plate lights or headlights
are on. The indicator turns off when these
lights are turned off.
Instruments and controls2-15
Page 88 of 453
2-18Instruments and controls
Transmission position indica-
tor (if so equipped)
When the ignition switch is pushed to the
ON position, the indicator shows the
transmission position.
For AT models:
In the manual shift mode, when the
transmission does not shift to the se-
lected gear due to the transmission
protection mode, the AT position indica-
tor light will blink and a buzzer will sound.
(See “Driving the vehicle” (P.5-12).)
Turn signal/hazard indicator
lights
The light flashes when the turn signal
switch lever or hazard switch is turned on.
Vehicle Dynamic Control (VDC)
off indicator light
When the ignition switch is in the ON
position, the Vehicle Dynamic Control
(VDC) off indicator light illuminates and
then turns off.
The light comes on when the VDC off
switch is pushed to OFF. This indicates
that the VDC system and traction control
system are not operating.
AUDIBLE REMINDERS
Key reminder chime
A chime will sound if the driver side door
is opened while the ignition switch is
pushed to the ACC position or pushed
to the OFF or LOCK position with the
Intelligent Key left in the Intelligent Key
port. Make sure the ignition switch is
pushed to the OFF position, and take
the Intelligent Key with you when leaving
the vehicle.
Light reminder chime
A chime will sound when the driver side
door is opened with the light switch in the
orposition and the ignition
switch in the ACC, OFF or LOCK position.
Turn the light switch off when you leave
the vehicle.
Parking brake reminder chime
A chime will sound if the vehicle speed is
above 4 MPH (7 km/h) with the parking
brake applied. Stop the vehicle and re-
lease the parking brake.
Brake pad wear warning
The disc brake pads have audible wear
warnings. When a brake pad requires
replacement, it will make a high pitched
scraping sound when the vehicle is in
motion. This scraping sound will first
occur only when the brake pedal is
depressed. After more wear of the brake
pad the sound will always be heard even
if the brake pedal is not depressed. Have
the brakes checked as soon as possible if
the warning sound is heard.
Page 184 of 453

4-16Center display, heater, air conditioner, audio, phone and voice recognition systems
Select Units:
Select the “Select Units” key. Choose “US”
(Mile, °F, MPG) or “Metric” (km, °C, L/100
km) for your favorite display appearance.
Voice Recognition settings
For details about the “Voice Recognition”
settings, see “NISSAN Voice Recognition
System (models with navigation system)”
(P.4-99).
Camera settings
The “Camera” screen will appear when
selecting the “Camera” key.
For details about the camera system
operation, see “RearView Monitor (models
with navigation system)” (P.4-17).
SAA2491
Image Viewer
The image files in the USB memory will be
displayed. To display the Image Viewer,
push the SETTING button, select the
“Other” key and then select the “Image
Viewer” key. The image of the selected file
is displayed on the right side of the
screen.
When a number of folders are included in
the USB memory, select a folder from the
list to display the file list.
Images will not be shown on the display
while the vehicle is in any drive position to
reduce driver distraction. To view images,
stop the vehicle in a safe location and
apply the parking brake.
SAA2492
Full Screen Display:
The full screen display will appear when
selecting the “Full Screen Display” key.
To operate the Image Viewer or to
change the settings, select the desired
key using the multi-function controller.
.
(Start)
Select the “
” key to start playing
the slideshow.
.
(Stop)
Select the “
” key to stop the
slideshow.
.
(Next)
Select the “
” key to display the next
file.
Page 202 of 453
4-34Center display, heater, air conditioner, audio, phone and voice recognition systems
— 3.1 in (8 cm) discs
— CD/DVDs that are not round
— CD/DVDs with a paper label
— CD/DVDs that are warped,scratched or have abnormal edges
— This audio system can only play prerecorded CD/DVDs. It has no
capabilities to record or burn CD/
DVDs.
. If the CD/DVD cannot be played, one
of the following messages will be
displayed.
Disc Read Error:
— Confirm that the CD/DVD is in-
serted correctly (the label side is
facing up, etc.).
— Confirm that the CD/DVD is not bent or warped and it is free of
scratches.
Please Eject Disc:
— This may be an error due to the temperature inside the player being
too high. Remove the CD/DVD by
pushing the EJECT button, and
after a short time reinsert the CD/
DVD. The CD/DVD can be played
when the temperature of the player
returns to normal. If the error
persists, consult your local dealer. Unplayable File:
— The file may be copy protected.
— The file is not MP3, WMA, AAC, M4A
or DivX® type.
Region Invalid:
— The DVD is not for region 1 or all regions. Use DVDs with a region
code “1”, “ALL” or “1 included” for
your DVD entertainment system.
(The region code
is displayed as
a small symbol printed on the top
of the DVD
.) This vehicle-installed
DVD player cannot play DVDs with a
region code other than “1” or “ALL”.
Copyright and trademark:
. The technology protected by the U.S.
patent and other intellectual property
rights owned by Macrovision Corpora-
tion and other right holders is
adopted for this system.
. This copyright protected technology
cannot be used without a permit from
Macrovision Corporation. It is limited
to be personal use, etc., as long as the
permit from Macrovision Corporation
is not issued.
. Modifying or disassembling is prohib-
ited.
. Dolby digital is manufactured under
license from Dolby Laboratories, Inc. .
Dolby and the double D mark “
” are
trademarks of Dolby Laboratories, Inc.
. DTS and DTS 2.0 “
” are registered
trademarks of DTS, Inc.
Parental level (parental control):
DVDs with the parental control setting
can be played with this system. Please
use your own judgement to set the
parental control with the system.
Disc selection:
The following disc formats can be played
with the DVD drive.
. DVD-VIDEO
. VIDEO-CD
. CD-DA (Conventional Compact Disc)
. DTS-CD
USB (Universal Serial Bus) connec-
tion port
WARNING
Do not connect, disconnect or oper-
ate the USB device while driving.
Doing so can be a distraction. If
distracted you could lose control of
your vehicle and cause an accident
or serious injury.
Page 216 of 453
4-48Center display, heater, air conditioner, audio, phone and voice recognition systems
WARNING
Do not connect, disconnect or oper-
ate the USB device while driving.
Doing so can be a distraction. If
distracted you could lose control of
your vehicle and cause an accident
or serious injury.
CAUTION
.Do not force the USB device into
the USB connection port. Insert-
ing the USB device tilted or up-
side-down into the port may da-
mage the port. Make sure that
the USB device is connected cor-
rectly into the USB connection
port. (Some USB devices come
with a
mark as a guide. Make
sure that the mark is facing the
correct direction before inserting
the device.)
. Do not leave the USB cable in a
place where it can be pulled
unintentionally. Pulling the cable
may damage the port. Refer to your device manufacturer’s own-
er information regarding the proper use
and care of the device.
USB button:
When the USB button is pushed with the
system off and the USB memory device is
inserted, the system will turn on.
USB device main operation:
The following operations are identical to
the audio main operation of the Compact
Disc (CD) operation. For details, see “CD
player operation” (P.4-45).
. List view
. Quick search
.
. RDM (Random play)
. RPT (Repeat track)
. SCAN
. Folder browsing
DISP button:
While a track with recorded music infor-
mation tags (ID3-tags) is being played, the
title of the played track is displayed. If the
tags are not provided then a notification
message is displayed.
When the DISP button is pushed repeat-
edly, further information about the track
can be displayed along with the track title
as follows:
Track time ?Artist ?Album ?Folder
name ?Track time
Track details:
Pushing and holding the DISP button will
turn the display into a detailed overview
and after a few seconds it returns to the
main display, or push the DISP button
briefly.
Page 217 of 453
JVH0921X
iPod® player operation
Connecting iPod®:
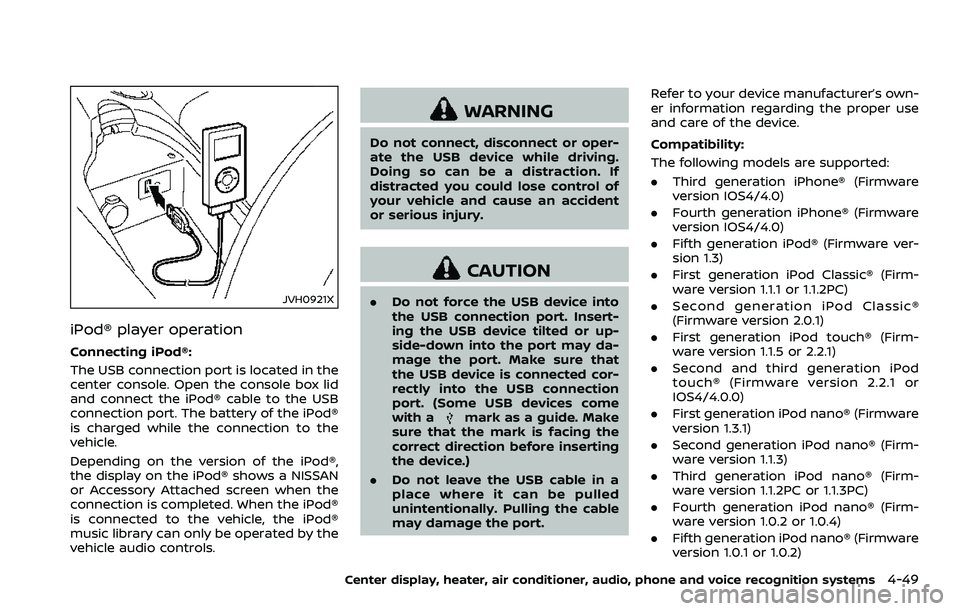
The USB connection port is located in the
center console. Open the console box lid
and connect the iPod® cable to the USB
connection port. The battery of the iPod®
is charged while the connection to the
vehicle.
Depending on the version of the iPod®,
the display on the iPod® shows a NISSAN
or Accessory Attached screen when the
connection is completed. When the iPod®
is connected to the vehicle, the iPod®
music library can only be operated by the
vehicle audio controls.
WARNING
Do not connect, disconnect or oper-
ate the USB device while driving.
Doing so can be a distraction. If
distracted you could lose control of
your vehicle and cause an accident
or serious injury.
CAUTION
.Do not force the USB device into
the USB connection port. Insert-
ing the USB device tilted or up-
side-down into the port may da-
mage the port. Make sure that
the USB device is connected cor-
rectly into the USB connection
port. (Some USB devices come
with a
mark as a guide. Make
sure that the mark is facing the
correct direction before inserting
the device.)
. Do not leave the USB cable in a
place where it can be pulled
unintentionally. Pulling the cable
may damage the port. Refer to your device manufacturer’s own-
er information regarding the proper use
and care of the device.
Compatibility:
The following models are supported:
.
Third generation iPhone® (Firmware
version IOS4/4.0)
. Fourth generation iPhone® (Firmware
version IOS4/4.0)
. Fifth generation iPod® (Firmware ver-
sion 1.3)
. First generation iPod Classic® (Firm-
ware version 1.1.1 or 1.1.2PC)
. Second generation iPod Classic®
(Firmware version 2.0.1)
. First generation iPod touch® (Firm-
ware version 1.1.5 or 2.2.1)
. Second and third generation iPod
touch® (Firmware version 2.2.1 or
IOS4/4.0.0)
. First generation iPod nano® (Firmware
version 1.3.1)
. Second generation iPod nano® (Firm-
ware version 1.1.3)
. Third generation iPod nano® (Firm-
ware version 1.1.2PC or 1.1.3PC)
. Fourth generation iPod nano® (Firm-
ware version 1.0.2 or 1.0.4)
. Fifth generation iPod nano® (Firmware
version 1.0.1 or 1.0.2)
Center display, heater, air conditioner, audio, phone and voice recognition systems4-49
Page 227 of 453
USB (Universal Serial Bus) CON-
NECTION PORT (models with navi-
gation system)
Audio main operation
WARNING
Do not connect, disconnect or oper-
ate the USB device while driving.
Doing so can be a distraction. If
distracted you could lose control of
your vehicle and cause an accident
or serious injury.
CAUTION
.Do not force the USB device into
the USB connection port. Insert-
ing the USB device tilted or up-
side-down into the port may da-
mage the port. Make sure that
the USB device is connected cor-
rectly into the USB connection
port.
. Do not grab the USB connection
port cover (if so equipped) when
pulling the USB device out of the
port. This could damage the port and the cover.
. Do not leave the USB cable in a
place where it can be pulled
unintentionally. Pulling the cable
may damage the port.
Refer to your device manufacturer’s own-
er information regarding the proper use
and care of the device.
SAA2499
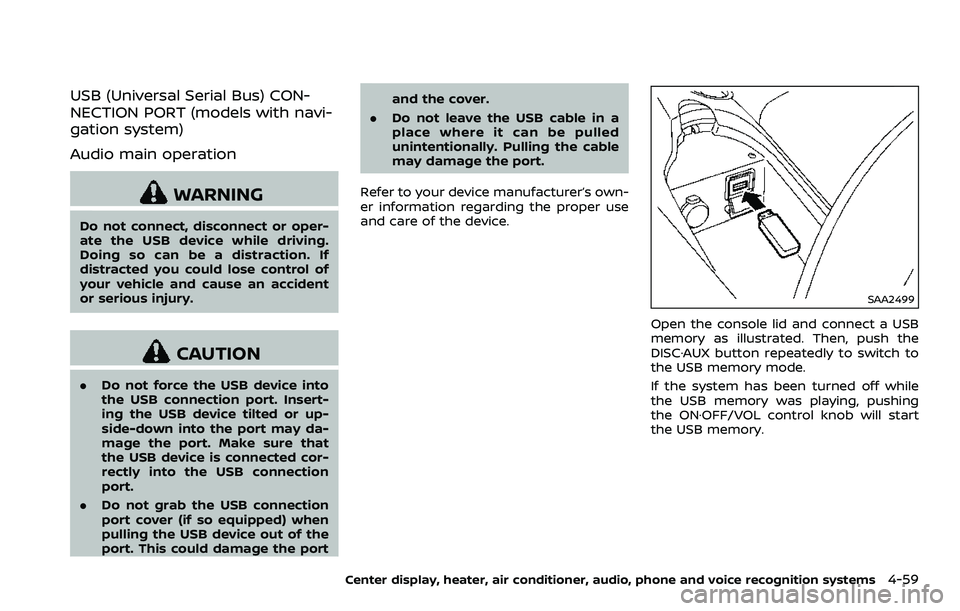
Open the console lid and connect a USB
memory as illustrated. Then, push the
DISC·AUX button repeatedly to switch to
the USB memory mode.
If the system has been turned off while
the USB memory was playing, pushing
the ON·OFF/VOL control knob will start
the USB memory.
Center display, heater, air conditioner, audio, phone and voice recognition systems4-59
Page 236 of 453
4-68Center display, heater, air conditioner, audio, phone and voice recognition systems
Connected Devices:
Registered devices are shown on the list.
Select a Bluetooth® device from the list,
the following options will be available.
.Select
Select “Select” to connect the selected
device to the vehicle. If there is a
different device currently connected,
the selected device will replace the
current device.
. Edit
Rename the selected Bluetooth® de-
vice using the keypad displayed on
the screen. (See “How to use touch
screen” (P.4-5).)
. Delete
Delete the selected Bluetooth® device.
Edit Bluetooth Info:
Change the name broadcasted by this
system over Bluetooth®. Change the PIN
code that is entered when connecting a
hands free device to this system.
Replace Connected Phone:
Replace the Bluetooth® connection with a
connected Bluetooth® cellular phone. For
details about Hands-Free Phone System,
see “Bluetooth® hands-free phone system
(models with navigation system)” (P.4-76).iPod® PLAYER OPERATION (models
with navigation system)
Connecting iPod®
WARNING
Do not connect, disconnect or oper-
ate the USB device while driving.
Doing so can be a distraction. If
distracted you could lose control of
your vehicle and cause an accident
or serious injury.
CAUTION
. Do not force the USB device into
the USB connection port. Insert-
ing the USB device tilted or up-
side-down into the port may da-
mage the port. Make sure that
the USB device is connected cor-
rectly into the USB connection
port.
. Do not grab the USB connection
port cover (if so equipped) when
pulling the USB device out of the
port. This could damage the port
and the cover. .
Do not leave the USB cable in a
place where it can be pulled
unintentionally. Pulling the cable
may damage the port.
Refer to your device manufacturer’s own-
er information regarding the proper use
and care of the device.