Page 4 of 538

Instruments and controlsE085001020811. Combination headlamps and dipper switch p. 6-52Automatic High-Beam (AHB) switch* p. 6-54
Turn-signal lever p. 6-60
Front fog lamp switch p. 6-61
Rear fog lamp switch p. 6-62
2. Instruments p. 6-02
3. Steering wheel audio remote control switches p. 8-26 [For DISPLAY AUDIO, Smartphone Link Display Audio and
MITSUBISHI Multi Communication System (MMCS), refer to
the separate owner’s manual.]
4. Power switch p. 7-12
5. Regenerative braking level selector (paddle type)* p. 7-19
6. Windscreen wiper and washer switch p. 6-62 Rear window wiper and washer switch p. 6-65
Headlamp washer switch p. 6-66
7. Cruise control switches p. 7-42, 7-52
8. Supplemental restraint system (SRS) - airbag (for driver’s seat) p. 5-26, 5-30
Horn switch p. 6-70
9. Bluetooth® 2.0 interface* p. 8-49
10. Camera switch* p. 7-109
11. Supplemental restraint system (SRS) - front knee airbag p. 5-26, 5-30
12. Fuse box p. 11-16
13. Steering wheel height and reach adjustment lever p. 7-07
14. Driver’s side electric tailgate switch* p. 4-20
15. Lane Depature Warning (LDW) switch* p. 7-85
16. Forward Collision Mitigation System (FCM) and Ultrasonic mis- acceleration Mitigation System (UMS) ON/OFF switch* p. 7-68
17. Sonar switch* p. 7-96, 7-100
18. Acoustic Vehicle Alerting System (AVAS) OFF switch p. 7-29
19. Headlamp levelling switch* p. 6-59
20. Active stability control (ASC) OFF switch p. 7-41
21. Multi information display switch p. 6-04
Instruments and controls
1-02OGGE18E1Overview1LHD
Page 5 of 538

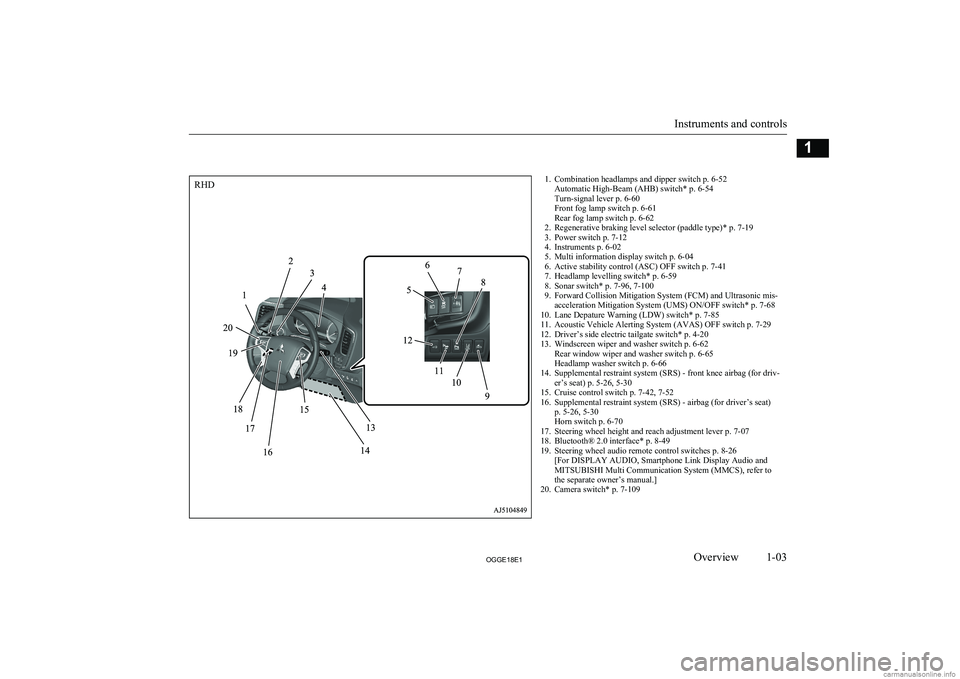
1. Combination headlamps and dipper switch p. 6-52Automatic High-Beam (AHB) switch* p. 6-54
Turn-signal lever p. 6-60
Front fog lamp switch p. 6-61
Rear fog lamp switch p. 6-62
2. Regenerative braking level selector (paddle type)* p. 7-19
3. Power switch p. 7-12
4. Instruments p. 6-02
5. Multi information display switch p. 6-04
6. Active stability control (ASC) OFF switch p. 7-41
7. Headlamp levelling switch* p. 6-59
8. Sonar switch* p. 7-96, 7-100
9. Forward Collision Mitigation System (FCM) and Ultrasonic mis- acceleration Mitigation System (UMS) ON/OFF switch* p. 7-68
10. Lane Depature Warning (LDW) switch* p. 7-85
11. Acoustic Vehicle Alerting System (AVAS) OFF switch p. 7-29
12. Driver’s side electric tailgate switch* p. 4-20
13. Windscreen wiper and washer switch p. 6-62 Rear window wiper and washer switch p. 6-65
Headlamp washer switch p. 6-66
14. Supplemental restraint system (SRS) - front knee airbag (for driv- er’s seat) p. 5-26, 5-30
15. Cruise control switch p. 7-42, 7-52
16. Supplemental restraint system (SRS) - airbag (for driver’s seat) p. 5-26, 5-30
Horn switch p. 6-70
17. Steering wheel height and reach adjustment lever p. 7-07
18. Bluetooth® 2.0 interface* p. 8-49
19. Steering wheel audio remote control switches p. 8-26 [For DISPLAY AUDIO, Smartphone Link Display Audio and
MITSUBISHI Multi Communication System (MMCS), refer to
the separate owner’s manual.]
20. Camera switch* p. 7-109
Instruments and controls
1-03OGGE18E1Overview1RHD
Page 6 of 538
![MITSUBISHI OUTLANDER PHEV 2018 Owners Manual (in English) 1. Multi Around Monitor* p. 7-106Audio* p. 8-13
[For DISPLAY AUDIO, Smartphone Link Display Audio and
MITSUBISHI Multi Communication System (MMCS), refer to
the separate owner’s manual.]
2. Hazard w MITSUBISHI OUTLANDER PHEV 2018 Owners Manual (in English) 1. Multi Around Monitor* p. 7-106Audio* p. 8-13
[For DISPLAY AUDIO, Smartphone Link Display Audio and
MITSUBISHI Multi Communication System (MMCS), refer to
the separate owner’s manual.]
2. Hazard w](/manual-img/19/34890/w960_34890-5.png)
1. Multi Around Monitor* p. 7-106Audio* p. 8-13
[For DISPLAY AUDIO, Smartphone Link Display Audio and
MITSUBISHI Multi Communication System (MMCS), refer to
the separate owner’s manual.]
2. Hazard warning flasher switch p. 6-60
3. ECO mode switch p. 6-61
4. Front passenger’s airbag indicator p. 5-29
5. Passenger’s ventilators p. 8-02
6. Accessory socket* p. 8-74 Cigarette lighter* p. 8-73
7. Electric tailgate power switch* p. 4-20
8. Key slot p. 7-15
9. 220-240 V AC power supply switch* p. 8-75
10. Blind Spot Warning (BSW) switch* p. 7-79
11. Heated steering wheel switch* p. 6-69
12. Heated windscreen switch* p. 6-68
13. Cup holder p. 8-82
14. Selector lever (Joystick type) p. 7-16
15. 220-240 V AC power supply* p. 8-75
16. Floor console box p. 8-81 Arm rest
Accessory socket p. 8-74
USB input terminal p. 8-69
17. Fuel tank filler door release lever p. 2-14
18. Bonnet release lever p. 11-04
19. Rear window demister switch p. 6-67 Wiper de-icer switch* p. 6-67
20. Air conditioner p. 8-04
21. Seat belt reminder p. 5-11
Instruments and controls
1-04OGGE18E1Overview1LHD
Page 7 of 538

1. Accessory socket p. 8-74
2. Electric tailgate power switch* p. 4-20
3. Key slot p. 7-15
4. 220-240 V AC power supply switch* p. 8-75
5. Blind Spot Warning (BSW) switch* p. 7-79
6. Heated steering wheel switch* p. 6-69
7. Heated windscreen switch* p. 6-68
8. Bonnet release lever p. 11-04
9. Fuel tank filler door release lever p. 2-14
10. Floor console box p. 8-81 Arm rest
Accessory socket p. 8-74
USB input terminal p. 8-69
11. 220-240 V AC power supply* p. 8-75
12. Selector lever (Joystick type) p. 7-16
13. Cup holder p. 8-82
14. Rear window demister switch p. 6-67 Wiper de-icer switch* p. 6-67
15. Air conditioner p. 8-04
16. Seat belt reminder p. 5-11
17. Fuse box p. 11-16
18. Passenger’s ventilators p. 8-02
19. Hazard warning flasher switch p. 6-60
20. ECO mode switch p. 6-61
21. Front passenger’s airbag indicator p. 5-29
22. Audio* p. 8-13 Multi Around Monitor* p. 7-106
[For DISPLAY AUDIO, Smartphone Link Display Audio and
MITSUBISHI Multi Communication System (MMCS), refer to
the separate owner’s manual.]
Instruments and controls
1-05OGGE18E1Overview1RHD
Page 16 of 538

Outside (Rear)E085004023611. Antenna2. Tail lamps p. 11-24, 11-29
3. Keyless entry system p. 4-03 Keyless operation system p. 4-06
Locking and unlocking the doors p. 4-14
4. Changing tyres p. 9-13 Tyre pressure monitoring system (TPMS) p. 7-89
Tyre inflation pressures p. 11-10
Tyre rotation p. 11-11
Snow traction device (tyre chains) p. 11-13
Size of tyres and wheels p. 12-08
5. Charging lid p. 3-12 Charging port courtesy lamp p. 3-06
6. Stop lamps p. 11-24, 11-29
7. Rear turn-signal lamps p. 6-60, 11-24, 11-29
8. Reversing lamp (LHD vehicles) p. 11-24, 11-29 Rear fog lamp (RHD vehicles) p. 6-62, 11-24, 11-29
9. Ultrasonic misacceleration Mitigation System (UMS)* p. 7-74 Reversing sensor system* p. 7-94
Parking sensors* p. 7-98
10. Rear fog lamp (LHD vehicles) p. 6-62, 11-24, 11-29 Reversing lamp (RHD vehicles) p. 11-24, 11-29
11. Licence plate lamps p. 11-24, 11-30
12. Rear-view camera* p. 7-102, 7-106
13. Rear window wiper p. 6-65
14. Tailgate* p. 4-19 Electric tailgate* p. 4-20
15. High-mounted stop lamp p. 11-24
Outside (Rear)
1-14OGGE18E1Overview1
Page 18 of 538

Around the driver’s seat
E08500801687
1-Combination headlamps
Rotate the switch to turn on the lamps.
OFFAll lamps off {except for day-
time running lamps}
AUTO
With the operation mode of the power switch in the “ON” posi-
tion, head-lamps, position, tail, licence plate, instrument panellamps and downlight turn on and off automatically in accord-
ance with outside light level. {Daytime running lamps will go
on while the tail lamps are off.} All lamps turn off automatically
when the operation mode is put
in OFF.Position, tail, licence plate, in-
strument panel lamps and down- light onHeadlamps and other lamps go
on
Refer to “Combination headlamps and dipper switch” on page 6-52.
1-Turn-signal lever
The turn-signal lamps flash when the lever is
operated
1- Turn-signals
2- Lane-change signals
Refer to “Turn-signal lever” on page 6-60.
2-Steering wheel height and
reach adjustment
1. Release the lever while holding the
steering wheel up.
2. Adjust the steering wheel to the desired
position.
Quick guide
1-16OGGE18E1Overview1
Page 19 of 538

3.Securely lock the steering wheel by pull-
ing the lever fully upward.A-LockedB-Release
Refer to “Steering wheel height and reach adjustment” on page 7-07.
3-Power switch
If you are carrying the keyless operation key,
you can start the Plug-in Hybrid EV System.
If you press the power switch without de-
pressing the brake pedal, you can change the
operation mode in the order of OFF, ACC,
ON, OFF.OFF-The indication lamp (A) on the
power switch turns off.ACC-The indication lamp on the en-
gine switch illuminates orange.ON-The indication lamp on the pow-
er switch illuminates blue.
Refer to “Power switch” on page 7-12.
4-Wiper and washer switchMIST-Misting function
The wipers will operate
once.OFF-OffAUTO-Auto-wiper control
The wipers will automati- cally operate depending on
the degree of wetness on the windscreen.LO-SlowHI-Fast
The washer fluid will be sprayed onto the
windscreen by pulling the lever towards you.
Refer to “Wiper and washer switch” on page 6-62.
Quick guide
1-17OGGE18E1Overview1
Page 21 of 538

After unlocking the driver’s door, push the
rear portion of the charging lid (A) until it clicks, and open the charging lid.
Release the tab (B) to open the inner lid.
C-Normal charging lidD-Quick charging lidRefer to “Normal charging (charging method with rated AC 220-240V outlet)”
on page 3-10 and “Quick charging
(charging method with quick charger)” on
page 3-17.Electrical parking switch
E08502200024
Press the switch to lock the wheels when you
are parking your vehicle. The indication lamp on the switch illuminates green.
Refer to “Electrical parking switch” on
page 7-18.
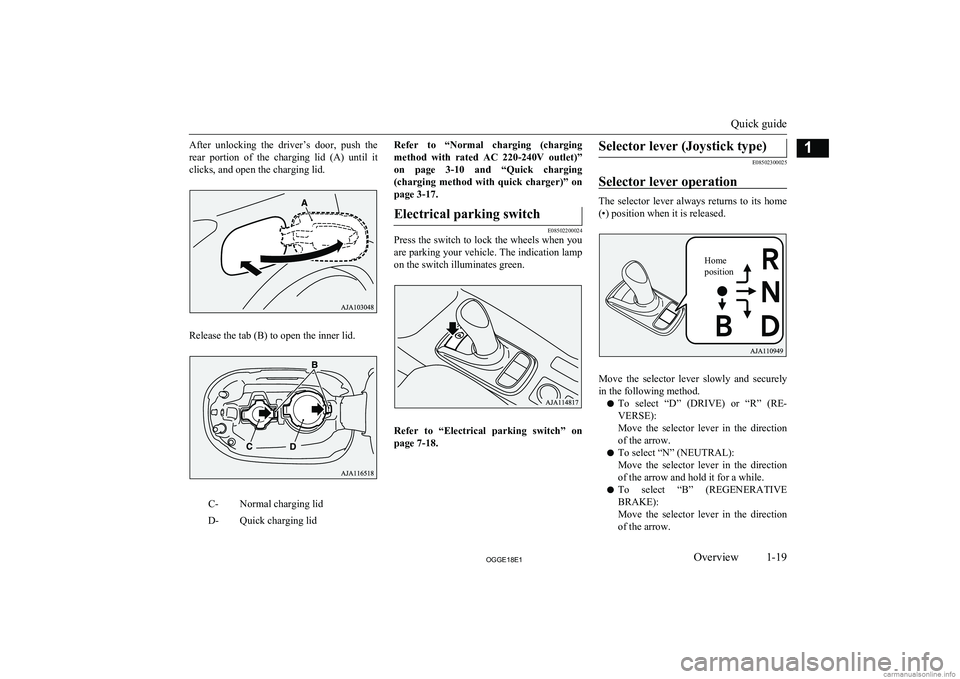
Selector lever (Joystick type)
E08502300025
Selector lever operation
The selector lever always returns to its home
(•) position when it is released.
Move the selector lever slowly and securely
in the following method.
l To select “D” (DRIVE) or “R” (RE-
VERSE):
Move the selector lever in the direction
of the arrow.
l To select “N” (NEUTRAL):
Move the selector lever in the direction
of the arrow and hold it for a while.
l To select “B” (REGENERATIVE
BRAKE):
Move the selector lever in the direction
of the arrow.
Quick guide
1-19OGGE18E1Overview1 Home
position