2018 MITSUBISHI OUTLANDER PHEV tow
[x] Cancel search: towPage 330 of 538
NOTElBe sure that adequate clearance is main-
tained for raising the tailgate while loading
luggage on the roof carrier.Trailer towing
E00610001906
In order to tow a trailer with your vehicle,
have a trailer towing device mounted that
meets all relevant regulations in your area, consult a MITSUBISHI MOTORS Author-
ized Service Point.
The regulations concerning the towing of a
trailer may differ from country to country. You are advised to obey the regulations in
each area.
CAUTIONl Danger of Accident!
A towing bar should be fitted according to MITSUBISHI MOTORS guidelines.
Maximum towable weight with
brake and maximum trailer- nose weight
Never exceed the maximum towable weight
with brake and the maximum trailer-nose weight as listed in the specifications.
(Refer to page “Vehicle weight” on page
12-05.)
If you tow a trailer at an altitude of more than
1,000 m above sea-level, reduce your weight by 10 % of the gross combination weight for
every increase of 1,000 m above sea-level, as
the engine output is lowered owing to de-
crease in atmospheric pressure.
Towing bar mounting specifi-cations
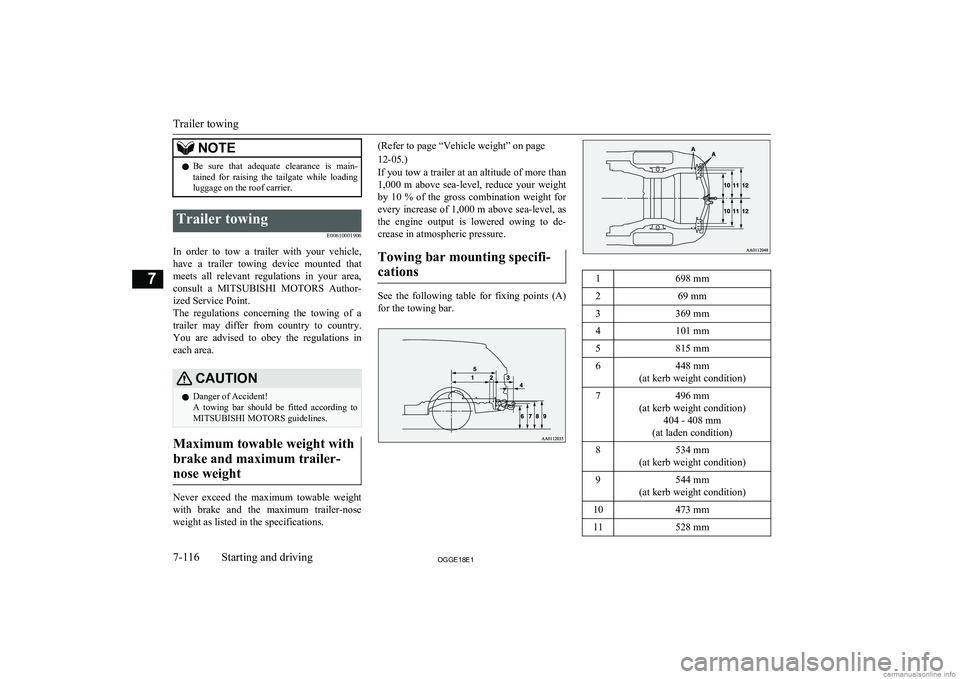
See the following table for fixing points (A) for the towing bar.
1698 mm269 mm3369 mm4101 mm5815 mm6448 mm
(at kerb weight condition)7496 mm
(at kerb weight condition) 404 - 408 mm
(at laden condition)8534 mm
(at kerb weight condition)9544 mm
(at kerb weight condition)10473 mm11528 mm
Trailer towing
7-116OGGE18E1Starting and driving7
Page 331 of 538

12583 mm
Operating hints
lBe sure that the driving speed does not
exceed 100 km/h (62 mph) for trailer op-
eration. It is also recommended that you obey the local regulations in case driving speed with a trailer is limited to less than
100 km/h (62 mph).
l To prevent shocks from the overrun
brake, depress the brake pedal lightly at first and then more strongly.
Overheating
This will normally occur as a result of some
mechanical failure. If your vehicle should overheat, stop and check for a loose or bro-ken water pump/alternator drive belt, a
blocked radiator air intake or a low coolant level. If these items are satisfactory the over-
heating could be caused by a number of me-
chanical causes that would have to be
checked at a competent service centre.
CAUTIONl If the engine overheats, reference should be
made to “Engine overheating” section of
“For emergencies” prior to taking any cor- rective action.Parking
It is not recommended to park on a steep
slope while towing trailer.
If parking on a steep slope cannot be avoided,
the road grade should be less than 12% and
the following procedure performed. 1. Apply the parking brake firmly on the
vehicle and the trailer (if fitted).
2. Put the select position in “P”.
3. Place chocks or blocks at the tyres on
both vehicle and trailer.
4. Turn the front wheels into the shoulder
of the road to prevent the vehicle from moving.
Driving on long up hills while towing trailer
When the remaining quantity of the drive bat-tery is low, or high-speed driving on long up
hills at high temperature, the drive battery
output is restricted and the vehicle speed may be decreased.
The vehicle speed may be recovered if the
drive battery quantity is recovered.
NOTEl In charge mode, if the remaining quantity of
the drive battery can be increased in ad-
vance, it can prevent the vehicle speed from
decreasing on long up hills.
Refer to “Battery charge mode switch” on page 7-28.
Trailer towing
7-117OGGE18E1Starting and driving7
Page 344 of 538
For ordinary demisting
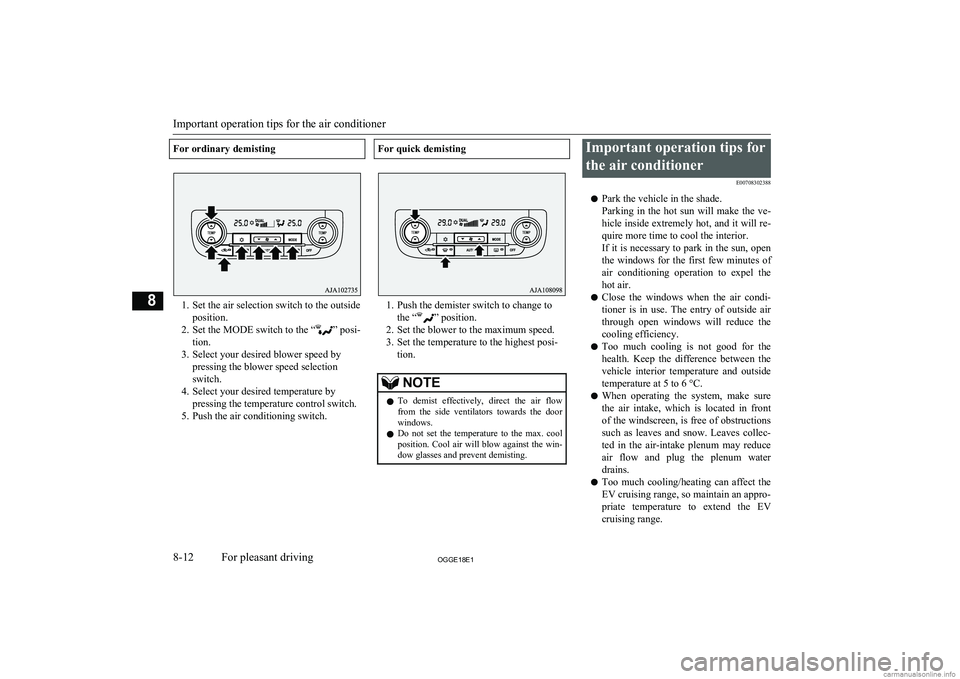
1. Set the air selection switch to the outsideposition.
2. Set the MODE switch to the “
” posi-
tion.
3. Select your desired blower speed by pressing the blower speed selection
switch.
4. Select your desired temperature by pressing the temperature control switch.
5. Push the air conditioning switch.
For quick demisting
1. Push the demister switch to change to the “
” position.
2. Set the blower to the maximum speed.
3. Set the temperature to the highest posi- tion.
NOTEl To demist effectively, direct the air flow
from the side ventilators towards the door windows.
l Do not set the temperature to the max. cool
position. Cool air will blow against the win-
dow glasses and prevent demisting.Important operation tips for
the air conditioner E00708302388
l Park the vehicle in the shade.
Parking in the hot sun will make the ve-
hicle inside extremely hot, and it will re-
quire more time to cool the interior.
If it is necessary to park in the sun, open
the windows for the first few minutes of air conditioning operation to expel the
hot air.
l Close the windows when the air condi-
tioner is in use. The entry of outside air
through open windows will reduce the cooling efficiency.
l Too much cooling is not good for the
health. Keep the difference between the
vehicle interior temperature and outside
temperature at 5 to 6 °C.
l When operating the system, make sure
the air intake, which is located in front
of the windscreen, is free of obstructions such as leaves and snow. Leaves collec- ted in the air-intake plenum may reduce
air flow and plug the plenum water
drains.
l Too much cooling/heating can affect the
EV cruising range, so maintain an appro-
priate temperature to extend the EV
cruising range.
Important operation tips for the air conditioner
8-12OGGE18E1For pleasant driving8
Page 416 of 538
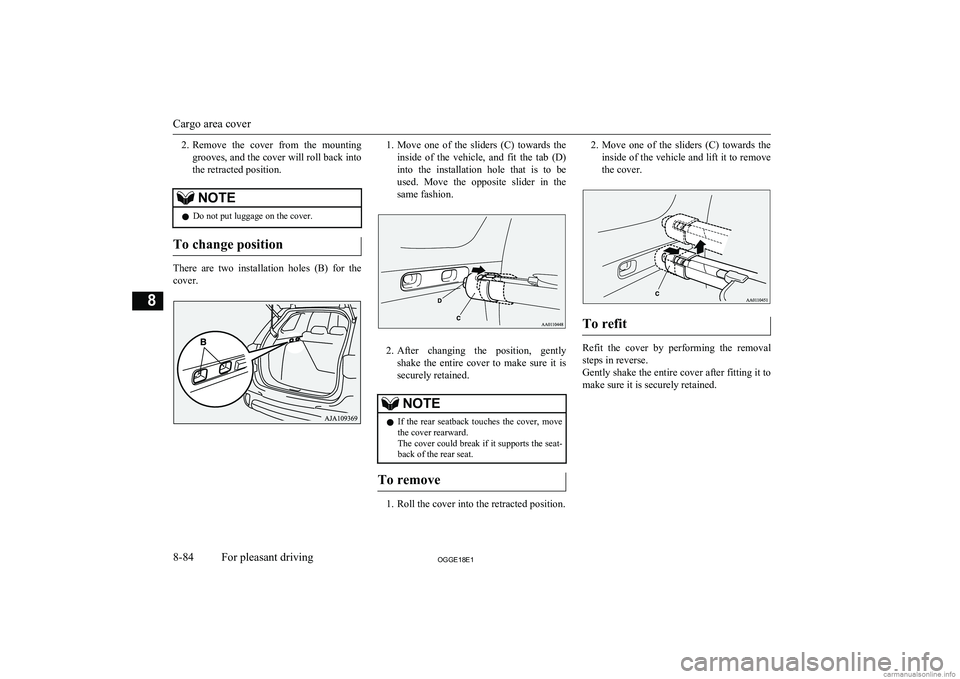
2.Remove the cover from the mounting
grooves, and the cover will roll back into
the retracted position.NOTEl Do not put luggage on the cover.
To change position
There are two installation holes (B) for the
cover.
1. Move one of the sliders (C) towards the
inside of the vehicle, and fit the tab (D) into the installation hole that is to be
used. Move the opposite slider in the
same fashion.
2. After changing the position, gently
shake the entire cover to make sure it is securely retained.
NOTEl If the rear seatback touches the cover, move
the cover rearward.
The cover could break if it supports the seat- back of the rear seat.
To remove
1. Roll the cover into the retracted position.
2. Move one of the sliders (C) towards the
inside of the vehicle and lift it to remove
the cover.
To refit
Refit the cover by performing the removal steps in reverse.
Gently shake the entire cover after fitting it to make sure it is securely retained.
Cargo area cover
8-84OGGE18E1For pleasant driving8
Page 419 of 538
If the vehicle breaks down.................................................................. 9-02Emergency starting............................................................................. 9-02
Engine overheating............................................................................. 9-04
Tools and jack..................................................................................... 9-06
Tyre repair kit......................................................................................9-07
How to change a tyre.......................................................................... 9-13
Towing................................................................................................ 9-17
Operation under adverse driving conditions....................................... 9-20For emergencies
OGGE18E19
Page 424 of 538
WARNINGlMake sure that the engine and the Plug-in
Hybrid EV system have cooled down be- fore removing the radiator cap (D) and
the reserve tank cap (E), because hot steam or boiling water will otherwise gush from the filler port and may scald you.CAUTIONl Do not add coolant while the engine is hot.
Suddenly adding cold coolant could damage the engine. Wait for the engine to cool
down, then add coolant a little at a time.
6. Examine the radiator hoses for coolant
leakage and the drive belt for looseness
or damage.
If there is anything wrong with the cool-
ing system or drive belt, we recommend
you to have it checked and repaired.
Tools and jack
E00800902507
Storage
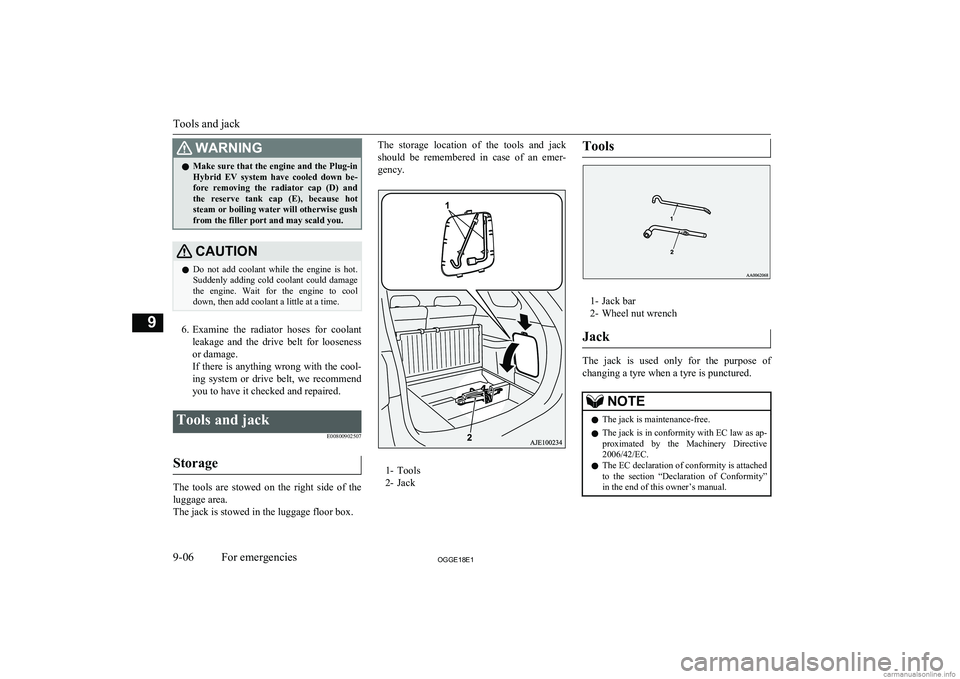
The tools are stowed on the right side of the
luggage area.
The jack is stowed in the luggage floor box.
The storage location of the tools and jack
should be remembered in case of an emer-
gency.
1- Tools
2- Jack
Tools
1- Jack bar
2- Wheel nut wrench
Jack
The jack is used only for the purpose of
changing a tyre when a tyre is punctured.
NOTEl The jack is maintenance-free.
l The jack is in conformity with EC law as ap-
proximated by the Machinery Directive
2006/42/EC.
l The EC declaration of conformity is attached
to the section “Declaration of Conformity”
in the end of this owner’s manual.
Tools and jack
9-06OGGE18E1For emergencies9
Page 429 of 538
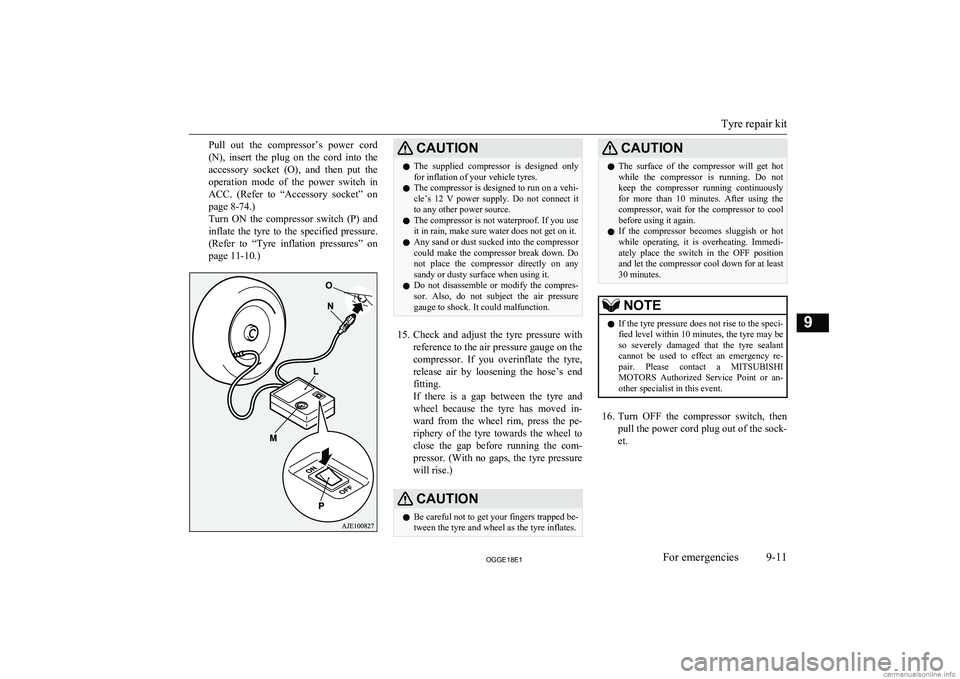
Pull out the compressor’s power cord
(N), insert the plug on the cord into the
accessory socket (O), and then put the operation mode of the power switch in ACC. (Refer to “Accessory socket” on
page 8-74.)
Turn ON the compressor switch (P) and
inflate the tyre to the specified pressure. (Refer to “Tyre inflation pressures” on
page 11-10.)CAUTIONl The supplied compressor is designed only
for inflation of your vehicle tyres.
l The compressor is designed to run on a vehi-
cle’s 12 V power supply. Do not connect itto any other power source.
l The compressor is not waterproof. If you use
it in rain, make sure water does not get on it.
l Any sand or dust sucked into the compressor
could make the compressor break down. Do not place the compressor directly on anysandy or dusty surface when using it.
l Do not disassemble or modify the compres-
sor. Also, do not subject the air pressure
gauge to shock. It could malfunction.
15. Check and adjust the tyre pressure with
reference to the air pressure gauge on the
compressor. If you overinflate the tyre, release air by loosening the hose’s end
fitting.
If there is a gap between the tyre and
wheel because the tyre has moved in-
ward from the wheel rim, press the pe- riphery of the tyre towards the wheel to
close the gap before running the com- pressor. (With no gaps, the tyre pressure
will rise.)
CAUTIONl Be careful not to get your fingers trapped be-
tween the tyre and wheel as the tyre inflates.CAUTIONl The surface of the compressor will get hot
while the compressor is running. Do not
keep the compressor running continuously for more than 10 minutes. After using the compressor, wait for the compressor to cool
before using it again.
l If the compressor becomes sluggish or hot
while operating, it is overheating. Immedi- ately place the switch in the OFF positionand let the compressor cool down for at least30 minutes.NOTEl If the tyre pressure does not rise to the speci-
fied level within 10 minutes, the tyre may be
so severely damaged that the tyre sealant
cannot be used to effect an emergency re- pair. Please contact a MITSUBISHI
MOTORS Authorized Service Point or an-
other specialist in this event.
16. Turn OFF the compressor switch, then
pull the power cord plug out of the sock- et.
Tyre repair kit
9-11OGGE18E1For emergencies9
Page 430 of 538

NOTElSimply putting sealant and air into the tyre
using the tyre repair kit does not seal the
puncture hole. Air will leak through the puncture hole until the emergency repair procedure is completed (through step 19 or
step 20 of these instructions).
17. Affix the speed restriction sticker (Q) to
the three-diamond mark on the steering wheel.
CAUTIONl Do not affix the sticker anywhere except the
specified position on the pad of the steeringwheel. Affixing the sticker in an incorrect
position could prevent the SRS airbag from working normally.
18. When you have inflated the tyre to the
specified pressure, stow the compressor,
bottle, and other items in the vehicle and
promptly start driving the vehicle so that the tyre sealant can spread evenly in the
tyre. Drive with great care. Do not ex- ceed a speed of 80 km/h (50 mph). Ob-
serve local speed limits.CAUTIONl If you sense any abnormality while driving,
stop the vehicle and contact a MITSUBISHI
MOTORS Authorized Service Point or an-
other specialist. Otherwise the tyre pressure
may drop before the emergency repair pro- cedure is completed, rendering the vehicle
unsafe.NOTEl Driving faster than 80 km/h (50 mph)
can
make the vehicle vibrate.
19. After driving for 10 minutes or 5 km ,
check the tyre pressure using the air
pressure gauge on the compressor. If the
tyre pressure has apparently not drop- ped, the emergency repair procedure iscomplete. Continue the process from
step 21.
If the tyre pressure is not sufficient, in- flate the tyre to the specified pressure
again and drive the vehicle carefully
without exceeding a speed of 80 km/h.
CAUTIONl If the tyre pressure is lower than the mini-
mum permitted pressure (1.3 bar {130 kPa}), the tyre cannot successfully be re-
paired with the tyre sealant. Do not drive the vehicle any further. Contact a MITSUBISHI
MOTORS Authorized Service Point or an-
other specialist.
20. After driving for 10 minutes or 5 km ,
check the tyre pressure using the air
pressure gauge on the compressor. If the
tyre pressure has apparently not drop- ped, the emergency repair procedure iscomplete. You must still not exceed a speed of 80 km/h. Observe local speed
limits.
NOTEl If the tyre pressure has dropped below the
specified level when you check it at the end
of the repair procedure, do not drive the ve- hicle any further. Contact a MITSUBISHI
MOTORS Authorized Service Point or an-
other specialist.
Tyre repair kit
9-12OGGE18E1For emergencies9