2018 MITSUBISHI OUTLANDER III rear view mirror
[x] Cancel search: rear view mirrorPage 226 of 441

Multi Around Monitor (if so equipped)
Features and controls 5-145
5
CAUTIONBefore using the Multi Around Monitor,make sure that all doors and the liftgate areclosed and the outside
mirrors are unfolded.
If an outside mirror is folded and/or if a frontdoor and/or the liftgate
is open, the areas dis-
played on the Multi Around Monitor will notbe appropriate.
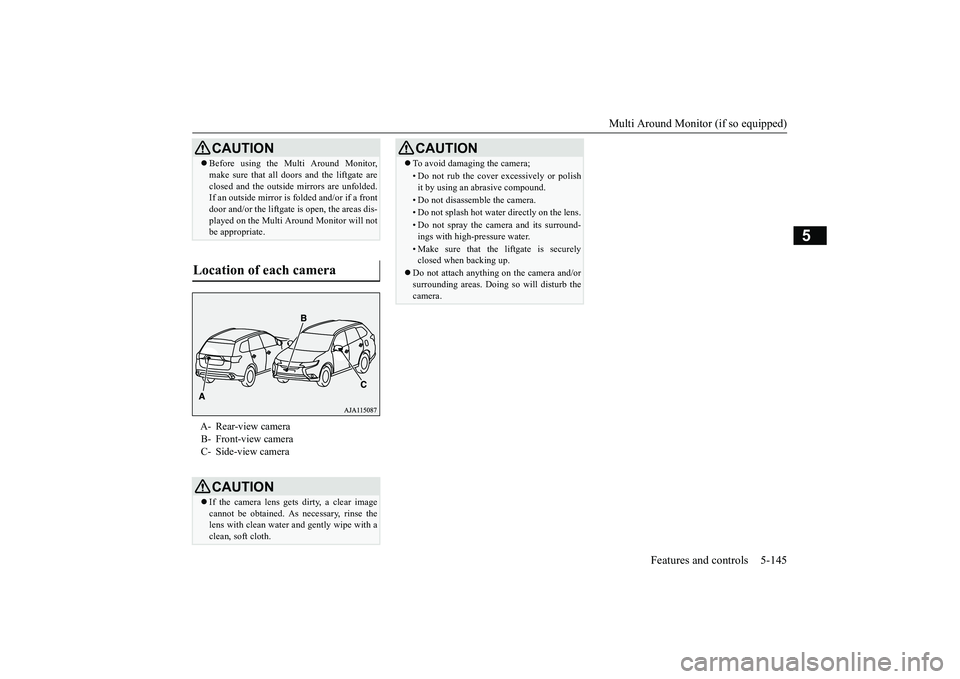
Location of each camera
A- Rear-view cameraB- Front-view cameraC- Side-view cameraCAUTIONIf the camera lens gets
dirty, a clear image
cannot be obtained. As
necessary, rinse the
lens with clean water a
nd gently wipe with a
clean, soft cloth.
To avoid damaging the camera;• Do not rub the cover excessively or polishit by using an abrasive compound.• Do not disassemble the camera.• Do not splash hot wate
r directly on the lens.
• Do not spray the camera and its surround-ings with high-pressure water.• Make sure that the liftgate is securelyclosed when backing up.
Do not attach anythi
ng on the camera and/or
surrounding areas. Doing
so will disturb the
camera.CAUTION
BK0249100US.book 145 ページ 2017年5月10日 水曜日 午前8時49分
Page 233 of 441

Multi Around Monitor (if so equipped)
5
N00587900023
Reference lines for the
vehicle width and the
front end of the vehicle are displayed on thescreen.
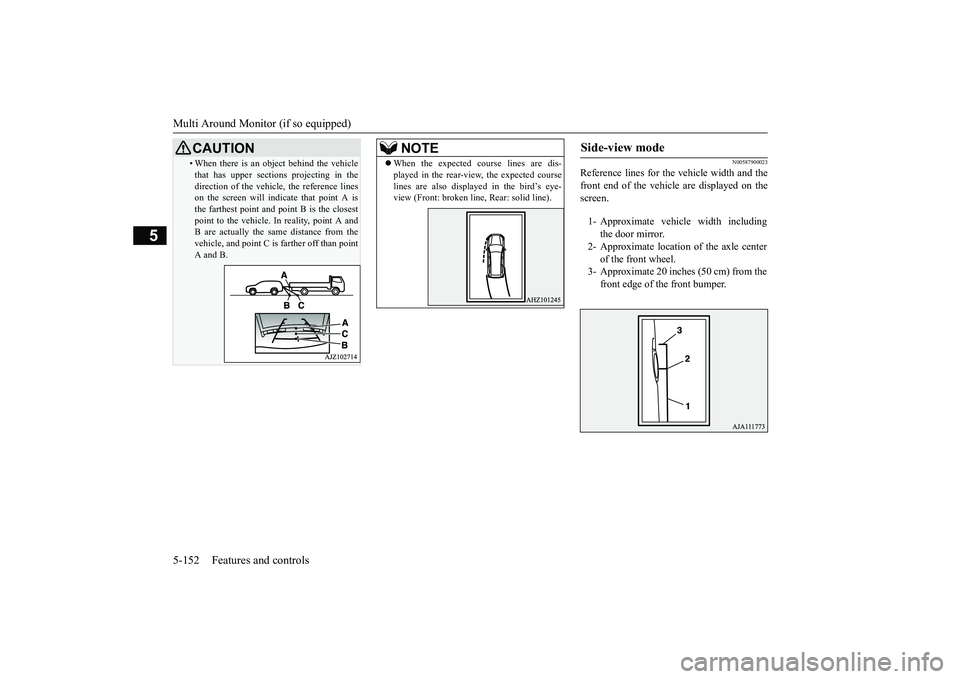
• When there is an obj
ect behind the vehicle
that has upper sections
projecting in the
direction of the vehicle, the reference lineson the screen will indi
cate that point A is
the farthest point and point B is the closestpoint to the vehicle. In
reality, point A and
B are actually the same distance from thevehicle, and point C is farther off than pointA and B.CAUTION
NOTE
When the expected course lines are dis-played in the rear-view, the expected courselines are also displayed in the bird’s eye-view (Front: broken line, Rear: solid line).
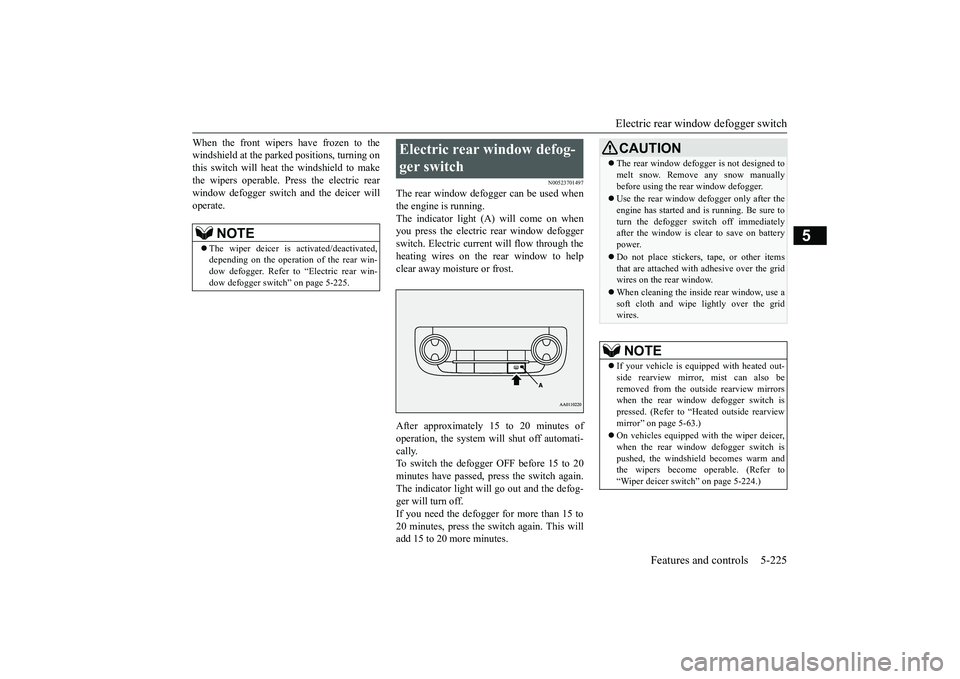
Side-view mode
1- Approximate vehicle width including
the door mirror.
2- Approximate location of the axle center
of the front wheel.
3- Approximate 20 inches (50 cm) from the
front edge of the front bumper.
BK0249100US.book 152 ページ 2017年5月10日 水曜日 午前8時49分
Page 306 of 441

Electric rear window defogger switch
Features and controls 5-225
5
When the front wipers have frozen to thewindshield at the parked
positions, turning on
this switch will heat the windshield to makethe wipers operable. Pr
ess the electric rear
window defogger switch and the deicer willoperate.
N00523701497
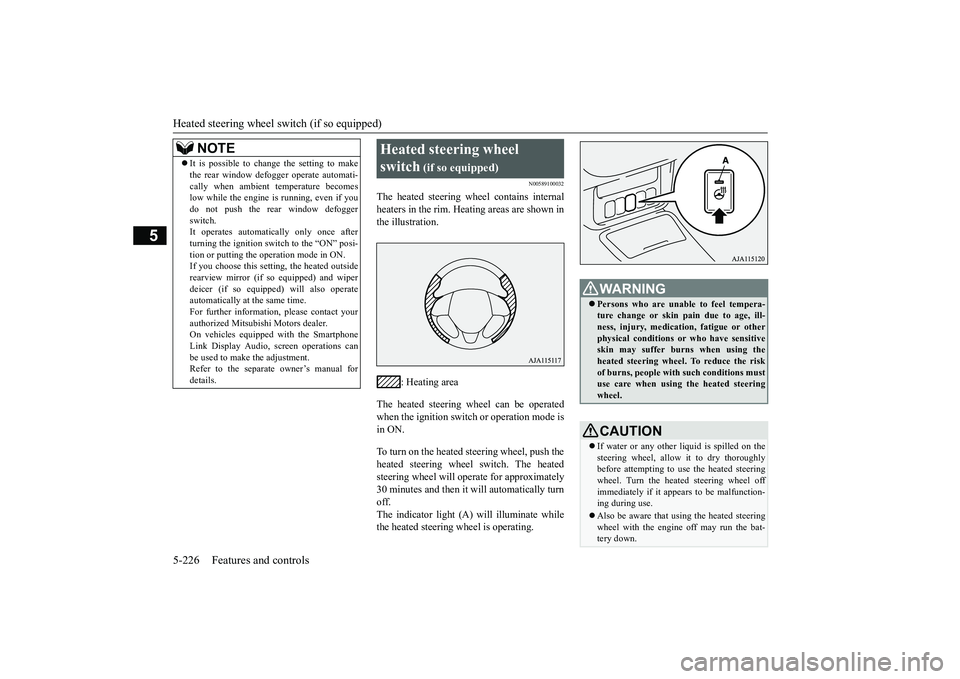
The rear window defogger can be used whenthe engine is running.The indicator light (A) will come on whenyou press the electric rear window defoggerswitch. Electric current will flow through theheating wires on the rear window to helpclear away moisture or frost.After approximately 15 to 20 minutes ofoperation, the system wi
ll shut off automati-
cally.To switch the defogger OFF before 15 to 20minutes have passed,
press the switch again.
The indicator light will
go out and the defog-
ger will turn off.If you need the defogger for more than 15 to20 minutes, press the switch again. This willadd 15 to 20 more minutes.
NOTE
The wiper deicer is
activated/de
activated,
depending on the operation of the rear win-dow defogger. Refer to
“Electric rear win-
dow defogger switch
” on page 5-225.
Electric rear window defog-ger switch
CAUTIONThe rear window defogge
r is not designed to
melt snow. Remove
any snow manually
before using the rear window defogger.Use the rear window de
fogger only after the
engine has started and
is running. Be sure to
turn the defogger swit
ch off immediately
after the window is cl
ear to save on battery
power.Do not place stickers,
tape, or other items
that are attached with adhesive over the gridwires on the rear window.When cleaning the inside
rear window, use a
soft cloth and wipe lightly over the gridwires.NOTE
If your vehicle is equi
pped with heated out-
side rearview mirror, mist can also beremoved from the outside rearview mirrorswhen the rear window defogger switch ispressed. (Refer to “Hmirror” on page 5-63.)On vehicles equipped w
ith the wiper deicer,
when the rear window defogger switch ispushed, the windshield
becomes warm and
the wipers become operable. (Refer to“Wiper deicer switch” on page 5-224.)
BK0249100US.book 225 ページ 2017年5月10日 水曜日 午前8時49分
Page 307 of 441

Heated steering wheel sw
itch (if so equipped)
5-226 Features and controls
5
N00589100032
The heated steering wheel contains internalheaters in the rim. Heating areas are shown inthe illustration.
: Heating area
The heated steering wheel can be operatedwhen the ignition switch or operation mode isin ON.To turn on the heated steering wheel, push theheated steering wheel switch. The heatedsteering wheel will ope
rate for approximately
30 minutes and then it
will automatically turn
off.The indicator light (A) will illuminate whilethe heated steering wheel is operating.
It is possible to change the setting to makethe rear window def
ogger operate automati-
cally when ambient temperature becomeslow while the engine is running, even if youdo not push the rear window defoggerswitch.It operates automatica
lly only once after
turning the ignition switch to the “ON” posi-tion or putting the ope
ration mode in ON.
If you choose this setti
ng, the heated outside
rearview mirror (if so
equipped) and wiper
deicer (if so equippe
d) will also operate
automatically at the same time.For further information, please contact yourauthorized Mitsubishi Motors dealer.On vehicles equippe
d with the Smartphone
Link Display Audio, sc
reen operations can
be used to make the adjustment.Refer to the separate
owner’s manual for
details.NOTE
Heated steering wheel switch
(if so equipped)
Persons who are unable
to feel tempera-
ture change or skin
pain due to age, ill-
ness, injury, medicati
on, fatigue or other
physical conditions or
who have sensitive
skin may suffer burns when using theheated steering wheel. To reduce the riskof burns, people with such conditions mustuse care when using the heated steeringwheel.CAUTIONIf water or any other li
quid is spilled on the
steering wheel, allow it to dry thoroughlybefore attempting to use the heated steeringwheel. Turn the heated steering wheel offimmediately if it appe
ars to be malfunction-
ing during use.Also be aware that us
ing the heated steering
wheel with the engine off may run the bat-tery down.
BK0249100US.book 226 ページ 2017年5月10日 水曜日 午前8時49分
Page 405 of 441

Fuses9-28 Vehicle care and maintenance
9
*: Fusible linkSome fuses may not be installed on yourvehicle, depending on
the vehicle model
or specifications.The table above show
s the main equip-
ment corresponding to each fuse.
7 12 V power outlet 15 A8 Rear window wiper 15 A9 Sunroof 20 A10 Ignition switch 10 A11 Option 10 A12
Hazard warning
flasher
15 A
13 4-wheel drive system 10 A14
Stop lights (Brake lights)
15 A
15 Gauges 10 A16 SRS airbag 7.5 A17 Radio 15 A18 Control unit relay 7.5 A19
Interior lights(Room lights)
15 A
20 Back-up lights 7.5 A21
Heated outside rearview mirrors
7.5 A
22
Outside rearview
mirrors
10 A
No.
Sym-bol
Electrical system
Capacity
23
Cigarette lighter/12 V power outlet
15 A
24
Charge 7.5 A
Heated steering
wheel
15 A
25
Power seat(Driver seat)
30 A*
26 Heated seats 30 A27
Power seat(Passenger seat)
No.
Sym-bol
Electrical system
Capacity
Engine compartment fuse location table No.
Sym-bol
Electrical sys-
tem
Capacity
SBF1
Air condition-ing condenser fan motor
30 A*
VLC 40 A*
Behind the fuse block coverMain fuse block
BK0249100US.book 28 ページ 2017年5月10日 水曜日 午前8時49分
Page 419 of 441

Cleaning the outside of your vehicle9-42 Vehicle care and maintenance
9
Salt and other chemicals used on winter roadsin some geographical areas can have a detri-mental effect on the vehicle underbody. Youshould flush the underbody with a high pres-sure hose every time you wash the outside ofyour vehicle.Take special care to remove mud or otherdebris which could trap and hold salt andmoisture.After washing your vehicle, wipe off allwaterdrops from the rubber parts around thedoors to prevent the doors from freezing.
N00946000205
Wax your vehicle once or twice a year, orwhen water does not bead up on the paint.Use a soft cloth to put a small amount of waxon the painted surfaces.
After the wax has
dried, polish with
a dry soft cloth.
Do not wax your vehicle in direct sunlight.You should wax when the painted surfacesare cool.
Never spray or splash water on the electricalparts in the engine compartment. This maydamage them. Be careful also when washingthe underbody to ensure that water does notenter the engine compartment.Avoid automatic car washers that use rotat-ing brushes. These br
ushes may scratch the
paint surface a
nd make it dull.
Scratches are more not
iceable on darker col-
ored vehicles.Some hot water wash
ing equipment uses
high pressure and heat
to clean your vehicle.
Because hot water can da
mage plastics parts
and seep inside your ve
hicle, make sure you
do the following when using such equip-ment:• Keep the washing nozzle at least 28 inches(70 cm) away from the vehicle body.• When washing around the door glass, holdthe nozzle at a distance of more than 28inches (70 cm) and at a right angle to theglass surface.
Make sure to do the following when using anautomatic car wash, with help from eitherthis manual or the car wash operator, toavoid damaging your vehicle:• Fold the outside
rearview mirrors.
• Tape or remove the rear wiper arm assem-bly.• If your vehicle is equi
pped with a roof rails,
check with the car wash operator beforeusing the car wash.CAUTION
• If your vehicle is e
quipped with the rain
sensor, place th
e wiper switch lever in the
“OFF” position to deac
tivate the rain sen-
sor.
During cold weather
NOTE
When the door is frozen, opening it by forcemay tear off or crack the rubber gasketinstalled around the door. Pour warm waterto melt the ice. Be
sure to thoroughly wipe
off the water after opening the door. To pre-vent freezing of the
weatherstripping on the
doors, hood, etc., treat
with silicone lubri-
cant.CAUTION
Waxing
CAUTIONWaxes containing high abrasive compoundsshould not be used. Th
ese waxes remove rust
and stain effectively fr
om the paintwork, but
are harmful to the finish of the paint, becausethey also remove
paint/clearcoat.
They are also harmful to other glossy sur-faces such as the grille, trim, moldings, etc.Do not use gasoline, benzine, kerosene orpaint thinners to remove
road tar or other dirt
from the vehicle surface.Do not put wax on the areas having blackmatte coating because
it can cause uneven
discoloration, patches, bl
urs, etc. If these get
wax on them, wipe the wax off right awaywith a soft clot
h and warm water.
BK0249100US.book 42 ページ 2017年5月10日 水曜日 午前8時49分
Page 438 of 441

Alphabetical index
12-3
12
Fuel hoses
......................................
9-23
Fuel selection
...................................
3-2
Tank capacity
.................................
11-7
Fuel Pump Shut-off System
.................
8-16
Fuses
.................................................
9-26
Fusible links
.......................................
9-25
G
General maintenance
...........................
9-24
General vehicle data
............................
11-4
Genuine parts
.......................................
3-7
Glove compartment
...........................
5-239
Glove compartment light
Bulb capacity
.................................
9-33
H
Hazard warning
flasher switch
...........
5-218
Hazard warning lights
.......................
5-202
Head restraints
....................................
4-11
Headlight leveling switch
..................
5-216
Headlights
Bulb capacity
.................................
9-32
Dimmer
.......................................
5-210
Headlight flasher
..........................
5-211
Replacement
.........................
9-34
, 9-35
Switch
.........................................
5-207
Heated steering wheel switch
.............
5-226
High beam indicator
..........................
5-202
High-mounted stop light
Bulb capacity
.................................
9-32
Hill start assist
...................................
5-95
HomeLink® Wireless
Control System
.5-231
Hood lock release me
chanism and safety
catch
...............................................
9-25
Horn switch
......................................
5-227
I
If the vehicle breaks down
.....................
8-2
Ignition switch
...................................
5-63
Important facts to know in
case of an accident
10-4Indicators
....................
5-181
, 5-201
, 5-202
Information screen display
.................
5-182
Inside rearview mirror
.........................
5-57
Inspection and maintena
nce following rough
road operation
..................................
5-91
Instrument cluster
..............................
5-154
Interior lights
....................................
5-236
J
Jack
....................................................
8-5
Storage
............................................
8-5
Jump-starting the engine
.......................
8-2
K
Keyless entry system
....................
5-7
, 5-30
Keys
....................................................
5-3
L
Labeling
.............................................
11-2
Lane Departure Warning System (LDW)
.....
5-134License plate light
Bulb capacity
.................................
9-32
Replacement
...................................
9-39
Liftgate
..............................................
5-38
Link System
.....................................
5-227
Loading information
..............................
6-6
Lubricants
..........................................
11-7
Luggage floor box
.............................
5-240
Luggage hooks
.................................
5-246
M
MIVEC engine
..........................
5-26
, 5-67
Modification of your vehicle
..................
3-5
Multi Around Monitor
.......................
5-144
Multi information display - Type 1
.....
5-155
Multi information display - Type 2
.....
5-173
BK0249100US.book 3 ページ 2017年5月10日 水曜日 午前8時49分
Page 439 of 441

Alphabetical index12-4
12
O
Octane number
.....................................
3-2
Oil
Engine oil
......................................
11-7
Rear axle oil
...................................
11-7
Transfer oil
....................................
11-7
Operation under adverse driving conditions
...
8-15Outside rearview mirrors
.....................
5-60
Overheating
.........................................
8-4
P
Parking
................................................
6-6
Parking brake
.................................
5-53
Parking brake lever stroke
...................
9-22
Parking lights
Bulb capacity
.................................
9-32
Replacement
..................................
9-36
Polishing
............................................
9-43
Power brakes
......................................
5-92
Power liftgate
.....................................
5-39
Power outlet
.....................................
5-230
Power windows
..................................
5-49
Puncture (Tire changing)
.......................
8-6
R
Radiator cap
........................................
9-9
Radio
General information
about your radio 7-14
Reading lights
Bulb capacity
..................................
9-33
Rear axle oil
..............................
9-12
, 11-7
Rear combination lights
Bulb capacity
..................................
9-32
Replacement
...................................
9-37
Rear Cross Traffic Alert
.....................
5-131
Rear side-marker lights
Bulb capacity
..................................
9-32
Rear turn signal light
Bulb capacity
..................................
9-32
Replacement
...................................
9-37
Rear-view camera
.............................
5-142
Rearview mirror
Inside rearview mirror
.....................
5-57
Outside rearview mirrors
.................
5-60
Replacement of light bulbs
...................
9-31
Replacing tires and wheels
...................
9-19
Reporting Safety Defects
.....................
10-2
S
Safe driving techniques
.........................
6-4
S-AWC (Super-All Wheel Control)
......
5-85
Seat belt
.............................................
4-18
Adjustable seat belt shoulder anchor
.4-24
Child restraint systems
....................
4-27
Front passenger seat belt warning light
.....
4-23Maintenance and inspection
.............
4-34
Seat belt extender
...........................
4-25
Seat belt force limitter
.....................
4-27
Seat belt pr
e-tensioners
...................
4-25
Seat belt use
during pregnancy
.........
4-25
Seats
....................................................
4-2
Arm rest
........................................
4-10
Front seats
.......................................
4-4
Head restraints
...............................
4-11
Heated seat
......................................
4-8
Making a cargo area
........................
4-13
Making a flat seat
...........................
4-16
Seat arrangement
..............................
4-3
Seats and restraint systems
................
4-4
Second row seats
..............................
4-8
Third row seats
...............................
4-10
Service brake
......................................
5-92
Service precautions
...............................
9-2
Side turn-signal light
Bulb capacity
.................................
9-32
Snow tires
..........................................
9-21
Spark plugs
........................................
9-23
Starting the engine
.....................
5-25
, 5-66
Steering
Steering wheel height and reach adjustment
BK0249100US.book 4 ページ 2017年5月10日 水曜日 午前8時49分