2018 MITSUBISHI L200 stop start
[x] Cancel search: stop startPage 21 of 466

7-Fuel tank filler door release
lever*
Open the fuel tank filler door.
The fuel tank filler is located on the rear left side of your vehicle.
Refer to “Filling the fuel tank” on page 2-03.
Automatic transmission Sports
Mode 5A/T
E08501001325
Selector lever operation
The transmission selects an optimum gear ra- tio automatically, depending on the speed of the vehicle and the position of the acceleratorpedal.
While depressing the brake ped-
al, move the selector lever through the gate.Move the selector lever through
the gate.
Selector lever positions
“P” PARK
This position locks the transmission to pre-
vent the vehicle from moving. The engine
can be started in this position.
“R” REVERSE
This position is to back up.
“N” NEUTRAL
At this position the transmission is disengag- ed.
“D” DRIVE
This position is for normal driving.
Refer to “Automatic transmission Sports Mode 5A/T” on page 6-29.
Multi information display
E08501201226
Always stop the vehicle in a safe place before
operating.
Quick guide
1-19OKTE18E1Overview/Quick guide1Type 1 Type 2 LHD RHD
Page 37 of 466

NOTElBe sure to perform the procedure with the
MITSUBISHI mark facing you. If the
MITSUBISHI mark is not facing you when
you open the key case, the switches may
come out.
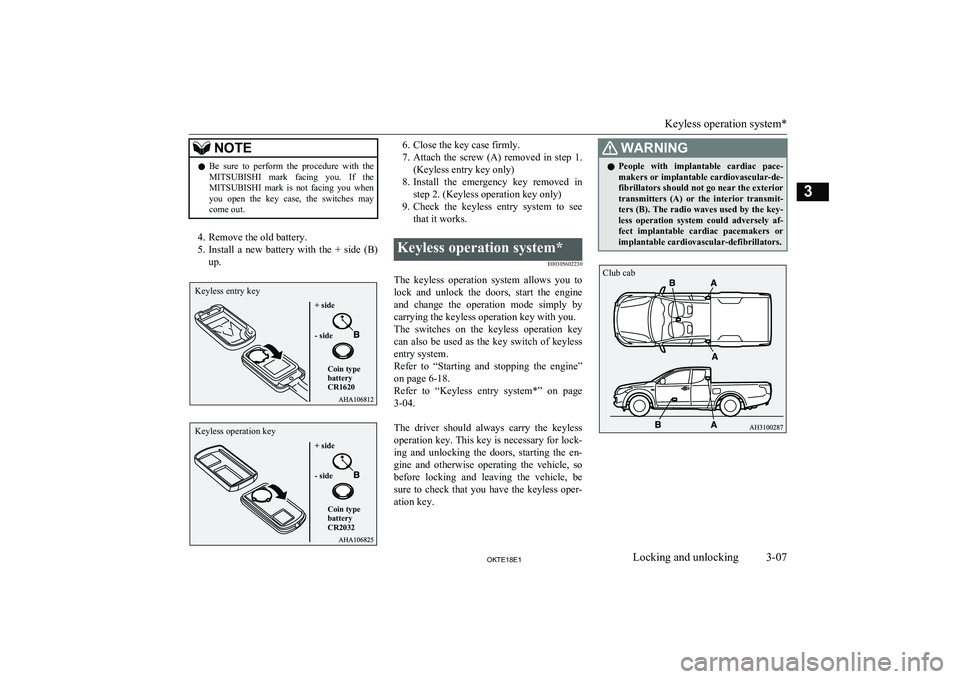
4. Remove the old battery.
5. Install a new battery with the + side (B)
up.
6. Close the key case firmly.
7. Attach the screw (A) removed in step 1.
(Keyless entry key only)
8. Install the emergency key removed in
step 2. (Keyless operation key only)
9. Check the keyless entry system to see
that it works.Keyless operation system*
E00305602230
The keyless operation system allows you tolock and unlock the doors, start the engine
and change the operation mode simply by
carrying the keyless operation key with you. The switches on the keyless operation key can also be used as the key switch of keyless
entry system.
Refer to “Starting and stopping the engine” on page 6-18.
Refer to “Keyless entry system*” on page 3-04.
The driver should always carry the keyless operation key. This key is necessary for lock- ing and unlocking the doors, starting the en-
gine and otherwise operating the vehicle, so before locking and leaving the vehicle, be
sure to check that you have the keyless oper- ation key.
WARNINGl People with implantable cardiac pace-
makers or implantable cardiovascular-de- fibrillators should not go near the exterior
transmitters (A) or the interior transmit-
ters (B). The radio waves used by the key-
less operation system could adversely af- fect implantable cardiac pacemakers orimplantable cardiovascular-defibrillators.
Keyless operation system*
3-07OKTE18E1Locking and unlocking3 Keyless entry key+ side - side
Coin type battery CR1620 Keyless operation key+ side - side
Coin type battery CR2032 Club cab
Page 44 of 466

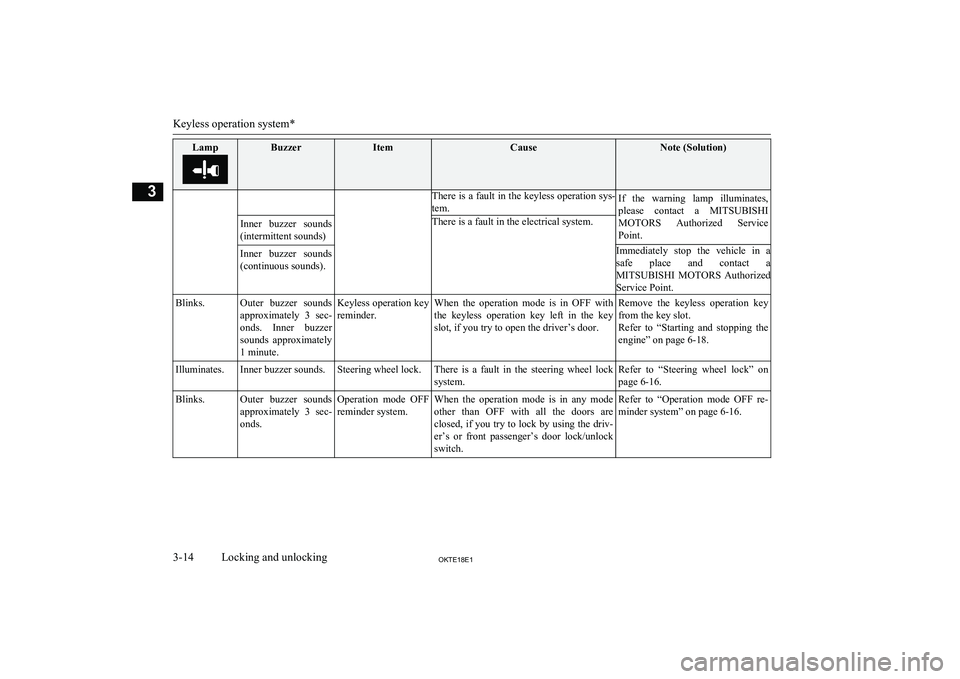
LampBuzzerItemCauseNote (Solution)There is a fault in the keyless operation sys-tem.If the warning lamp illuminates,please contact a MITSUBISHI
MOTORS Authorized Service
Point.Immediately stop the vehicle in a safe place and contact a
MITSUBISHI MOTORS Authorized
Service Point.Inner buzzer sounds
(intermittent sounds)There is a fault in the electrical system.Inner buzzer sounds (continuous sounds).Blinks.Outer buzzer sounds approximately 3 sec-onds. Inner buzzer sounds approximately
1 minute.Keyless operation key reminder.When the operation mode is in OFF withthe keyless operation key left in the key
slot, if you try to open the driver’s door.Remove the keyless operation key from the key slot.
Refer to “Starting and stopping the
engine” on page 6-18.Illuminates.Inner buzzer sounds.Steering wheel lock.There is a fault in the steering wheel lock
system.Refer to “Steering wheel lock” on
page 6-16.Blinks.Outer buzzer sounds approximately 3 sec-onds.Operation mode OFF reminder system.When the operation mode is in any mode
other than OFF with all the doors are closed, if you try to lock by using the driv- er’s or front passenger’s door lock/unlock
switch.Refer to “Operation mode OFF re- minder system” on page 6-16.
Keyless operation system*
3-14OKTE18E1Locking and unlocking3
Page 62 of 466

WARNINGlNever wear the lap portion of the belt
across your abdomen. During accidents it
can press sharply against the abdomen and increase the risk of injury.
l The seat belts must not be twisted when
worn.
3. Pull the belt slightly to adjust slackness
as desired.
To unfasten
Hold the latch plate and push the button on
the buckle.
NOTEl As the belt retracts automatically, keep hold-
ing the latch plate while retracting so that the
belt stows slowly. Failure to do this could damage the vehicle.NOTEl If the seat belt (A) or ring (B) becomes dirty,
the belt may not retract smoothly. If the seatbelt and ring are dirty, clean them with a
mild soap or detergent solution.Seat belt reminder
E00409802361
For the driver and the front
passenger’s seat*
*-This warning lamp shows the case
of the left-hand drive vehicles.
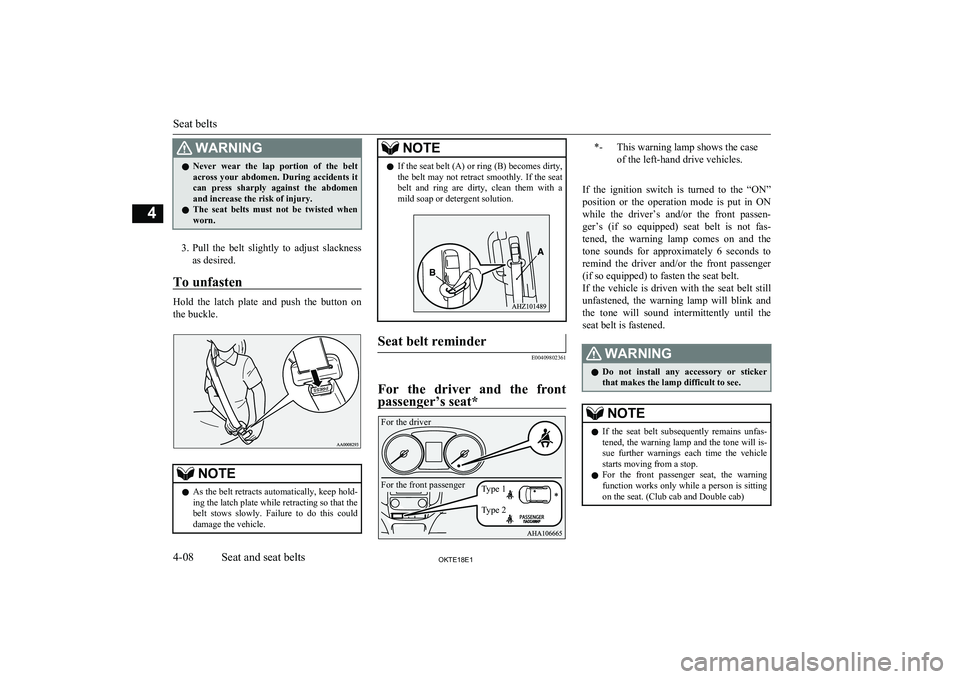
If the ignition switch is turned to the “ON” position or the operation mode is put in ON
while the driver’s and/or the front passen- ger’s (if so equipped) seat belt is not fas-tened, the warning lamp comes on and the
tone sounds for approximately 6 seconds to
remind the driver and/or the front passenger
(if so equipped) to fasten the seat belt.
If the vehicle is driven with the seat belt still
unfastened, the warning lamp will blink and the tone will sound intermittently until the
seat belt is fastened.
WARNINGl Do not install any accessory or sticker
that makes the lamp difficult to see.NOTEl If the seat belt subsequently remains unfas-
tened, the warning lamp and the tone will is-
sue further warnings each time the vehicle starts moving from a stop.
l For the front passenger seat, the warning
function works only while a person is sitting
on the seat. (Club cab and Double cab)
Seat belts
4-08OKTE18E1Seat and seat belts4 For the driver
For the front passenger
Type 1
Type 2
Page 105 of 466

Warning lampsE00502400147Brake warning lamp
E00502503875
This lamp illuminates whenthe ignition switch is turnedto the “ON” position or the
operation mode is put in ON, and goes off after a few sec-onds.
Always make sure that the lamp goes off be- fore driving.
With the ignition switch or the operation mode in ON, the brake warning lamp illumi-
nates under the following conditions:
l When the parking brake lever has been
engaged.
l When the brake fluid level in the reser-
voir falls to a low level.
l When the brake force distribution func-
tion is not operating correctly.
With the ignition switch or the operation
mode in ON, a buzzer sounds under the fol- lowing condition:
l The vehicle speed exceeds 8 km/h
(5 mph) with the parking brake applied.
CAUTIONl In the situations listed below, brake perform-
ance may be compromised or the vehicle may become unstable if brakes are applied
suddenly; consequently, avoid driving at
high speeds or applying the brakes suddenly. Furthermore, the vehicle should be brought
to a stop in a safe location and to have it
checked.
• The brake warning lamp does not illumi-
nate when the parking brake is applied ordoes not turn off when the parking brake is released.
• The ABS warning lamp and brake warn-
ing lamp illuminate at the same time
For details, refer to “ABS warning lamp”
on page 6-57.
• The brake warning lamp remains illumi-
nated during driving.
l The vehicle should be brought to a halt in
the following manner when brake perform- ance has deteriorated.
• Depress the brake pedal harder than usual.
Even if the brake pedal moves down to
the very end of its possible stroke, keep it
pressed down hard.
• Should the brakes fail, use engine braking
to reduce your speed and pull the parking
brake lever.
Depress the brake pedal to operate the
stop lamp to alert the vehicles behind you.Check engine warning lamp
E00502603137
This lamp is a part of an on-
board diagnostic system
which monitors the emis-
sions, engine control system or A/T control system.
If a problem is detected in
one of these systems, this lamp illuminates or flashes.
Although your vehicle will usually be driva-
ble and not need towing, we recommend you
to have the system checked as soon as possi-
ble.
This lamp will also illuminate when the igni-
tion switch is turned “ON” or the operation mode is put in ON, and goes off after the en-gine has started. If it does not go off after the
engine has started, we recommend you to have the vehicle checked.
CAUTIONl Prolonged driving with this lamp on may
cause further damage to the emission control
system. It could also affect fuel economy and drivability.
l If the lamp does not illuminate when the ig-
nition switch is turned to the “ON” position
or the operation mode is put in ON, we rec- ommend you to have the system checked.
Warning lamps
5-15OKTE18E1Instruments and controls5
Page 117 of 466

Precautions to observe whenusing wipers and washers
E00507601473
l If the moving wipers become blocked
partway through a sweep by ice or other deposits on the glass, the wipers maytemporarily stop operating to prevent the
motor from overheating. In this case,
park the vehicle in a safe place, turn the ignition switch to the “LOCK” position
or put the operation mode in OFF, and
then remove the ice or other deposits.
The wipers will start operating again af- ter the wiper motor cools down, so
check that the wipers operate before us-
ing them.
l Do not use the wipers when the glass is
dry.
They may scratch the glass surface and the blades wear out prematurely.
l Before using the wipers in cold weather,
check that the wiper blades are not fro-zen onto the glass. The motor may burn
out if the wipers are used with the blades
frozen onto the glass.
l Avoid using the washer continuously for
more than 20 seconds. Do not operate the washer when the fluid reservoir isempty.
Otherwise, the motor may burn out.
l Periodically check the level of washer
fluid in the reservoir and refill if re-
quired.
During cold weather, add a recommen- ded washer solution that will not freeze
in the washer reservoir. Failure to do so
could result in loss of washer function and frost damage to the system compo- nents.Rear window demister
switch E00507902604
The rear window demister switch can be op-erated when the engine is running.
Push the switch to turn on the rear window
demister. It will be turned off automatically
in about 20 minutes. To turn off the demister
within about 20 minutes, push the switch again.
The indication lamp (A) will illuminate while
the demister is on.
Rear window demister switch
5-27OKTE18E1Instruments and controls5Type 1 Type 2
Page 119 of 466

Economical driving............................................................................. 6-02
Driving, alcohol and drugs.................................................................. 6-02
Safe driving techniques....................................................................... 6-03
Running-in recommendations............................................................. 6-04 Parking brake...................................................................................... 6-05
Parking................................................................................................ 6-06
Steering wheel height and reach adjustment....................................... 6-07
Inside rear-view mirror....................................................................... 6-08 Outside rear-view mirrors................................................................... 6-09
Ignition switch*...................................................................................6-13 Engine switch*.................................................................................... 6-14
Steering wheel lock............................................................................. 6-16
Starting and stopping the engine......................................................... 6-18
Diesel particulate filter (DPF)............................................................. 6-22 Turbocharger operation*..................................................................... 6-23Auto Stop & Go (AS&G) system*..................................................... 6-23
Manual transmission*......................................................................... 6-27 Automatic transmission Sports Mode 5A/T........................................6-29Easy Select 4WD*.............................................................................. 6-35
Super Select 4WD II*......................................................................... 6-40
Rear differential lock*........................................................................ 6-45 4-wheel drive operation*.................................................................... 6-49
Inspection and maintenance following rough road operation............. 6-51
Cautions on handling of 4-wheel drive vehicles................................. 6-52
Braking................................................................................................ 6-53
Hill start assist..................................................................................... 6-54
Brake assist system............................................................................. 6-55
Emergency stop signal system*.......................................................... 6-56
Anti-lock brake system (ABS)............................................................ 6-56Power steering system.........................................................................6-58
Active Stability & Traction Control (ASTC)*....................................6-59
Trailer Stability Assist (TSA)............................................................. 6-62 Cruise control*.................................................................................... 6-63
Speed Limiter...................................................................................... 6-69
Lane Departure Warning (LDW)*...................................................... 6-75
Rear-view camera*............................................................................. 6-79
Cargo loads......................................................................................... 6-83Trailer towing......................................................................................6-84Starting and driving
OKTE18E16
Page 120 of 466

Economical drivingE00600102608
For economical driving, there are some tech- nical requirements that have to be met. Theprerequisite for low fuel consumption is a
properly adjusted engine. In order to achieve longer life of the vehicle and the most eco- nomical operation, we recommend you tohave the vehicle checked at regular intervals in accordance with the service standards.
Fuel economy and generation of exhaust gas
and noise are highly influenced by personal
driving habits as well as the particular operat- ing conditions. The following points shouldbe observed in order to minimize wear of
brakes, tyres and engine as well as to reduce
environmental pollution.
Accelerating and decelerating
Drive according to the traffic conditions andavoid sudden starts, sudden acceleration and
sudden braking, as they will increase fuel
consumption.
Shifting
Shift only at an appropriate speed and engine speed. Always use the highest shift position
possible.
The transfer shift lever or the drive mode-se-
lector should be set to “2H” when driving 4WD vehicles on normal roads and express
ways to obtain best possible fuel economy.
City traffic
Frequent starting and stopping increases the
average fuel consumption. Use roads with smooth traffic flow whenever possible. When driving on congested roads, avoid use of a
low shift position at high engine speeds.
Idling
The vehicle consumes fuel even during idling. Avoid extended idling whenever pos-
sible.
Speed
At higher vehicle speed, more fuel is con-
sumed. Avoid driving at full speed. Even a slight release of the accelerator pedal willsave a significant amount of fuel.
Tyre inflation pressure
Check the tyre inflation pressures at regular intervals. Low tyre inflation pressure increa-ses road resistance and fuel consumption. In addition, low tyre pressures adversely affect
tyre wear and driving stability.
Cargo loads
Do not drive with unnecessary articles in the
luggage compartment. Especially during city
driving where frequent starting and stopping is necessary, the increased weight of the ve-
hicle will greatly affect fuel consumption. Al- so avoid driving with unnecessary luggage or carriers, etc., on the roof; the increased air re- sistance will increase fuel consumption.
Cold engine starting
Starting of a cold engine consumes more fuel. Unnecessary fuel consumption is alsocaused by keeping a hot engine running. Af-
ter the engine is started, commence driving as soon as possible.
Cooler or air conditioning
The use of the air conditioner will increase the fuel consumption.
Driving, alcohol and drugs
E00600200070
Driving after drinking alcohol is one of the
most frequent causes of accidents.
Economical driving
6-02OKTE18E1Starting and driving6