2018 MERCEDES-BENZ SPRINTER high beam
[x] Cancel search: high beamPage 88 of 294

Highbeam Assist
General notes
You can use this function to set the headlamps
to change between low beam and high beam
automatically. The system recognizes vehicles
with their lights on, either approaching from the
opposite direction or traveling in front of your
vehicle, and consequently switches the head-
lamps from high beam to low beam.
Once the system no longer detects any other
vehicles, it reactivates the high-beam head-
lamps.
The system's optical sensor is located behind
the windshield near the overhead control panel.
Important safety notes
GWARNING
Highbeam Assist does not recognize road
users:
Rwho have no lights, e.g. pedestrians
Rwho have poor lighting, e.g. cyclists
Rwhose lighting is blocked, e.g. by a barrier
In very rare cases, Highbeam Assist may fail to
recognize other road users who have lights, or
may recognize them too late. In this or similar situations, the automatic high-beam head-
lamps will not be deactivated or will be acti-
vated regardless. There is a risk of an acci-
dent.
Always carefully observe the traffic conditions
and switch off the high-beam headlamps in
good time.
Highbeam Assist cannot take into account road,
weather or traffic conditions. Highbeam Assist
is only an aid. You are responsible for adjusting
the vehicle's lighting to the prevailing light, vis-
ibility and traffic conditions.
In particular, the detection of obstacles can be
restricted if there is:
Rpoor visibility, e.g. due to fog, heavy rain or
snow
Rdirt on the sensors or anything else covering
the sensors
Activating/deactivating Highbeam
Assist
XTo activate: switch on the Highbeam Assist
function using the on-board computer
(
Ypage 170).
XTurn the light switch to the Ãposition.
XPress the combination switch beyond the
pressure point in the direction of arrow :
(
Ypage 84).
Highbeam Assist is active.
The _ or
indicator lamp in the
multifunction display lights up when it is dark
and the light sensor activates the low-beam
headlamps.
If you are driving at speeds above approx-
imately 22 mph (35 km/h) and no other road
users have been detected:
The high-beam headlamps are switched on
automatically. The Kindicator lamp in the
instrument cluster also lights up.
If you are driving at speeds below approx-
imately 19 mph (30 km/h), other road users
have been detected or the roads are ade-
quately lit:
The high-beam headlamps are switched off
automatically. The Kindicator lamp in the
instrument cluster goes out. The _or
indicator lamp in the multifunction
display remains lit.
XTo deactivate: move the combination switch
back to its normal position or move the light
switch to another position.
The _ or
indicator lamp in the
multifunction display goes out.
Headlamps fogged up on the inside
The headlamps may fog up on the inside if there is high atmospheric humidity.
XSwitch on the low-beam headlamps and drive
off.
The level of moisture diminishes, depending
on the length of the journey and the weather
conditions (humidity and temperature).
If the level of moisture does not diminish:
XHave the headlamps checked at a qualified
specialist workshop.
86Exterior lighting
Lights and windshield wipers
Page 91 of 294

Changing bulbs
Important safety notes
GDANGER
Xenon bulbs carry a high voltage. You can get an electric shock if you remove the cover of
the Xenon bulb and touch the electrical con-
tacts. There is a risk of fatal injury.
Never touch the parts or the electrical con-
tacts of the Xenon bulb. Always have work on
the Xenon bulbs carried out at a qualified spe-
cialist workshop.
GWARNING
Bulbs, lamps and connectors can get very hot
when operating. If you change a bulb, you
could burn yourself on these components.
There is a risk of injury.
Allow these components to cool down before
changing a bulb.
!Make sure the bulbs are always securely
installed.
If your vehicle is equipped with Bi-Xenon bulbs,
you can recognize this by the following: the cone
of light from the Xenon bulbs moves from the
top to the bottom and back again when you start
the engine. For this to be observed, the low-
beam headlamps must be switched on before
starting the engine.
The bulbs and lamps are an essential compo-
nent of vehicle safety. You must therefore make
sure that these function correctly at all times.
Have the headlamp setting checked regularly.
RAlways switch off the vehicle's lighting sys-
tem before changing a bulb.
This will prevent a short circuit.
RDo not touch the glass tube of new bulbs with your bare hands. Always use a clean, lint-free
cloth or only touch the base of the bulb when
installing.
Even minor contamination can burn into the
glass surface and reduce the service life of the
bulbs.
RDo not use a bulb that has been dropped or
that has scratches on its glass tube.
The bulb could explode.
ROnly use bulbs in closed lamps which have
been designed for this purpose.
ROnly use spare bulbs of the same type and
with the prescribed voltage
RProtect the bulbs from moisture when in use.
If the new bulb still does not light up, consult a
qualified specialist workshop.
RHave the LEDs and bulbs of the following
lamps changed at a qualified specialist work-
shop:
-the additional turn signals in the exterior
mirrors
-the high-mounted brake lamp
-LED daytime running lamps (Bi-Xenon
headlamps)
-Bi-Xenon lamps (Bi-Xenon headlamps)
-front fog lamps
If you require assistance changing bulbs, con-
sult a qualified specialist workshop.
Front bulbs
Overview of bulb replacement – bulb
types
The following bulbs can be replaced. Bulb types can be found in the legend.
Vehicle swit hhalogen headlamps
:
Turn signal lamp, parking lamp, side marker
lamp: NAK 3457
;Daytime running lamps: W21W
=Low-beam headlamps: H7 55W
?High-beam headlamps: H7 55W
Changing bulbs89
Lights and windshield wipers
Z
Page 92 of 294

Vehicles with Bi-Xenon headlamps
:
Turn signal lamp, parking lamp, side marker
lamp: NAK 3457
;Cornering light function: H7 55W
Vehicles with additional turn signals in the
exterior mirrors
Additional turn signal lamp: HPC 16WY
Low-beam headlamps and high-beam
headlamps/cornering lamp
Example: halogen headlamps
XSwitch off the lighting system.
XOpen the hood (Ypage 219).
XTurn housing cover :in the direction of the
arrow and remove it.
Example: halogen headlamps
;
Low-beam headlamp bulb holder
=Bulb holder for high-beam headlamp
XTurn the corresponding socket with bulb ;
or = counter-clockwise and pull it out of the
lamp.
XPull the bulb out of the bulb holder.
XInsert the new bulb in such a way that its base
fits into the recess of the bulb holder.
XInsert the bulb holder with the bulb into the
lamp and turn it clockwise to tighten.
The bulb holder engages audibly.
XPlace housing cover :into the opening and
turn in the opposite direction of the arrow.
XClose the hood.
Cornering light function/daytime run-
ning lamps
XSwitch off the lighting system.
XOpen the hood (Ypage 219).
XTurn housing cover :counter-clockwise and
remove.
90Changing bulbs
Lights and windshield wipers
Page 165 of 294
Using thef,g,4or9 buttons you can
select the following functions:
RCalling up the service due date
(Ypage 227)
RChecking the oil level (Ypage 221)
RChecking the DEF level (Ypage 161)
RPreselecting/setting the auxiliary heating
switch-on time (Ypage 109)
RTire pressure monitor(Ypage 254)
RSetting the time (Ypage 163)
RActivating/deactivating Highbeam Assist
(Ypage 170)
RSetting the daytime running lamps
(Ypage 82)
Setting the time
XTurn the key to position 2in the ignition lock.
XPress the 4menu button repeatedly until the
hours figure flashes.
XPress the forg button to set the hour.
XPress the 9reset button.
The minute display flashes.
XPress the forg button to set the minute.
iIf you keep the forg button pressed, the
value will change continuously.
Activating/deactivating Highbeam
Assist
XTurn the key to position 2in the ignition lock.
XPress the 4menu button repeatedly until the
_ indicator lamp flashes and the onorOFFmessage appears in the display.
XUse the forg button to switch Highbeam
Assist on/off.
Switching the daytime running lamps
on/off
If you switch the daytime running lamps on, the
daytime running lamps will automatically light
up when the engine is running.
For safety reasons, it is only possible to change
this setting when the vehicle is stationary. The
factory setting is on
in countries in which day-
time running lamp mode or daytime running
lamps are mandatory.
XTurn the key to position 2in the ignition lock.
XPress the 4menu button repeatedly until the
L indicator lamp flashes and the onorOFFmessage appears in the display.
XPress the forg button to activate or deac-
tivate the daytime running lamps.
iUSA only:
If you turn the light switch to TorL,
the corresponding light switches on. If you
turn the light switch to Ã, the daytime
running lamps remain switched on.
Canada only:
If you turn the light switch to L, the low-
beam headlamps switch on. If you turn the
light switch to TorÃ, the daytime run-
ning lamps remain switched on.
On-board computer (vehicles with
steering wheel buttons)
Operating the on-board computer
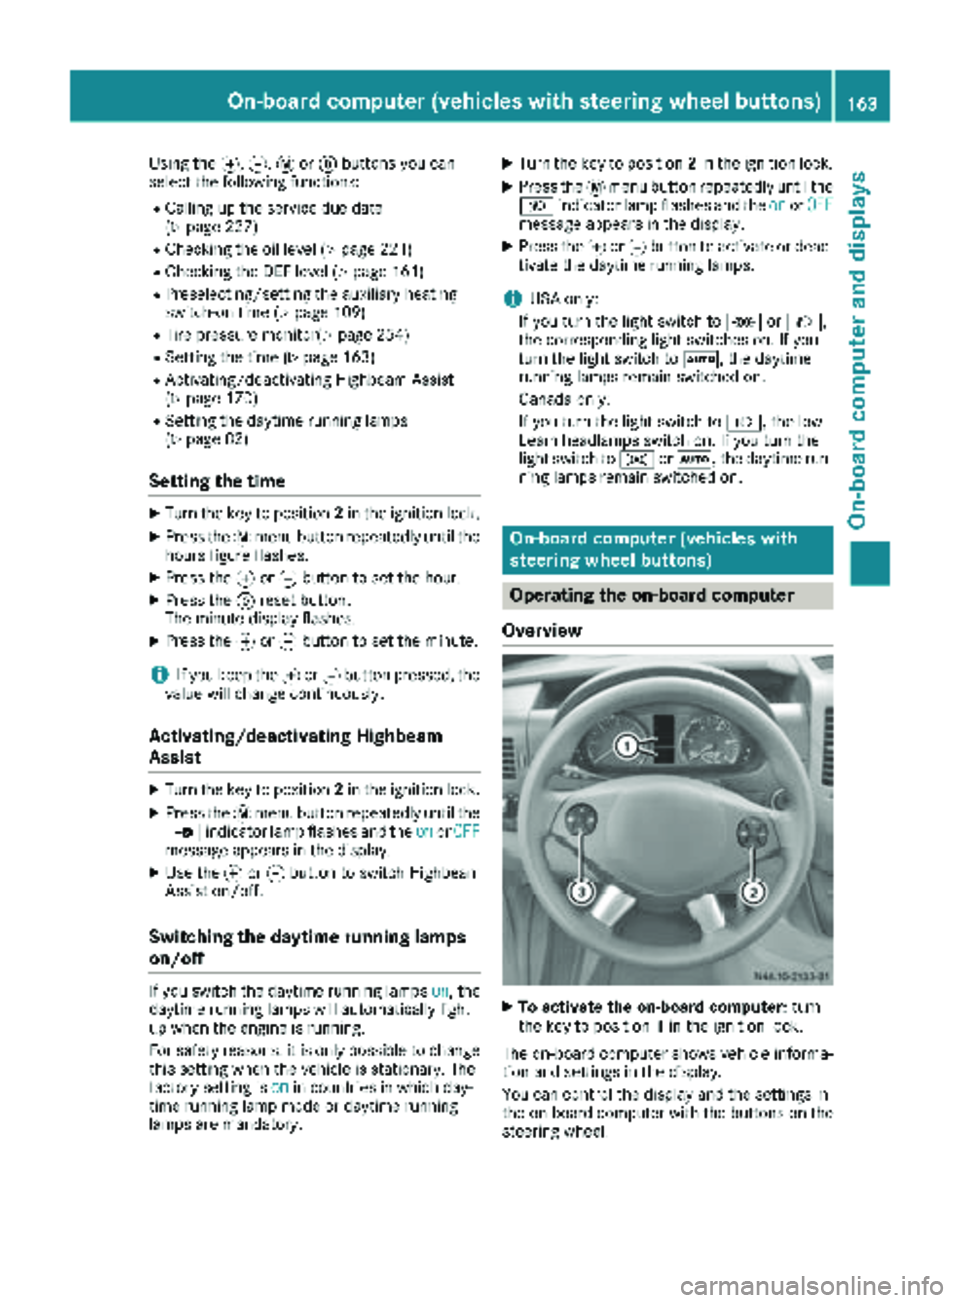
Overview
XTo activate the on-board computer: turn
the key to position 1in the ignition lock.
The on-board computer shows vehicle informa-
tion and settings in the display.
You can control the display and the settings in
the on-board computer with the buttons on the
steering wheel.
On-board computer (vehicles with steering wheel buttons)163
On-board computer and displays
Z
Page 169 of 294

Settings menu
Introduction
In the Settings menu, the following options and
submenus are available:
RResetting all settings
RResetting the functions of a submenu
RInstrument cluster (Ypage 168)
-Units and language settings
-Status bar settings
RTime(Ypage 169)
RLighting (Ypage 170)
-Switching surround lighting on/off
-Switching the daytime running lamps
on/off
-Setting the delayed switch-off time for the
exterior lighting
-Activating/deactivating Highbeam Assist
RVehicle
-Setting the radio station selection
-Setting the windshield wiper sensitivity
RStationary heating or auxiliary heating
(Ypage 109)
RConvenience (Ypage 172)
-Key-dependent settings
iFor safety reasons, it is not possible to reset
all of the functions while the vehicle is in
motion. For example, in the Lighting
sub-
menu, the Daytime runn. lampsfunction
remains unchanged.
Resetting all settings
Settings menu
When the Settingsmessage is displayed, you
can reset all functions of the submenu to the
factory settings. Using the steering wheel buttons
XPress the
VorU button repeatedly
until the Settingsmenu appears in the dis-
play.
XPress and hold the 9reset button for approx-
imately 3 seconds.
You will see a message in the display prompt-
ing you to press the 9reset button again to
confirm.
XPress the 9reset button again.
The functions in all submenus are reset to the
factory settings.
iIf you want to retain the settings, do not
press the 9reset button a second time. The
Settings
menu appears again after approx-
imately 5 seconds.
Resetting the functions of a submenu
You can individually reset the functions of each
submenu to the factory settings.
Using the steering wheel buttons
XPress the VorU button repeatedly
until the Settingsmenu appears in the dis-
play.
XPress the 9button to switch to the sub-
menu selection.
XPress the WorX button to select a
submenu.
XPress and hold the 9reset button for approx-
imately 3 seconds.
You will see a message in the display prompt-
ing you to press the 9reset button again to
confirm.
XPress the 9reset button again.
All functions in the submenu are reset to the
factory settings.
iIf you want to retain the settings, do not
press the 9reset button a second time. The
Settings
menu appears again after approx-
imately 5 seconds.
On-board computer (vehicles with steering wheel buttons)167
On-board computer and displays
Z
Page 172 of 294

XPress theWorX button to select the
Clock/Datesubmenu.
XPress the 9button to select Set clockHoursorMinutes.
XPress the WorX button to set the val-
ues.
Selecting the time format
Using the steering wheel buttons
XPress the VorU button repeatedly
until the Settingsmenu appears in the dis-
play.
XPress the 9button to switch to the sub-
menu selection.
XPress the WorX button to select the
Clock/Datesubmenu.
XPress the 9button to select the 12/24 hfunction.
The selection marker is on the current setting.
XPress theWorX button to select the
12 hor 24 hclock format.
Lighting submenu
Activating/deactivating Highbeam Assist
Using the steering wheel buttons
XPress the VorU button repeatedly
until the Settingsmenu appears in the dis-
play.
XPress the 9button to switch to the sub-
menu selection.
XPress the WorX button to select the
Lightingsubmenu.
XPress the 9button to select the High‐beam Assistfunction.
The selection marker is on the current setting.
XPress the WorX button to switch
Highbeam Assist OnorOff.
iFor safety reasons, it is not possible to reset
the HighbeamAssistfunction to the factory
settings during a journey. You will see the fol-
lowing message in the display: Setting
only possible at standstill.
For further information about Highbeam Assist,
see (
Ypage 86).
Switching the daytime running lamps on/
off
If you switch the daytime running lamps to On,
the daytime running lamps will automatically
light up when the engine is running.
For safety reasons, it is only possible to change
this setting when the vehicle is stationary. The
factory setting is On
in countries in which day-
time running lamp mode or daytime running
lamps are mandatory.
Using the steering wheel buttons
XPress the VorU button repeatedly
until the Settingsmenu appears in the dis-
play.
XPress the 9button to switch to the sub-
menu selection.
XPress the WorX button to select the
Lightingsubmenu.
XPress the 9button to select the Daytimedriv. lightsfunction.
The selection marker is on the current setting.
XPress the WorX button to switch the
daytime running lamps OnorOff.
iIf you turn the light switch to TorL,
the corresponding lamp switches on. If you
turn the light switch to Ã, the daytime
running lamps remain switched on.
iFor safety reasons, it is not possible to reset
the Daytime driv. lightsfunction to the
factory setting while the vehicle is in motion.
170On-board computer (vehicles with steering wheel buttons)
On-board computer and displays
Page 182 of 294
Drivingsystems
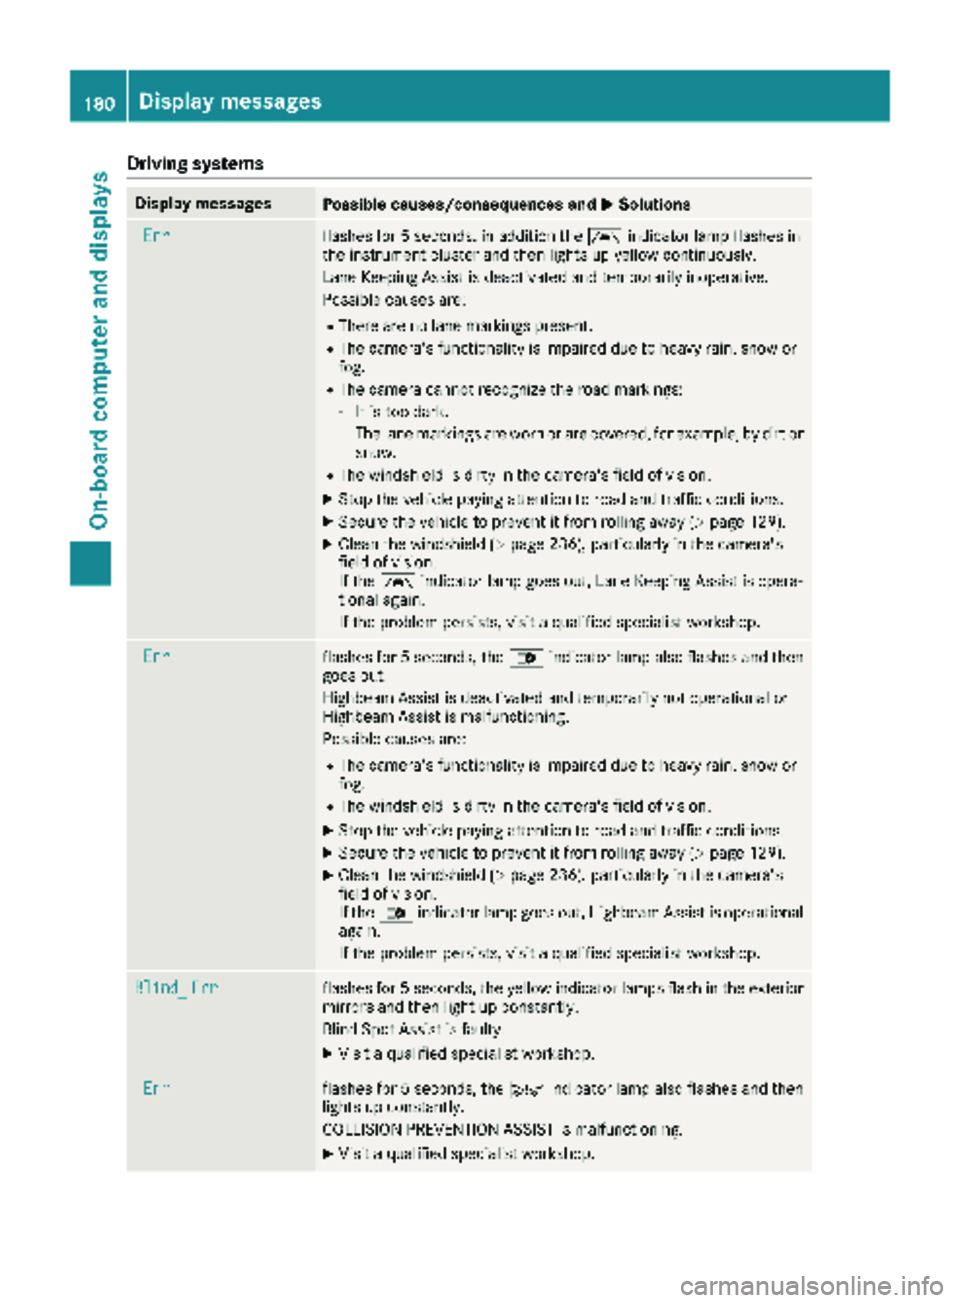
Display messagesPossible causes/consequences an dMSolutions
Errflashe sfo r 5 seconds, in addition th eà indicator lamp flashes in
th einstrumen tcluster and then lights up yello wcontinuously.
Lan eKeepin gAssis tis deactivated and temporarily inoperative .
Possible causes are :
RThere are no lanemarking spresent.
RThe camera's functionalit yis impaire ddue to heav yrain ,snow or
fog.
RThe camera canno trecogniz eth eroad markings:
-It is to odark.
-The lan emarking sare wor nor are covered, fo rexample, by dir tor
snow.
RThe windshield is dirty in th ecamera's field of vision .
XStop thevehicle payin gattention to road and traffic conditions.
XSecur eth evehicle to preven tit from rollin gaway (Ypage 129).
XClean th ewindshield (Ypage 236), particularly in th ecamera's
field of vision .
If th eà indicator lamp goe sout ,Lan eKeepin gAssis tis opera-
tional again .
If th eproblem persists ,visit aqualified specialis tworkshop .
Errflashesfo r 5 seconds ,th e_ indicator lamp also flashes and then
goe sout .
Highbeam Assis tis deactivated and temporarily no toperational or
Highbeam Assis tis malfunctioning.
Possible causes are :
RThe camera's functionalit yis impaire ddue to heav yrain ,snow or
fog.
RThe windshield is dirty in th ecamera's field of vision .
XStop thevehicle payin gattention to road and traffic conditions.
XSecur eth evehicle to preven tit from rollin gaway (Ypage 129).
XClean th ewindshield (Ypage 236), particularly in th ecamera's
field of vision .
If th e_ indicator lamp goe sout ,Highbeam Assis tis operational
again .
If th eproblem persists ,visit aqualified specialis tworkshop .
Blind_Errflashesfo r 5 seconds ,th eyello windicator lamp sflas hin th eexterio r
mirrors and then ligh tup constantly.
Blin dSpot Assis tis faulty.
XVisit aqualified specialis tworkshop .
Errflashesfo r 5 seconds ,th eÄ indicator lamp also flashes and then
lights up constantly.
COLLISION PREVENTION ASSIST is malfunctioning.
XVisit aqualified specialis tworkshop .
180Display messages
On-board computer and displays
Page 187 of 294
Lights
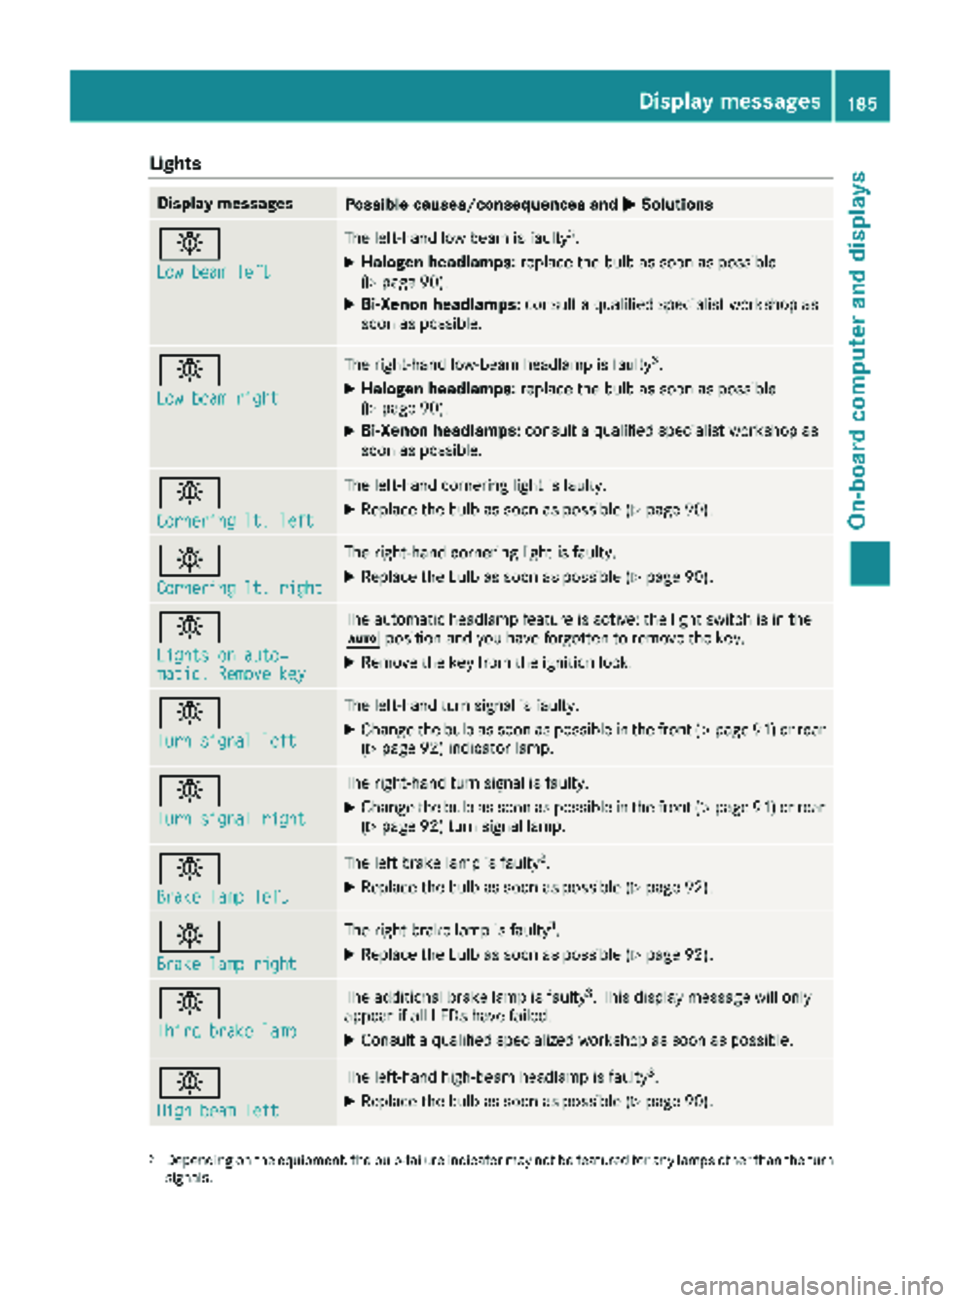
Display messagesPossible causes/consequences andMSolutions
b
Low beam left
The left-hand low beam is faulty3.
XHalogen headlamps:replace the bulb as soon as possible
(Ypage 90).
XBi-Xenon headlamps: consult a qualified specialist workshop as
soon as possible.
b
Low beam right
The right-hand low-beam headlamp is faulty3.
XHalogen headlamps: replace the bulb as soon as possible
(Ypage 90).
XBi-Xenon headlamps: consult a qualified specialist workshop as
soon as possible.
b
Cornering lt. left
The left-hand cornering light is faulty.
XReplace the bulb as soon as possible (Ypage 90).
b
Cornering lt. right
The right-hand cornering light is faulty.
XReplace the bulb as soon as possible (Ypage 90).
b
Lights on auto‐matic. Remove key
The automatic headlamp feature is active: the light switch is in the
à position and you have forgotten to remove the key.
XRemove the key from the ignition lock.
b
Turn signal left
The left-hand turn signal is faulty.
XChange the bulb as soon as possible in the front (Ypage 91) or rear
(Ypage 92) indicator lamp.
b
Turn signal right
The right-hand turn signal is faulty.
XChange the bulb as soon as possible in the front (Ypage 91) or rear
(Ypage 92) turn signal lamp.
b
Brake lamp left
The left brake lamp is faulty3.
XReplace the bulb as soon as possible (Ypage 92).
b
Brake lamp right
The right brake lamp is faulty3.
XReplace the bulb as soon as possible (Ypage 92).
b
Third brake lamp
The additional brake lamp is faulty3. This display message will only
appear if all LEDs have failed.
XConsult a qualified specialized workshop as soon as possible.
b
High beam left
The left-hand high-beam headlamp is faulty3.
XReplace the bulb as soon as possible (Ypage 90).
3Depending on the equipment, the bulb-failure indicator may not befeatured for any lamps other than the turn
signals.
Display messages185
On-board computer and displays
Z