2018 MERCEDES-BENZ SLC ROADSTER key
[x] Cancel search: keyPage 94 of 298
thenopent he driver's or front-passenger
door.
iThe exterio rmirrors do not fol doutif they
have been folde dinmanually.
Exterior mirro rpushed ou tofposition
If an exterio rmirrorh asbeen pushe doutof
position, procee dasfollows:
XVehicle swithout electricall yfolding exte-
rio rm irrors: movethe exterio rmirrori nto
the correct positio nmanually.
XVehicle swithe lect ricall yfolding exterior
mirrors: press and hol dmirror-folding button
unti lyou hear the mirrorc lick into place
(
Ypage 91).
The mirrorh ousing is engaged agai nand you
can adjus tthe exterio rmirrors as usual
(
Ypage 91).
Automati canti-glare mirrors
GWARNING
Electrolyte maye scap eift he glas sinana uto-
matic anti-glar emirror breaks. Th eelectrolyte
is harmfula nd causesirritation. It must not
come into contact with your skin, eyes ,res-
piratory organs or clothing or be swallowed.
There is ariskofi njury.
If yo ucome into contact with the electrolyte,
observe the following:
RRinse off the electrolyte fromy ours kin
immediatel ywithw ater.
RImmediately rinse the electrolyte ou tof
your eyes thoroughl ywithc lean water.
RIf the electrolyte is swallowed, immediately
rinse your mouth ou tthoroughly. Do not
induce vomiting.
RIf electrolyte come sinto contact with your
skinorh airoriss wallowed ,see km edical
attentio nimm ediately.
RImmediately change ou tofclothing which
hasc ome into contact with electrolyte.
RIf an allergi creactio noccurs, seek medical
attentio nimm ediately. The rear-view mirrora
nd the exteriormirroro n
the driver's side automaticall ygointo anti-glare
mod eift he following conditions ar emet simul-
taneously:
Rthe ignition is switched on and
Rincident light fromh eadlamps strikes the sen-
sor in the rear-view mirror
The mirrors do not go into anti-glar emodei
f
re
vers egearise ngaged or if the interio rlighting
is switched on.
Parking position fort he exterior mir-
ror on the front-passenge rside
Settin gand storin gthe parking position
Usin grevers egear
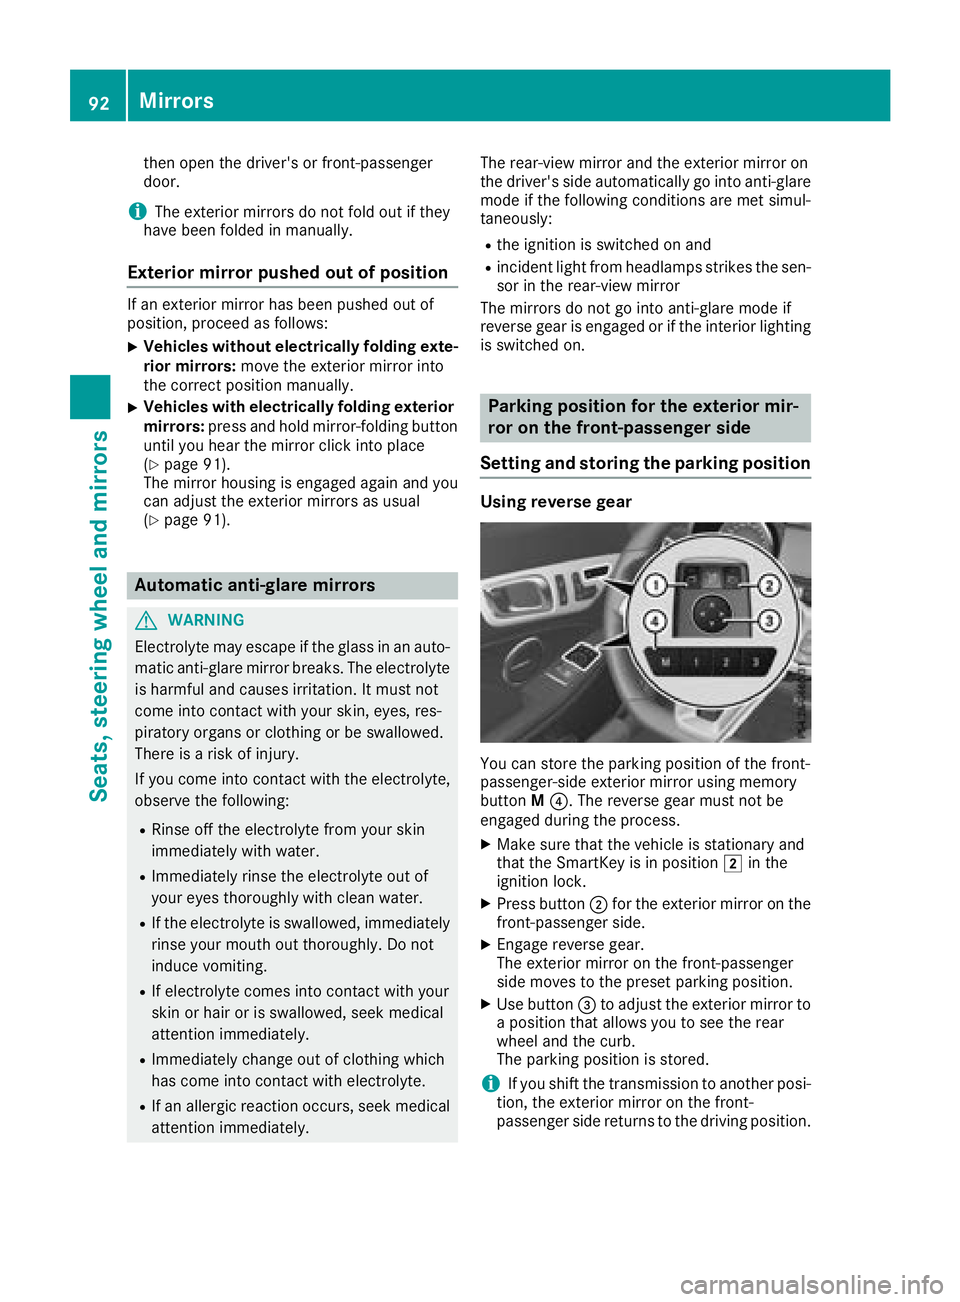
Youc an stor ethe parking positio nofthe front-
passenger-side exterio rmirroru sing memory
button M?.T he reverse gea rmustn ot be
engaged durin gthe process.
XMake sure thatt he vehicleisstationar yand
thatt he SmartKeyisinp osition 2in the
ignition lock.
XPress button ;for the exterio rmirror ont he
front-passenge rside.
XEngage revers egear.
The exterio rmirroront he front-passenger
side moves to the presetp arking position.
XUse button =to adjus tthe exterio rmirrort o
ap osit iont hata llowsyou to seet he rear
whee land the curb.
Th ep arking positio niss tored.
iIf yo ushift the transmission to anotherp osi-
tion, the exterio rmirroront he front-
passenge rsider eturns to the drivin gposit ion.
92Mirrors
Seats, steering wheel andmirrors
Page 95 of 298
Using the memory button
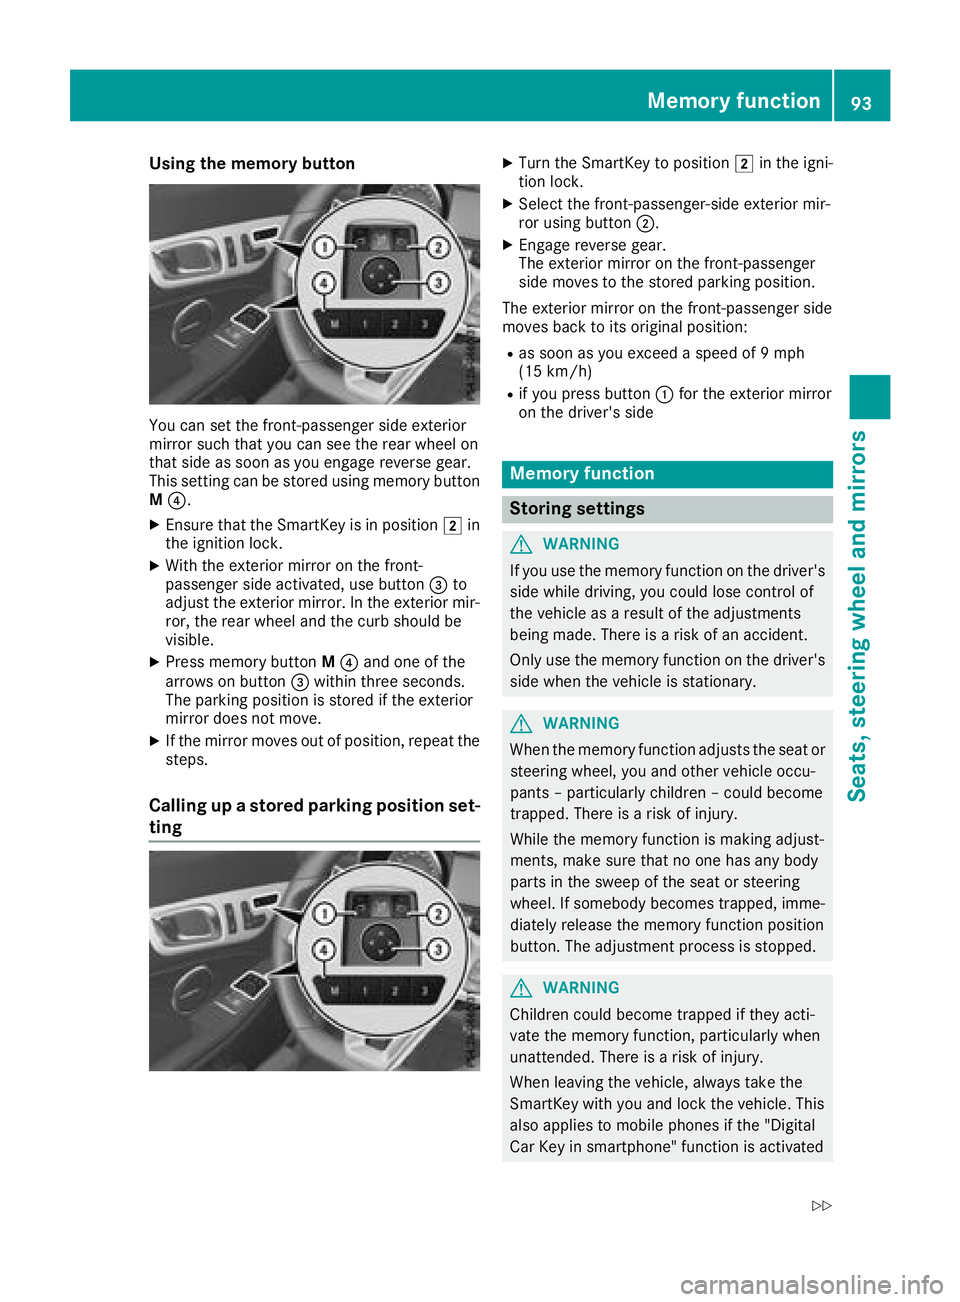
You can set the front-passenger side exterior
mirror such that you can see the rear wheel on
that side as soon as you engage reverse gear.
This setting can be stored using memorybutton
M ?.
XEnsure that the SmartKey is in position 2in
the ignition lock.
XWith the exterior mirror on the front-
passenger side activated, use button =to
adjust the exterior mirror.Int he exterior mir-
ror, the rear wheel and the curb should be
visible.
XPress memoryb uttonM? and one of the
arrows on button =within three seconds.
The parkin gposition is stored if the exterior
mirror does not move.
XIf the mirror moves out of position ,repeat the
steps.
Calling up astored parking position set-
ting
XTurn the SmartKey to position 2in the igni-
tion lock.
XSelec tthe front-passenger-side exterior mir-
ror using button ;.
XEngage reverse gear.
The exterior mirror on the front-passenger
side moves to the stored parkin gposition.
The exterior mirror on the front-passenger side
moves back to its original position:
Ras soon as you exceed aspeed of 9mph
(15 km/h)
Rif you press button :for the exterior mirror
on the driver'ss ide
Memoryfunction
Storing settings
GWARNING
If you use the memoryf unction on the driver's
side while driving, you could lose contro lof
the vehicle as aresult of the adjustments
being made. There is arisk of an accident.
Only use the memoryf unction on the driver's
side when the vehicle is stationary.
GWARNING
When the memoryf unction adjuststhe seat or
steering wheel, you and other vehicle occu-
pant s–p articularly children –could become
trapped. There is arisk of injury.
While the memoryf unction is makingadjust-
ments, make sure that no one has any body
parts in the sweep of the seat or steering
wheel. If somebody becomes trapped, imme-
diately release the memoryf unction position
button. The adjustment proces sisstopped.
GWARNING
Children could become trapped if they acti-
vate the memoryf unction,particularly when
unattended. There is arisk of injury.
When leaving the vehicle, always tak ethe
SmartKey with you and lock the vehicle. This
also applies to mobile phones if the "Digital
Car Key in smartphone" function is activated
Memor yfunction93
Seats, steering wheel and mirrors
Z
Page 96 of 298
via the Mercedesmeconnect web app.Never
leave children unsupervisedint he vehicle.
The memory function can be activated at any
time, e.g. even when the SmartKey is not in the ignitio nlock.
With the memory function, you can store up to
three different settings, e.g. for three different
people.
The following settings are stored as asingle
memory preset:
Rposition of the seat, backrest and head
restraint
Rdriver'ss ide:steering wheelp osition
Rdriver'sside:position of the exterior mirrors
on the driver'sa nd front-passenge rsides
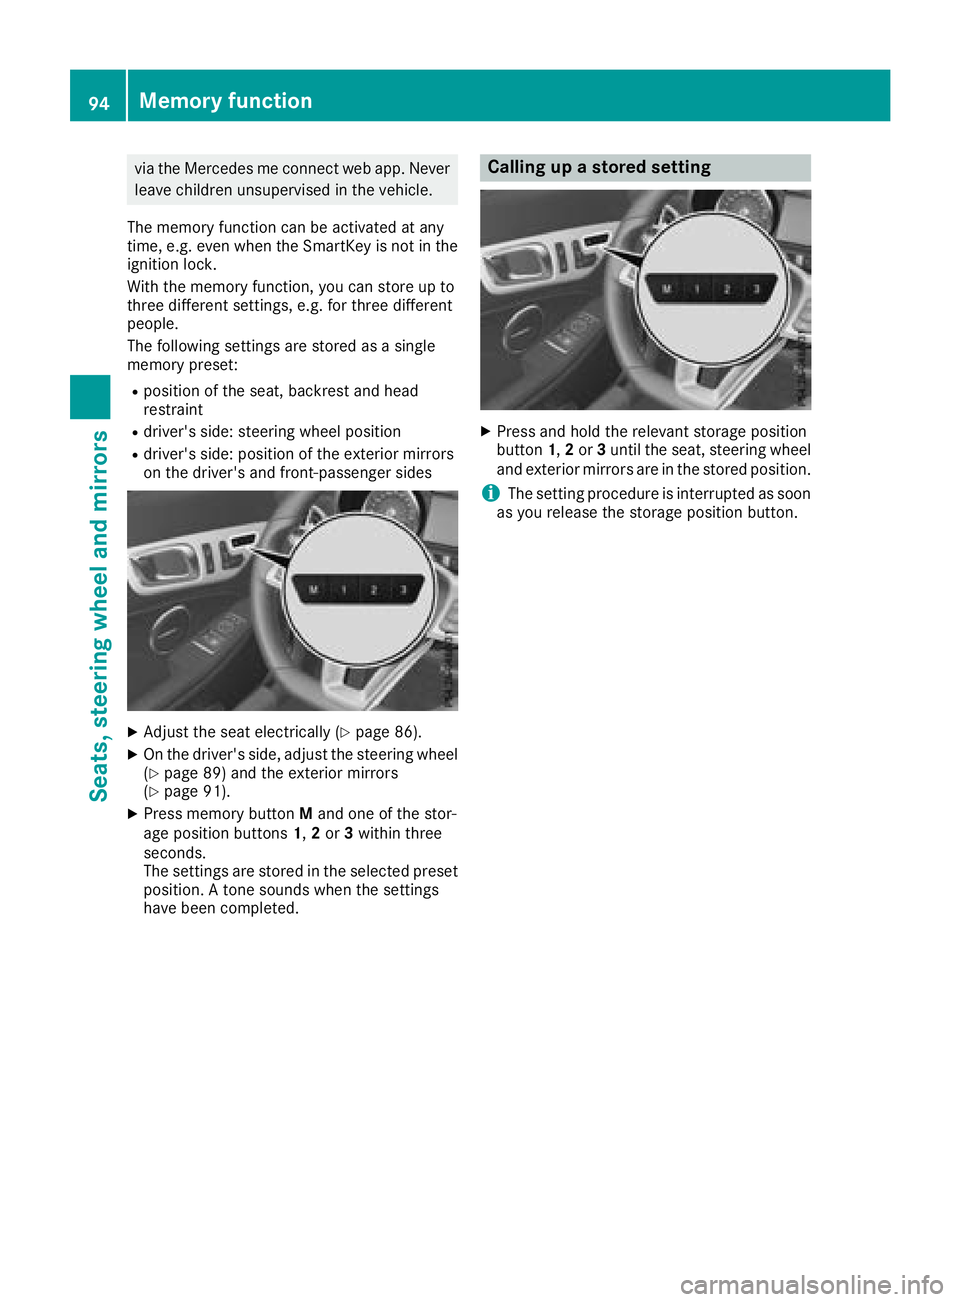
XAdjust the seat electrically (Ypag e86).
XOn the driver'ss ide,adjust the steering wheel
(Ypag e89) and the exterior mirrors
(Ypag e91).
XPress memory button Mand one of the stor-
age position buttons 1,2or 3withi nthree
seconds.
The settings are stored in the selected preset
position. Atone sounds when the settings
have been completed.
Calling up astored setting
XPress and hold the relevant storage position
button 1,2or 3until the seat, steering wheel
and exterior mirrors are in the stored position.
iThe setting procedure is interrupted as soon
as you release the storage position button.
94Memory function
Seats, steering wheel and mirrors
Page 97 of 298
Exteriorlighting
General notes
For reasonsofs afety, Mercedes-Ben zrecom-
mends that you driv ewith th elightss witched on
even durin gthe daytime. In somec ountries,
operatio noftheheadlamps varies due to legal
requirement sand self-imposedo bligations.
Settingthe exterio rlighting
Settin goptions
Exterior lighting can be set using:
Rthel ight switch
Rthec ombinatio nswitch (Ypage 96)
Rtheo n-board compute r(Ypage 172)
Light switch
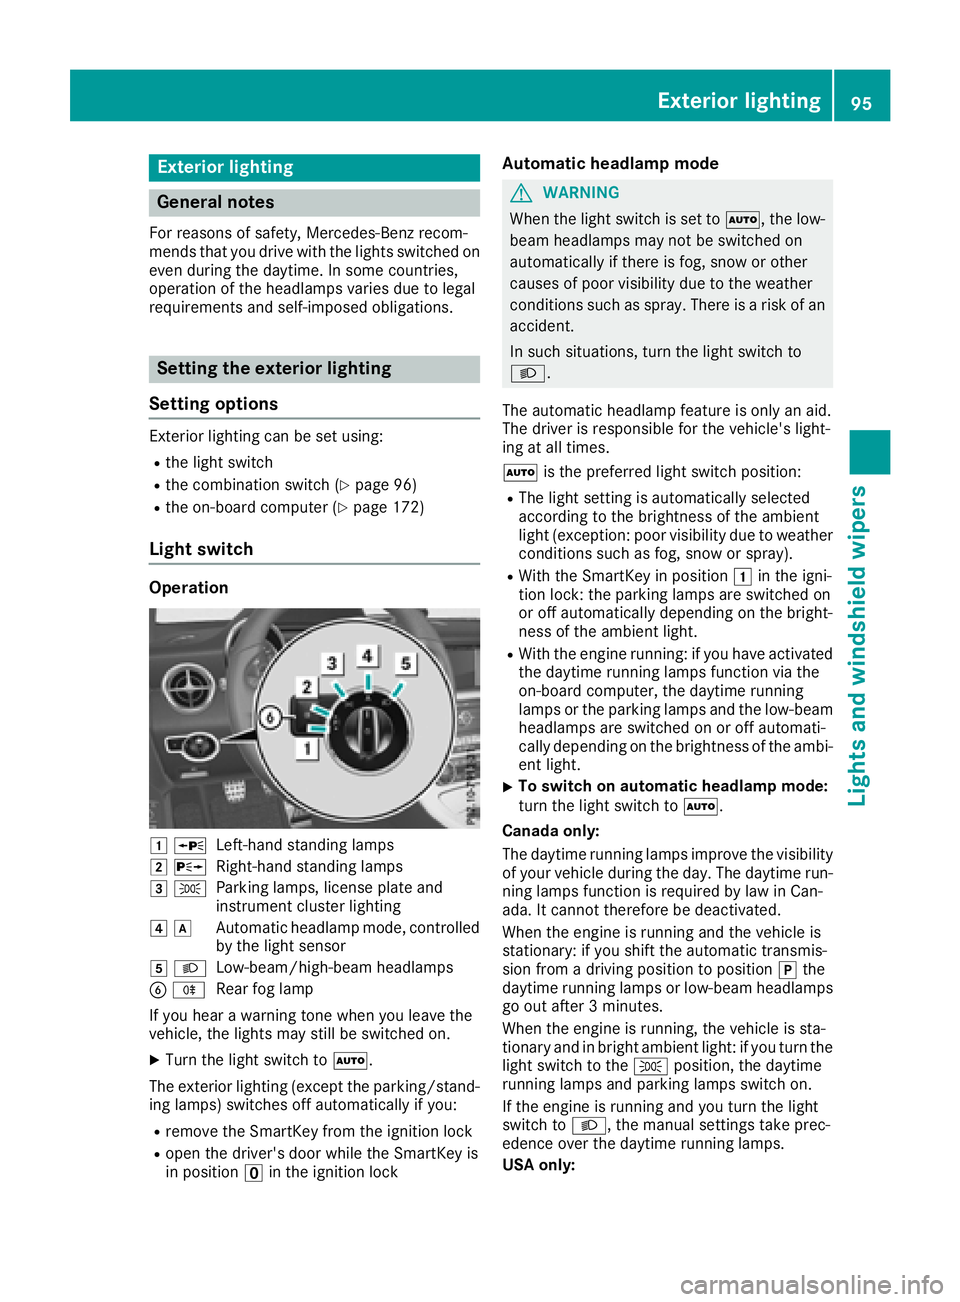
Operation
1WLeft-hands tanding lamps
2 XRight-hand standing lamps
3TParking lamps ,licens eplatea nd
instrumen tcluste rlighting
4dAutomatic headlam pmode, controlled
by the light sensor
5 LLow-beam/high-bea mheadlamps
BRRear fog lamp
If yo uhearaw arning tone when yo uleave the
vehicle, the lights mays till be switched on.
XTurn the light switch toÃ.
The exterio rlighting (excep tthe parking/stand-
ing lamps )switches off automaticall yifyou:
Rremove the SmartKeyf rom the ignition lock
Ropen the driver's door whil ethe SmartKeyi s
in position uin the ignition lock
Automati cheadlamp mode
GWARNING
Whe nthe light switch is set to Ã,the low-
beam headlamps mayn ot be switched on
automaticall yifthereisf og,snow or other
causes of poor visibility du etothe weather
conditions such as spray .There is ariskofa n
accident.
In such situations, turn the light switch to
L.
The automatic headlam pfeature is onlyana id.
The driver is responsibl efor the vehicle's light-
ing at al ltimes.
à is the preferred light switch position:
RThe light setting is automaticall yselected
according to the brightness of the ambient
light (exception: poor visibility du etoweather
conditions such as fog ,snow or spray).
RWith the SmartKeyinp osition 1in the igni-
tio nlock: the parking lamps ar eswitched on
or off automaticall ydepen ding on the bright-
ness of the ambient light.
RWith the engine running :ifyouhave activated
the daytime running lamps functio nvia the
on-board computer, the daytime running
lamps or the parking lamps and the low-beam
headlamps ar eswitched on or off automati-
cally depending on the brightness of the ambi-
ent light.
XTo switc honautomatic headlamp mode:
turn the light switch to Ã.
Canada only:
The daytime running lamps improve the visibility of your vehicl eduri
ng the day. The daytime run-
ning lamps functio nisr equired by la winCan-
ada. It canno ttherefore be deactivated.
Whe nthe engine is running and the vehicl eis
stationary: if yo ushift the automatic transmis-
sion from adriving positio ntoposition jthe
daytime running lamps or low-bea mheadlamps
go outa fter3m inutes.
Whe nthe engine is running ,the vehicl eissta-
tionar yand in bright ambient light: if yo uturn the
light switch to the Tposition, the daytime
running lamps and parking lamps switch on.
If the engine is running and yo uturn the light
switch to L,the manua lsettings take prec-
edence overt he daytime running lamps.
US Ao nly:
Exterior lighting95
Lights and windshield wiper s
Z
Page 98 of 298
The daytime runninglamps improve the visibility
of your vehicle during the day. To do this, the
daytime runnin glamps function must be
switched on using the on-board computer
(
Ypage 172).
If the engine is runnin gand you turn the light
switch to TorL,t he manual settings
take precedenceo ver the daytime running
lamps.
Low-beam headlamps
GWARNING
When the light switch is set to Ã,the low-
beam headlamps may not be switched on
automatically if there is fog, snow or other
causes of poor visibility due to the weather
conditions such as spray. There is arisk of an
accident.
In such situations, turn the light switch to
L.
Even if the light sensor does not detect that it is
dark, the parking lamps and low-beam head-
lamps switch on when the ignition is switched on and the light switch is set to the Lposition.
This is aparticularly useful function in the event
of rain and fog.
XTo switch on the low-beam headlamps:
turn the SmartKey to position 2in the igni-
tion lock or start the engine.
XTurn the light switch to L.
The green Lindicator lamp in the instru-
ment cluster lights up.
Rear fog lamp
The rear fog lamp improves visibility of your
vehicle for the traffic behind in the event of thick
fog. Please take noteoft he country-specific
regulations for the use of rear fog lamps.
XTo switch on the rear fog lamp: turn the
SmartKey to position 2in the ignition lock or
start the engine.
XTurn the light switch to LorÃ.
XPress the Rbutton.
The yellow Rindicator lamp in the instru-
ment cluster lights up.
XTo switch off the rear fog lamp: press the
R button.
The yellow Rindicator lamp in the instru-
ment cluster goes out.
Parking lamps
!If the battery charge is very low, the parking
lamps or standin glamps are automatically
switched off to enable the next engine start.
Always park your vehicle safely and in awell lit
area, in accordanc ewith the relevant legal
stipulations. Avoid using the Tparking
lamps over aperiod of several hours. If pos-
sible, switch on the right-hand Xor left-
hand W standin glamps.
XTo switch on: turn the light switch to T.
The green Tindicator lamp in the instru-
ment cluster lights up.
Standing lamps
Switching on the standin glamps ensures the
corresponding side of the vehicle is illuminated.
XTo switch on the standing lam ps:the
SmartKey is not in the ignition lock or it is in
position uin the ignition lock.
XTurn the light switch to W(left-han dside of
the vehicle) or X(right-hand side of the
vehicle).
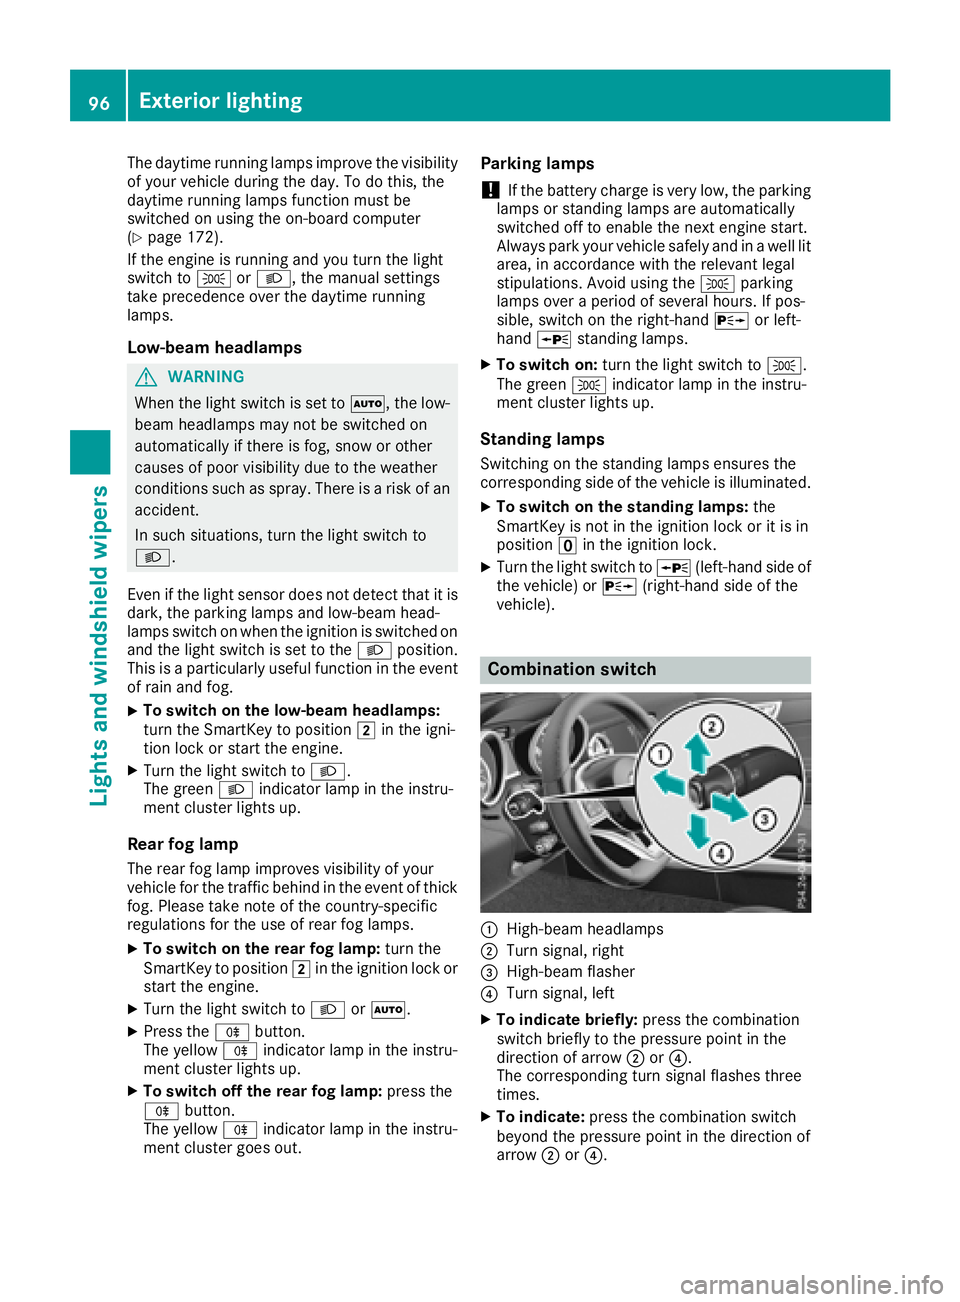
Combination switch
:High-beam headlamps
;Turn signal, right
=High-beam flasher
?Turn signal, left
XTo indicate briefly: press the combination
switch briefly to the pressure point in the
direction of arrow ;or?.
The corresponding turn signal flashes three
times.
XTo indicate: press the combination switch
beyond the pressure point in the direction of
arrow ;or?.
96Exterior lighting
Lights and windshield wipers
Page 101 of 298
Interior lighting
Overview of interior lighting
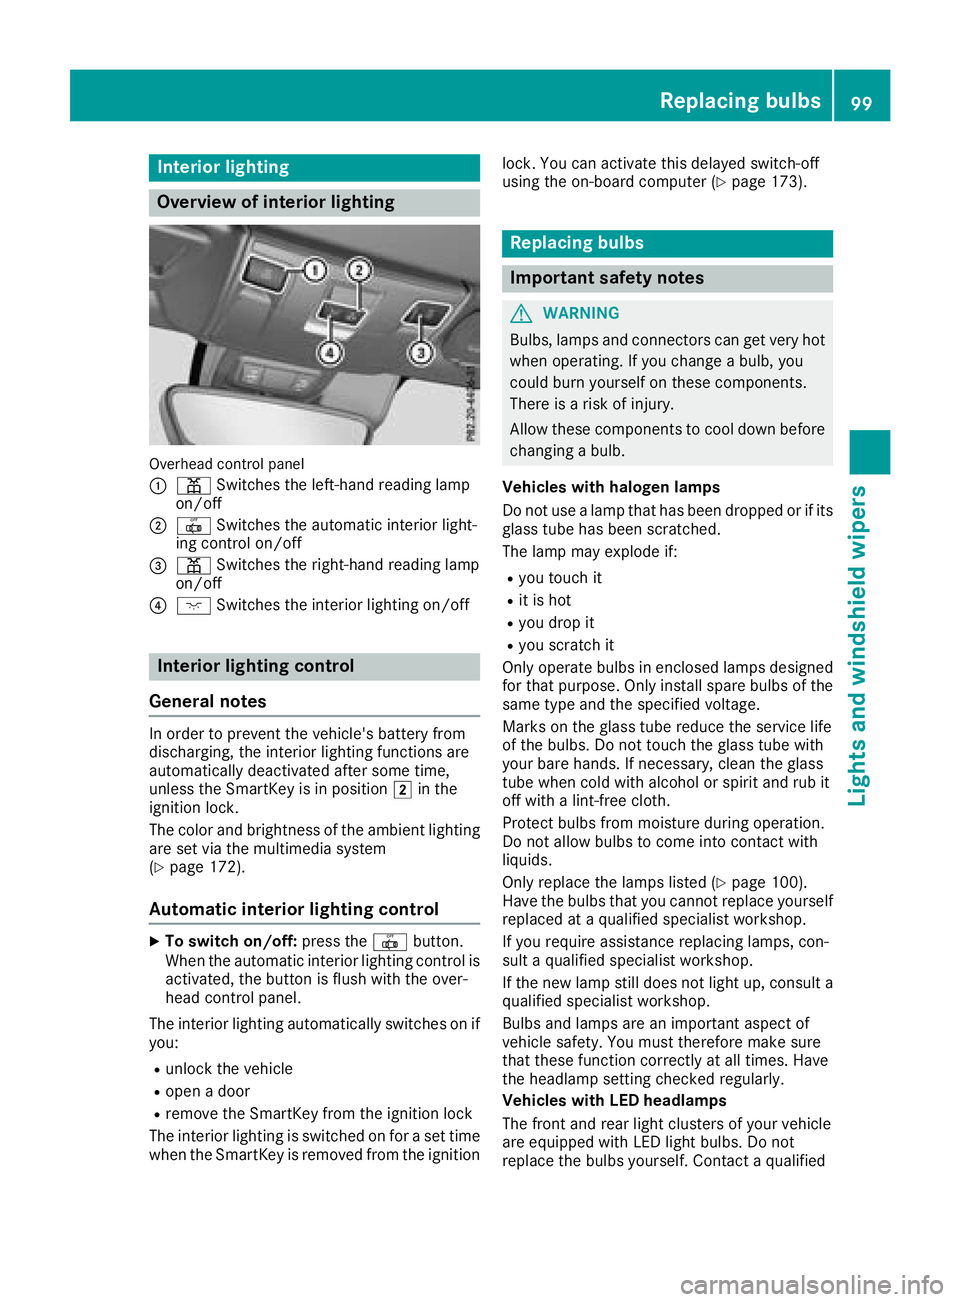
Overhead control panel
:
pSwitches th eleft-han dreading lamp
on/off
;| Switches th eautomatic interio rlight-
ing control on/off
=p Switches th eright-hand reading lamp
on/off
?c Switches th einterio rlighting on/off
Interior lighting control
General notes
In order to preven tthe vehicle's battery from
discharging ,the interio rlighting function sare
automatically deactivated after som etime,
unless th eSmartKey is in position 2in th e
ignition lock.
The color and brightness of th eambien tlighting
are set via th emultimedia system
(
Ypage 172).
Automati cinterior lighting control
XTo switch on/off: press the| button.
When th eautomatic interio rlighting control is
activated, th ebutto nisf lushw itht he over-
head control panel.
The interio rlighting automatically switches on if
you:
Runlock th evehicl e
Ropen adoor
Rremove th eSmartKey from th eignition loc k
The interio rlighting is switched on for aset time
when th eSma rtKey is remove dfromt heignition lock. You can activat
ethisd elaye dswitch-off
usin gthe on-board computer (
Ypage 173).
Replacingbulbs
Important safety notes
GWARNIN G
Bulbs, lamp sand connectors can get ver yhot
when operating .Ifyou chang eabulb, you
could burn yourself on these components.
Ther eisar iskofi njury.
Allow these component stocooldown before
changing abulb.
Vehicles with halogen lamps
Do no tuse alamp that has been dropped or if it s
glass tub ehas been scratched.
The lamp may explod eif:
Ryou touch it
Rit is hot
Ryou dro pit
Ryou scratch it
Only operate bulbs in enclosed lamp sdesigned
for that purpose .Onlyi nstal lspar ebulbs of th e
sam etypea nd th especifie dvoltage.
Mark sont heglass tub ereduce th eservic elife
of th ebulbs .Don ottouch th eglass tub ewith
your bare hands. If necessary, clean th eglass
tub ew hen cold wit halcohol or spirit and rub it
off wit halint-free cloth .
Protect bulbs from moisture during operation .
Do no tallow bulbs to come int ocontac twith
liquids.
Only replace th elamp slisted (
Ypage 100).
Hav ethe bulbs that you canno treplace yourself
replace dataq ualified specialist workshop.
If you require assistanc ereplacing lamps, con-
sult aqualified specialist workshop.
If th enew lamp still does no tligh tup, consult a
qualified specialist workshop.
Bulb sand lamp sare an important aspect of
vehicl esafety. You must therefor emakes ure
that these function corre
ctl
yatall times .Have
th eh eadlamp setting checke dregularly.
Vehicles with LED headlamp s
The fron tand rear ligh tclusters of your vehicl e
are equipped wit hLED ligh tbulbs .Don ot
replace th ebulbs yourself .Contac taqualified
Replacingb ulbs99
Lightsand windshield wipers
Z
Page 104 of 298
and it falls onto thewindshield, th ewindshield
may be damage dbytheforce of th eimpact.
Mercedes-Ben zrecommend sthaty ou have
th ew iper blades changed at aqualified spe-
cialis tworkshop.
!Always position th ewindshield wiper arms
vertically before folding them away from the
windshield. By doings o, you will avoid dam-
age to th ehood.
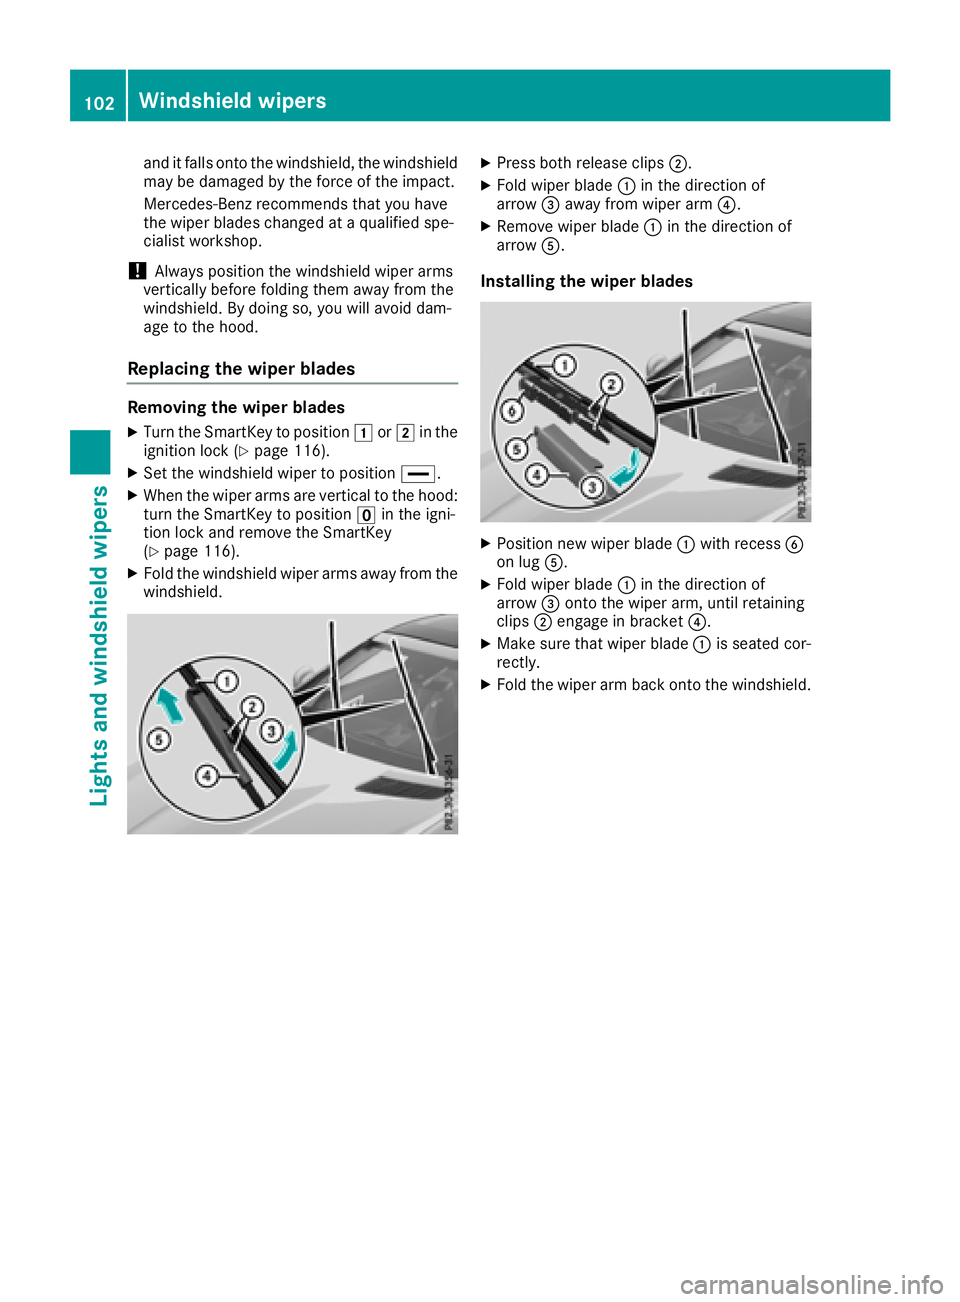
Replacing th ewiper blades
Removing th ewiper blades
XTurn th eSma rtKey to position 1or2 in the
ignition lock(Ypage 116).
XSet th ewindshield wiper to position °.
XWhen thewiper arm sare vertical to th ehood:
tur nthe SmartKey to position uin th eigni-
tio nlocka nd remove th eSmartKey
(
Ypage 116).
XFol dthe windshield wiper arm saway from the
windshield.
XPress bothr elease clips ;.
XFoldw iper blade :in th edirection of
arrow =away from wiper arm ?.
XRemovewiper blade :in th edirection of
arrow A.
Installin gthe wiper blades
XPositio nnew wiper blade :with recess B
on lug A.
XFoldw iper blade :in th edirection of
arrow =onto th ewiper arm ,until retaining
clips ;engage in bracket ?.
XMakesure that wiper blade :is seated cor-
rectly.
XFol dthe wiper arm back onto th ewindshield.
102Windshield wipers
Lightsa nd windshield wipers
Page 105 of 298
Problems with the windshield wipers
ProblemPossible causes/consequences andMSolutions
The windshield wipers
are jammed.Leaves or snow, for example, may be obstructing the windshield wiper
movement.The wiper motor has been deactivated.
XFor safety reasons, you should remove the SmartKey from the igni-
tion lock.
or
XSwitch off the engine using the Start/Stop button and open the
driver's door.
XRemove the cause of the obstruction.
XSwitch the windshield wipers back on.
The windshield wipers
fail completely.The windshield wiper drive is malfunctioning.
XSelect another wiper speed on the combination switch.
XHave the windshield wipers checked at aqualified specialist work-
shop.
The windshield washer
fluid from the spray noz-
zles no longer hits the
center of the windshield.The spray nozzles are misaligned.
XHave the spray nozzles adjusted at aqualified specialist workshop.
Windshield wipers103
Lights and windshieldw ipers
Z