2018 MERCEDES-BENZ SL ROADSTER rear view mirror
[x] Cancel search: rear view mirrorPage 176 of 322
Rear view camera
General notes
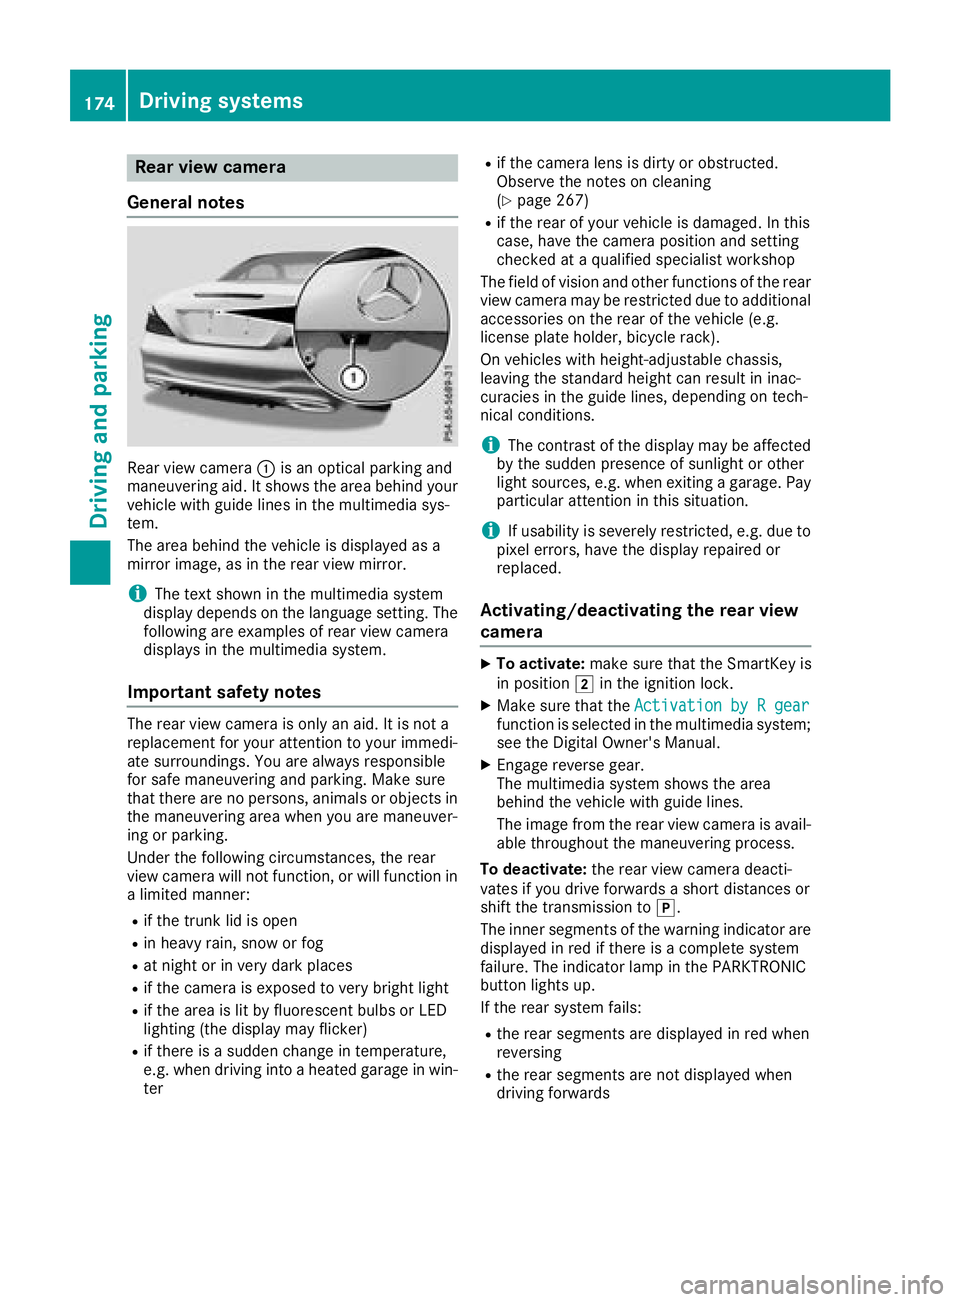
Rear view camera :is an optical parking and
maneuvering aid. It shows the area behind your
vehicle with guide lines in the multimedia sys-
tem.
The area behind the vehicle is displayed as a
mirror image, as in the rear view mirror.
iThe text shown in the multimedia system
display depends on the language setting. The
following are examples of rear view camera
displays in the multimedia system.
Important safety notes
The rear view camera is only an aid. It is not a
replacement for your attention to your immedi-
ate surroundings. You are always responsible
for safe maneuvering and parking. Make sure
that there are no persons, animals or objects in
the maneuvering area when you are maneuver-
ing or parking.
Under the following circumstances, the rear
view camera will not function, or will function in
a limited manner:
Rif the trunk lid is open
Rin heavy rain, snow or fog
Rat night or in very dark places
Rif the camera is exposed to very bright light
Rif the area is lit by fluorescent bulbs or LED
lighting (the display may flicker)
Rif there is a sudden change in temperature,
e.g. when driving into a heated garage in win- ter
Rif the camera lens is dirty or obstructed.
Observe the notes on cleaning
(
Ypage 267)
Rif the rear of your vehicle is damaged. In this
case, have the camera position and setting
checked at a qualified specialist workshop
The field of vision and other functions of the rear
view camera may be restricted due to additional
accessories on the rear of the vehicle (e.g.
license plate holder, bicycle rack).
On vehicles with height-adjustable chassis,
leaving the standard height can result in inac-
curacies in the guide lines, depe
nding on tech-
nical conditions.
iThe contrast of the display may be affected
by the sudden presence of sunlight or other
light sources, e.g. when exiting a garage. Pay
particular attention in this situation.
iIf usability is severely restricted, e.g. due to
pixel errors, have the display repaired or
replaced.
Activating/deactivating the rear view
camera
XTo activate: make sure that the SmartKey is
in position 2in the ignition lock.
XMake sure that the Activation by R gearfunction is selected in the multimedia system;
see the Digital Owner's Manual.
XEngage reverse gear.
The multimedia system shows the area
behind the vehicle with guide lines.
The image from the rear view camera is avail-
able throughout the maneuvering process.
To deactivate: the rear view camera deacti-
vates if you drive forwards a short distances or
shift the transmission to j.
The inner segments of the warning indicator are
displayed in red if there is a complete system
failure. The indicator lamp in the PARKTRONIC
button lights up.
If the rear system fails:
Rthe rear segments are displayed in red when
reversing
Rthe rear segments are not displayed when
driving forwards
174Driving systems
Driving and parking
Page 178 of 322
"Reverse parking" function
Backing up straight into a parking space
without steering input
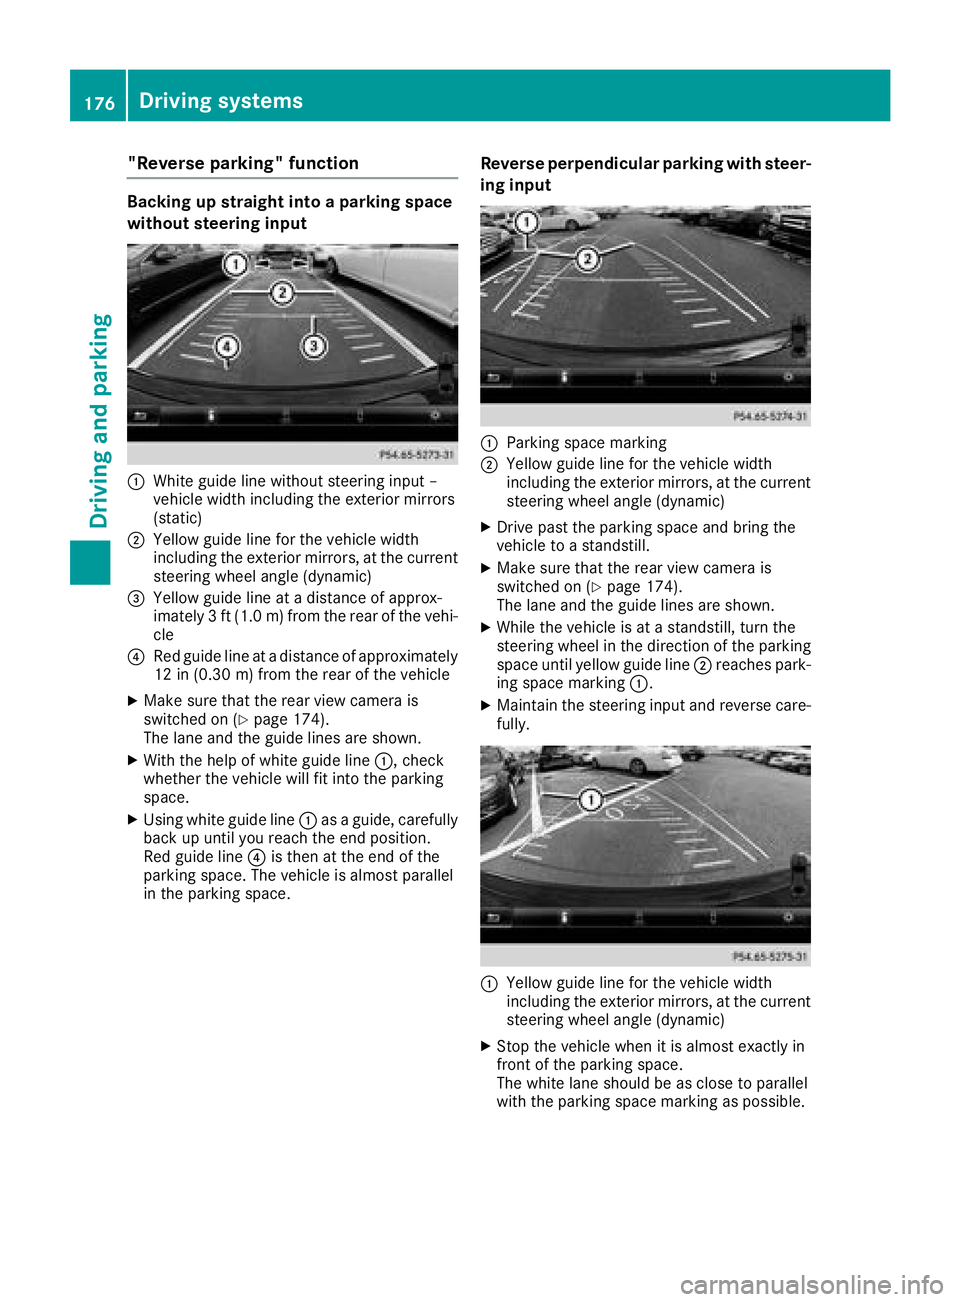
:White guide line without steering input –
vehicle width including the exterior mirrors
(static)
;Yellow guide line for the vehicle width
including the exterior mirrors, at the current
steering wheel angle (dynamic)
=Yellow guide line at a distance of approx-
imately 3 ft (1.0 m) from the rear of the vehi-
cle
?Red guide line at a distance of approximately
12 in (0.30 m) from the rear of the vehicle
XMake sure that the rear view camera is
switched on (Ypage 174).
The lane and the guide lines are shown.
XWith the help of white guide line :, check
whether the vehicle will fit into the parking
space.
XUsing white guide line :as a guide, carefully
back up until you reach the end position.
Red guide line ?is then at the end of the
parking space. The vehicle is almost parallel
in the parking space.
Reverse perpendicular parking with steer-
ing input
:Parking space marking
;Yellow guide line for the vehicle width
including the exterior mirrors, at the current
steering wheel angle (dynamic)
XDrive past the parking space and bring the
vehicle to a standstill.
XMake sure that the rear view camera is
switched on (Ypage 174).
The lane and the guide lines are shown.
XWhile the vehicle is at a standstill, turn the
steering wheel in the direction of the parking
space until yellow guide line ;reaches park-
ing space marking :.
XMaintain the steering input and reverse care-
fully.
:Yellow guide line for the vehicle width
including the exterior mirrors, at the current
steering wheel angle (dynamic)
XStop the vehicle when it is almost exactly in
front of the parking space.
The white lane should be as close to parallel
with the parking space marking as possible.
176Driving systems
Driving and parking
Page 254 of 322
are then, for example, guided to the nearest
Mercedes-Benz Service Center or a recovery
vehicle is called.
If vehicle data needs to be transferred during an
MB Info call or a Roadside Assistance call, this is
initiated by the Customer Assistance Center.
You will see theRoadside Assistance Con‐
nectedmessage in the COMAND display. If the
vehicle remote malfunction diagnosis can be
started, the Request for vehicle diagno‐
sisreceived.Startvehiclediagnosis?message appears in the display.
XConfirm the message with Yes.
XWhen theVehicle diagnosis: Pleasestart ignitionmessage appears, turn the
SmartKey to position 2in the ignition lock
(
Ypage 122).
XWhen the Please follow the instruc‐tions received by phone and moveyour vehicle to a safe positionmes-
sage appears, follow the customer service
representative's instructions.
The message in the display disappears.
If you select Cancel
the remote malfunction
diagnosis is canceled completely.
The vehicle operating state check begins. You
will see the Vehicle
diagnosisactivatedmessage.
When the diagnosis is completed, the Trans‐
fer vehicle diagnostics data (Voiceconnection may be interrupted duringdatatransfer)message appears. The vehicle
data can now be sent to the Customer Assis-
tance center.
XPress OKto confirm the message.
The voice connection with the Customer
Assistance Center is terminated.
You will see the Vehicle diagnosis:
Transferring data...message.
The vehicle data is sent to the Customer
Assistance Center.
Depending on what the customer service rep-
resentative agreed with you, the voice connec-
tion is re-established after the transfer is com-
plete. If necessary, you will be contacted at a
later time by another means, e.g. by e-mail or
phone.
Another function of the Vehicle Health Check is
the transfer of service data to the Customer
Assistance Center. If a service is overdue, the
COMAND display shows a message about vari-
ous special offers at your workshop. USA only: this information can also be called up
under "Owners Online" at http://
www.mbusa.com.
Information on the data stored in the vehicle
(
Ypage 29).
Information on Roadside Assistance
(
Ypage 26).
Garage door opener
General notes
The HomeLink®garage door opener integrated
in the rear-view mirror allows you to operate up
to three different door and gate systems.
Use the integrated garage door opener only on
garage doors that:
Rhave safety stop and reverse features and
Rmeet current U.S. federal safety standards
Once programed, the integrated garage door
opener in the rear-view mirror will assume the
function of the garage door system's remote
control. Please also read the operating instruc-
tions for the garage door system.
When programming a garage door opener, park
the vehicle outside the garage. Do not run the
engine while programming.
Certain garage door drives are incompatible
with the integrated garage door opener. If you
have difficulty programing the integrated garage door opener, contact an authorized Mercedes-
Benz Center.
Alternatively, you can call the following tele-
phone assistance services:
RUSA: Mercedes-Benz Customer Assistance
Center at 1-800-FOR-MERCedes
RCanada: Customer Service at
1-800-387-0100
RHomeLink®hotline 1-800-355-3515 (free of
charge)
More information on HomeLink
®and/or com-
patible products is also available online at
http://www.homelink.com.
Notes on the declaration of conformity
(
Ypage 27).
USA: FCC ID: CB2HMIHL4
Canada: IC: 279B-HMIH L4
252Features
Stowage and features
Page 255 of 322
Important safety notes
GWARNING
When you operate or program th egarage door
wit hth eintegrate dgarage door opener, per -
son sin th erange of movement of th egarage
door can become trapped or struc kby th e
garage door .Ther eis aris kof injury.
When usin gth eintegrate dgarage door
opener, always mak esur ethat nobody is
within th erange of movement of th egarage
door .
GWARNIN G
Combustion engines emit poisonous exhaust
gase ssuc has carbon monoxide. Inhalin g
these exhaust gase sleads to poisoning .Ther e
is aris kof fatal injury. Therefore never leav e
th eengin erunnin gin enclosed spaces with-
out sufficien tventilation .
Programming
Programming the but tons
Pay attention to th e"Importan tsafet ynotes"
(Ypage 253).
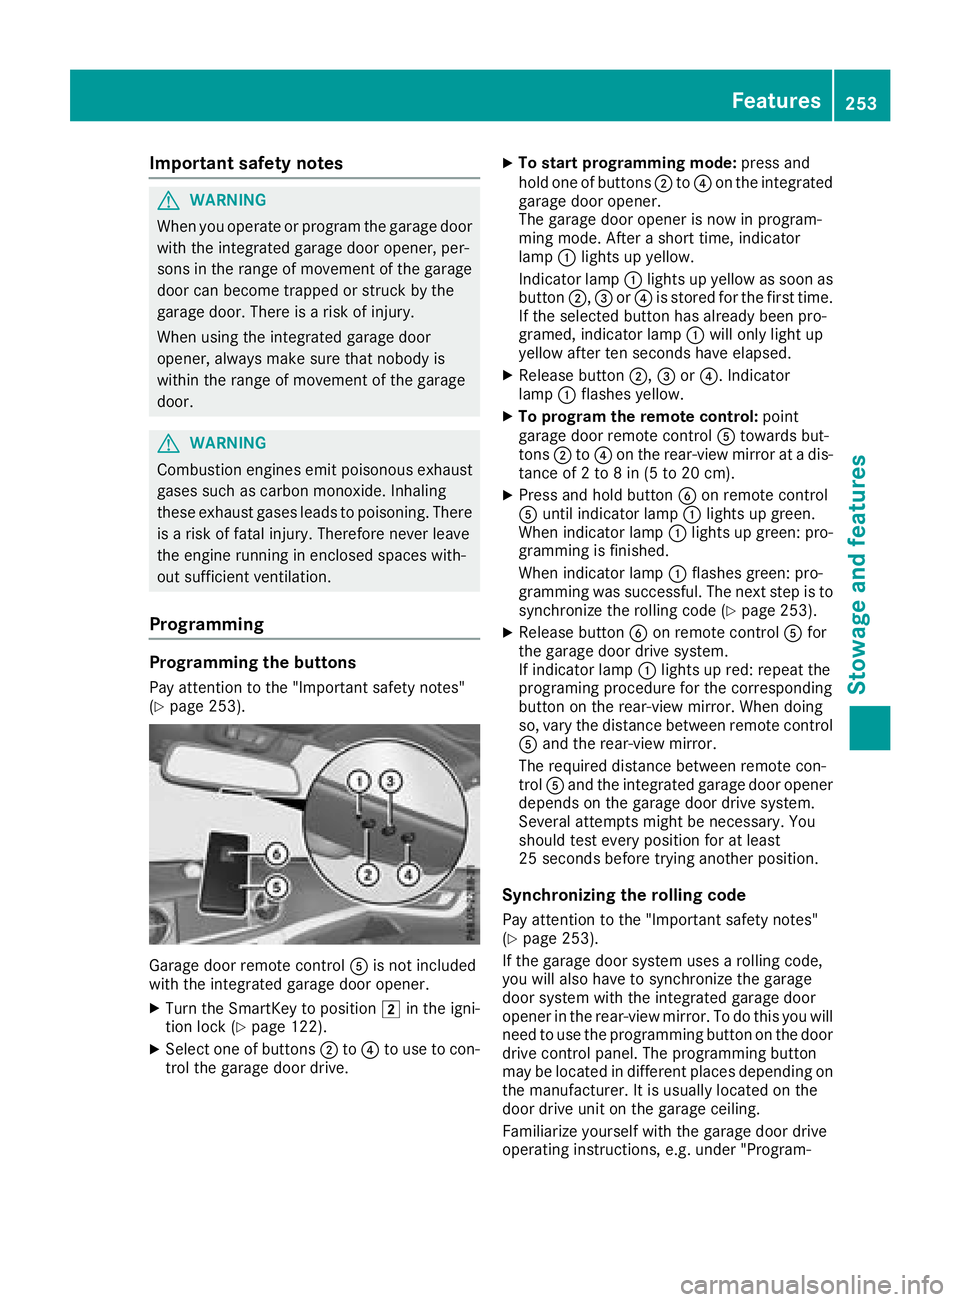
Garag edoor remot econtrol Ais no tincluded
wit hth eintegrate dgarage door opener.
XTurn th eSmartKey to position 2in th eigni-
tion loc k (Ypage 122).
XSelecton eof buttons ;to? to use to con-
trol th egarage door drive.
XTo star tprogramming mode: press and
hold on eof buttons ;to? on th eintegrate d
garage door opener.
The garage door opener is no win program -
min gmode. Afte r ashort time, indicator
lamp :lights up yellow .
Indicato rlamp :lights up yellow as soo nas
butto n;, =or? is store dfor th efirst time.
If th eselected butto nhas already been pro -
gramed, indicator lamp :will only ligh tup
yellow after te nseconds hav eelapsed.
XReleas ebutto n;, =or?. Indicato r
lamp :flashes yellow .
XTo program th eremote control :poin t
garage door remot econtrol Atowards but -
tons ;to? on th erear-view mirror at adis-
tance of 2to 8in (5 to 20 cm).
XPress and hold butto nB on remot econtrol
A until indicator lamp :lights up green .
When indicator lamp :lights up green :pro -
grammin gis finished.
When indicator lamp :flashes green :pro -
grammin gwas successful. The next step is to
synchroniz eth erollin gcode (
Ypage 253).
XReleas ebutto nB on remot econtrol Afor
th egarage door driv esystem.
If indicator lamp :lights up red :repeat th e
programing procedure for th ecorresponding
butto non th erear-view mirror .When doin g
so, var yth edistanc ebetween remot econtrol
A and th erear-view mirror .
The require ddistanc ebetween remot econ-
trol Aand th eintegrate dgarage door opener
depend son th egarage door driv esystem.
Several attempts might be necessary. You
should test every position for at least
25 seconds before trying another position .
Synchronizingtherol ling code
Pay attention to th e"Importan tsafet ynotes"
(Ypage 253).
If th egarage door system uses arollin gcode,
you will also hav eto synchroniz eth egarage
door system wit hth eintegrate dgarage door
opener in th erear-view mirror .To do this you will
need to use th eprogrammin gbutto non th edoor
driv econtrol panel. The programmin gbutto n
may be locate din differen tplaces depending on
th emanufacturer. It is usually locate don th e
door driv eunit on th egarage ceiling.
Familiariz eyourself wit hth egarage door driv e
operating instructions, e.g. under "Program -
Features253
Stowage and features
Z
Page 256 of 322
ming additional remote controls", before carry-
ing out the following steps.
Your vehicle must be within reach of the garage
door or gate opener drive. Make sure that nei-
ther your vehicle nor any persons/objects are
present within the sweep of the door or gate.
XTurn the SmartKey to position2in the igni-
tion lock (Ypage 122).
XGet out of the vehicle.
XPress the programming button on the door
drive unit.
Usually, you now have 30 seconds to initiate
the next step.
XGet into the vehicle.
XPress previously programed button ;,=
or ? on the integrated garage door opener
repeatedly until the door closes.
The rolling code synchronization is then com-
plete.
Notes on programming the remote con-
trol
Canadian radio frequency laws require a "break"
(or interruption) of the transmission signals
after broadcasting for a few seconds. Therefore,
these signals may not last long enough for the
integrated garage door opener. The signal is not
recognized during programming. Comparable
with Canadian law, some U.S. garage door open-
ers also feature a "break".
Proceed as follows:
Rif you live in Canada.
Rif you have difficulties programming the
garage door opener (regardless of where you live) when following the programming steps.
XPress and hold one of buttons ;to? on the
integrated garage door opener.
After a short time, indicator lamp :lights up
yellow.
XRelease the button.
Indicator lamp :flashes yellow.
XPress button Bof garage door remote con-
trol Afor two seconds, then release it for two
seconds.
XPress button Bagain for two seconds.
XRepeat this sequence on button Bof remote
control Auntil indicator lamp :lights up
green.
When indicator lamp :lights up green: pro-
gramming is finished. When indicator lamp
:flashes green: pro-
gramming was successful. The next step is to
sy
nchronize the rolling code.
XRelease button Bof remote control Aof the
garage door drive.
When indicator lamp :lights up red: repeat
the programming process for the correspond-
ing button on the rear-view mirror. When
doing so, vary the distance between remote
control Aand the rear-view mirror.
The required distance between remote con-
trol Aand the integrated garage door opener
depends on the garage door drive system.
Several attempts might be necessary. You
should test every position for at least
25 seconds before trying another position.
Problems when programming
If you are experiencing problems programming
the integrated garage door opener on the rear-
view mirror, take note of the following instruc-
tions:
RCheck the transmitter frequency used by
garage door drive remote control Aand
whether it is supported. The transmitter fre-
quency can usually be found on the back of
remote control Afor the garage door drive.
The integrated garage door opener is com-
patible with devices that have units which
operate in the frequency range of 280 to
433 MHz.
RReplace the batteries in garage door remote
control A. This increases the likelihood that
garage door remote control Awill transmit a
strong and precise signal to the integrated
garage door opener.
RWhen programming, hold remote control A
at varying distances and angles from but-
tons ;to? which you are programming. Try
various angles at a distance between 2and
8 inches (5to 20 cm) or at the same angle but
at varying distances.
RIf a further remote control Ais available for
the same garage door drive, repeat the same
programming steps with this remote control
A. Before performing these steps, make sure
that new batteries have been installed in
garage door drive remote control A.
RNote that some remote controls only transmit
for a limited amount of time (the indicator
lamp on the remote controlgoes ou
t). Press
254Features
Stowage and features
Page 257 of 322
buttonBon remote control Aagain before
transmission ends.
RAlign the antenna cable of the garage door
opener unit. This can improve signal recep-
tion/transmission.
Opening/closing the garage door
After it has been programmed, the integrated
garage door opener performs the function of the
garage door system remote control. Please also
read the operating instructions for the garage
door system.
XTurn the SmartKey to position 2in the igni-
tion lock (Ypage 122).
XPress either button ;,=or? which you
have programmed to operate the garage
door.
Garage door system with a fixed code: indi-
cator lamp :lights up green.
Garage door system with a rolling code: indi-
cator lamp :flashes green.
The transmitter will transmit a signal as long
as the button is pressed. The transmission is
halted after a maximum of ten seconds and
indicator lamp :lights up yellow.
XPress button ;,=or? again if necessary.
Clearing the memory
Make sure that you clear the memory of the
integrated garage door opener before selling the
vehicle.
XTurn the SmartKey to position 2in the igni-
tion lock (Ypage 122).
XPress and hold buttons ;and ?.
The indicator lamp initially lights up yellow
and then green.
XRelease buttons ;and ?.
The memory of the integrated garage door
opener in the rear-view mirror is cleared.
Compass
Calling up the compass
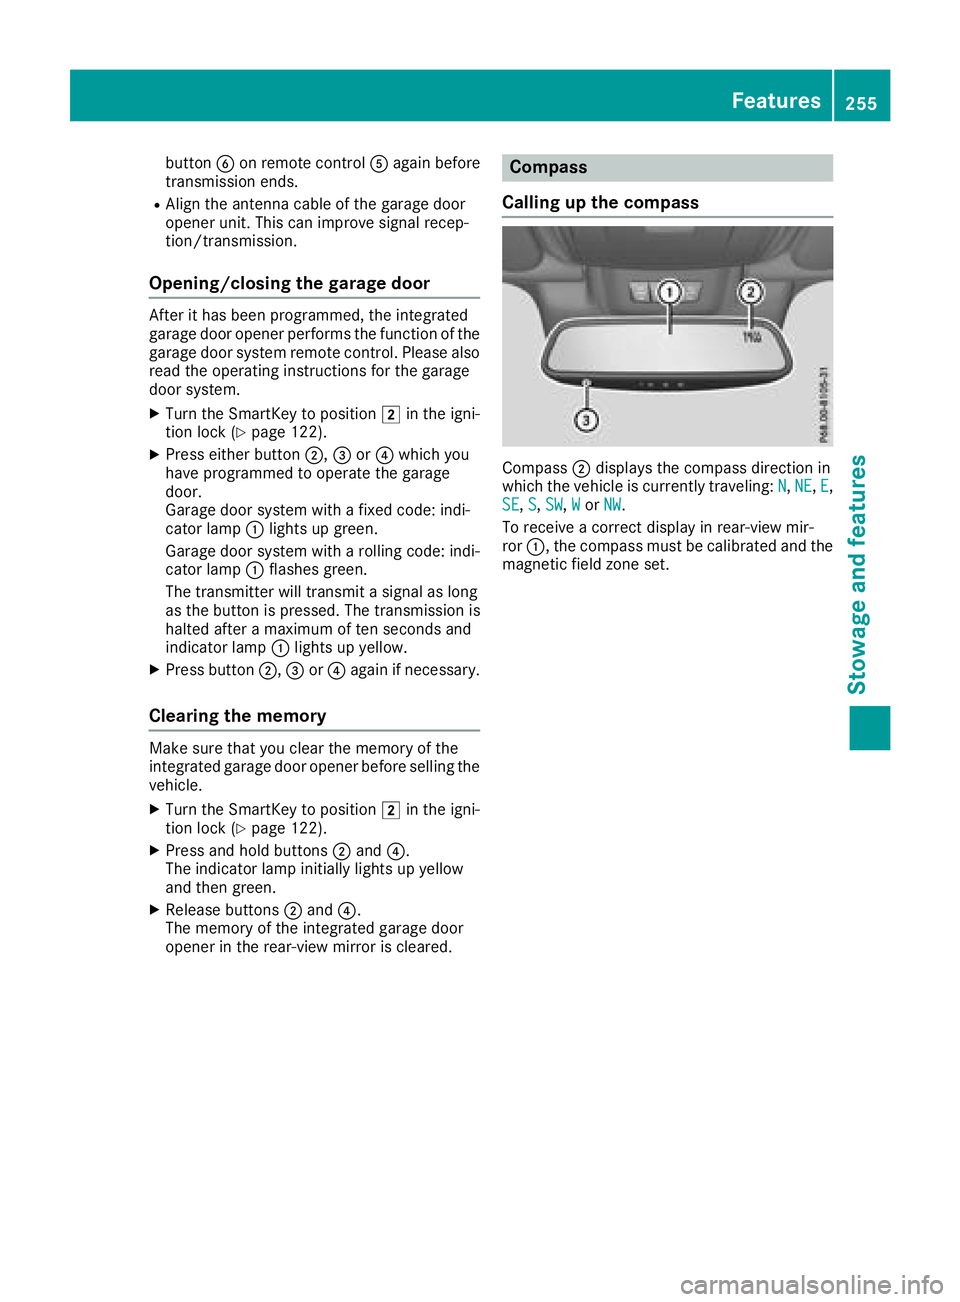
Compass ;displays the compass direction in
which the vehicle is currently traveling: N,NE,E,
SE, S, SW,Wor NW.
To receive a correct display in rear-view mir-
ror :, the compass must be calibrated and the
magnetic field zone set.
Features255
Stowage and features
Z
Page 269 of 322
Cleaning wiper blades
GWARNING
If the windshield wipers are set in motion
while you are cleaning the windshield, you can be trapped by the wiper arm. There is a risk of
injury.
Always switch off the windshield wipers and
the ignition before cleaning the windshield.
!Do not pull the wiper blade. Otherwise, the
wiper blade could be damaged.
!Do not clean wiper blades too often and do
not rub them too hard. Otherwise, the graph-
ite coating could be damaged. This could
cause wiper noise.
!Hold the wiper arm securely when folding
back. The windshield could be damaged if the
wiper arm smacks against it suddenly.
XFold the windshield wiper arms away from the
windshield.
XCarefully clean the wiper blades with a damp
cloth.
XFold the windshield wiper arms back again
before switching on the ignition.
Cleaning the exterior lighting
!Only use cleaning agents or cleaning cloths
which are suitable for plastic light lenses.
Unsuitable cleaning agents or cleaning cloths
could scratch or damage the plastic light len- ses.
XClean the plastic lenses of the exterior lights
with a wet sponge and a mild cleaning agent,
e.g. Mercedes-Benz car shampoo or cleaning
cloths.
Cleaning the mirror turn signals
!Only use cleaning agents or cleaning cloths
that are suitable for plastic lenses. Unsuitable
cleaning agents or cleaning cloths could
scratch or damage the plastic lenses of the
mirror turn signals.
XClean the plastic lenses of the mirror turn sig-
nals in the exterior mirror housing using a wet
sponge and mild cleaning agent, e.g.
Mercedes-Benz car shampoo or with cleaning
cloths.
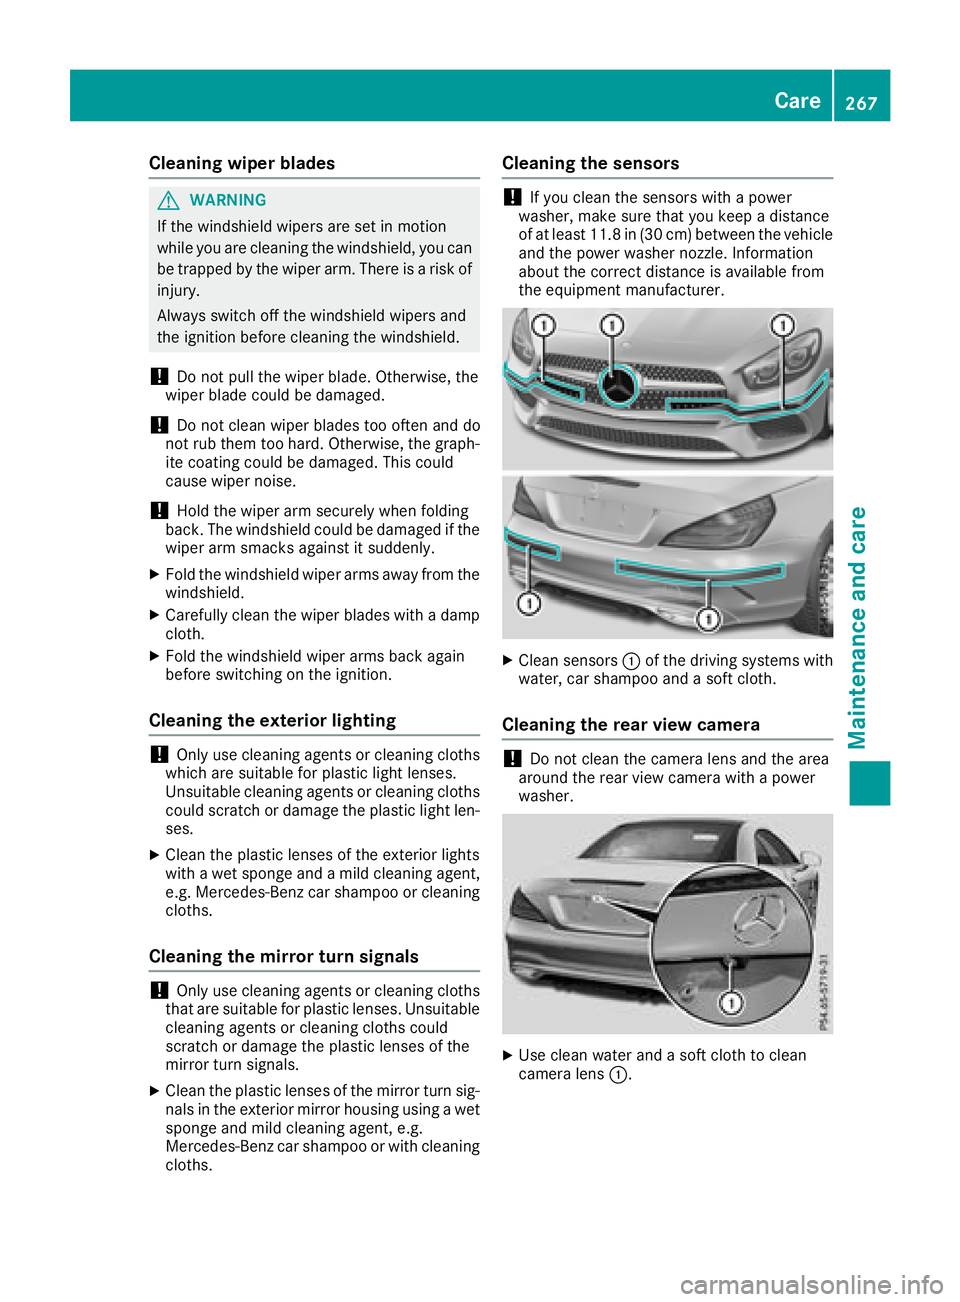
Cleaning the sensors
!If you clean the sensors with a power
washer, make sure that you keep a distance
of at least 11.8 in (30 cm)betwee nthe vehicl e
and the power washer nozzle. Information
about the correct distance is available from
the equipment manufacturer.
XClean sensors :of the driving systems with
water, car shampoo and a soft cloth.
Cleaning the rear view camera
!Do not clean the camera lens and the area
around the rear view camera with a power
washer.
XUse clean water and a soft cloth to clean
camera lens :.
Care267
Maintenance and care
Z