2018 MERCEDES-BENZ SL ROADSTER center console
[x] Cancel search: center consolePage 39 of 322
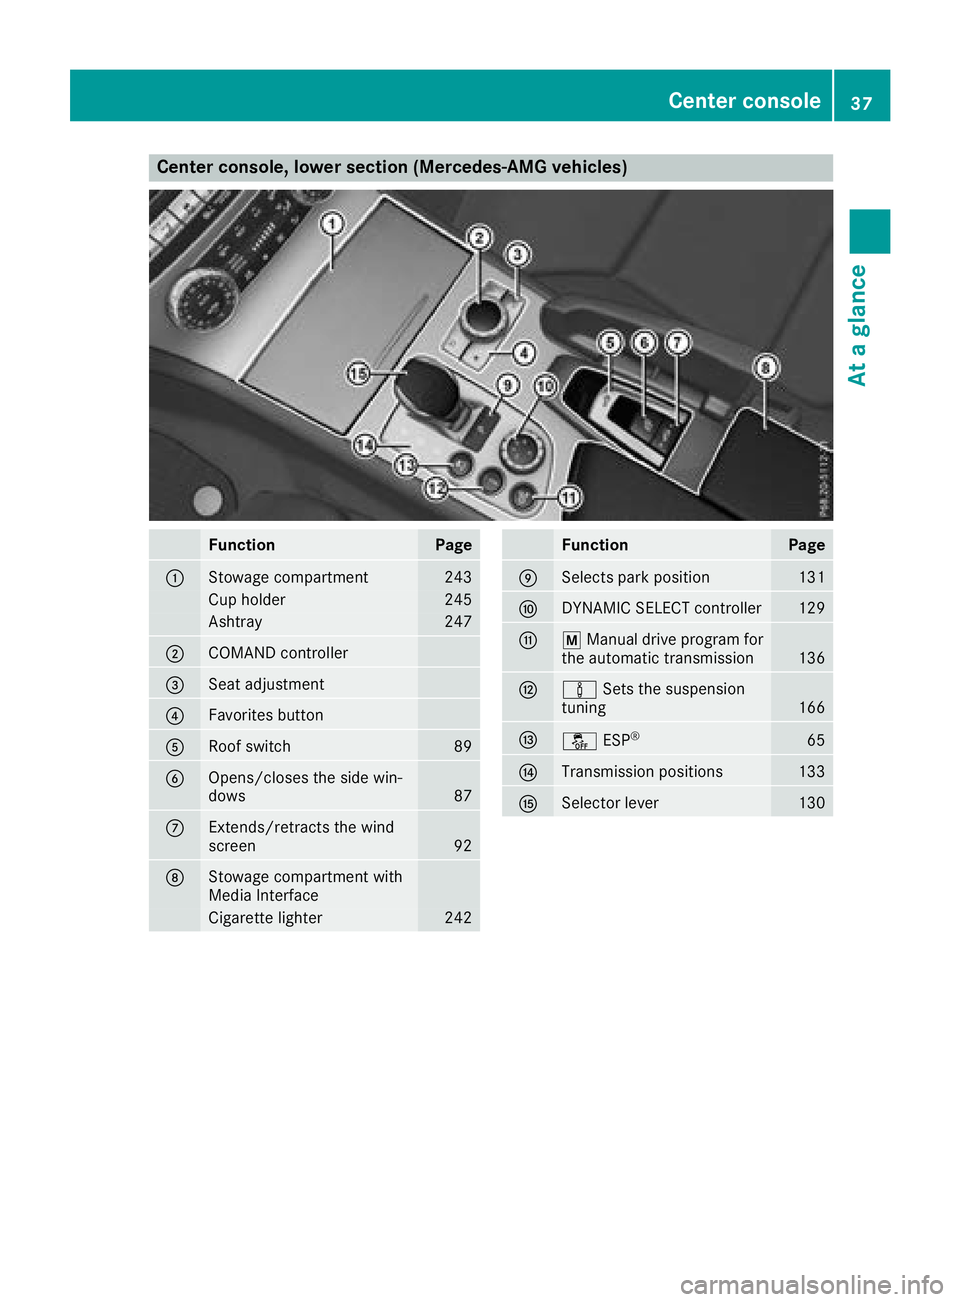
Center console, lower section (Mercedes-AMG vehicles)
FunctionPage
:Stowage compartment243
Cup holder245
Ashtray247
;COMAND controller
=Seat adjustment
?Favorites button
ARoof switch89
BOpens/closes the side win-
dows87
CExtends/retracts the wind
screen92
DStowage compartment with
Media Interface
Cigarette lighter242
FunctionPage
ESelects park position131
FDYNAMIC SELECT controller129
GpManual drive program for
the automatic transmission136
Hà Sets the suspension
tuning166
Iå ESP®65
JTransmission positions133
KSelector lever130
Center console37
At a glance
Page 89 of 322
XTo close:close the front side window on the
corresponding side (Ypage 86).
XPull the respective switch and hold it.
The corresponding rear side window will con- tinue to close until you release the switch.
Opening and closing all side windows
Using the switch on the center console
GWARNING
While opening the side windows, body parts in
the closing area could become trapped. There is a risk of injury.
Make sure that no body parts are in close
proximity during the closing procedure. If
somebody becomes trapped, release the
switch or press the switch down to open the
side window again.
You can use the switch on the center console to
close all side windows simultaneously.
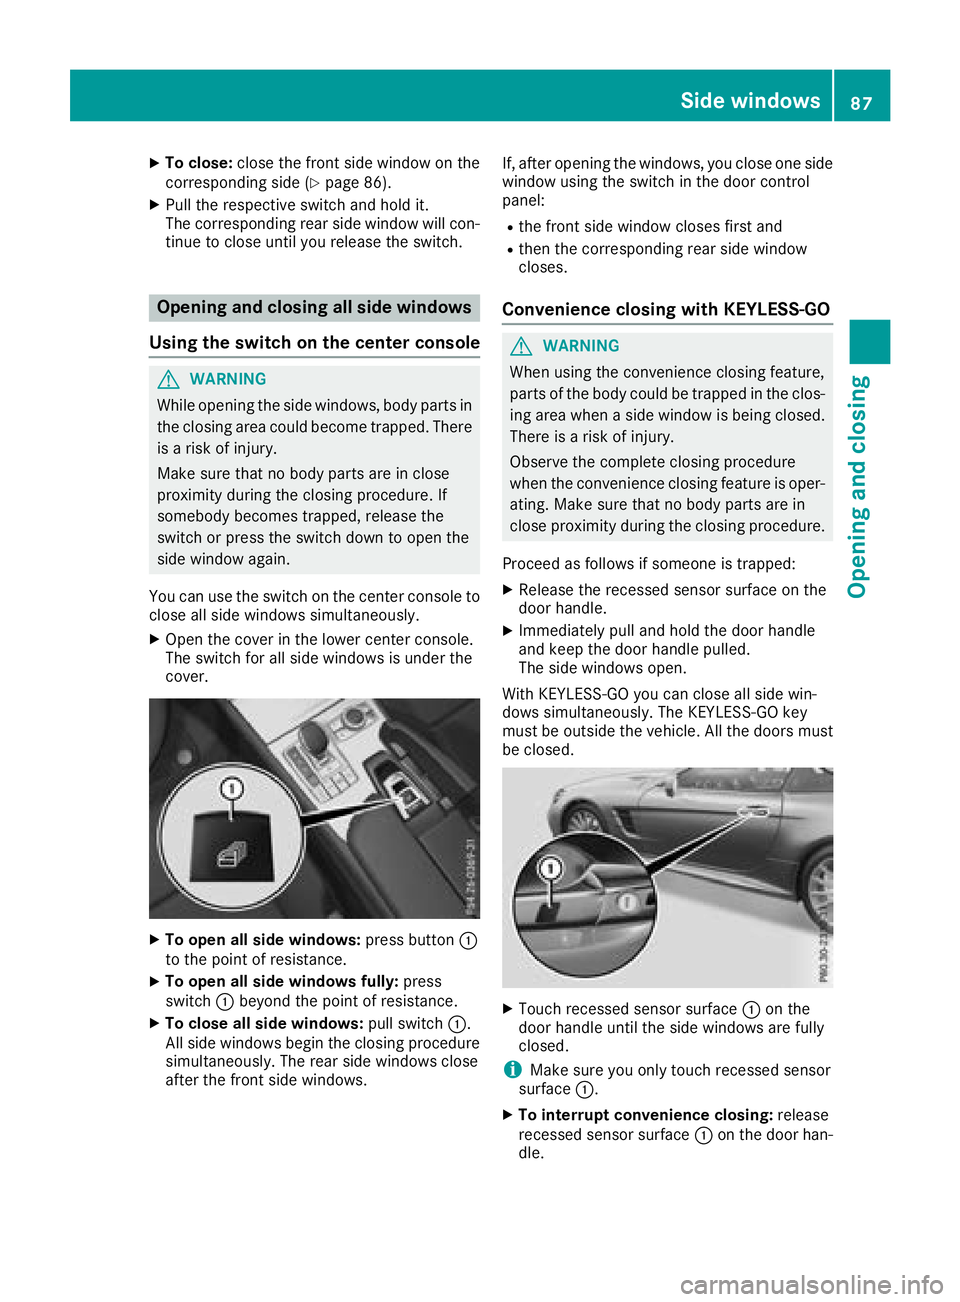
XOpen the cover in the lower center console.
The switch for all side windows is under the
cover.
XTo open all side windows: press button:
to the point of resistance.
XTo open all side windows fully: press
switch :beyond the point of resistance.
XTo close all side windows: pull switch:.
All side windows begin the closing procedure
simultaneously. The rear side windows close
after the front side windows. If, after opening the windows, you close one side
window using the switch in the door control
panel:
Rthe front side window closes first and
Rthen the corresponding rear side window
closes.
Convenience closing with KEYLESS-GO
GWARNING
When using the convenience closing feature,
parts of the body could be trapped in the clos-
ing area when a side window is being closed.
There is a risk of injury.
Observe the complete closing procedure
when the convenience closing feature is oper-
ating. Make sure that no body parts are in
close proximity during the closing procedure.
Proceed as follows if someone is trapped:
XRelease the recessed sensor surface on the
door handle.
XImmediately pull and hold the door handle
and keep the door handle pulled.
The side windows open.
With KEYLESS-GO you can close all side win-
dows simultaneously. The KEYLESS-GO key
must be outside the vehicle. All the doors must
be closed.
XTouch recessed sensor surface :on the
door handle until the side windows are fully
closed.
iMake sure you only touch recessed sensor
surface :.
XTo interrupt convenience closing: release
recessed sensor surface :on the door han-
dle.
Side windows87
Opening and closing
Z
Page 92 of 322
Opening and closing
XClose the trunk lid (Ypage 80).
If the trunk is loaded correctly, the trunk par-
tition closes automatically.
XTurn the SmartKey to position 2in the igni-
tion lock.
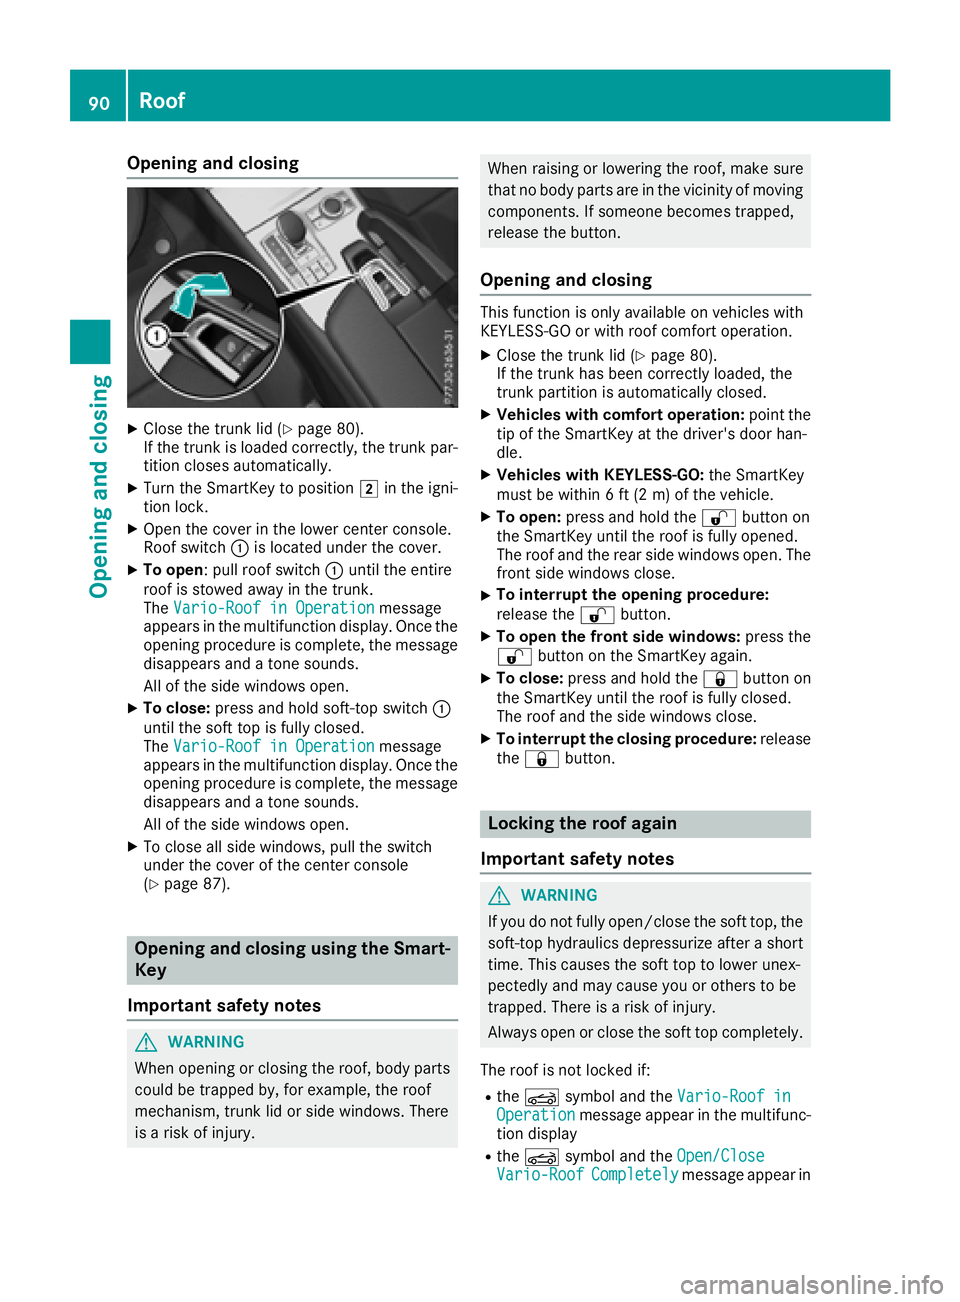
XOpen the cover in the lower center console.
Roof switch :is located under the cover.
XTo open: pull roof switch :until the entire
roof is stowed away in the trunk.
The Vario-Roof in Operation
message
appears in the multifunction display. Once the
opening procedure is complete, the message
disappears and a tone sounds.
All of the side windows open.
XTo close: press and hold soft-top switch :
until the soft top is fully closed.
The Vario-Roof in Operation
message
appears in the multifunction display. Once the opening procedure is complete, the message
disappears and a tone sounds.
All of the side windows open.
XTo close all side windows, pull the switch
under the cover of the center console
(
Ypage 87).
Opening and closing using the Smart-
Key
Important safety notes
GWARNING
When opening or closing the roof, body parts
could be trapped by, for example, the roof
mechanism, trunk lid or side windows. There
is a risk of injury.
When raising or lowering the roof, make sure
that no body parts are in the vicinity of moving components. If someone becomes trapped,
release the button.
Opening and closing
This function is only available on vehicles with
KEYLESS-GO or with roof comfort operation.
XClose the trunk lid (Ypage 80).
If the trunk has been correctly loaded, the
trunk partition is automatically closed.
XVehicles with comfort operation: point the
tip of the SmartKey at the driver's door han-
dle.
XVehicles with KEYLESS-GO: the SmartKey
must be within 6 ft (2 m) of the vehicle.
XTo open: press and hold the %button on
the SmartKey until the roof is fully opened.
The roof and the rear side windows open. The
front side windows close.
XTo interrupt the opening procedure:
release the %button.
XTo open the front side windows: press the
% button on the SmartKey again.
XTo close: press and hold the &button on
the SmartKey until the roof is fully closed.
The roof and the side windows close.
XTo interrupt the closing procedure: release
the & button.
Locking the roof again
Important safety notes
GWARNING
If you do not fully open/close the soft top, the
soft-top hydraulics depressurize after a short
time. This causes the soft top to lower unex-
pectedly and may cause you or others to be
trapped. There is a risk of injury.
Always open or close the soft top completely.
The roof is not locked if:
Rthe K symbol and the Vario-Roof inOperationmessage appear in the multifunc-
tion display
Rthe K symbol and the Open/CloseVario-RoofCompletelymessage appear in
90Roof
Opening and closing
Page 94 of 322
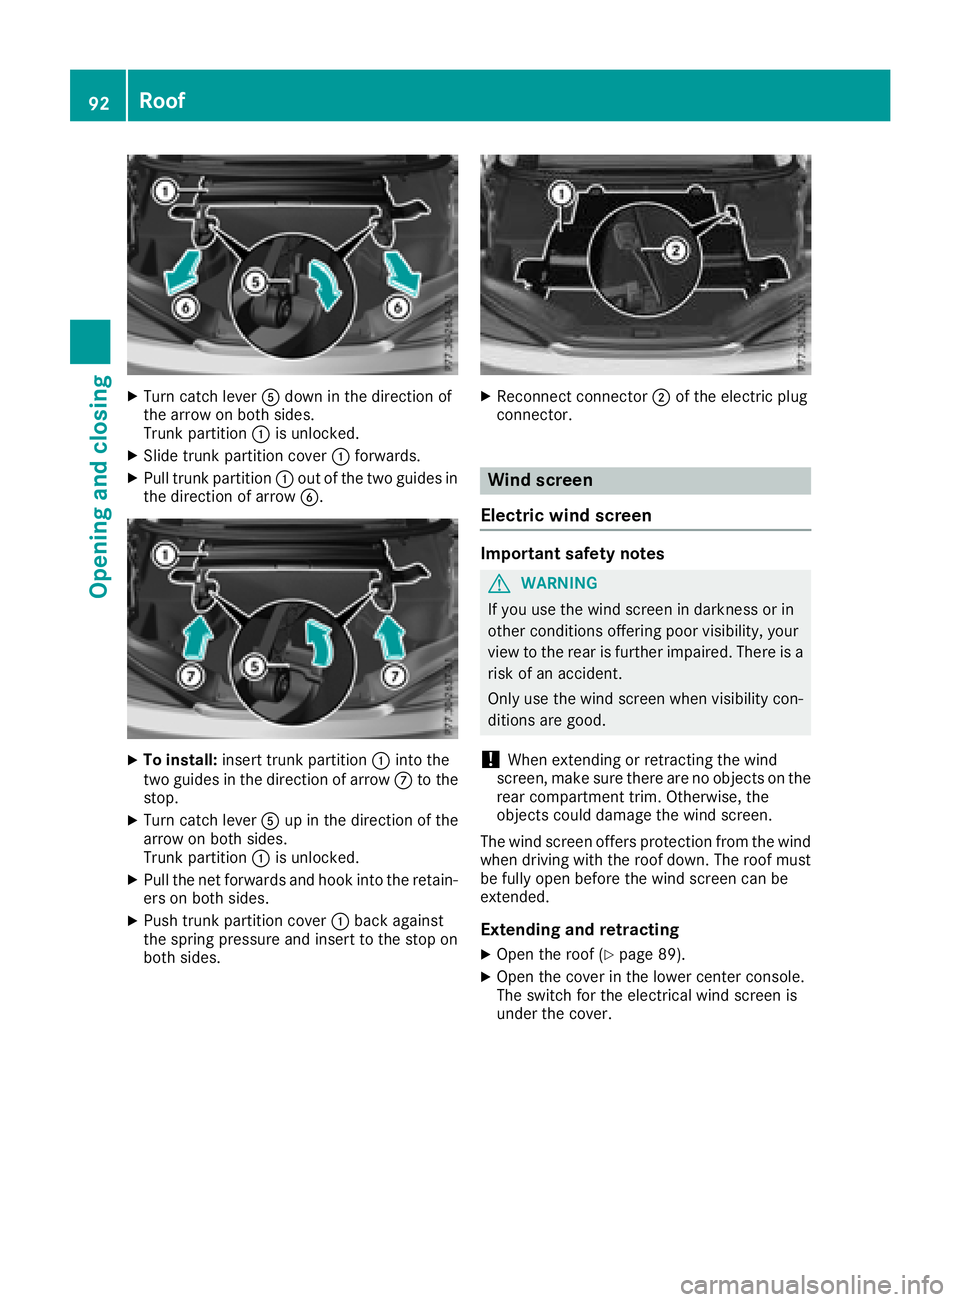
XTurn catch leverAdown in the direction of
the arrow on both sides.
Trunk partition :is unlocked.
XSlide trunk partition cover :forwards.
XPull trunk partition :out of the two guides in
the direction of arrow B.
XTo install:insert trunk partition :into the
two guides in the direction of arrow Cto the
stop.
XTurn catch lever Aup in the direction of the
arrow on both sides.
Trunk partition :is unlocked.
XPull the net forwards and hook into the retain-
ers on both sides.
XPush trunk partition cover :back against
the spring pressure and insert to the stop on
both sides.
XReconnect connector ;of the electric plug
connector.
Wind screen
Electric wind screen
Important safety notes
GWARNING
If you use the wind screen in darkness or in
other conditions offering poor visibility, your
view to the rear is further impaired. There is a
risk of an accident.
Only use the wind screen when visibility con-
ditions are good.
!When extending or retracting the wind
screen, make sure there are no objects on the
rear compartment trim. Otherwise, the
objects could damage the wind screen.
The wind screen offers protection from the wind
when driving with the roof down. The roof must
be fully open before the wind screen can be
extended.
Extending and retracting
XOpen the roof (Ypage 89).
XOpen the cover in the lower center console.
The switch for the electrical wind screen is
under the cover.
92Roof
Opening and closing
Page 175 of 322
Exiting a parking space
In order for Parking Pilot to assist you:
Rthe border of the parking space must be highenough at the front and the rear. A curb is too
small, for example.
Rthe border of the parking space must not be
too wide. Your vehicle can be maneuvered
into a position at a maximum of 45° to the
starting position in the parking space.
Ra maneuvering distance of at least 3.3 ft
(1.0 m) must be available.
Parking Pilot can assist you with exiting a park-
ing space only if you have parked the vehicle
parallel to the direction of travel using Parking
Pilot.
XStart the engine.
XRelease the electric parking brake.
XSwitch on the turn signal in the direction you
will drive out of the parking space.
XShift the transmission to position hork.
The Start Parking Pilot? Yes: OK No:
% message appears in the multifunction
display.
XTo cancel the procedure: press the%
button on the multifunction steering wheel or
pull away.
or
XTo exit a parking space using Parking
Pilot: press the abutton on the multi-
function steering wheel.
The Parking Pilot Active Accelerate
and Brake Observe Surroundingsmes-
sage appears in the multifunction display.
XLet go of the multifunction steering wheel.
XPull away, being ready to brake at all times. Do
not exceed a maximum speed of approx-
imately 6 mph (10 km/h) when exiting a park-
ing space. Otherwise, Parking Pilot is can-
celed immediately.
XDepending on the message or as required,
shift the transmission to position hork
when the vehicle is stationary.
Parking Pilot immediately steers in the other
direction. The Parking Pilot Active
Accelerate and Brake Observe Sur‐roundingsmessage appears in the multi-
function display.
iYou will achieve the best results by waiting
for the steering procedure to complete before
pulling away. If you back up after activation, the steering
wheel is moved to the straight-ahead posi-
tion.
XDrive forwards and reverse as prompted by
the Parking Assist PARKTRONIC warning dis-
plays, several times if necessary.
Once you have exited the parking space com-
pletely, the steering wheel is moved to the
straight-ahead position. You hear a tone and the
Parking
PilotFinishedmessage appears in
the multifunction display. You will then have to
steer and merge into traffic on your own. Park-
ing Assist PARKTRONIC is still available. You can
take over the steering before the vehicle has
exited the parking space completely. This is
useful, for example when you recognize that it is
already possible to pull out of the parking space.
Canceling Parking Pilot
You can cancel Parking Pilot at any time.
XStop the movement of the multifunction
steering wheel or steer yourself.
Parking Pilot is canceled immediately. The
Parking
PilotCanceledmessage appears
in the multifunction display.
or
XPress the "Park Assist PARKTRONIC" button
on the center console (Ypage 169).
Parking Assist PARKTRONIC is switched off
and Parking Pilot is immediately canceled.
The Parking Pilot Canceled
message
appears in the multifunction display.
Parking Pilot is canceled automatically when:
Rparking using Parking Pilot is no longer pos-
sible
Ryou are driving faster than 6 mph (10 km/h)
Ra wheel spins, ESP®intervenes or fails. The
÷ ESP®warning lamp lights up in the
instrument cluster
A warning tone sounds. The parking symbol dis-
appears and the multifunction display shows the
Parking Pilot Canceled
message.
When Parking Pilot is canceled, you must steer
again yourself.
Driving systems173
Driving and parking
Z
Page 212 of 322
Display messagesPossible causes/consequences andMSolutions
FrontPassengerAir‐bag Disabled SeeOperator' sManual
The front-passenger air bag and front-passenger knee bag are deac -
tivated during th ejourney, although:
Ran adult
or
Raperson of th ecorrespondin gstatur eis on th efront-passenger seat
If additional force sare applie dto th eseat ,th esystem may interpret
th eoccupant's weigh tas lower than it actually is.
GWARNIN G
The front-passenger fron tair bag and fron tpassenger knee bag may
no tbe triggered in th eevent of an accident.
There is an increased ris kof injury.
XPull ove rand stop th evehicl esafely as soo nas possible, payin g
attention to roa dand traffic conditions.
XSecur eth evehicl eagainst rollin gaway (Ypage 142).
XSwitchth eignition off .
XHaveth eoccupant on th efront-passenger seat get out of th evehi-
cle .
XKee pth eseat unoccupied ,close th efront-passenger door and
switch on th eignition .
XObserveth ePASSENGER AI RBA Gindicator lamp sin th ecenter
console and th emultifunction display and chec kth efollowing:
Seat unoccupied and ignition switched on :
Raself-diagnosis is carrie dout .The PASSENGER AI RBA GOF Fand
PASSENGER AI RBA GON indicator lamp smus tligh tup simulta-
neousl yfor approx imate
ly six seconds
Rth
ePASSENGER AI RBA GOF Findicator lamp mus tthen ligh tup
and remain lit after th eself-diagnosis .If th eindicator lamp is on ,
OCS has deactivated th efront-passenger fron tair bag and front-
passenger knee bag (
Ypage 48)
RtheFront Passenger Airbag Enable dSee Operator' sManualorFront Passenger Airbag Disabled See Opera‐tor's Manualdisplay message smus tno tbe shown in th emul-
tifunction display
XWait for aperiod of at least 60 seconds until th enecessar ysystem
checks hav ebeen completed.
XMak esur ethat th edisplay message sdo no tappear in th emulti-
function display.
If these condition sare fulfilled ,th efront-passenger seat can be occu-
pied again .Whether th ePASSENGER AI RBA GOF For ON indicator
lamp remain slit or goe sout depend son how OCS classifies th eoccu-
pant.
If th econdition sare no tfulfilled ,th esystem is no toperating correctly.
XVisit aqualified specialist workshop immediately.
Observ eth eadditional information on OCS (
Ypage 48).
210Display messages
On-board computer and displays
Page 213 of 322
Display messagesPossible causes/consequences andMSolutions
FrontPassengerAir‐bag Enable dSeeOperator' sManual
The front-passenger air bag and front-passenger knee bag are enabled
during th ejourney, eve nthough :
Rachild, asmall adult or an objec tweighing less than th esystem' s
weigh tthreshold is locate don th efront-passenger seat
or
Rth efront-passenger seat is unoccupied
The system may detec tobjects or force sapplyin gadditional weigh ton
th eseat .
GWARNIN G
The front-passenger fron tair bag and th efront-passenger knee bag
may be triggered unintentionally.
There is an increased ris kof injury.
XPull ove rand stop th evehicl esafely as soo nas possible, payin g
attention to roa dand traffic conditions.
XSecur eth evehicl eagainst rollin gaway (Ypage 142).
XSwitchth eignition off .
XOpenth efront-passenger door .
XRemove thechild and th echild restrain tsystem from th efront-
passenger seat .
XMakesur ethat there are no objects on th eseat addin gto th e
weight.
The system might otherwise detec tth eadditional weigh tand inter-
pre tth eseat occupant's weigh tas greate rthan it actually is.
XKee pth eseat unoccupied ,close th efront-passenger door and
switch on th eignition .
XObserveth ePASSENGER AI RBA Gindicator lamp sin th ecenter
console and th emultifunction display and chec kth efollowing:
Seat unoccupied and ignition switched on :
Raself-diagnosis is carrie dout .The PASSENGER AI RBA GOF Fand
PASSENGER AI RBA GON indicator lamp smus tligh tup simulta-
neousl yfor approximately six seconds
Rth ePASSENGER AI RBA GOF Findicator lamp mus tthen ligh tup
and remain lit after th eself-diagnosis .If th eindicator lamp is on ,
OCS (Occupant Classification System) has deactivated th efront-
passenger fron tair bag and front-passenger knee bag
(
Ypage 48)
Rth eFront Passenger Airbag Enable dSee Operator' sManualorFront Passenger Airbag Disabled See Opera‐tor's Manualdisplay message smus tno tbe shown in th emul-
tifunction display
XWait for aperiod of at least 60 seconds until th enecessar ysystem
checks hav ebeen completed.
XMak esur ethat th edisplay message sdo no tappear in th emulti-
function display.
If these condition sare fulfilled ,th efront-passenger seat can be occu-
pied again .Whether th ePASSENGER AI RBA GOF For ON indicator
Display messages21 1
On-board computer and displays
Z
Page 239 of 322
Operating system
Overview
General notes
!Do not use the space in front of the display
for storage. Objects placed here could dam-
age the display or impair its function. Avoid
any direct contact with the display surface.
Pressure on the display surface may result in
impairments to the display, which could be
irreversible.
Wearing polarized sunglasses may impair your
ability to read the display.
The display has an automatic temperature-con-
trolled switch-off feature. The brightness is
automatically reduced if the temperature is too
high. The display may temporarily switch off
completely.
Cleaning instructions
!Do not touch the display. The display has a
very sensitive high-gloss surface; there is a
risk of scratching. If you have to clean the
screen, however, use a mild cleaning agent
and a soft, lint-free cloth.
The display must be switched off and have
cooled down before you start cleaning. Do not
apply pressure to the display surface when
cleaning it, as this could cause irreversible dam-
age to the display.
Switching the multimedia system
on/off
XPress the qcontrol knob.
Adjusting the volume
XTurn the qcontrol knob.
The volume is adjusted:
Rfor the currently selected media source
Rduring traffic or navigation announcements
Rin hands-free mode during an active call
Switching the sound on or off
XPress the 8button on the control panel.
If the audio output is switched off, the status
line will show the 8symbol. If you switch the media source or set the volume, the sound
is automatically switched on.
iNavigation announcements will be heard
even if the sound is muted.
Functions
The multimedia system has the following func-
tions:
RRadio mode
RMedia mode with media search
RSound systems
RNavigation system
RCommunication functions
RSIRIUS Weather
RVehicle functions with system settings
RFavorites functions
Controller
The controller in the center console lets you:
Rselect menu items on the display
Renter characters
Rselect a destination on the map
Rsave entries
The controller can be:
Rturned 3
Rslid left or right 1
Rslid forwards or back 4
Rslid diagonally2
Rpressed briefly or pressed and held 7
Back button
You can use the%button to exit a menu or to
call up the main menu of the current operating
mode.
XTo exit the menu: briefly press the%
button.
The multimedia system changes to the next
higher menu level in the current operating
mode.
XTo call up the main menu: press the%
button for longer than two seconds.
The multimedia system changes to the main
menu of the current operating mode.
Operating system237
Multimedia system
Z