2018 MERCEDES-BENZ S-CLASS SEDAN height
[x] Cancel search: heightPage 95 of 562
Thefoot re st can only be adjus ted when one of
th efo llowing conditions has been fulfilled:
RThe front passenge r seat is moved fully
fo rw ard
RThe front passenger seat is in the position for
ch auf feur mode
#Ad just there ar seat (→page 93).
#Ad just there clining rear seat (→page 93).
#To select the front passenger seat: press
button 1.
When the indicator lamp lights up, the front
passenger seat is selected.
#Ad just the front passenger seat using the
buttons in the door control panel in there ar
passenger compartment.
% Mercedes-M aybach vehicles: it is suffi‐
cient toadjust thefo ot re st ifth e front
passenger seat is mo ved into the center set‐
ting area.
% You can use theove rride feature in there ar
passenger compartment todisable this func‐
tion (
→page 56).
Ad justing the rear seats electrical ly
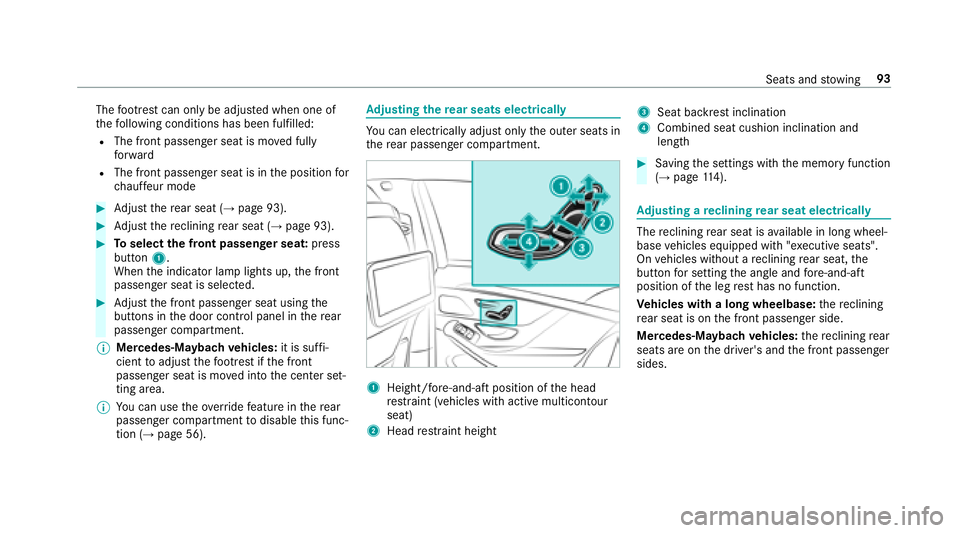
You can electrically adjust only the outer seats in
th ere ar passenger compartment.
1Height/fore-and-aft position of the head
re stra int (vehicles with active multicontour
seat)
2Head restra int height
3Seat backrest inclination
4Combined seat cushion inclination and
length
#Saving the settings with the memory function
(→page 114).
Ad justing a reclining rear seat electrical ly
Thereclining rear seat is available in long wheel‐
base vehicles equipped with "e xecuti veseats".
On vehicles without a reclining rear seat, the
button for setting the angle and fore -and-aft
position of the leg rest has no function.
Ve hicles with a long wheelbase: there clining
re ar seat is on the front passenger side.
Mercedes-Maybach vehicles: there clining rear
seats are on the driver's and the front passenger
sides.
Seats and stowing 93
Page 96 of 562

1Height/fore-and-aft position ofthe head
re stra int (vehicles with active multicontour
seat)
2Head restra int height
3Seat backrest inclination
4Combined seat cushion inclination and
length
5Combined seat cushion inclination and
length
6An gle of the leg rest
7Fo re-and-aft position of the leg rest
#Sa ve the settings using the memory function
(→page 114).
% Theleg re st folds down if overloaded. If this
is the case, fold up the leg rest and engage
it.
% Vehicles with a long wheelbase and a Chauf‐
fe ur/ Rear Seat Memory Package also ha vea
fo ot re st. This is located on the lo wer part of
th e front passenger seat backrest
(
→page 91).
Setting the fully reclined position
Re quirements:RThe po wer supply is switched on.
This function is available in vehicles with a long
wheelbase.
#To set there clined position: press and hold
button 1until there clined position is
re ached.
RThe rear seat mo ves into there clined
position.
RThe front passenger seat mo ves into the
position forch auf feur mode.
RThe foot re st mo ves out from under the
front passenger seat.
94 Seats and stowing
Page 97 of 562
Rifav ailable, the leg rest rises.#To set the seat position: manually adjust
th e seat tothe desired position.
or
#Call up the settings with the memory func‐
tion (→page 114).
% You can use theove rride feature in there ar
passenger compartment todisable this func‐
tion (
→page 56).
% The leg rest folds down if overloaded. If this
is the case, fold up the leg rest and engage
it.
Chauf feur mode
Information on chauf feur mode
&
WARNING Risk of injury duetohead
re stra ints which are not ins talled or are
adjus ted inco rrectly
If head restra ints are not ins talled or are
adjus ted incor rectly, the head restra ints can‐
not pr ovide pr otection as intended.
There is an increased risk of injury in the
head and neck area, e.g. in theeve nt of an
accident or when braking.
#Alw ays drive with the head restra ints
ins talled.
#Before driving off, make sure forev ery
ve hicle occupant that the center of the
head restra int supports the back of the
head at about eye le vel.
Do not swap the head restra ints of the front and
re ar seats. Otherwise, you cannot adjust the
height and angle of the head restra ints cor rectl y.
Ad just the head restra int fore -and-aft position so
th at it is as close as possible tothe back of your
head.
& WARNING Risk of accident wi th the
front passenger head restra int folded
down
If th e front passenger seat is in thech auf feur
mode position and the front passenger head
re stra int is folded down, the view of the pas‐
senger's outside mir ror can be impai red.
#To have a free view of the outside mir‐
ro r,re mo vethe front passenger head
re stra int before beginning a journe y.
*NO
TEDama getoobjects in the luggage
net of the front passenger foot we ll when
adjusting the front passenger seat tothe
ch auf feur position
Objects in the luggage net in the front
passenger foot we ll can become damaged
when the front passenger seat is adjus tedto
th ech auf feur position.
#Re mo vethe objects from the luggage
net.
* NO
TEDama getothe seats when moving
th e seats back
The seats may be damaged byobjects when
moving the seats bac k.
#When moving the seats bac k,make
sure that there are no objects in the
fo ot we ll or under or behind the seats.
Seats and stowing 95
Page 102 of 562
Settingthe fully reclined position of the front
passenger seat (chau ffeur mode)
Setting there clined position
This function is available in vehicles with thefo l‐
lowing equipment:
RElectrically adjus table rear seats.
RIndividual rear seats without a leg rest.
Yo u can mo vethe front passenger seat into a
fully reclined position. The rear seat and front
passenger seat then pr ovide a continuous sur‐
fa ce.
#Put the seat cushion of there ar seat all the
wa ybac kin thefo re -and-aft position
(
→pa ge 93).
#Mo vethe front passenger seat into position
fo rch auf feur mode (→page 96).
#Re mo vethe front passenger head restra int
(→page 97).
#Mo vethe front passenger seat so that the
backrest is in a fully reclined position
(
→page 89). Leaving the
reclined position
#Fo ldthe front passenger seat backrest
upright toa suitable position.
#Inst allthe front passenger head restra int
(→page 97).
Head restra ints
Ad justing the front seat head restra ints man‐
ually
& WARNING Risk of injury from adjusting
th eve hicle settings while theve hicle is in
motion
Yo u could lose cont rol of theve hicle in the
fo llowing situations:
Rifyo u adjust the driver's seat, the head
re stra int, thesteering wheel or the mir ror
while theve hicle is in motion
Rifyo ufa sten your seat belt while theve hi‐
cle is in motion
#Before starting the engine: adjust the
driver's seat, the head restra int, the
steering wheel or the mir ror and fasten
yo ur seat belt.
&
WARNING Risk of injury duetohead
re stra ints which are not ins talled or are
adjus ted incor rectly
If head restra ints are not ins talled or are
adjus ted incor rectly, the head restra ints can‐
not pr ovide pr otection as intended.
There is an increased risk of injury in the
head and neck area, e.g. in theeve nt of an
accident or when braking.
#Alw ays drive with the head restra ints
ins talled.
#Before driving off, make sure forev ery
ve hicle occupant that the center of the
head restra int supports the back of the
head at about eye le vel.
Do not rotate the head restra ints of the front and
re ar seats. Otherwise, you cannot adjust the
height and angle of the head restra ints cor rectl y.
10 0
Seats and stowing
Page 108 of 562
Overview of massageand workout prog rams
The following massage prog ram can be selected:
Massage prog ram for the front seats Function
Hot Relaxing Massage for bac kR elaxing massage prog ram starting in the pelvic area. Warm pressure points can be felt, full back massage,
st re tching the pelvic area. Ending with gentle stroking motions.
Hot Relaxing Massage for shoulder sR elaxing massage prog ram starting in the shoulder area. Warm pressure points can be felt, full twin-w ave
back massage, stre tching the shoulder area. Ending with gentle stroking motions.
Ac tivating Massa ge Activating ba ckmassa gewith inc reasing twin-w aves and then soo thing mo vements.
Classic Massage Massage with increasing twin-waves and soo thing mo vements.
Mobilizing Massage Mobilization ofthe spinal column and the comple teupper body bymeans of a pressure point mobilizing
massage at chest height.
Ac tive Workout prog rams
The Active Workout programs requ ire your act ive
co-operation and are a co nvenient wayof exe r‐ cising
your abdomen and back muscles during a
traf fic jam, forex ample, bytensing and releasing
th e specific muscle groups. Tensing and releas‐ ing also helps
toimpr oveblood flow to yo ur
muscles. Press against a pressure point as soon
as youfe el it.
10 6
Seats and stowing
Page 113 of 562

1Adjusts the dis tance tothesteering wheel
2Ad justs the height
#Sa ve the settings with the memory function
(→page 113).
Overvi ewofthest eering wheel heater
The steering wheel heater can be operated when
th e po wer supp lyor ignition is switched on.
1To activate
2Todeactivate
3Indicator lamp
Easy entry and exitfeature
Fu nction of the easy entry and exitfeature
&
WARNING Risk of accident when driving
off while adjusting the easy exitfeature
‑ If you dr ive off while the easy ent ryand exit
fe ature is making adjustments, you could
lose cont rol of theve hicle.
#Alw ayswa it until the adjustment proc‐
ess is comple tebefore driving off.
&
WARNING Risk of becoming trapped
while adjusting the easy ent ryand exit
fe ature
When the easy ent ryand exitfeature adjusts
th esteering wheel and the driver's seat, you
and other vehicle occupants – particular ly
ch ildren – could become trapped.
#During the adjustment process of the
easy ent ryand exitfeature, make sure
th at no one has any body parts in the
sweep of the seat or thesteering wheel.
Seats and stowing 111
Page 126 of 562
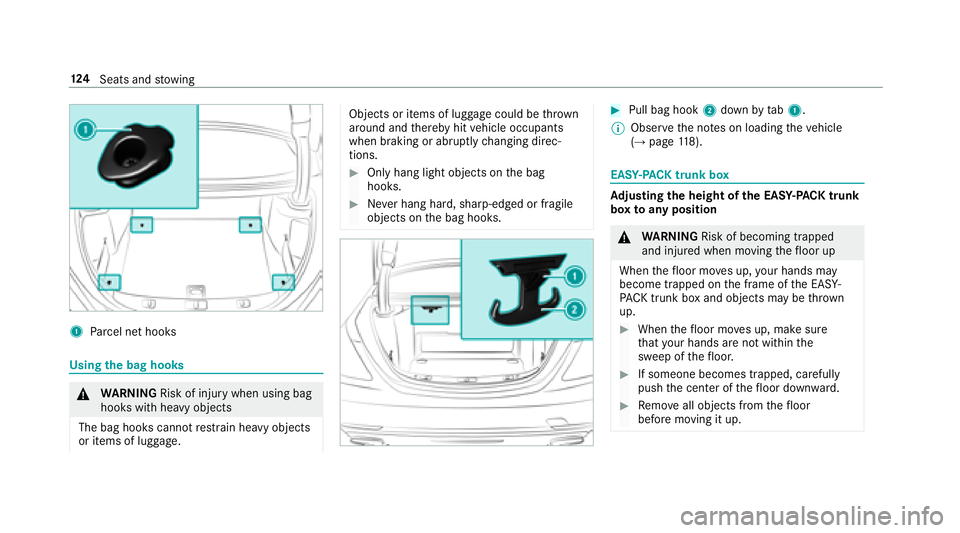
1Parcel net hooks
Using the bag hooks
&
WARNING Risk of injury when using bag
hooks with heavy objects
The bag hooks cannot restra in heavy objects
or items of luggage.
Objects or items of luggage could be throw n
around and thereby hit vehicle occupants
when braking or abruptly changing direc‐
tions.
#Only hang light objects on the bag
hooks.
#Ne ver hang hard, sharp-edged or fragile
objects on the bag hooks.
#Pull bag hook 2down bytab1.
% Obser vethe no tes on loading theve hicle
(
→page 118).
EAS Y-PA CK trunk box
Adjusting the height of the EA SY-PAC K trunk
box toany position
&
WARNING Risk of becoming trapped
and injure d when moving thefloor up
When thefloor mo ves up, your hands may
become trapped on the frame of the EA SY-
PA CK trun kbo xan dobject sma ybe throw n
up.
#When thefloor mo ves up, make sure
th at your hands are not within the
sweep of thefloor.
#If someone becomes trapped, carefully
push the center of thefloor down ward.
#Re mo veall objects from thefloor
before moving it up.
12 4
Seats and stowing
Page 216 of 562

Thevehicle is lo wered again in thefo llowing sit‐
uations:
RWhen driving fasterthan 75 mph
(120 km/h).
RWhen driving between 50 mph (80 km/h)
and 75mph(120 km/h) for app roxima tely
th re e minutes.
RAf ter selecting a drive program using the
DY NA MIC SELECT switch.
The vehicle is adjus tedto the height of the last
active drive prog ram.
Lo weri ngtheve hicle
#Press button 1.
Indicator lamp 2goes out. The vehicle is
adjus tedto the height of the last active drive
program.
MAGIC BODY CONT ROL
MAGIC BODY CONT ROL function
MAGIC BODY CONTROL is an electrohydraulic
suspension with variable damping for impr oved
driving comfort. The all-round le vel control sys‐
te m ensures the best possible suspension and
const ant ground clearance, even wi tha laden
ve hicle. When driving at speed, theve hicle is
lo we red automatically toimpr ove driving saf ety
and toreduce fuel consum ption. The suspension
tuning is adjus ted depending on thero ad sur‐
fa ce, vehicle load and the drive program selec‐
te d. The ROAD SURFA CE SCAN function detects
areas of une venness in thero ad before you drive
ove rth em bymeans of a multifunction camera.
This reduces chassis mo vements. The option of
manually adjust ingtheve hicle le vel is also avail‐
able.
The damping is adjus ted individually toeach
wheel and depends on:
RThe driving style, e.g. sporty
RThe road sur face condition, e.g. bump s
RThe individual selection of "Sport", "Com‐
fort", "CURVE" or "Economy"
MAGIC BODY CONTROL comprises:
RActive Body Control ABC
RRO AD SURFA CE SCAN
RCurveinclination function CURVE
RAutomatic le vel control sy stem
RAu tomatic vehicle stabilization in theeve nt of
sidewinds
RSpeed-dependent lo wering toreduce fuel
consum ption
RManual le vel adjustment
RDY NA MIC SELECT switch and le vel button
21 4
Driving and pa rking