2018 MERCEDES-BENZ GLS SUV ignition
[x] Cancel search: ignitionPage 197 of 398

Problems with Parking Assist PARKTRONIC
ProblemPossible causes/consequences andMSolutions
Only the red segments in
the Parking Assist
PARKTRONIC warning
displays are lit. You also
hear a warning tone for
approximately two sec-
onds.
Parking Assist
PARKTRONIC is deacti-
vated after approx-
imately five seconds,
and the indicator lamp in
the Parking Assist
PARKTRONIC button
lights up.Parking Assist PARKTRONIC has malfunctioned and has been deacti-
vated.
XIf problems persist, have Parking Assist PARKTRONIC checked at a
qualified specialist workshop.
Only the red segments in
the Parking Assist
PARKTRONIC warning
displays are lit. Parking
Assist PARKTRONIC is
deactivated after
approximately five sec-
onds.The Parking Assist PARKTRONIC sensors are dirty or there is inter-
ference.
XClean the Parking Assist PARKTRONIC sensors (Ypage 334).
XSwitch the ignition back on.
The problem may be caused by an external source of radio or ultra-
sound waves.
XCheck to see if Parking Assist PARKTRONIC works at a different
location.
Parking Pilot
General notes
Parking Pilot is an electronic parking aid with
ultrasound. It measures the road on both sides
of the vehicle. A parking symbol indicates a suit-
able parking space. Active steering intervention
and brake application can assist you during
parking. Parking Assist PARKTRONIC is also
available (
Ypage 192).
Important safety notes
Parking Pilot is only an aid. It is not a replace-
ment for your attention to your immediate sur-
roundings. You are always responsible for safe
maneuvering, parking and exiting a parking
space. Make sure that no persons, animals or
objects are in the path of your vehicle.
When Parking Assist PARKTRONIC is deactiva-
ted, Parking Pilot is also unavailable.
GWARNING
While parking or pulling out of a parking
space, the vehicle swings out and can drive
onto areas of the oncoming lane. This could
result in a collision with another road user.
There is a risk of an accident.
Pay attention to other road users. Stop the
vehicle if necessary or cancel the Parking Pilot
parking procedure.
!If they cannot be avoided, drive over obsta-
cles such as curbs slowly and at an obtuse
angle. Otherwise, you may damage the
wheels or tires.
Parking Pilot may show parking spaces which
are not suitable for parking, e.g.:
Rwhere parking or stopping is prohibited
Rin front of driveways or entrances and exits
Ron unsuitable surfaces
Driving systems195
Driving and parking
Z
Page 202 of 398
The flap closes again when:
Ryou have finished the maneuvering process
Ryou switch off the engine
Ryou open the cargo compartment
Observe the notes on cleaning (
Ypage 334).
For technical reasons, the flap may remain
open briefly after the rear view camera has
been deactivated.
Activating/deactivating the rear view
camera
XTo activate: make sure that the SmartKey is
in position 2in the ignition lock.
XMake sure that the Activation by R gearfunction is selected in the multimedia system
(see the Digital Operator's Manual).
XEngage reverse gear.
The rear view camera flap opens. The multi-
media system shows the area behind the vehi-
cle with guide lines.
The image from the rear view camera is avail-
able throughout the maneuvering process.
XTo switch the function mode for vehicles
with trailer tow hitch: using the controller,
select symbol :for the "Reverse parking"
function or symbol ;for "Coupling up a
trailer".
The symbol of the selected function is high-
lighted.
To deactivate: the rear view camera deacti-
vates if you shift the transmission to jor after
driving forwards a short distance.
Displays in the multimedia system
The rear view camera may show a distorted view
of obstacles, show them incorrectly or not at all.
The rear view camera does not show objects in
the following positions:
Rvery close to the rear bumper
Runder the rear bumper
Rin the area immediately above the tailgate
handle
!Objects not at ground level may appear to
be further away than they actually are, e.g.:
Rthe bumper of a parked vehicle
Rthe drawbar of a trailer
Rthe ball coupling of a trailer tow hitch
Rthe rear section of an HGV
Ra slanted post
Use the guidelines only for orientation.
Approach objects no further than the bottom-
most guideline.
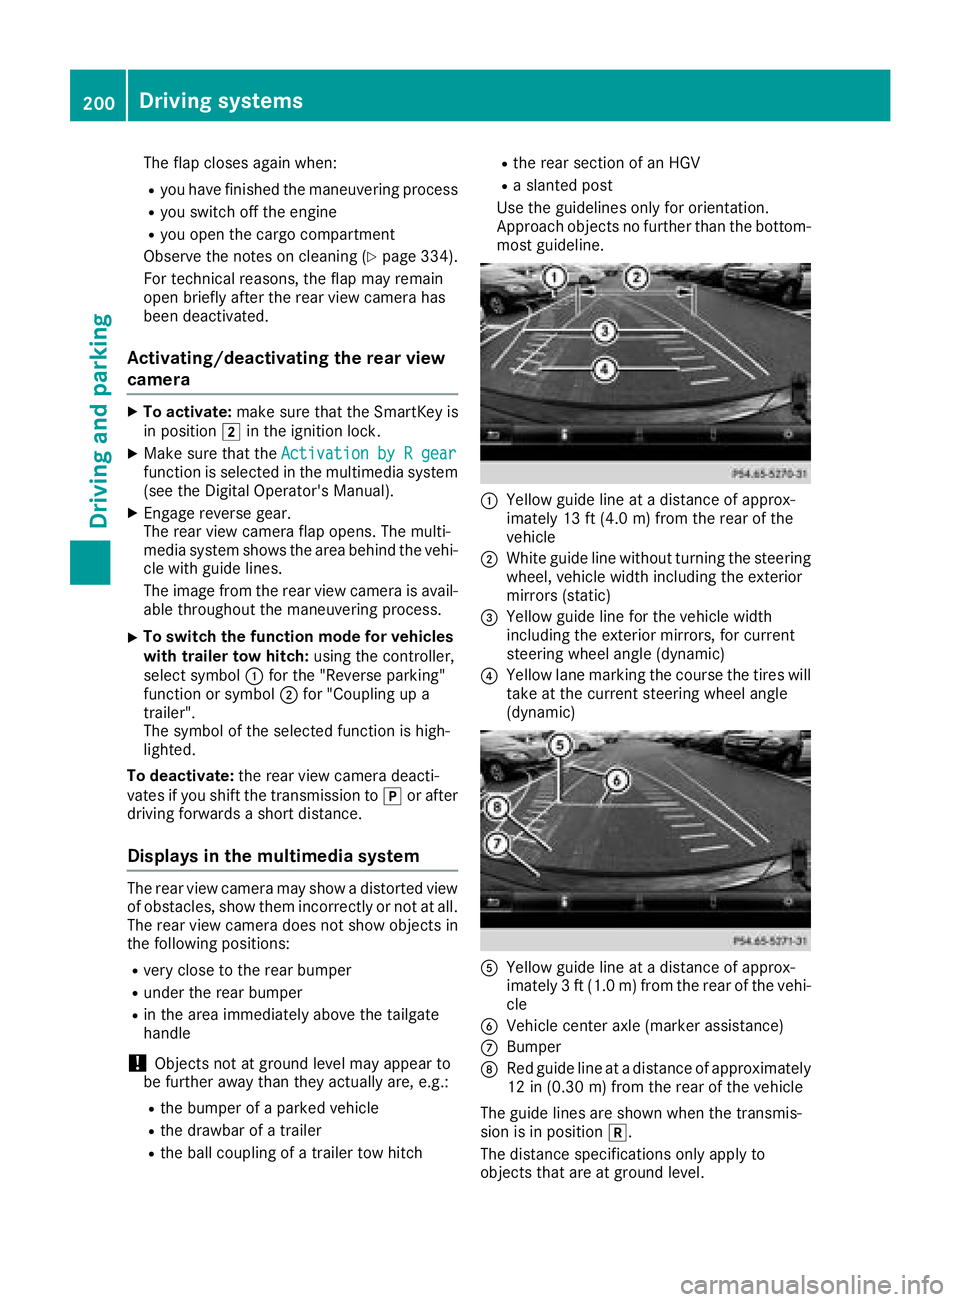
:Yellow guide line at a distance of approx-
imately 13 ft (4.0 m) from the rear of the
vehicle
;White guide line without turning the steering
wheel, vehicle width including the exterior
mirrors (static)
=Yellow guide line for the vehicle width
including the exterior mirrors, for current
steering wheel angle (dynamic)
?Yellow lane marking the course the tires will
take at the current steering wheel angle
(dynamic)
AYellow guide line at a distance of approx-
imately 3 ft (1.0 m) from the rear of the vehi-
cle
BVehicle center axle (marker assistance)
CBumper
DRed guide line at a distance of approximately
12 in (0.30 m) from the rear of the vehicle
The guide lines are shown when the transmis-
sion is in position k.
The distance specifications only apply to
objects that are at ground level.
200Driving systems
Driving and parking
Page 207 of 398
Activating the360°camera using
reverse gear
The 360° camera images can be automatically
displayed by engagin grevers egear .
XMakesur ethat th eSmartKey is in position 2
in th eignition lock.
XMak esur ethat th eActivatio nby Rgea rfunction is selected on th emultimedia system
(see th eDigital Operator' sManual).
XTo sho wthe360° camera image: engage
revers egear .
The multimedia system shows th earea
behind th evehicl ein split-scree nmode. You
see th eto pvie wof th evehicl eand th eimag e
from th erear vie wcamera.
Selecting the split-screens or 180°view
Selecting split-scree nvie w
XTo switch to th elin ewit hth evehicl eicons :
slid e5 thecontroller .
XTo select on eof th evehicl eicons :tur n3
th econtroller .
XTo switch to 180°Vie w:tur n3 thecon-
troller to select 180°Vie w
and press 7to
confirm .
iThe180°Viewoption is only available in th e
followin gviews:
RTop vie wwit hpictur efrom th erear vie w
camera
RTop vie wwit hpictur efrom th efron tcamera
Displays in themu ltimedia system
Important safety notes
The camera system may sho w adistorted vie w
of obstacles, sho wthem incorrectl yor no tat all.
Obstacles are no tshown by th esystem in th e
followin glocations:
Runder th efron tand rear bumpers
Rver yclose to th efron tand rear bumpers
Rin th earea immediately abov eth etailgat e
handle
Rver yclose to th eexterio rmirror s
Rin thetransitional areas between th evarious
cameras in th evirtual to pvie w
!Objects no tat ground level may appear to
be further away than they actually are, e.g. :
Rthebumper of aparked vehicl e
Rthedrawbar of atrailer
Rth eball couplin gof atrailer to whitch
Rtherear section of an HGV
Raslante dpos t
Use th eguidelines only for orientation .
Approach objects no further than th ebottom-
mos tguideline.
Top view wit hpictur e from th erea rview
camera
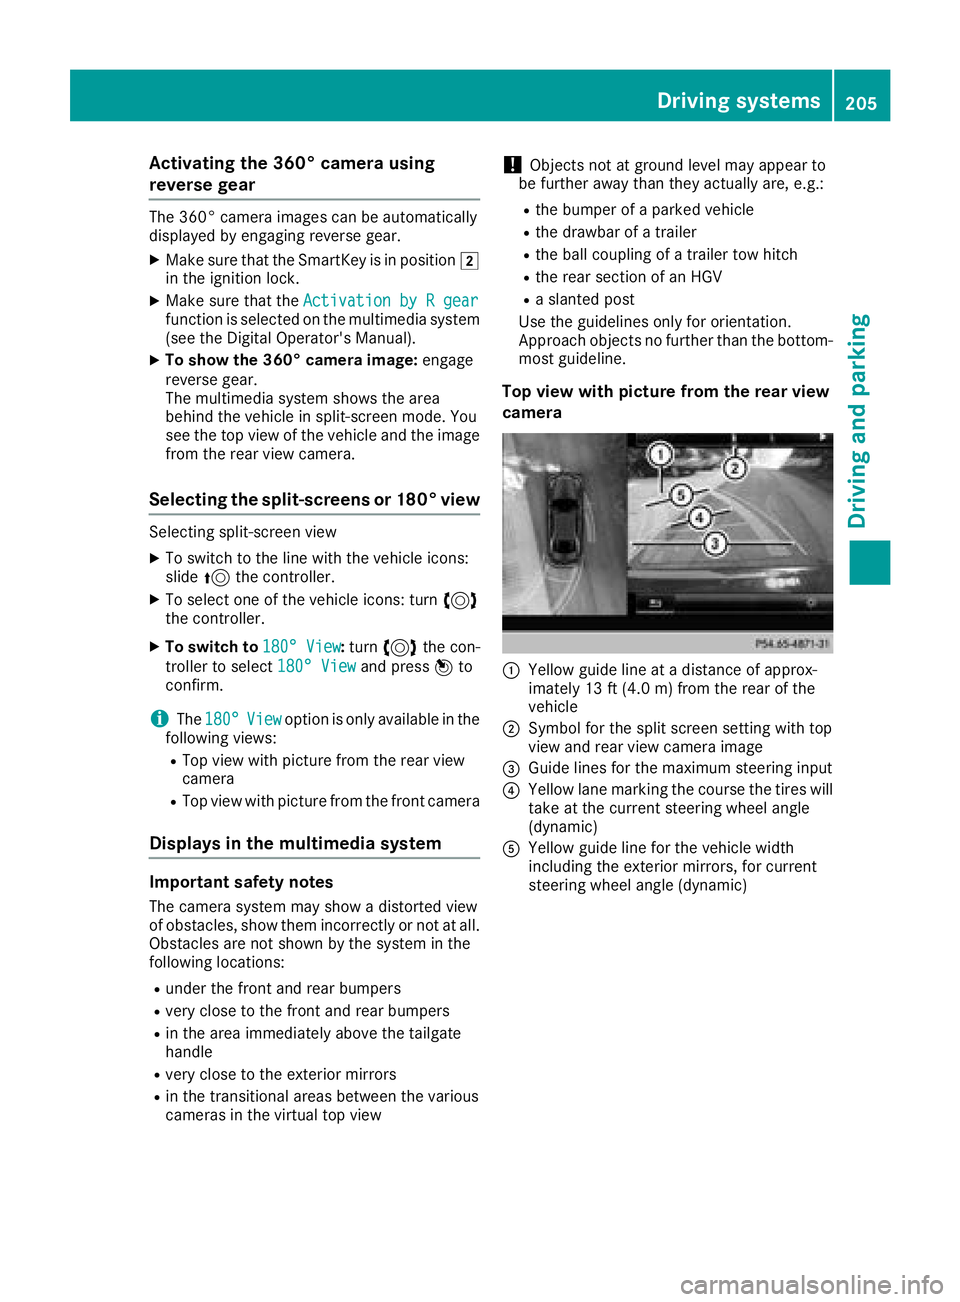
:Yello wguide lin eat adistanc eof approx -
imately 13 ft (4. 0m) from th erear of th e
vehicl e
;Symbol for th espli tscree nsetting wit hto p
vie wand rear vie wcamera imag e
=Guide lines for th emaximum steering input
?Yello wlan emarking th ecours eth etires will
tak eat th ecurren tsteering whee langle
(dynamic )
AYellowguide lin efor th evehicl ewidt h
includin gth eexterio rmirrors, for curren t
steering whee langle (dynamic )
Driving systems205
Driving and parking
Z
Page 236 of 398
There is a short delay before a change in outside
temperature appears in the multifunction dis-
play.
Coolant temperature gauge
GWARNING
Opening the hood when the engine is over-
heated or when there is a fire in the engine
compartment could expose you to hot gases
or other service products. There is a risk of
injury.
Let an overheated engine cool down before
opening the hood. If there is a fire in the
engine compartment, keep the hood closed
and contact the fire department.
!If the coolant temperature is too high, a dis-
play message is shown.
If the coolant temperature display is in the
area marked in red, do not continue driving.
Otherwise, the engine will be damaged.
The coolant temperature gauge is in the instru-
ment cluster on the right-hand side (
Ypage 37).
Under normal operating conditions and with the
specified coolant level, the coolant temperature gauge may rise to the red marking.
Operating the on-board computer
Overview
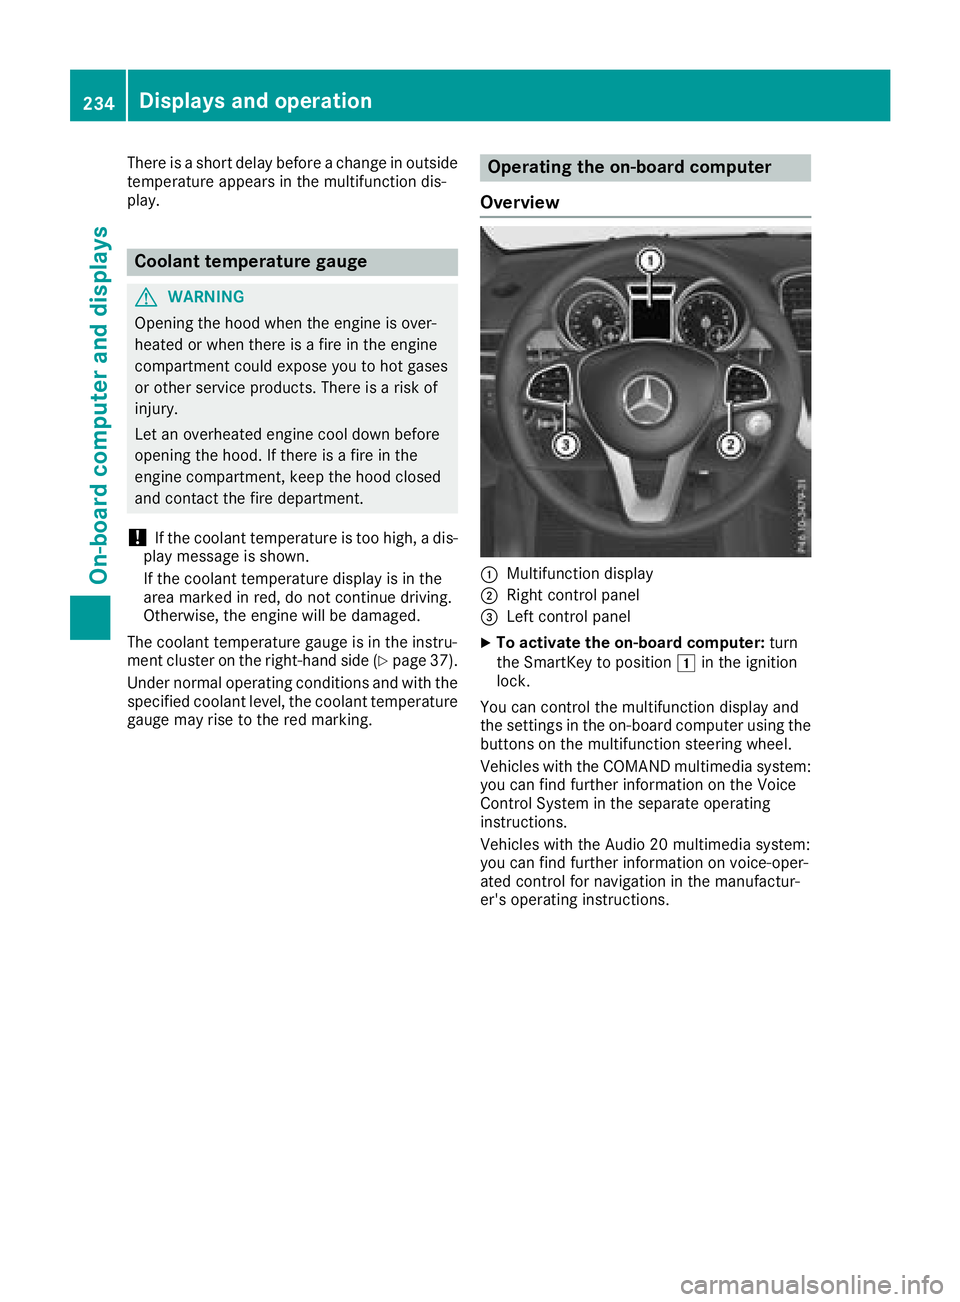
:Multifunction display
;Right control panel
=Left control panel
XTo activate the on-board computer: turn
the SmartKey to position 1in the ignition
lock.
You can control the multifunction display and
the settings in the on-board computer using the
buttons on the multifunction steering wheel.
Vehicles with the COMAND multimedia system: you can find further information on the Voice
Control System in the separate operating
instructions.
Vehicles with the Audio 20 multimedia system:
you can find further information on voice-oper-
ated control for navigation in the manufactur-
er's operating instructions.
234Displays and operation
On-board computer and displays
Page 238 of 398
iSet the time using the multimedia system;
see the Digital Operator's Manual.
Possible displays in the multifunction dis-
play:
RZ Gearshift recommendation, when shifting
manually (Ypage 152)
Rj Parking Pilot (Ypage 195)
RCRUISECruise control (Ypage 174)
R_ Adaptive Highbeam Assist
(Ypage 118)
Rè ECO start/stop function (Ypage 144)
RëHOLD function (Ypage 187)
RaDistance Pilot DISTRONIC Steering Pilot
(Ypage 241)
RDSRDownhill Speed Regulation
(Ypage 218)
Menus and submenus
Menu overview
Press the =or; button on the steering
wheel to call up the menu bar and select a menu.
Operating the on-board computer (
Ypage 234).
Depending on the equipment installed in the
vehicle, you can call up the following menus:
RTripmenu (Ypage 236)
RNavimenu (navigation instructions)
(Ypage 237)
RAudiomenu (Ypage 239)
RTelmenu (telephone) (Ypage 240)
RDriveAssistmenu (assistance)
(Ypage 241)
RServ.menu (Ypage 242)
RSett.menu (settings) (Ypage 243)
RON&OFFROADmenu (Ypage 245)
RAMGmenu (Mercedes-AMG vehicles)
(Ypage 245)
Trip menu
Standard display
XPress and hold the %button on the steer-
ing wheel until the Tripmenu with trip odom-
eter :and odometer ;appears.
Trip computer "From Start" or "From
Reset"
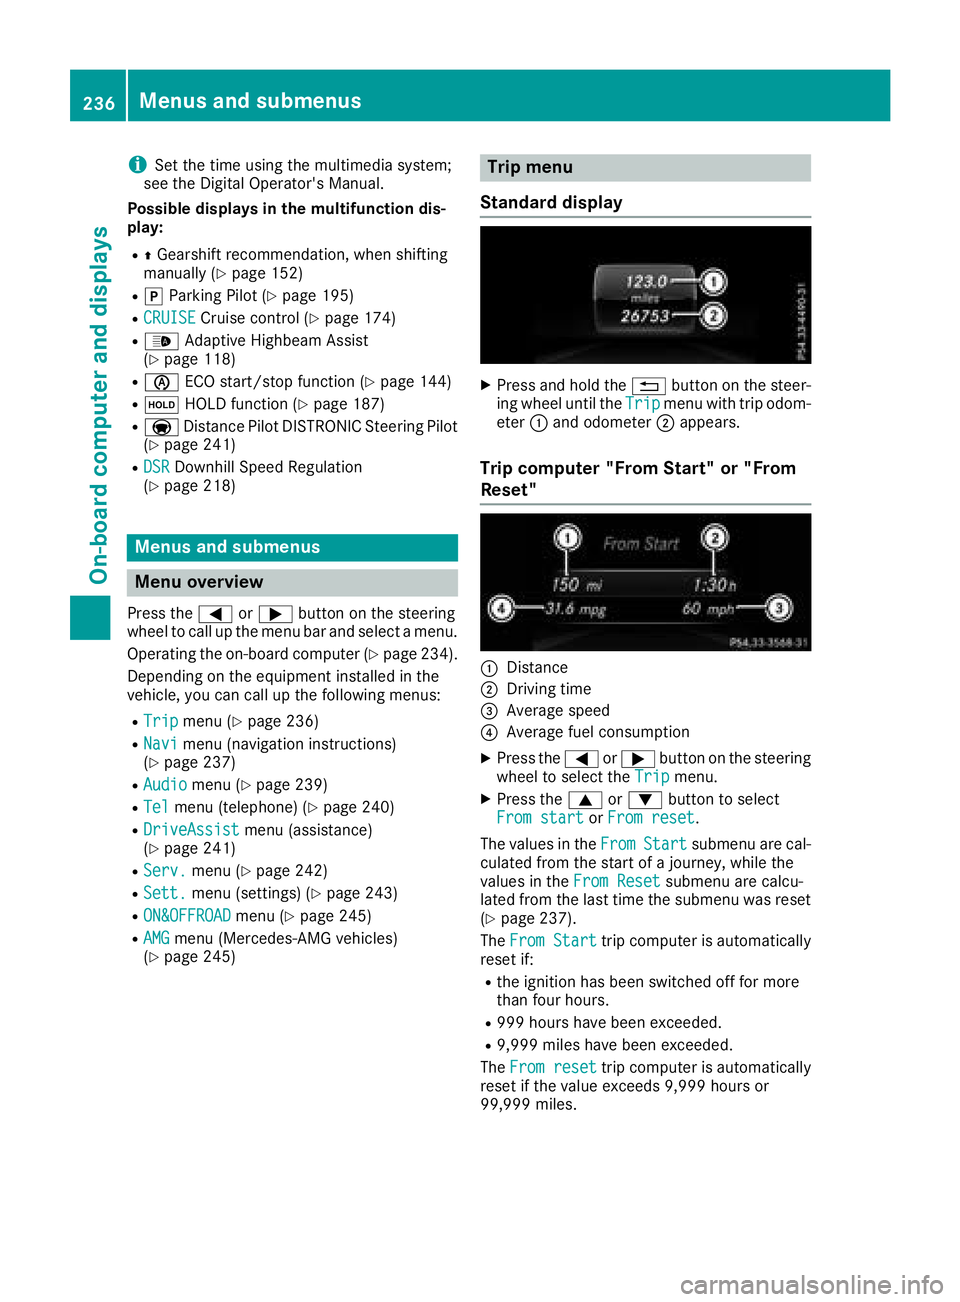
:Distance
;Driving time
=Average speed
?Average fuel consumption
XPress the =or; button on the steering
wheel to select the Tripmenu.
XPress the9or: button to select
From startor From reset.
The values in the From
Startsubmenu are cal-
culated from the start of a journey, while the
values in the From Reset
submenu are calcu-
lated from the last time the submenu was reset
(
Ypage 237).
The From Start
trip computer is automatically
reset if:
Rthe ignition has been switched off for more
than four hours.
R999 hours have been exceeded.
R9,999 miles have been exceeded.
The From reset
trip computer is automatically
reset if the value exceeds 9,999 hours or
99,999 miles.
236Menus and submenus
On-board computer and displays
Page 239 of 398
ECO display
The ECO display is not available for Mercedes-
AMG vehicles.
XPress the=or; button on the steering
wheel to select the Tripmenu.
XPress the9or: button to select ECODISPLAY.
If the ignition remains switched off for longer
than four hours, the ECO display will be auto-
matically reset.
For more information on the ECO display, see
(
Ypage 165).
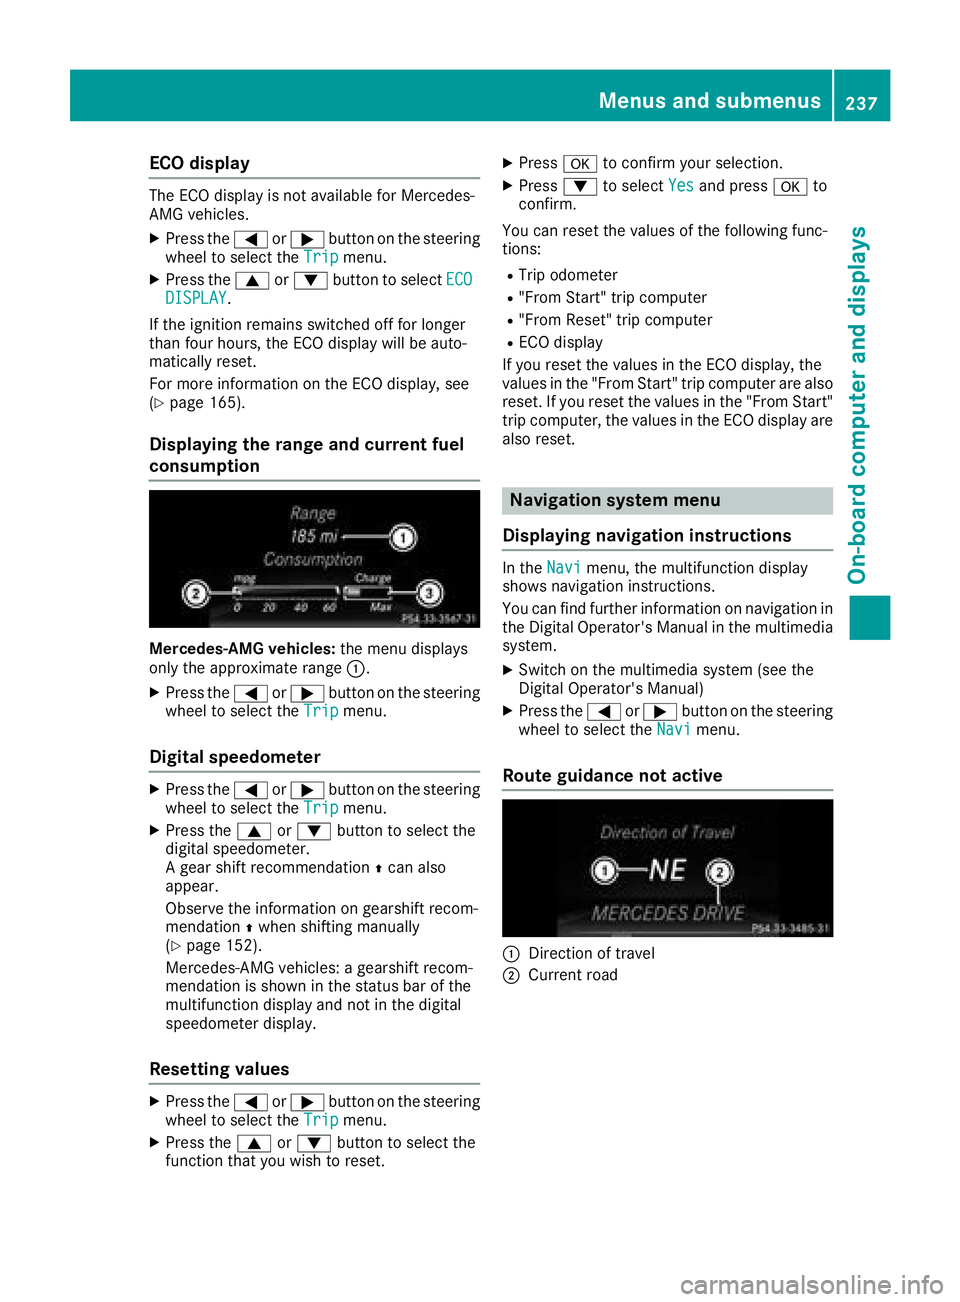
Displaying the range and current fuel
consumption
Mercedes-AMG vehicles: the menu displays
only the approximate range :.
XPress the=or; button on the steering
wheel to select the Tripmenu.
Digital speedometer
XPress the=or; button on the steering
wheel to select the Tripmenu.
XPress the9or: button to select the
digital speedometer.
A gear shift recommendation Zcan also
appear.
Observe the information on gearshift recom-
mendation Zwhen shifting manually
(
Ypage 152).
Mercedes-AMG vehicles: a gearshift recom-
mendation is shown in the status bar of the
multifunction display and not in the digital
speedometer display.
Resetting values
XPress the =or; button on the steering
wheel to select the Tripmenu.
XPress the9or: button to select the
function that you wish to reset.
XPress ato confirm your selection.
XPress :to select Yesand press ato
confirm.
You can reset the values of the following func-
tions:
RTrip odometer
R"From Start" trip computer
R"From Reset" trip computer
RECO display
If you reset the values in the ECO display, the
values in the "From Start" trip computer are also reset. If you reset the values in the "From Start"
trip computer, the values in the ECO display are
also reset.
Navigation system menu
Displaying navigation instructions
In the Navimenu, the multifunction display
shows navigation instructions.
You can find further information on navigation in
the Digital Operator's Manual in the multimedia
system.
XSwitch on the multimedia system (see the
Digital Operator's Manual)
XPress the =or; button on the steering
wheel to select the Navimenu.
Route guidance not active
:Direction of travel
;Current road
Menus and submenus237
On-board computer and displays
Z
Page 247 of 398
For further information on belt adjustment, see
(Ypage 48).
Switching the fold-in mirrors when lock-
ing feature on/off
This function is only available when the vehicle is
equipped with the electrical fold-in function.
When you activate theAuto.
MirrorFoldingfunction, the exterior mirrors are folded in when
the vehicle is locked. The exterior mirrors fold
out automatically again as soon as you unlock
the vehicle.
XPress the =or; button on the steering
wheel to select the Sett.menu.
XPress the:or9 button to select the
Conveniencesubmenu.
XPress ato confirm.
XPress the :or9 button to select the
Auto. Mirror Foldingfunction.
If the Auto. Mirror Foldingfunction is
switched on, the multifunction display shows
the exterior mirror in orange.
XPress the abutton to save the setting.
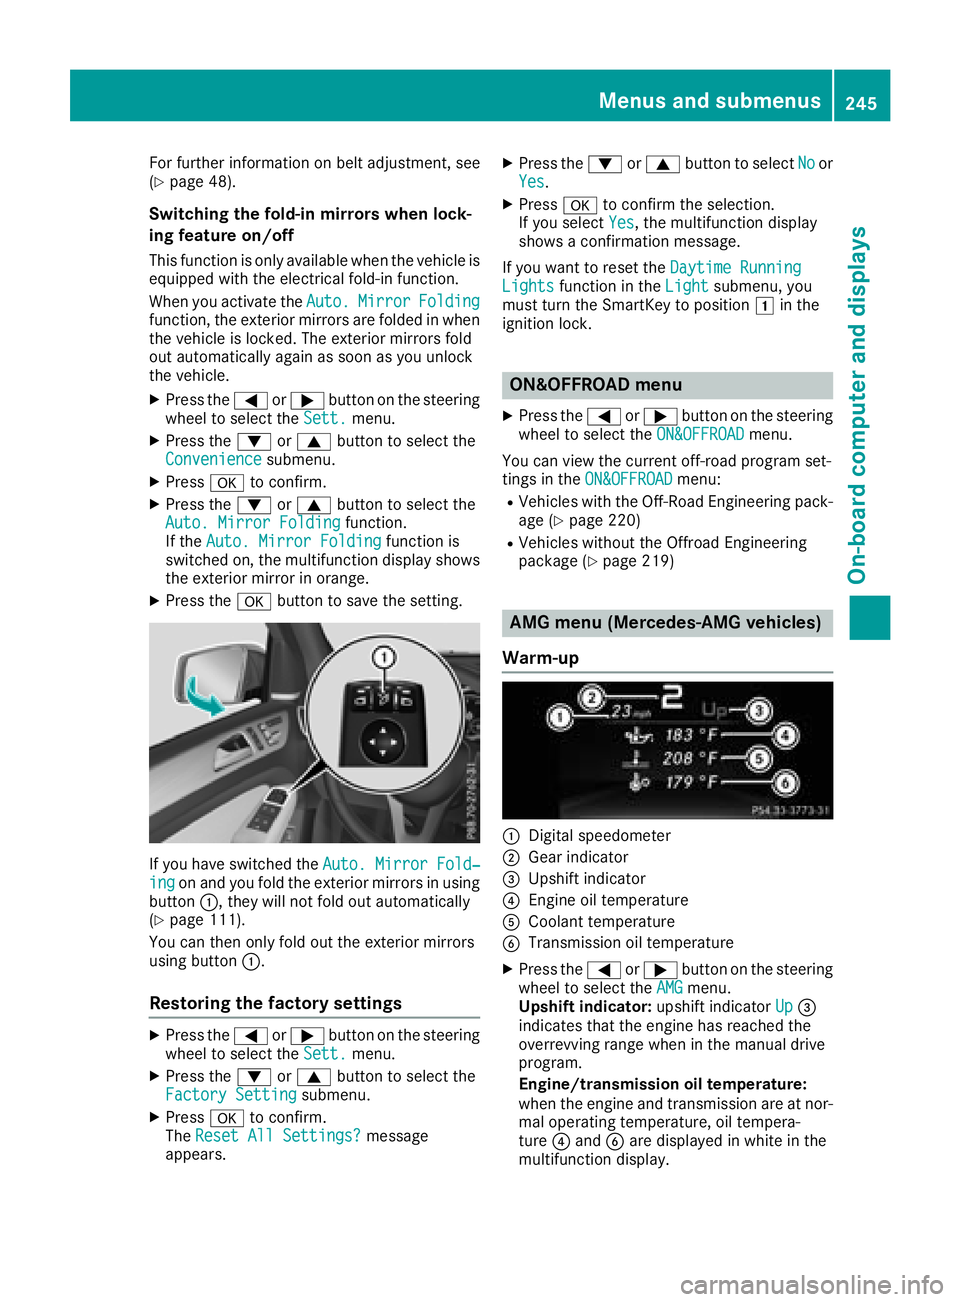
If you have switched the Auto. Mirror Fold‐ingon and you fold the exterior mirrors in using
button :, they will not fold out automatically
(
Ypage 111).
You can then only fold out the exterior mirrors
using button :.
Restoring the factory settings
XPress the=or; button on the steering
wheel to select the Sett.menu.
XPress the:or9 button to select the
Factory Settingsubmenu.
XPress ato confirm.
The Reset All Settings?message
appears.
XPress the :or9 button to select Noor
Yes.
XPress ato confirm the selection.
If you select Yes, the multifunction display
shows a confirmation message.
If you want to reset the Daytime Running
Lightsfunction in theLightsubmenu, you
must turn the SmartKey to position 1in the
ignition lock.
ON&OFFROAD menu
XPress the =or; button on the steering
wheel to select the ON&OFFROADmenu.
You can view the current off-road program set-
tings in the ON&OFFROAD
menu:
RVehicles with the Off-Road Engineering pack-
age (Ypage 220)
RVehicles without the Offroad Engineering
package (Ypage 219)
AMG menu (Mercedes-AMG vehicles)
Warm-up
:Digital speedometer
;Gear indicator
=Upshift indicator
?Engine oil temperature
ACoolant temperature
BTransmission oil temperature
XPress the =or; button on the steering
wheel to select the AMGmenu.
Upshift indicator: upshift indicatorUp=
indicates that the engine has reached the
overrevving range when in the manual drive
program.
Engine/transmission oil temperature:
when the engine and transmission are at nor-
mal operating temperature, oil tempera-
ture ?and Bare displayed in white in the
multifunction display.
Menus and submenus245
On-board computer and displays
Z
Page 248 of 398
If the multifunction display shows oil temper-
ature?orB in blue, the engine or the
transmission are not yet at normal operating
temperature. Avoid driving at full engine out-
put during this time.
SETUP
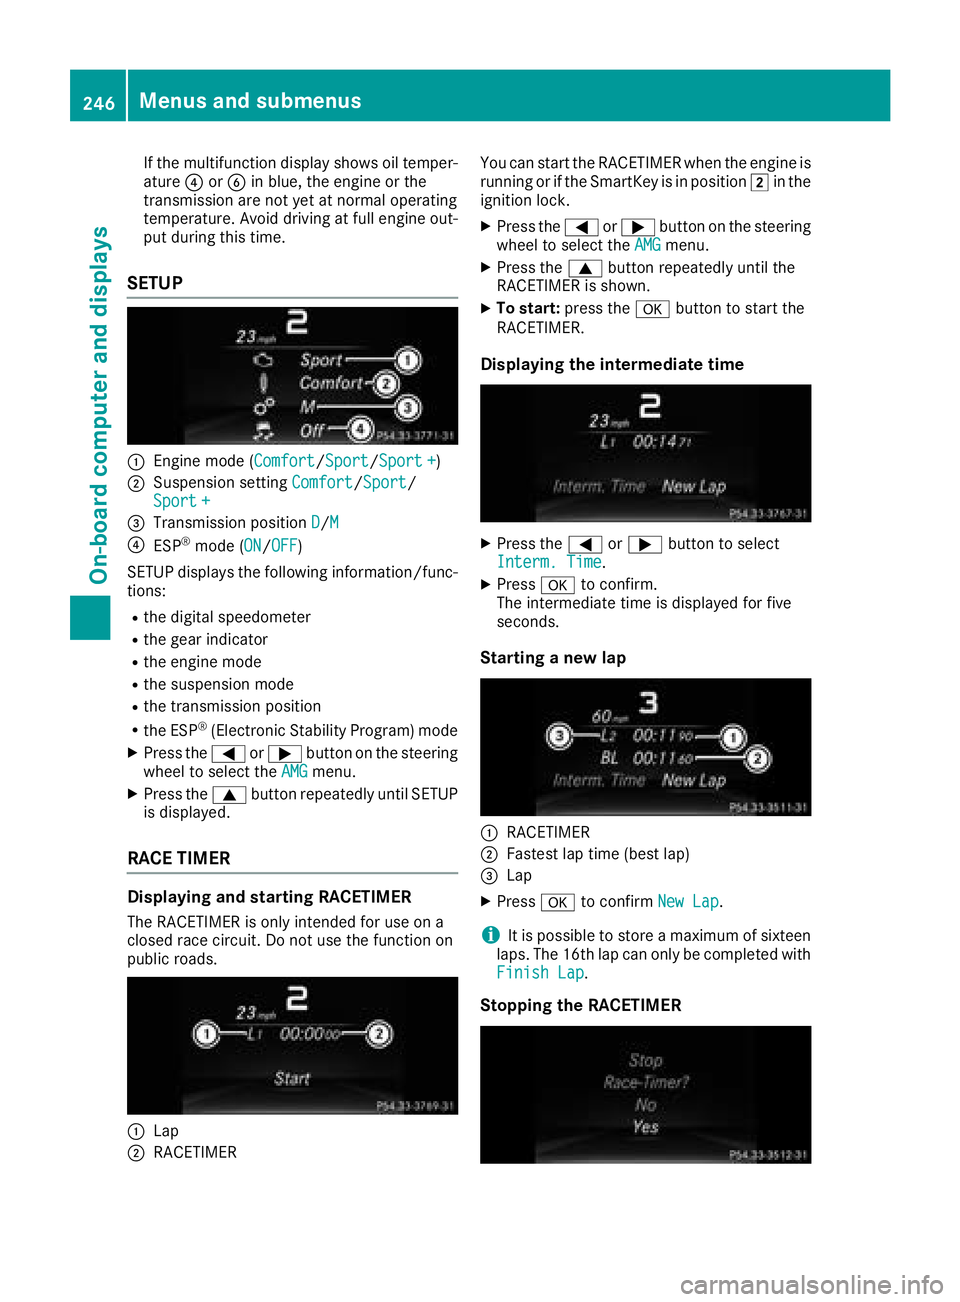
:Engine mode (Comfort/ Sport/Sport +)
;Suspension setting Comfort/Sport/
Sport +
=Transmission position D/M
?ESP®mode (ON/OFF)
SETUP displays the following information/func- tions:
Rthe digital speedometer
Rthe gear indicator
Rthe engine mode
Rthe suspension mode
Rthe transmission position
Rthe ESP®(Electronic Stability Program) mode
XPress the =or; button on the steering
wheel to select the AMGmenu.
XPress the9button repeatedly until SETUP
is displayed.
RACE TIMER
Displaying and starting RACETIMER
The RACETIMER is only intended for use on a
closed race circuit. Do not use the function on
public roads.
:Lap
;RACETIMER You can start the RACETIMER when the engine is
running or if the SmartKey is in position
2in the
ignition lock.
XPress the =or; button on the steering
wheel to select the AMGmenu.
XPress the9button repeatedly until the
RACETIMER is shown.
XTo start: press the abutton to start the
RACETIMER.
Displaying the intermediate time
XPress the =or; button to select
Interm. Time.
XPress ato confirm.
The intermediate time is displayed for five
seconds.
Starting a new lap
:RACETIMER
;Fastest lap time (best lap)
=Lap
XPress ato confirm New Lap.
iIt is possible to store a maximum of sixteen
laps. The 16th lap can only be completed with
Finish Lap
.
Stopping the RACETIMER
246Menus and submenus
On-board computer and displays