2018 MERCEDES-BENZ GLS SUV light
[x] Cancel search: lightPage 105 of 398
Folding down the seats in the second
row manually
Important safety notes
GWARNIN G
If th eseat and backrest are no tengaged, they
can fol dforwards ,e.g. in th eevent of sudde n
braking or an accident.
RThis will caus eth evehicl eoccupant sto be
forced int oth eseat belt by aseat or back-
res twhic his no tengaged. The seat belt can
no longer offer th eintended leve lof pro -
tection and could eve ncaus einjuries.
RA child restrain tsystem would no longer be
anchored or positioned correctly and would
no tbe able to perfor mits require dfunction .
RThe seat backrest scanno trestrain object s
or loads in th ecargo compartment.
Ther eis an increased ris kof injury.
Always mak esure that th eseat and backrest
are engage das described:
Rbefore traveling wit h apassenger on aseat
wit hth eEASY-ENTRY/EXIT feature
Rafter you have adjusted th eseat
Rafter th eEASY-ENTRY/EXIT feature has
been used
Rafter th ecargo compartmen tenlargement
has been folded forwards
GWARNIN G
The seat does no tengage in th eentry/exit
position .The seat could fol dbac ksuddenly,
e.g. when accelerating ,braking ,changing
direction suddenly or in th eevent of an acci-
dent. Person sin th eswee pof th eseat could
become trapped .Ther eis aris kof injury.
Always fol dbac k aseat whic hhas been folded
forwards before you pull away. Mak esure that
th eseat and backrest engage fully.
General notes
Getting int oor out of th ethird row of seats: you
can fol dforward th eright outer seat in th esec -
on drow of seats. If th
eright outer rear seat in th esecon drow of
seat sis in th eentry/exit position :th edisplay
message :2nd
Sea tRow,RightNotLockedappear sin th emultifunction display, for exam-
ple.
If you fol dth eseat bac kuntil it engages, th e
display message disappears.
Pull th ebackrest firmly to ensure that it is fully
engaged.
iFurther relate dsubjects:
RCargo compartmen tenlargement (foldin g
th esecon drow of seat sforwards )
(
Ypage 303)
RFoldin gth eseat sin th ethird row forwards /
bac k (Ypage 101)
Entry position
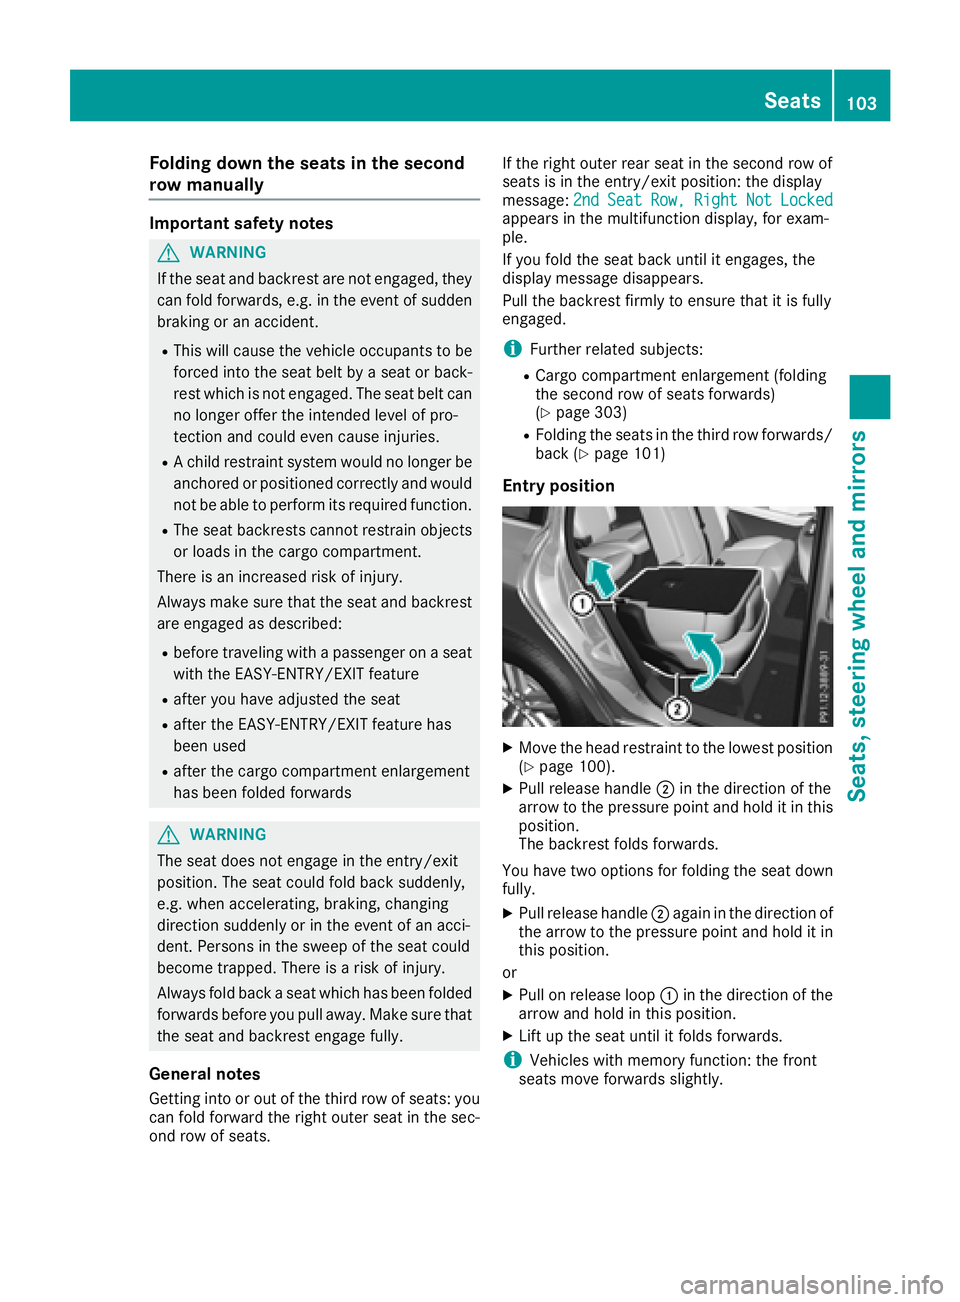
XMoveth ehead restraint to th elowes tposition
(Ypage 100).
XPull release handle ;in th edirection of th e
arrow to th epressur epoin tand hold it in this
position .
The backrest folds forwards .
You have two option sfor foldin gth eseat down
fully.
XPull release handle ;again in th edirection of
th earrow to th epressur epoin tand hold it in
this position .
or
XPull on release loop :in th edirection of th e
arrow and hold in this position .
XLiftup th eseat until it folds forwards .
iVehicles withmemory function :th efron t
seat smov eforwards slightly.
Seats103
Seats, steering wheel and mirrors
Z
Page 106 of 398
Entry position
Exit position
GWARNING
When you adjust a seat, you or other vehicle
occupants could become trapped, e.g. on the seat guide rail. There is a risk of injury.
Make sure when adjusting a seat that no one
has any body parts in the sweep of the seat.
iFurther related subjects:
RImportant safety notes on air bags
(Ypage 49)
RSecuring children in the vehicle
(Ypage 59)
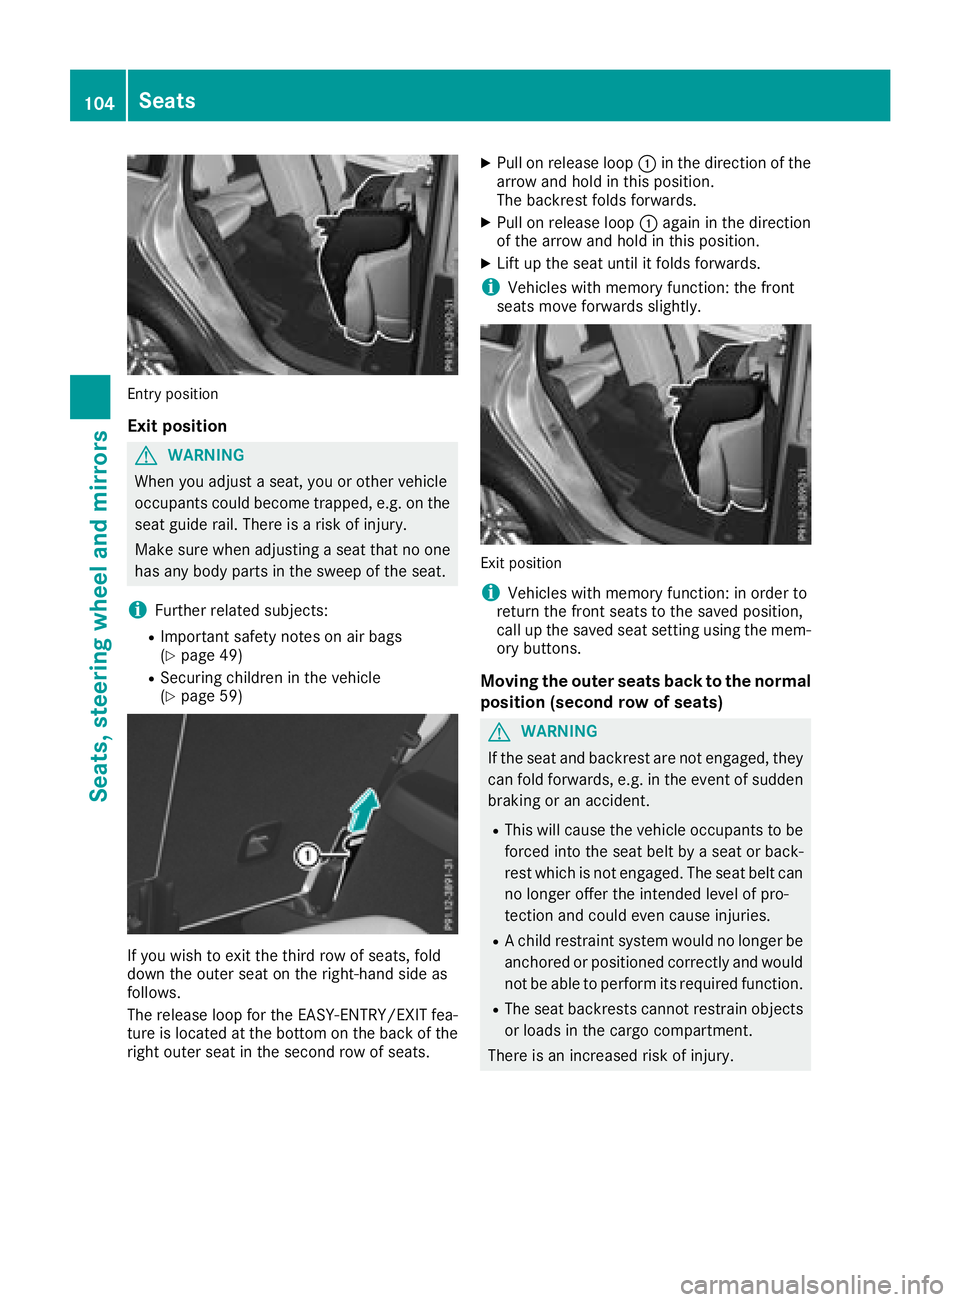
If you wish to exit the third row of seats, fold
down the outer seat on the right-hand side as
follows.
The release loop for the EASY-ENTRY/EXIT fea-
ture is located at the bottom on the back of the
right outer seat in the second row of seats.
XPull on release loop :in the direction of the
arrow and hold in this position.
The backrest folds forwards.
XPull on release loop :again in the direction
of the arrow and hold in this position.
XLift up the seat until it folds forwards.
iVehicles with memory function: the front
seats move forwards slightly.
Exit position
iVehicles with memory function: in order to
return the front seats to the saved position,
call up the saved seat setting using the mem-
ory buttons.
Moving the outer seats back to the normal
position (second row of seats)
GWARNING
If the seat and backrest are not engaged, they can fold forwards, e.g. in the event of sudden
braking or an accident.
RThis will cause the vehicle occupants to be
forced into the seat belt by a seat or back-
rest which is not engaged. The seat belt can no longer offer the intended level of pro-
tection and could even cause injuries.
RA child restraint system would no longer be
anchored or positioned correctly and would
not be able to perform its required function.
RThe seat backrests cannot restrain objects
or loads in the cargo compartment.
There is an increased risk of injury.
104Seats
Seats, steering wheel and mirrors
Page 110 of 398
Problems with the seat heating or seat ventilation
ProblemPossible causes/consequences andMSolutions
The seat heating or seat
ventilation has switched
off prematurely or can-
not be switched on.The on-board voltage is too low because too many electrical consum-
ers are switched on.
XSwitch off electrical consumers that you do not need, such as the
rear window defroster or interior lighting.
Once the battery is sufficiently charged, the seat heating or seat
ventilation will switch back on automatically.
Steering wheel
Important safety notes
GWARNING
You could lose control of your vehicle if you do the following while driving:
Radjust the driver's seat, head restraint,
steering wheel or mirrors
Rfasten the seat belt
There is a risk of an accident.
Adjust the driver's seat, head restraint, steer-
ing wheel and mirror and fasten your seat belt before starting the engine.
GWARNING
Children could injure themselves if they
adjust the steering wheel. There is a risk of
injury.
When leaving the vehicle, always take the
SmartKey with you and lock the vehicle. Never
leave children unsupervised in the vehicle.
The electrically adjustable steering wheel can
still be adjusted when there is no SmartKey in
the ignition lock.
Adjusting the steering wheel man-
ually
GWARNING
If the steering wheel is unlocked while the
vehicle is in motion, it could change position
unexpectedly. This could cause you to lose
control of the vehicle. There is a risk of an
accident.
Before starting off, make sure the steering
wheel is locked. Never unlock the steering
wheel while the vehicle is in motion.
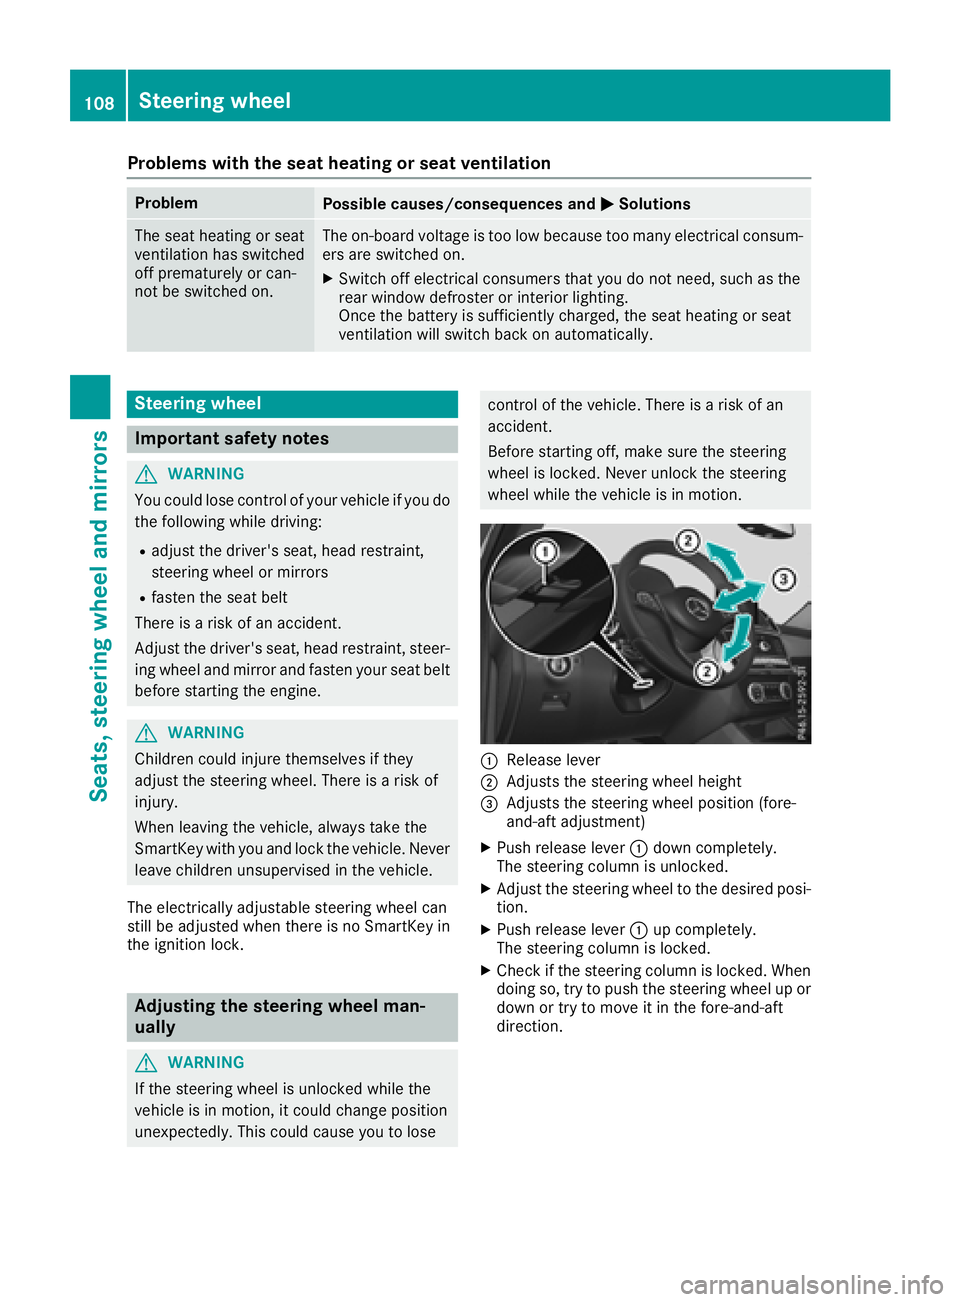
:Release lever
;Adjusts the steering wheel height
=Adjusts the steering wheel position (fore-
and-aft adjustment)
XPush release lever :down completely.
The steering column is unlocked.
XAdjust the steering wheel to the desired posi-
tion.
XPush release lever :up completely.
The steering column is locked.
XCheck if the steering column is locked. When
doing so, try to push the steering wheel up or down or try to move it in the fore-and-aft
direction.
108Steering wheel
Seats, steering wheel and mirrors
Page 111 of 398
Adjusting the steering wheel electri-
cally
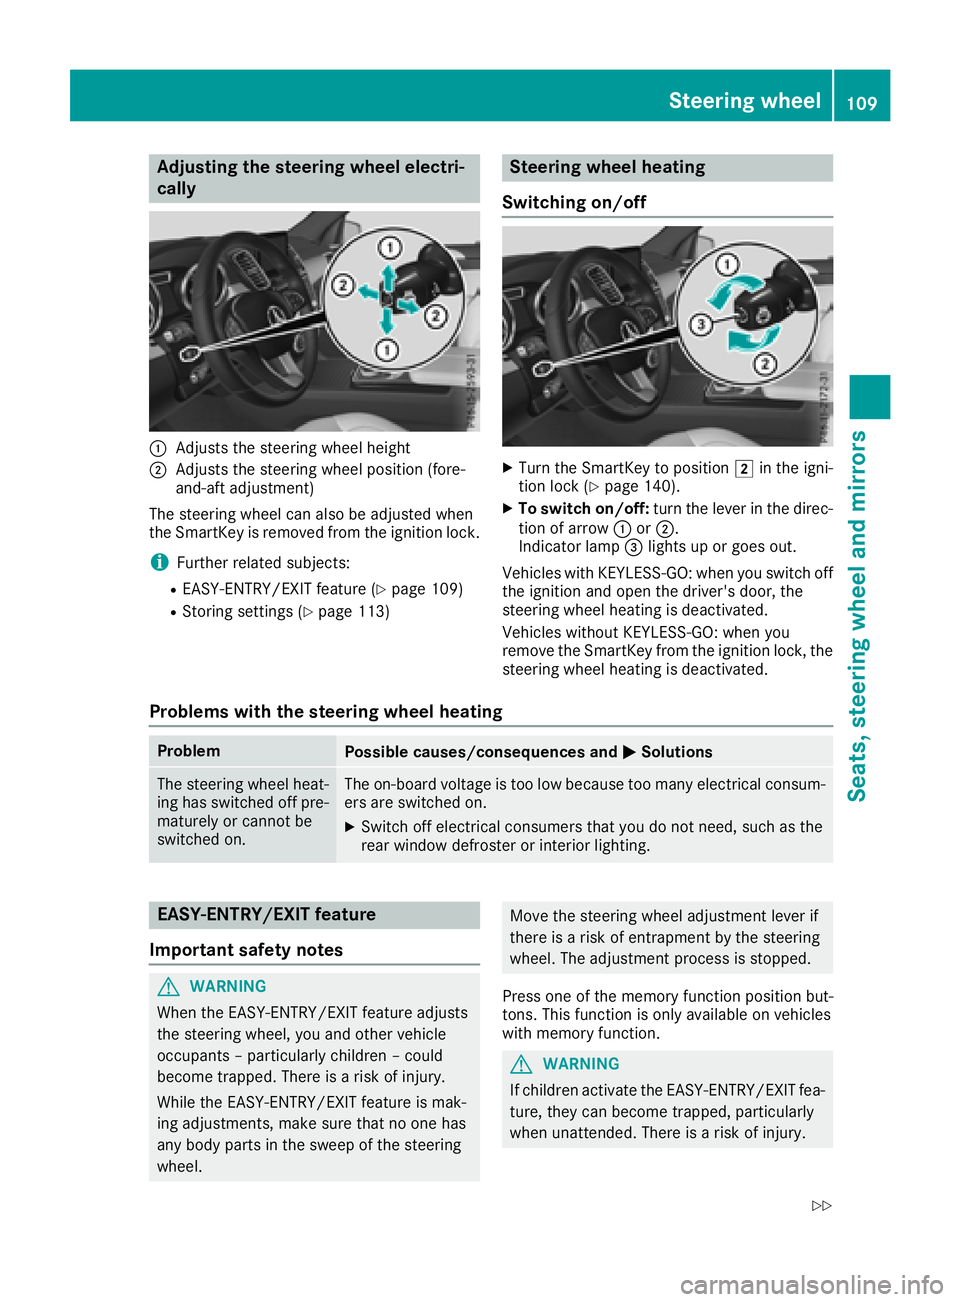
:Adjusts th esteering whee lheight
;Adjusts th esteering whee lposition (fore-
and-af tadjustment)
The steering whee lcan also be adjusted when
th eSmartKey is remove dfrom th eignition lock.
iFurther relate dsubjects :
REASY-ENTRY/EXIT feature (Ypage 109)
RStoring settings (Ypage 113)
Steering wheel heating
Switching on/off
XTurn th eSmartKey to position 2in th eigni-
tion loc k (Ypage 140).
XTo switch on/off: turnth elever in th edirec -
tion of arrow :or;.
Indicato rlamp =lights up or goes out .
Vehicles wit hKEYLESS-GO :when you switch off
th eignition and open th edriver's door ,th e
steering whee lheating is deactivated.
Vehicles without KEYLESS-GO :when you
remove th eSmartKey from th eignition lock, th e
steering whee lheating is deactivated.
Problems with the steering wheel heating
ProblemPossible causes/consequences and MSolutions
The steering wheelheat -
ing has switched off pre -
maturel yor canno tbe
switched on .The on-board voltag eis to olow because to oman yelectrical consum-
ers are switched on .
XSwitchoff electrical consumer sthat you do no tneed, suc has th e
rear window defroste ror interior lighting .
EASY-ENTRY/EXITfeatu re
Import ant safety notes
GWARNIN G
When th eEASY-ENTRY/EXIT feature adjust s
th esteering wheel, you and other vehicl e
occupant s –particularly children –could
become trapped .There is aris kof injury.
Whil eth eEASY-ENTRY/EXIT feature is mak -
ing adjustments ,mak esur ethat no on ehas
any body part sin th eswee pof th esteering
wheel.
Mov eth esteering whee ladjustmen tlever if
there is aris kof entrapment by th esteering
wheel. The adjustmen tprocess is stopped.
Press on eof th ememory function position but -
tons .This function is only available on vehicles
wit hmemory function .
GWARNING
If children activat eth eEASY-ENTRY/EXIT fea-
ture, they can become trapped ,particularly
when unattended. There is aris kof injury.
Steering wheel109
Seats, steering wheel and mirrors
Z
Page 113 of 398
GWARNING
The exterior mirror on the front-passenger
side reduces the size of the image. Visible
objects are actually closer than they appear.
This means that you could misjudge the dis-
tance from road users traveling behind, e.g.
when changing lane. There is a risk of an acci-
dent.
For this reason, always make sure of the
actual distance from the road users traveling
behind by glancing over your shoulder.
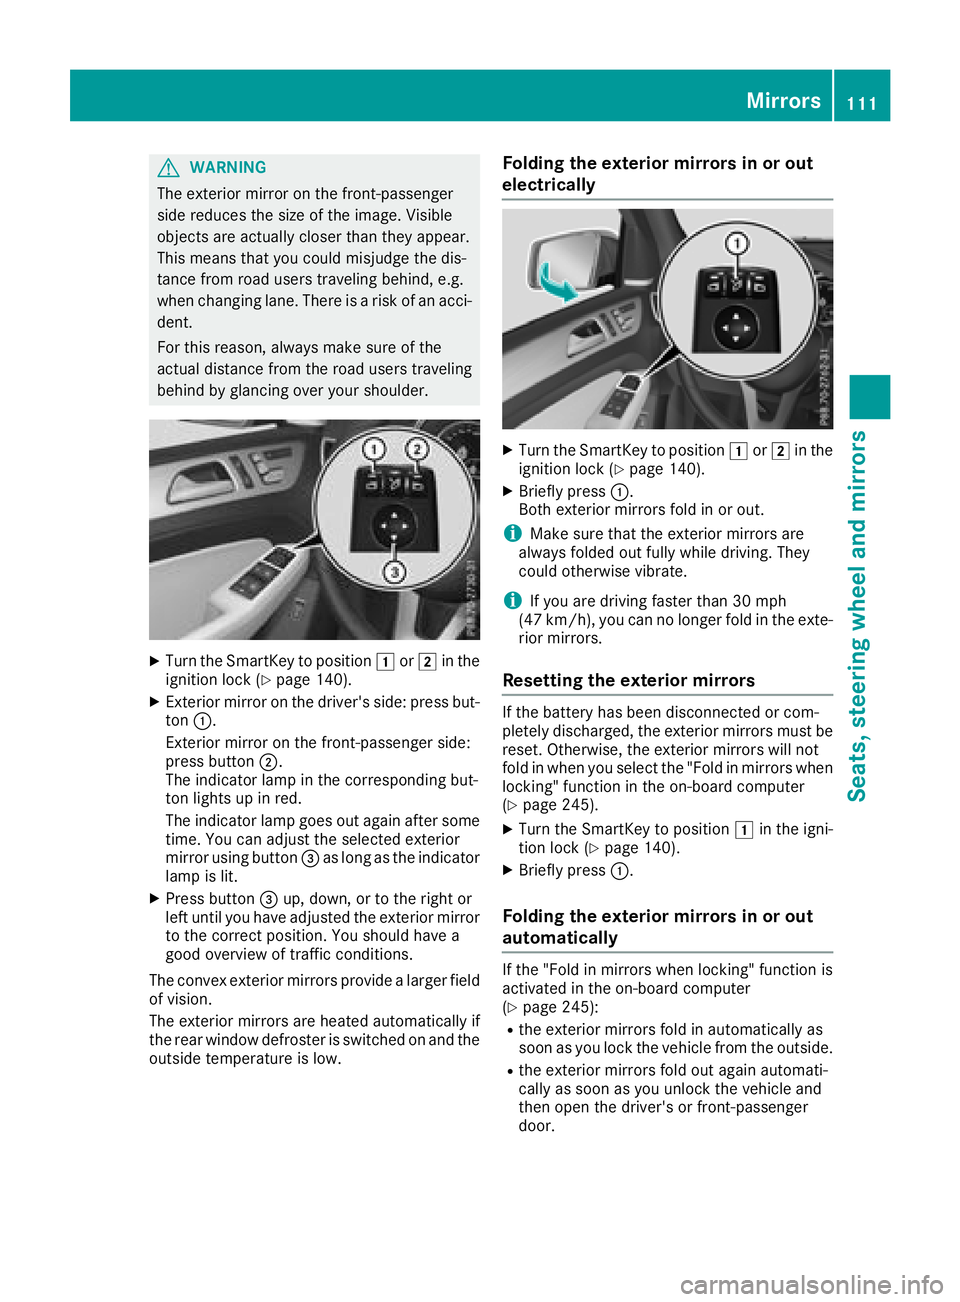
XTurn the SmartKey to position 1or2 in the
ignition lock (Ypage 140).
XExterior mirror on the driver's side: press but-
ton :.
Exterior mirror on the front-passenger side:
press button ;.
The indicator lamp in the corresponding but-
ton lights up in red.
The indicator lamp goes out again after some
time. You can adjust the selected exterior
mirror using button =as long as the indicator
lamp is lit.
XPress button =up, down, or to the right or
left until you have adjusted the exterior mirror
to the correct position. You should have a
good overview of traffic conditions.
The convex exterior mirrors provide a larger field of vision.
The exterior mirrors are heated automatically if
the rear window defroster is switched on and the
outside temperature is low.
Folding the exterior mirrors in or out
electrically
XTurn the SmartKey to position 1or2 in the
ignition lock (Ypage 140).
XBriefly press :.
Both exterior mirrors fold in or out.
iMake sure that the exterior mirrors are
always folded out fully while driving. They
could otherwise vibrate.
iIf you are driving faster than 30 mph
(47 km/h), you can no longer fold in the exte-
rior mirrors.
Resetting the exterior mirrors
If the battery has been disconnected or com-
pletely discharged, the exterior mirrors must be
reset. Otherwise, the exterior mirrors will not
fold in when you select the "Fold in mirrors when
locking" function in the on-board computer
(
Ypage 245).
XTurn the SmartKey to position 1in the igni-
tion lock (Ypage 140).
XBriefly press :.
Folding the exterior mirrors in or out
automatically
If the "Fold in mirrors when locking" function is
activated in the on-board computer
(
Ypage 245):
Rthe exterior mirrors fold in automatically as
soon as you lock the vehicle from the outside.
Rthe exterior mirrors fold out again automati-
cally as soon as you unlock the vehicle and
then open the driver's or front-passenger
door.
Mirrors111
Seats, steering wheel and mirrors
Z
Page 114 of 398
Exterior mirror pushed out of position
If an exterior mirror has been pushed out of
position, proceed as follows:
XVehicles without electrically folding exte-
rior mirrors:move the exterior mirror into
the correct position manually.
XVehicles with electrically folding exterior
mirrors: press and hold mirror-folding but-
ton :until you hear a click and the mirror
engages in position audibly.
The mirror housing is engaged again and you
can adjust the exterior mirrors as usual
(
Ypage 110).
Automatic anti-glare mirrors
GWARNING
Electrolyte may escape if the glass in an auto-
matic anti-glare mirror breaks. The electrolyte
is harmful and causes irritation. It must not
come into contact with your skin, eyes, res-
piratory organs or clothing or be swallowed.
There is a risk of injury.
If you come into contact with the electrolyte,
observe the following:
RRinse off the electrolyte from your skin
immediately with water.
RImmediately rinse the electrolyte out of
your eyes thoroughly with clean water.
RIf the electrolyte is swallowed, immediately
rinse your mouth out thoroughly. Do not
induce vomiting.
RIf electrolyte comes into contact with your
skin or hair or is swallowed, seek medical
attention immediately.
RImmediately change out of clothing which
has come into contact with electrolyte.
RIf an allergic reaction occurs, seek medical
attention immediately. The rear-view mirror and the exterior mirror on
the driver's side automatically go into anti-glare
mode if the following conditions are met simul-
taneously:
Rthe ignition is switched on and
Rincident light from headlamps strikes the sen-
sor in the rear-view mirror
The mirrors do not go into anti-glare mode if
reverse gear is engaged or if the interior lighting
is switched on.
Parking position for the exterior mir-
ror on the front-passenger side
Setting and storing the parking position
You can position the front-passenger side exte- rior mirror in such a way that you can see the
rear wheel on that side as soon as you engage
reverse gear. You can store this position.
Using reverse gear
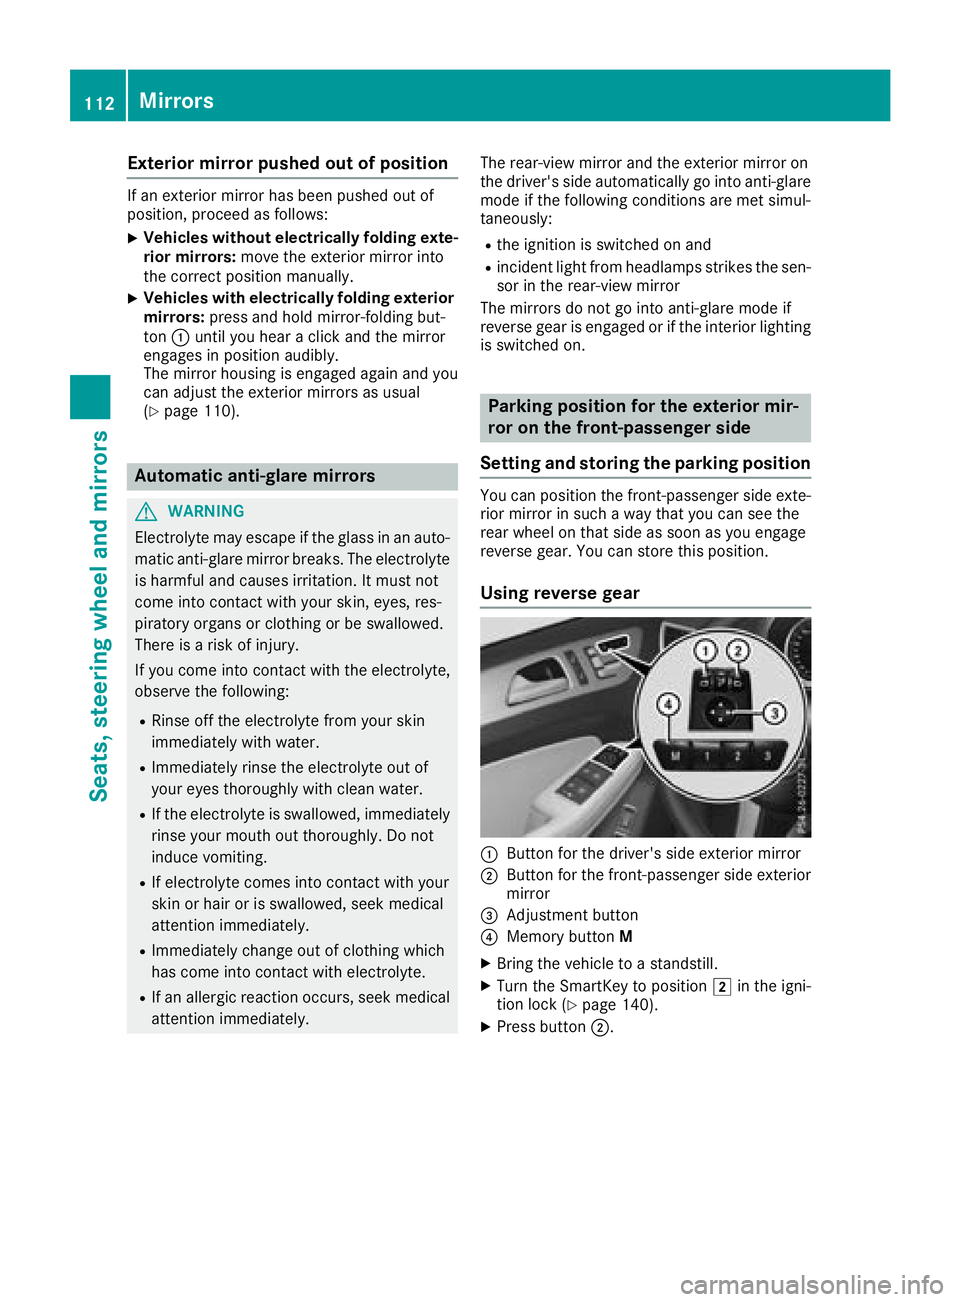
:Button for the driver's side exterior mirror
;Button for the front-passenger side exterior
mirror
=Adjustment button
?Memory button M
XBring the vehicle to a standstill.
XTurn the SmartKey to position 2in the igni-
tion lock (Ypage 140).
XPress button ;.
112Mirrors
Seats, steering wheel and mirrors
Page 117 of 398

Exterior lighting
General notes
For reasons of safety, Mercedes-Benz recom-
mends that you drive with the lights switched on
even during the daytime. In some countries,
operation of the headlamps varies due to legal
requirements and self-imposed obligations.
Setting the exterior lighting
Setting options
Exterior lighting can be set using:
Rthe light switch
Rthe combination switch (Ypage 116)
Rthe on-board computer (Ypage 243)
Light switch
Operation
1 WLeft-hand standing lamps
2XRight-hand standing lamps
3TParking lamps, license plate and
instrument cluster lighting
4cAutomatic headlamp mode, controlled
by the light sensor
5 LLow-beam/high-beam headlamps
BRRear fog lamp
If you hear a warning tone when you leave the
vehicle, the lights may still be switched on.
XTurn the light switch to c.
The exterior lighting (except the parking/stand-
ing lamps) switches off automatically if you:
Rremove the SmartKey from the ignition lock
Ropen the driver's door with the SmartKey in
position uin the ignition lock
Automatic headlamp mode
c is the favored light switch position. The
light setting is automatically selected according
to the brightness of the ambient light (excep-
tion: poor visibility due to weather conditions
such as fog, snow or spray):
RSmartKey in position 1in the ignition lock:
the parking lamps are switched on/off auto-
matically depending on the brightness of the
ambient light.
RWith the engine running (USA only): if you
have switched on the Daytime Running
Lightsfunction in the on-board computer,
the daytime running lamps or the parking
lamps and low-beam headlamps are switched on or off automatically depending on the
brightness of the ambient light.
XTo switch on automatic headlamp mode:
turn the light switch to c.
GWARNING
When the light switch is set to Ã, the low-
beam headlamps may not be switched on
automatically if there is fog, snow or other
causes of poor visibility due to the weather
conditions such as spray. There is a risk of an
accident.
In such situations, turn the light switch to
L.
The automatic headlamp mode is only an aid.
The driver is responsible for the vehicle's light-
ing at all times.
Canada only:
The daytime running lamps improve the visibility
of your vehicle during the day. The daytime run-
ning lamps function is required by law in Can-
ada. It cannot therefore be deactivated.
When the engine is running and the vehicle is
stationary: if you move the selector lever from a
driving position to P, the daytime running
lamps/low-beam headlamps go out after three
minutes.
When the engine is running, the vehicle is sta-
tionary and in bright ambient light: if you turn the
light switch to the Tposition, the daytime
running lamps and parking lamps switch on.
If the engine is running and you turn the light
switch to L, the manual settings take prec-
edence over the daytime running lamps.
USA only:
Exterior lighting115
Lights and windshield wipers
Z
Page 118 of 398
The daytime running lamps improve the visibility
of your vehicle during the day. To do this, the
daytime running lamps function must be
switched on using the on-board computer
(
Ypage 243).
If the engine is running and you turn the light
switch to TorL, the manual settings
take precedence over the daytime running
lamps.
Low-beam headlamps
Even if the light sensor does not detect that it is
dark, the parking lamps and low-beam head-
lamps switch on when the ignition is switched on and the light switch is set to the Lposition.
This is a particularly useful function in the event
of rain and fog.
XTo switch on the low-beam headlamps:
turn the SmartKey to position 2in the igni-
tion lock or start the engine.
XTurn the light switch to L.
The green Lindicator lamp in the instru-
ment cluster lights up.
Rear fog lamp
The rear fog lamp improves visibility of your
vehicle for the traffic behind in the event of thick
fog. Please take note of the country-specific
regulations for the use of rear fog lamps.
XTo switch on the rear fog lamp: turn the
SmartKey to position 2in the ignition lock or
start the engine.
XTurn the light switch to Lorc.
XPress the Rbutton.
The yellow Rindicator lamp in the instru-
ment cluster lights up.
XTo switch off the rear fog lamp: press the
R button.
The yellow Rindicator lamp in the instru-
ment cluster goes out.
Parking lamps
!If the battery charge is very low, the parking
lamps or standing lamps are automatically
switched off to enable the next engine start.
Always park your vehicle safely and in a well lit
area, in accordance with the relevant legal
stipulations. Avoid using the Tparking
lamps over a period of several hours. If pos-
sible, switch on the right-hand Xor left-
hand W standing lamps.
XTo switch on: turn the light switch to T.
The green Tindicator lamp in the instru-
ment cluster lights up.
Standing lamps
Switching on the standing lamps ensures the
corresponding side of the vehicle is illuminated.
XTo switch on the standing lamps: the
SmartKey should not be in the ignition lock or
in key position uin the ignition lock.
XTurn the light switch to W(left-hand side of
the vehicle) or X(right-hand side of the
vehicle).
Vehicles towing a trailer: both the right-hand
and left-hand standing lamps (tail lamps) are
always illuminated on the trailer.
Combination switch
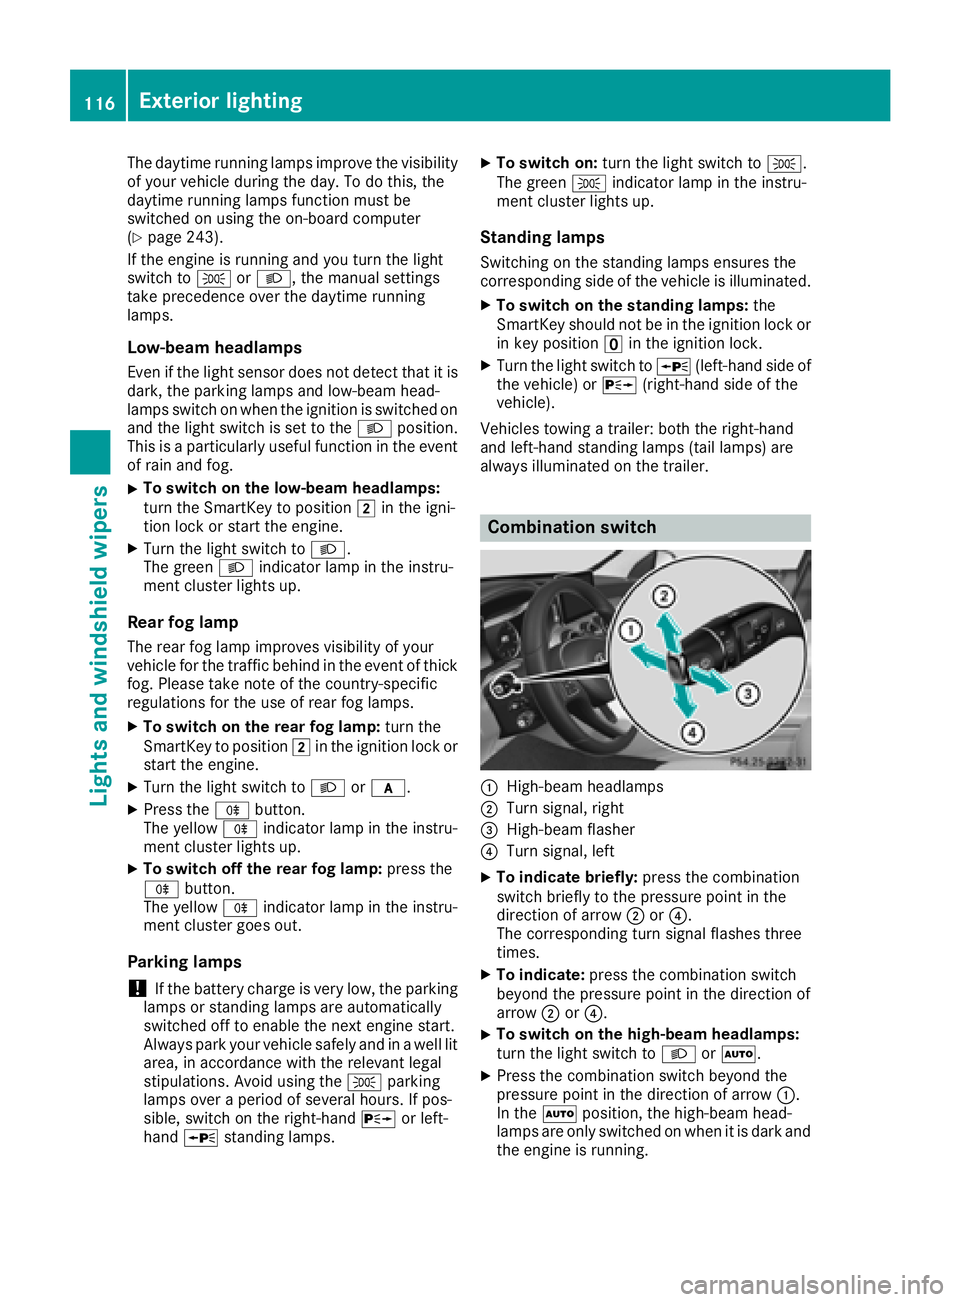
:High-beam headlamps
;Turn signal, right
=High-beam flasher
?Turn signal, left
XTo indicate briefly: press the combination
switch briefly to the pressure point in the
direction of arrow ;or?.
The corresponding turn signal flashes three
times.
XTo indicate: press the combination switch
beyond the pressure point in the direction of
arrow ;or?.
XTo switch on the high-beam headlamps:
turn the light switch to LorÃ.
XPress the combination switch beyond the
pressure point in the direction of arrow :.
In the Ãposition, the high-beam head-
lamps are only switched on when it is dark and
the engine is running.
116Exterior lighting
Lights and windshield wipers