2018 MERCEDES-BENZ GLS SUV oil
[x] Cancel search: oilPage 340 of 398
Where will I find...?
Reflective safety jacket
Removing/replacing the reflective
safety jacket
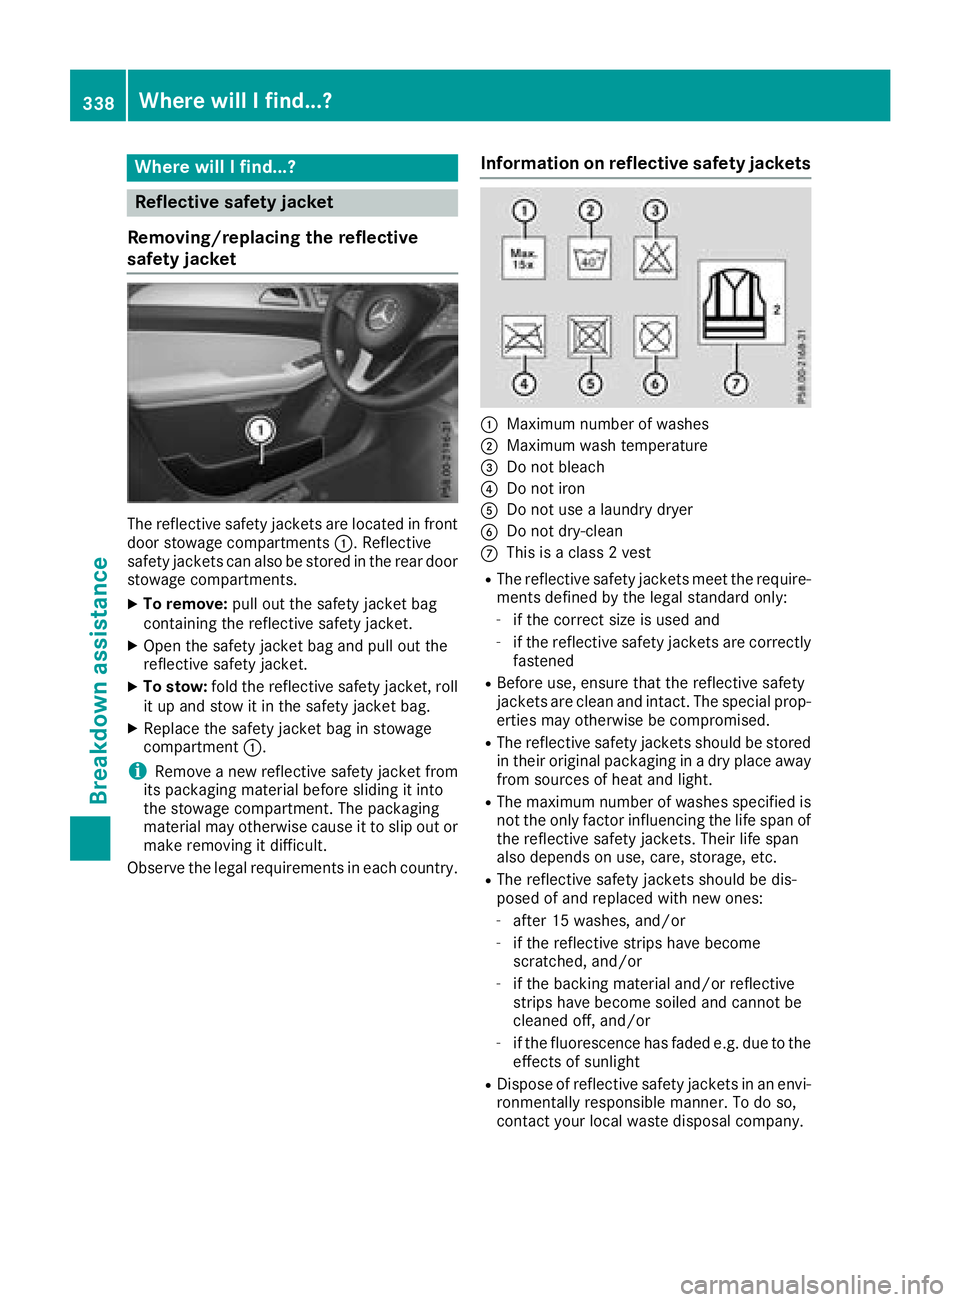
The reflective safety jackets are located in front
door stowage compartments :. Reflective
safety jackets can also be stored in the rear door stowage compartments.
XTo remove: pull out the safety jacket bag
containing the reflective safety jacket.
XOpen the safety jacket bag and pull out the
reflective safety jacket.
XTo stow: fold the reflective safety jacket, roll
it up and stow it in the safety jacket bag.
XReplace the safety jacket bag in stowage
compartment :.
iRemove a new reflective safety jacket from
its packaging material before sliding it into
the stowage compartment. The packaging
material may otherwise cause it to slip out or
make removing it difficult.
Observe the legal requirements in each country.
Information on reflective safety jackets
:Maximum number of washes
;Maximum wash temperature
=Do not bleach
?Do not iron
ADo not use a laundry dryer
BDo not dry-clean
CThis is a class 2 vest
RThe reflective safety jackets meet the require-
ments defined by the legal standard only:
-if the correct size is used and
-if the reflective safety jackets are correctly
fastened
RBefore use, ensure that the reflective safety
jackets are clean and intact. The special prop-
erties may otherwise be compromised.
RThe reflective safety jackets should be stored
in their original packaging in a dry place away
from sources of heat and light.
RThe maximum number of washes specified is
not the only factor influencing the life span of
the reflective safety jackets. Their life span
also depends on use, care, storage, etc.
RThe reflective safety jackets should be dis-
posed of and replaced with new ones:
-after 15 washes, and/or
-if the reflective strips have become
scratched, and/or
-if the backing material and/or reflective
strips have become soiled and cannot be
cleaned off, and/or
-if the fluorescence has faded e.g. due to the effects of sunlight
RDispose of reflective safety jackets in an envi-
ronmentally responsible manner. To do so,
contact your local waste disposal company.
338Where will I find...?
Breakdown assistance
Page 344 of 398
compressor from the stowage well under-
neath the cargo compartment floor
(
Ypage 339).
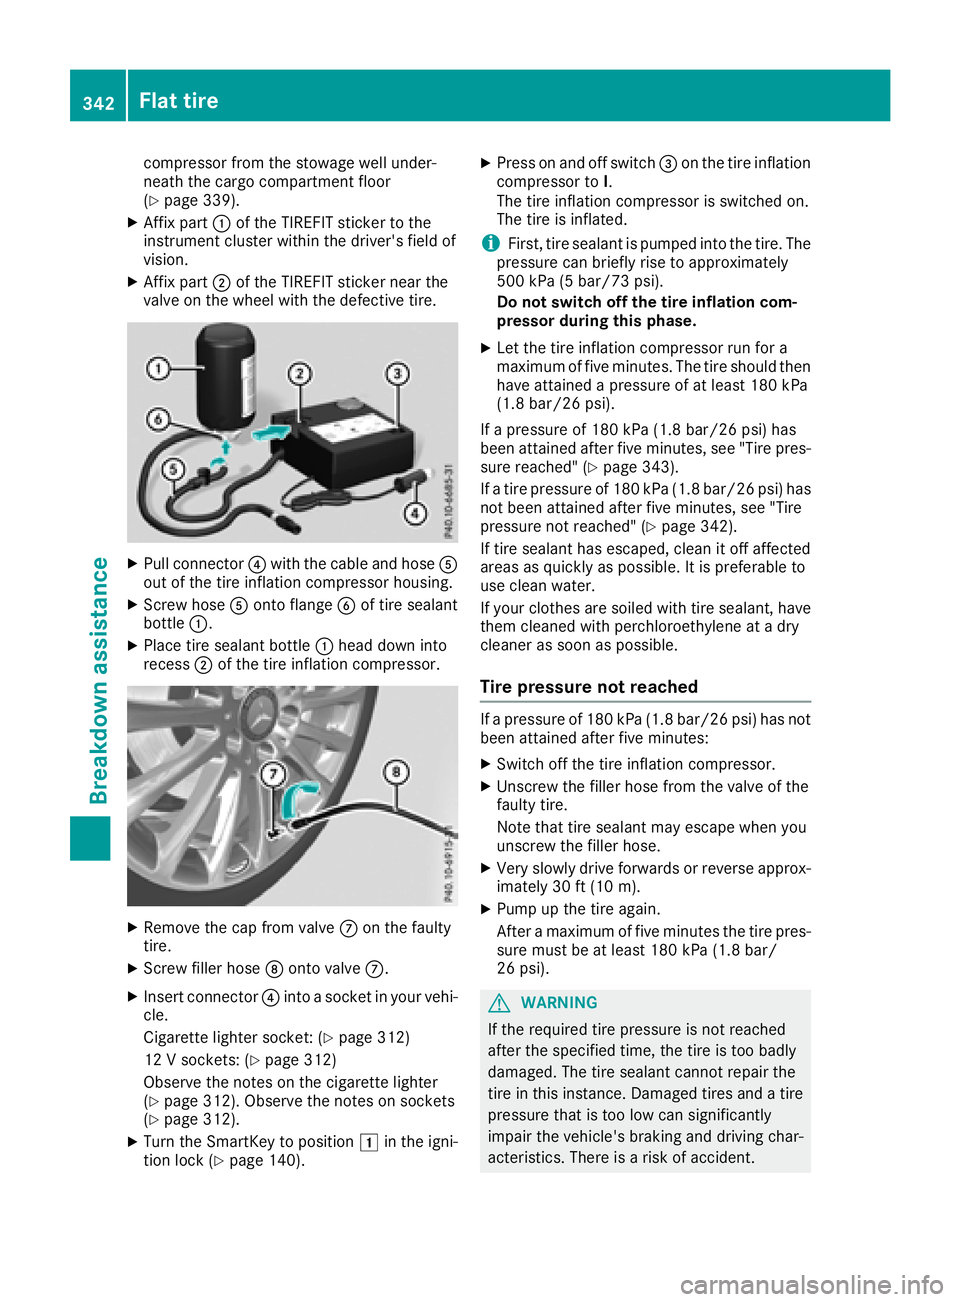
XAffix part:of the TIREFIT sticker to the
instrument cluster within the driver's field of
vision.
XAffix part ;of the TIREFIT sticker near the
valve on the wheel with the defective tire.
XPull connector ?with the cable and hose A
out of the tire inflation compressor housing.
XScrew hose Aonto flange Bof tire sealant
bottle :.
XPlace tire sealant bottle :head down into
recess ;of the tire inflation compressor.
XRemove the cap from valve Con the faulty
tire.
XScrew filler hose Donto valve C.
XInsert connector ?into a socket in your vehi-
cle.
Cigarette lighter socket: (
Ypage 312)
12 V sockets: (
Ypage 312)
Observe the notes on the cigarette lighter
(
Ypage 312). Observe the notes on sockets
(Ypage 312).
XTurn the SmartKey to position 1in the igni-
tion lock (Ypage 140).
XPress on and off switch =on the tire inflation
compressor to I.
The tire inflation compressor is switched on.
The tire is inflated.
iFirst, tire sealant is pumped into the tire. The
pressure can briefly rise to approximately
500 kPa (5 bar/73 psi).
Do not switch off the tire inflation com-
pressor during this phase.
XLet the tire inflation compressor run for a
maximum of five minutes. The tire should then
have attained a pressure of at least 180 kPa
(1.8 bar/26 psi).
If a pressure of 180 kPa (1.8 bar/26 psi) has
been attained after five minutes, see "Tire pres-
sure reached" (
Ypage 343).
If a tire pressure of 180 kPa (1.8 bar/26 psi) has
not been attained after five minutes, see "Tire
pressure not reached" (
Ypage 342).
If tire sealant has escaped, clean it off affected
areas as quickly as possible. It is preferable to
use clean water.
If your clothes are soiled with tire sealant, have
them cle aned w
ith perchloroethylene at a dry
cleaner as soon as possible.
Tire pressure not reached
If a pressure of 180 kPa (1.8 bar/26 psi) has not
been attained after five minutes:
XSwitch off the tire inflation compressor.
XUnscrew the filler hose from the valve of the
faulty tire.
Note that tire sealant may escape when you
unscrew the filler hose.
XVery slowly drive forwards or reverse approx- imately 30 ft (10 m).
XPump up the tire again.
After a maximum of five minutes the tire pres-sure must be at least 180 kPa (1.8 bar/
26 psi).
GWARNING
If the required tire pressure is not reached
after the specified time, the tire is too badly
damaged. The tire sealant cannot repair the
tire in this instance. Damaged tires and a tire
pressure that is too low can significantly
impair the vehicle's braking and driving char-
acteristics. There is a risk of accident.
342Flat tire
Breakdown assistance
Page 375 of 398
Speed rating
The speed rating is part of the tire identification.It specifies the speed range for which the tire is
approved.
GTW (Gross Trailer Weight)
The GTW is the weight of a trailer including the
weight of the load, luggage, accessories etc. on
the trailer.
GVW (Gross Vehicle Weight)
The gross vehicle weight includes the weight of
the vehicle including fuel, tools, the spare wheel,
accessories installed, occupants, luggage and
the drawbar noseweight, if applicable. The gross
vehicle weight must not exceed the gross vehi-
cle weight rating GVWR as specified on the vehi- cle identification plate on the B-pillar on the
driver's side.
GVWR (Gross Vehicle Weight Rating)
The GVWR is the maximum permissible gross
weight of a fully loaded vehicle (the weight of the
vehicle including all accessories, occupants,
fuel, luggage and the drawbar noseweight, if
applicable). The gross vehicle weight rating is
specified on the vehicle identification plate on
the B-pillar on the driver's side.
Maximum loaded vehicle weight
The maximum weight is the sum of:
Rthe curb weight of the vehicle
Rthe weight of the accessories
Rthe load limit
Rthe weight of the factory installed optional
equipment
Kilopascal (kPa)
Metric unit for tire pressure. 6.9 kPa corre-
sponds to 1 psi. Another unit for tire pressure is
bar. 100 kilopascals (kPa) are the equivalent of
1 bar.
Load index
In addition to the load-bearing index, the load
index may also be imprinted on the sidewall of
the tire. This specifies the load-bearing capacity
more precisely.
Curb weight
The weight of a vehicle with standard equipment
including the maximum capacity of fuel, oil and
coolant. It also includes the air-conditioning sys- tem and optional equipment if these are instal-
led in the vehicle, but does not include passen-
gers or luggage.
Maximum load rating
The maximum tire load is the maximum permis-
sible weight in kilograms or lbs for which a tire is approved.
Maximum permissible tire pressure
Maximum permissible tire pressure for one tire.
Maximum load on one tire
Maximum load on one tire. This is calculated by
dividing the maximum axle load of one axle by
two.
PSI (pounds per square inch)
A standard unit of measure for tire pressure.
Aspect ratio
Relationship between tire height and tire widt h
in percent.
Tire pressure
This is pressure inside the tire applying an out-
ward force to each square inch of the tire's sur-
face. The tire pressure is specified in pounds per
square inch (psi), in kilopascal (kPa) or in bar.
The tire pressure should only be corrected when the tires are cold.
Cold tire pressure
The tires are cold:
Rif the vehicle has been parked with the tires
out of direct sunlight for at least three hours
and
Rif the vehicle has not been driven further than
1 mile (1.6 km)
Tread
The part of the tire that comes into contact with
the road.
Bead
The tire bead ensures that the tire sits securely
on the wheel. There are several steel wires in the
bead to prevent the tire from coming loose from
the wheel rim.
All about wheels and tires373
Wheels and tires
Z
Page 377 of 398
be required earlier. Do not change the direction
of wheel rotation.
Clean the contact surfaces of the wheel and the
brake disc thoroughly every time a wheel is rota-ted. Check the tire pressure and, if necessary,
restart the tire pressure loss warning system or
the tire pressure monitor (
Ypage 361).
Direction of rotation
Tires with a specified direction of rotation have
additional benefits, e.g. if there is a risk of hydro-
planing. These advantages can only be gained if
the tires are installed corresponding to the
direction of rotation.
An arrow on the sidewall of the tire indicates its
correct direction of rotation.
Storing wheels
Store wheels that are not being used in a cool,
dry and preferably dark place. Protect the tires
from oil, grease, gasoline and diesel.
Mounting a wheel
Preparing the vehicle
XVehicle with emergency spare wheel:
when mounting the emergency spare wheel in
the event of a flat tire, follow the additional
notes on vehicle preparation under "Flat tire"
(
Ypage 339).
XStop the vehicle on solid, non-slippery and
level ground.
XApply the electric parking brake manually.
XBring the front wheels into the straight-ahead
position.
XVehicles with automatic transmission:
shift the transmission to position j.
XVehicles with the AIRMATIC package:
make sure that the normal vehicle level is
selected (
Ypage 190).
XVehicles with the Off-Road Engineering
package:make sure that the normal level is
selected (
Ypage 184).
XSwitch off the engine.
XVehicles without KEYLESS-GO: remove the
SmartKey from the ignition lock.
XVehicles with KEYLESS-GO: open the driv-
er's door.
The vehicle electronics are now in position
u. This means no SmartKey is in the ignition
lock.
XVehicles with KEYLESS-GO: remove the
Start/Stop button from the ignition lock
(
Ypage 140).
XIf included in the vehicle equipment, remove
the tire-change tool kit from the vehicle.
XSafeguard the vehicle against rolling away.
iApart from certain country-specific varia-
tions, vehicles are not equipped with a tire-
change tool kit. For more information on
which tools are required to perform a wheel
change on your vehicle, consult a qualified
specialist workshop.
Necessary tire-changing tools can include, for
example:
RJack
RWheel chock
RLug wrench
Securing the vehicle to prevent it from
rolling away
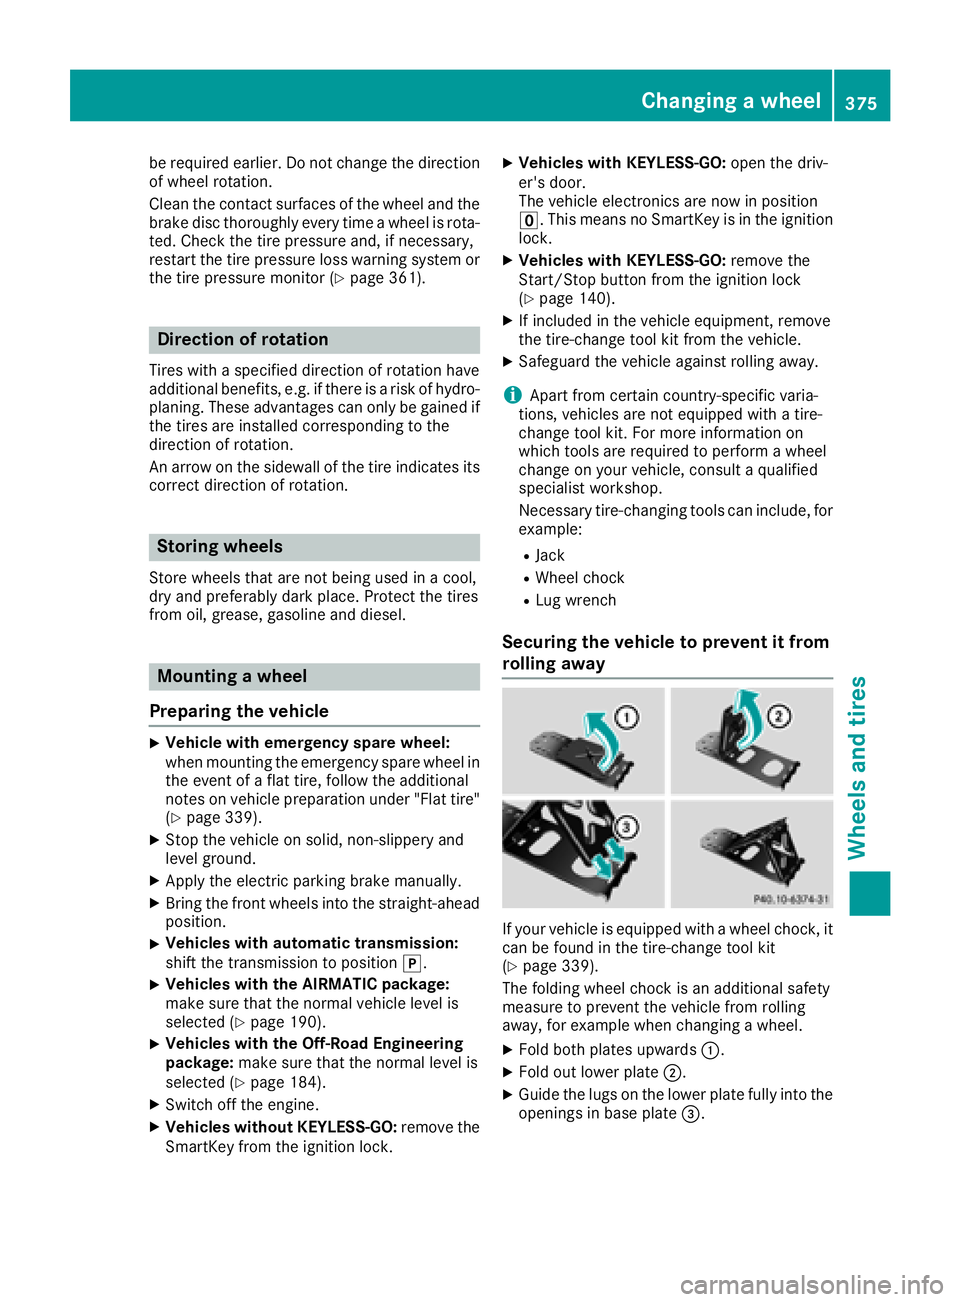
If your vehicle is equipped with a wheel chock, it can be found in the tire-change tool kit
(
Ypage 339).
The folding wheel chock is an additional safety
measure to prevent the vehicle from rolling
away, for example when changing a wheel.
XFold both plates upwards :.
XFold out lower plate;.
XGuide the lugs on the lower plate fully into the
openings in base plate =.
Changing a wheel375
Wheels and tires
Z
Page 379 of 398

The jacking points are located just behind the
front wheel housings and just in front of the rear
wheel housings (arrows).
XTake the ratchet wrench out of the vehicle
tool kit and place it on the hexagon nut of the
jack so that the letters AUFare visible.
XPosition jack =at jacking point ;.
The alignment bolt on the jack must be inser-
ted into the intended opening on the jacking
point.
XMake sure the foot of the jack is directly
beneath the jacking point.
XTurn ratchet wrench ?until jack =sits
completely on jacking point ;and the base
of the jack lies evenly on the ground.
XTurn ratchet wrench ?until the tire is raised
a maximum of 1.2 in (3 cm) from the ground.
Removing a wheel
!Do not place wheel bolts in sand or on a dirty
surface. The bolt and wheel hub threads could
otherwise be damaged when you screw them
in.
When mounting/removing wheels, and for as
long as the wheels are removed, avoid applying
any external force on the brake disks. This could impair the level of comfort when braking.
XUnscrew the uppermost wheel bolt com-
pletely.
XScrew alignment bolt :into the thread
instead of the wheel bolt.
XUnscrew the remaining wheel bolts fully.
XRemove the wheel.
Mounting a new wheel
GWARNING
Oiled or greased wheel bolts or damaged
wheel bolts/hub threads can cause the wheel bolts to come loose. As a result, you could
lose a wheel while driving. There is a risk of
accident.
Never oil or grease wheel bolts. In the event of
damage to the threads, contact a qualified
specialist workshop immediately. Have the
damaged wheel bolts or hub threads
replaced/renewed. Do not continue driving.
Changing a wheel377
Wheels and tires
Z
Page 388 of 398
from the data shown here. You can find the
data applicable to your vehicle on the vehicle
identification plate.
Vehicle identification number (VIN)
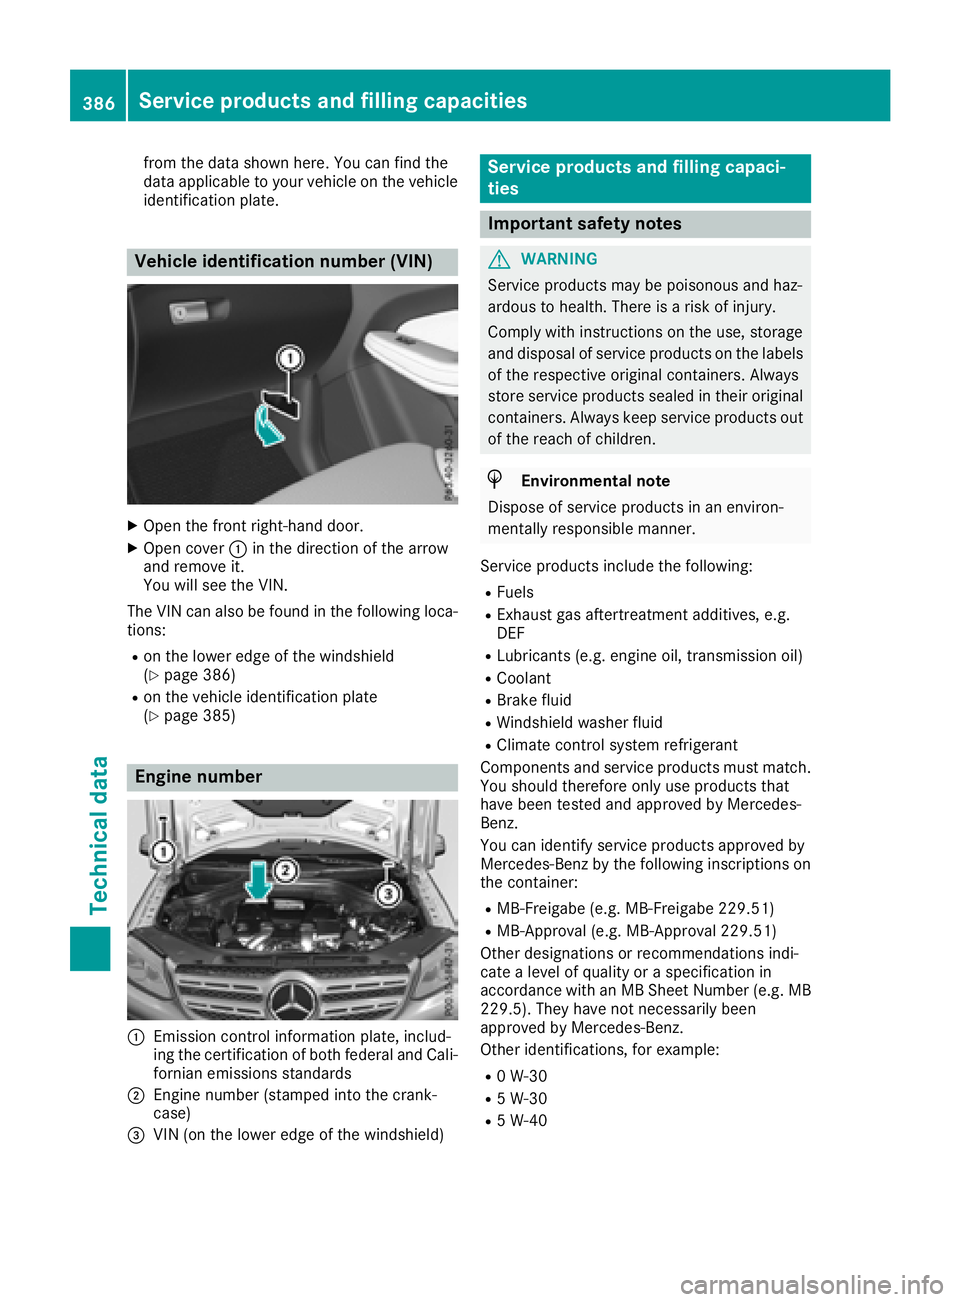
XOpen the front right-hand door.
XOpen cover:in the direction of the arrow
and remove it.
You will see the VIN.
The VIN can also be found in the following loca-
tions:
Ron the lower edge of the windshield
(Ypage 386)
Ron the vehicle identification plate
(Ypage 385)
Engine number
:Emission control information plate, includ-
ing the certification of both federal and Cali-
fornian emissions standards
;Engine number (stamped into the crank-
case)
=VIN (on the lower edge of the windshield)
Service products and filling capaci-
ties
Important safety notes
GWARNING
Service products may be poisonous and haz-
ardous to health. There is a risk of injury.
Comply with instructions on the use, storage
and disposal of service products on the labels
of the respective original containers. Always
store service products sealed in their original
containers. Always keep service products out
of the reach of children.
HEnvironmental note
Dispose of service products in an environ-
mentally responsible manner.
Service products include the following:
RFuels
RExhaust gas aftertreatment additives, e.g.
DEF
RLubricants (e.g. engine oil, transmission oil)
RCoolant
RBrake fluid
RWindshield washer fluid
RClimate control system refrigerant
Components and service products must match.
You should therefore only use products that
have been tested and approved by Mercedes-
Benz.
You can identify service products approved by
Mercedes-Benz by the following inscriptions on
the container:
RMB-Freigabe (e.g. MB-Freigabe 229.51)
RMB-Approval (e.g. MB-Approval 229.51)
Other designations or recommendations indi-
cate a level of quality or a specification in
accordance with an MB Sheet Number (e.g. MB 229.5). They have not necessarily been
approved by Mercedes-Benz.
Other identifications, for example:
R0 W-30
R5 W-30
R5 W-40
386Service products and filling capacities
Technical data
Page 390 of 398
If standard unleaded gasoline is unavailable
and you have to refuel with unleaded gasoline
of a lower grade, observe the following pre-
cautions:
ROnly fill the fuel tank to half full with regular unleaded gasoline and fill the rest with pre-
mium-grade unleaded gasoline as soon as
possible.
RDo not drive at the maximum speed.
RAvoid sudden acceleration and engine
speeds over 3,000 rpm.
You will usually find information about the fuel
grade on the fuel pump. If you cannot find the
label on the fuel pump, ask the gas station staff.
iFor more information, please contact a
qualified specialist workshop or visit
http://www.mbusa.com (USA only).
As a temporary measure, if the recommended
fuel is not available, you may also use regular
unleaded gasoline with an octane rating of
87 AKI/91 RON. This may reduce engine per-
formance and increase fuel consumption. Avoid
driving at full throttle and sudden acceleration.
Never refuel using gasoline with a lower AKI.
Information on refueling (
Ypage 156).
Additives
!Operating the engine with fuel additives
added later can lead to engine failure. Do not
mix fuel additives with fuel. This does not
include additives for the removal and preven-
tion of residue buildup. gasoline must only be mixed with additives recommended by
Mercedes-Benz. Comply with the instructions
for use on the product label. More information
about recommended additives can be
obtained from any authorized Mercedes-Benz
Center.
Mercedes-Benz recommends that you use bran- ded fuels that have additives.
The fuel quality available in some countries may
not be sufficient. Residue could build up in the
fuel injection system as a result. In such cases,
and in consultation with an authorized
Mercedes-Benz Center, the fuel may be mixed
with the cleaning additive recommended by
Mercedes-Benz. You must observe the notes
and mixing ratios specified on the container.
Diesel
Fuel grade
GWARNING
If you mix diesel fuel with gasoline, the flash
point is lower than that of pure diesel fuel.
When the engine is running, exhaust system
components could overheat without being
noticed. There is a risk of fire.
Never refuel with gasoline. Never mix gasoline with diesel fuel.
!Only use Ultra Low Sulfur Diesel (ULSD),
otherwise it may lead to increased wear and
damage to the fuel system, engine and
exhaust system.
!Do not use the following:
Rgasoline
Rdiesel with a bio-diesel content greater
than 5% (e.g. B20)
Rbio-diesel
Rvegetable oil
Rparaffin
Rkerosene
Rmarine diesel
Rheating oil
Do not mix such fuels with diesel fuel and do
not use any special additives. Otherwise,
engine damage may occur.
!In countries outside USA and Canada, only
use sulfur-free diesel with a sulfur content
under 50 ppm. Otherwise, the emission con-
trol system could be damaged.
You will usually find information about the fuel
grade on the pump. If you cannot find the label
on the pump, ask the staff for assistance.
Information on refueling (
Ypage 156).
Low outside temperatures
iDiesel fuel with improved cold flow proper-
ties is available during the winter months.
Further information about fuel properties can
be obtained from oil companies, e.g. at gas
stations.
388Service products and filling capacities
Technical data
Page 391 of 398
DEF
Important safet ynotes
Comply wit hth eimportant safet ynote sfo rser -
vic eproducts when handlin gDE F (Ypage 386).
DE Fis awater-soluble flui dfo rth eexhaus tgas
aftertreatmen tof diesel engines. It is:
Rno tpoisonous
Rcolorles sand odorless
Rno tflammable
Whe nyou ope nth eDE Fcontainer, small
amount sof ammonia vapor may be released.
Ammoni avapor shav e a pungen todo rand are
particularly irritatin gto th eskin ,to mucous
membrane sand to th eeyes .You may experi-
ence aburning sensation in your eyes ,nose and
throat .Coughin gand watering of th eeyes are
possible.
Do no tinhale ammonia vapors. Fil lth eDE Ftank
only in well-ventilated areas.
Low outsid etemperatures
DE Ffreezes at atemperature of approximately
12 ‡(-11 †). The vehicle is delivered from th e
factory equipped wit h aDEFpreheatin gsystem.
Winte roperation can thus be guaranteed eve n
at temperature sbelo w12 ‡(-11 †).
Additives
!Only use DE Fin accordance wit hIS O
22241. Do no tuse additive swit hDE Fand do
no tdilut eDE Fwit hwater. Thi smay destroy
th eBlueTE Cexhaus tgas aftertreatmen tsys -
tem.
Purity
!Impurities in DE F(e.g. due to other servic e
products ,cleanin gagents or dust )lead to :
Rincrease demission values
Rdamage to th ecatalytic converter
Rengin edamage
Rmalfunction sin th eBlueTE Cexhaus tgas
aftertreatmen tsyste m
Assurin gth epurit yof DE Fis particularly impor -
tant wit hrespec tto avoidin gmalfunction sin th e
BlueTE Cexhaus tgas aftertreatmen tsystem.
If DE Fis pumped out of th eDE Ftank ,e.g. durin g
repair work, it mus tno tbe returned to th etank .The purit
yof th eflui dcan no longer be guaran-
teed.
Filling capacities
ModelTota lcapacity
GLS 350 d4MATIC10.2 US gal
(38.7 l)
Engin eoil
General notes
!Do no tuse engin eoil or an oil filte rwit h
specification sdeviatin gfrom those expressl y
require dfo rth eprescribed servic eintervals.
Do no tchang eth eengin eoil or oil filte rin
order to set replacement intervals longer than those prescribed. Thi scould otherwise cause
damage to th eengin eor exhaus tgas after-
treatment.
Follow th einstruction son th eservic einterval
display fo rchangin gth eengin eoil. Thi scould
otherwise cause damage to th eengin eor
exhaus tgas aftertreatment.
Whe nhandlin gengin eoil, observ eth eimportant
safet ynote son servic eproducts (
Ypage 386).
The engin eoils are matched to th eperformanc e
of Mercedes-Ben zengines and servic eintervals.
You should therefore only use engin eoils and oil
filters that are approved fo rvehicles wit hmain -
tenance systems .
Fo r a list of approved engin eoils and oil filters ,
consult an authorized Mercedes-Ben zCenter.
Alternatively, visit th ewebsit e
http://bevo.mercedes-benz.com .
The table shows whic hengin eoils hav ebee n
approved fo ryour vehicle.
Service products and filling capacities389
Technical data
Z