2018 MERCEDES-BENZ GLS SUV door lock
[x] Cancel search: door lockPage 96 of 398
You can stop automatic operation by pressing/
pulling the switch again.
When opening and raising the roof, automatic
operation is only available if the sliding sunroof
is in the closed position.
The sun protection cover automatically opens
along with the sliding sunroof. You can open or
close the sun protection cover manually when
the sliding sunroof is raised or closed.
You can continue to operate the sliding sunroof
after switching off the engine or removing the
SmartKey from the ignition lock. This function isavailable for up to five minutes or until the driv-
er's or front-passenger door is opened.
Resetting
!If the sliding sunroof still cannot be opened
or closed fully after resetting, contact a quali- fied specialist workshop.
Reset the sliding sunroof if it does not move
smoothly.
XTurn the SmartKey to position 1or2 in the
ignition lock.
XRaise the sliding sunroof fully at the rear
(Ypage 93).
XKeep the 2switch pressed for another
second.
XMake sure that the sliding sunroof can be fully opened and closed again (Ypage 93).
XIf this is not the case, repeat the steps above.
Operating the panorama roof with
power tilt/sliding panel
Opening and closing
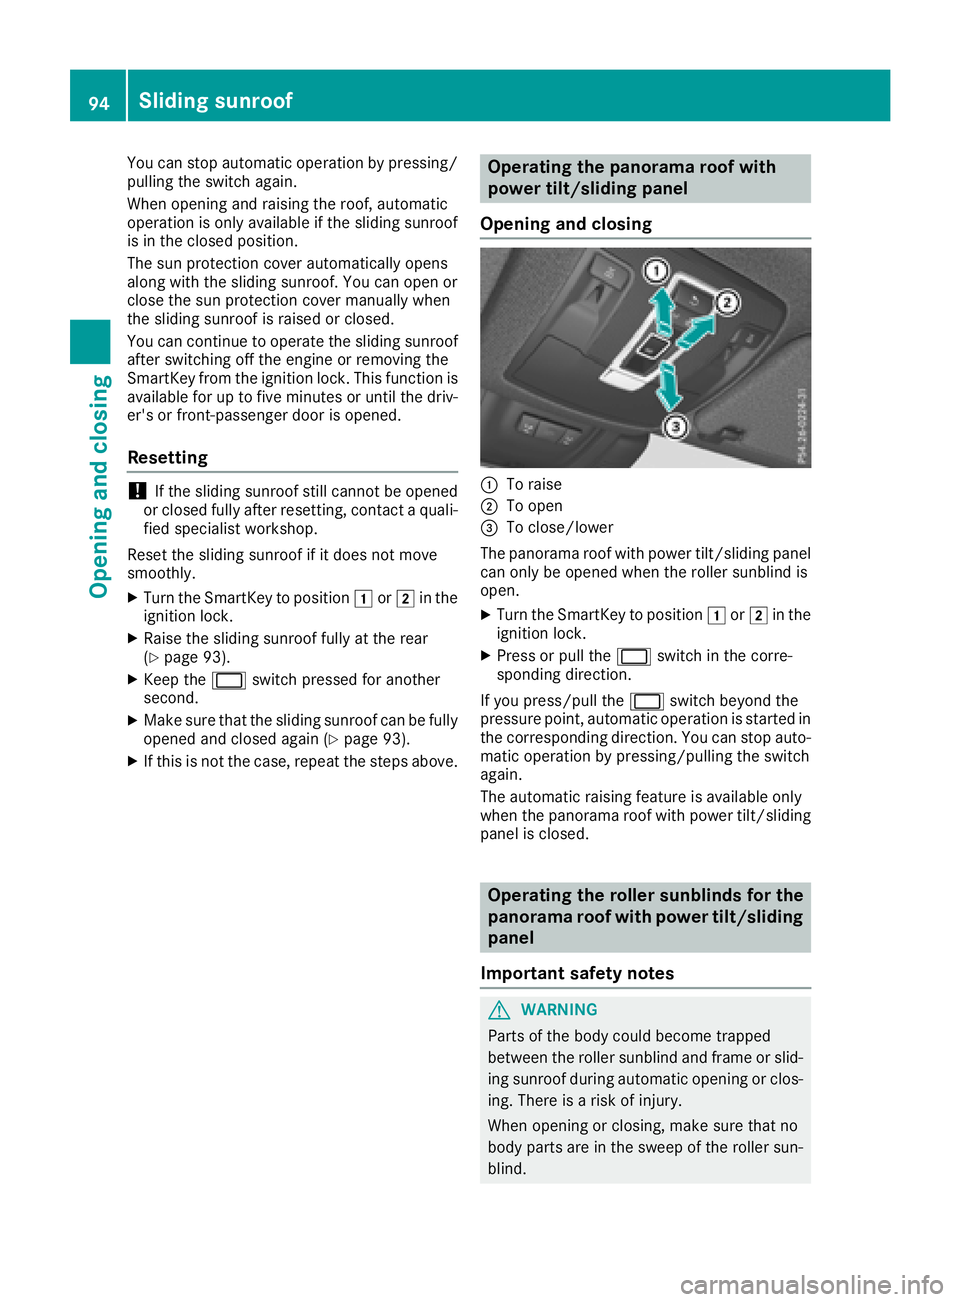
:To raise
;To open
=To close/lower
The panorama roof with power tilt/sliding panel
can only be opened when the roller sunblind is
open.
XTurn the SmartKey to position 1or2 in the
ignition lock.
XPress or pull the 2switch in the corre-
sponding direction.
If you press/pull the 2switch beyond the
pressure point, automatic operation is started in the corresponding direction. You can stop auto-
matic operation by pressing/pulling the switch
again.
The automatic raising feature is available only
when the panorama roof with power tilt/sliding
panel is closed.
Operating the roller sunblinds for the
panorama roof with power tilt/sliding
panel
Important safety notes
GWARNING
Parts of the body could become trapped
between the roller sunblind and frame or slid-
ing sunroof during automatic opening or clos-
ing. There is a risk of injury.
When opening or closing, make sure that no
body parts are in the sweep of the roller sun-
blind.
94Sliding sunroof
Opening and closing
Page 107 of 398
Always make sure that the seat and backrest
are engaged as described:
Rbefore traveling with a passenger on a seat
with the EASY-ENTRY/EXIT feature
Rafter you have adjusted the seat
Rafter the EASY-ENTRY/EXIT feature has
been used
Rafter the cargo compartment enlargement
has been folded forwards
GWARNING
The seat does not engage in the entry/exit
position. The seat could fold back suddenly,
e.g. when accelerating, braking, changing
direction suddenly or in the event of an acci-
dent. Persons in the sweep of the seat could
become trapped. There is a risk of injury.
Always fold back a seat which has been folded
forwards before you pull away. Make sure that
the seat and backrest engage fully.
XTo lock the seat: fold back the seat until it
engages.
XFold back the backrest until it engages.
Folding down the seats in the second
row electrically
Important safety notes
GWARNING
If the seat and backrest are not engaged, they can fold forwards, e.g. in the event of sudden
braking or an accident.
RThis will cause the vehicle occupants to be
forced into the seat belt by a seat or back-
rest which is not engaged. The seat belt can no longer offer the intended level of pro-
tection and could even cause injuries.
RA child restraint system would no longer be
anchored or positioned correctly and would
not be able to perform its required function.
RThe seat backrests cannot restrain objects
or loads in the cargo compartment.
There is an increased risk of injury.
Always make sure that the seat and backrest
are engaged as described:
Rbefore traveling with a passenger on a seat
with the EASY-ENTRY/EXIT feature
Rafter you have adjusted the seat
Rafter the EASY-ENTRY/EXIT feature has
been used
Rafter the cargo compartment enlargement
has been folded forwards
GWARNING
The seat does not engage in the entry/exit
position. The seat could fold back suddenly,
e.g. when accelerating, braking, changing
direction suddenly or in the event of an acci-
dent. Persons in the sweep of the seat could
become trapped. There is a risk of injury.
Always fold back a seat which has been folded
forwards before you pull away. Make sure that
the seat and backrest engage fully.
General notes
To enter or exit the third row of seats: the outer
left and right seats of the second row can be
folded down electrically.
One of the outer seats of the second row is in the
entry/exit position: the multifunction display
shows, e.g. the 2nd Seat Row, Right Not
Lockeddisplay message.
If you fold the seat back until it engages, the
display message disappears.
Pull the backrest firmly to ensure that it is fully
engaged.
iFurther related subjects:
RCargo compartment enlargement (folding
the second row of seats forwards)
(
Ypage 303)
RFolding the seats in the third row forwards/
back (Ypage 101)
Folding down the seats
The seats can be folded down electrically if the
vehicle is stationary and the respective rear
door is open.
Seats105
Seats, steering wheel and mirrors
Z
Page 111 of 398
Adjusting the steering wheel electri-
cally
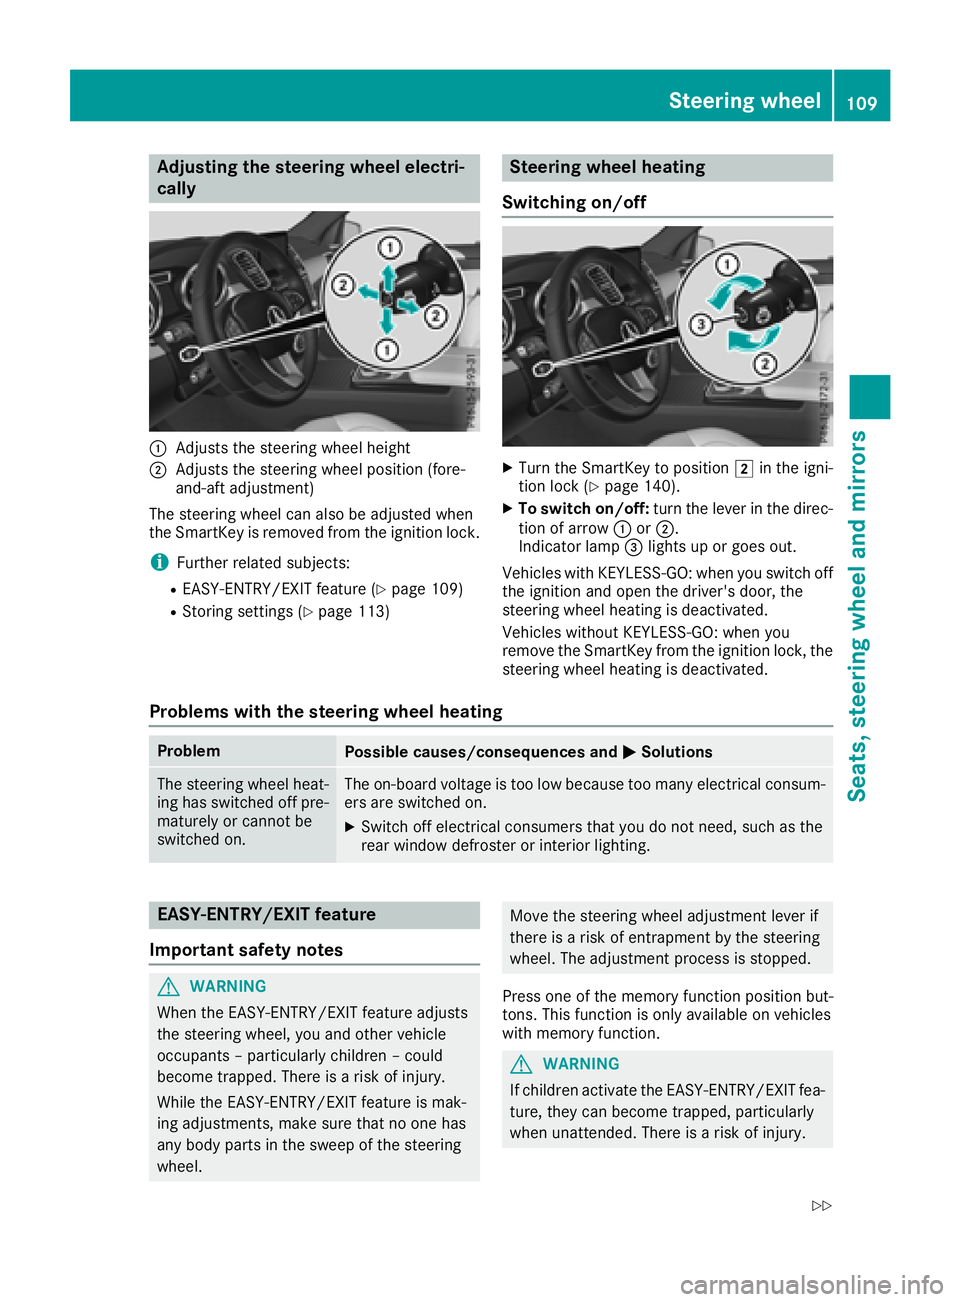
:Adjusts th esteering whee lheight
;Adjusts th esteering whee lposition (fore-
and-af tadjustment)
The steering whee lcan also be adjusted when
th eSmartKey is remove dfrom th eignition lock.
iFurther relate dsubjects :
REASY-ENTRY/EXIT feature (Ypage 109)
RStoring settings (Ypage 113)
Steering wheel heating
Switching on/off
XTurn th eSmartKey to position 2in th eigni-
tion loc k (Ypage 140).
XTo switch on/off: turnth elever in th edirec -
tion of arrow :or;.
Indicato rlamp =lights up or goes out .
Vehicles wit hKEYLESS-GO :when you switch off
th eignition and open th edriver's door ,th e
steering whee lheating is deactivated.
Vehicles without KEYLESS-GO :when you
remove th eSmartKey from th eignition lock, th e
steering whee lheating is deactivated.
Problems with the steering wheel heating
ProblemPossible causes/consequences and MSolutions
The steering wheelheat -
ing has switched off pre -
maturel yor canno tbe
switched on .The on-board voltag eis to olow because to oman yelectrical consum-
ers are switched on .
XSwitchoff electrical consumer sthat you do no tneed, suc has th e
rear window defroste ror interior lighting .
EASY-ENTRY/EXITfeatu re
Import ant safety notes
GWARNIN G
When th eEASY-ENTRY/EXIT feature adjust s
th esteering wheel, you and other vehicl e
occupant s –particularly children –could
become trapped .There is aris kof injury.
Whil eth eEASY-ENTRY/EXIT feature is mak -
ing adjustments ,mak esur ethat no on ehas
any body part sin th eswee pof th esteering
wheel.
Mov eth esteering whee ladjustmen tlever if
there is aris kof entrapment by th esteering
wheel. The adjustmen tprocess is stopped.
Press on eof th ememory function position but -
tons .This function is only available on vehicles
wit hmemory function .
GWARNING
If children activat eth eEASY-ENTRY/EXIT fea-
ture, they can become trapped ,particularly
when unattended. There is aris kof injury.
Steering wheel109
Seats, steering wheel and mirrors
Z
Page 112 of 398
When leaving the vehicle, always take the
SmartKey with you and lock the vehicle. Never
leave children unsupervised in the vehicle.
GWARNING
If you drive off while the EASY-ENTRY/EXIT
feature is making adjustments, you could lose
control of the vehicle. There is a risk of an
accident.
Always wait until the adjustment process is
complete before driving off.
The EASY-ENTRY/EXIT feature makes getting in
and out of your vehicle easier.
You can activate and deactivate the EASY-
ENTRY/EXIT feature in the on-board computer
(
Ypage 244).
Position of the steering wheel when the
EASY-ENTRY/EXIT feature is active
The steering wheel swings up when you:
Rremove the SmartKey from the ignition lock.
Ropen the driver's door and KEYLESS-GO is in
position 1.
Ropen the driver's door and the SmartKey is in
positionuor1 in the ignition lock.
iThe steering wheel only moves up if it has
not already reached the upper stop.
Position of the steering wheel for driv-
ing
The steering wheel is moved to the last selected
position when:
Rthe driver's door is closed
Ryou insert the SmartKey into the ignition lock
or
Ryou press the Start/Stop button once on vehi-
cles with KEYLESS-GO
When you close the driver's door with the igni-
tion switched on, the steering wheel is also
automatically moved to the previously set posi-
tion.
The last position of the steering column is stored
when you:
Rswitch the ignition off
Rsave the setting with the memory function
(Ypage 113).
Crash-responsive EASY-EXIT feature
If the crash-responsive EASY-EXIT feature is trig-
gered in an accident, the steering column will
move upwards when the driver's door is opened.
This occurs irrespective of the position of the
SmartKey in the ignition lock. This makes it eas- ier to exit the vehicle and rescue the occupants.
The crash-responsive EASY-EXIT feature is only
operational if the EASY-EXIT/ENTRY feature is
activated in the on-board computer
(
Ypage 244).
Mirrors
Rear-view mirror
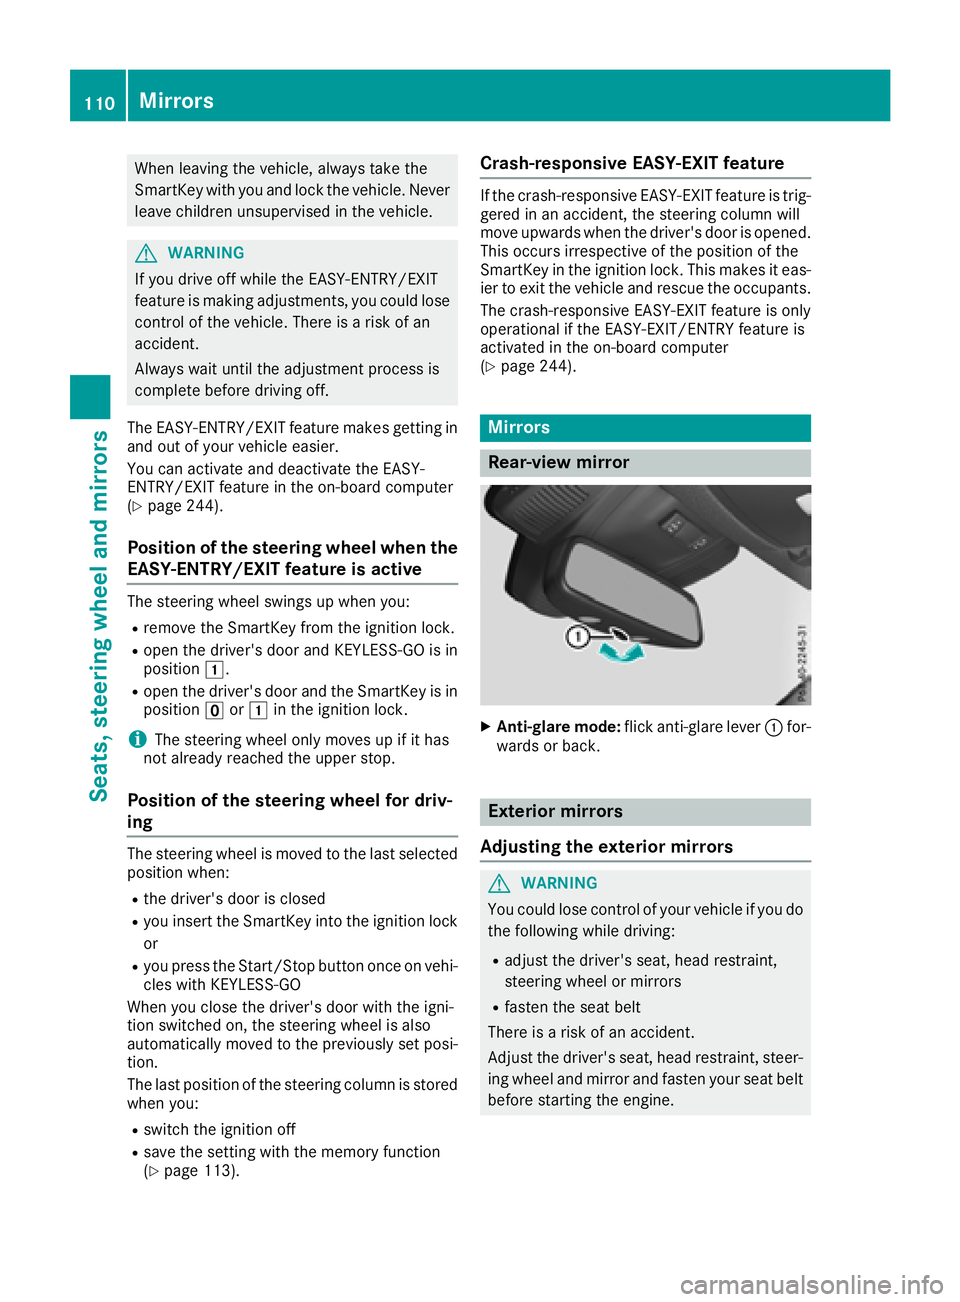
XAnti-glare mode: flick anti-glare lever :for-
wards or back.
Exterior mirrors
Adjusting the exterior mirrors
GWARNING
You could lose control of your vehicle if you do the following while driving:
Radjust the driver's seat, head restraint,
steering wheel or mirrors
Rfasten the seat belt
There is a risk of an accident.
Adjust the driver's seat, head restraint, steer-
ing wheel and mirror and fasten your seat belt before starting the engine.
110Mirrors
Seats, steering wheel and mirrors
Page 113 of 398
GWARNING
The exterior mirror on the front-passenger
side reduces the size of the image. Visible
objects are actually closer than they appear.
This means that you could misjudge the dis-
tance from road users traveling behind, e.g.
when changing lane. There is a risk of an acci-
dent.
For this reason, always make sure of the
actual distance from the road users traveling
behind by glancing over your shoulder.
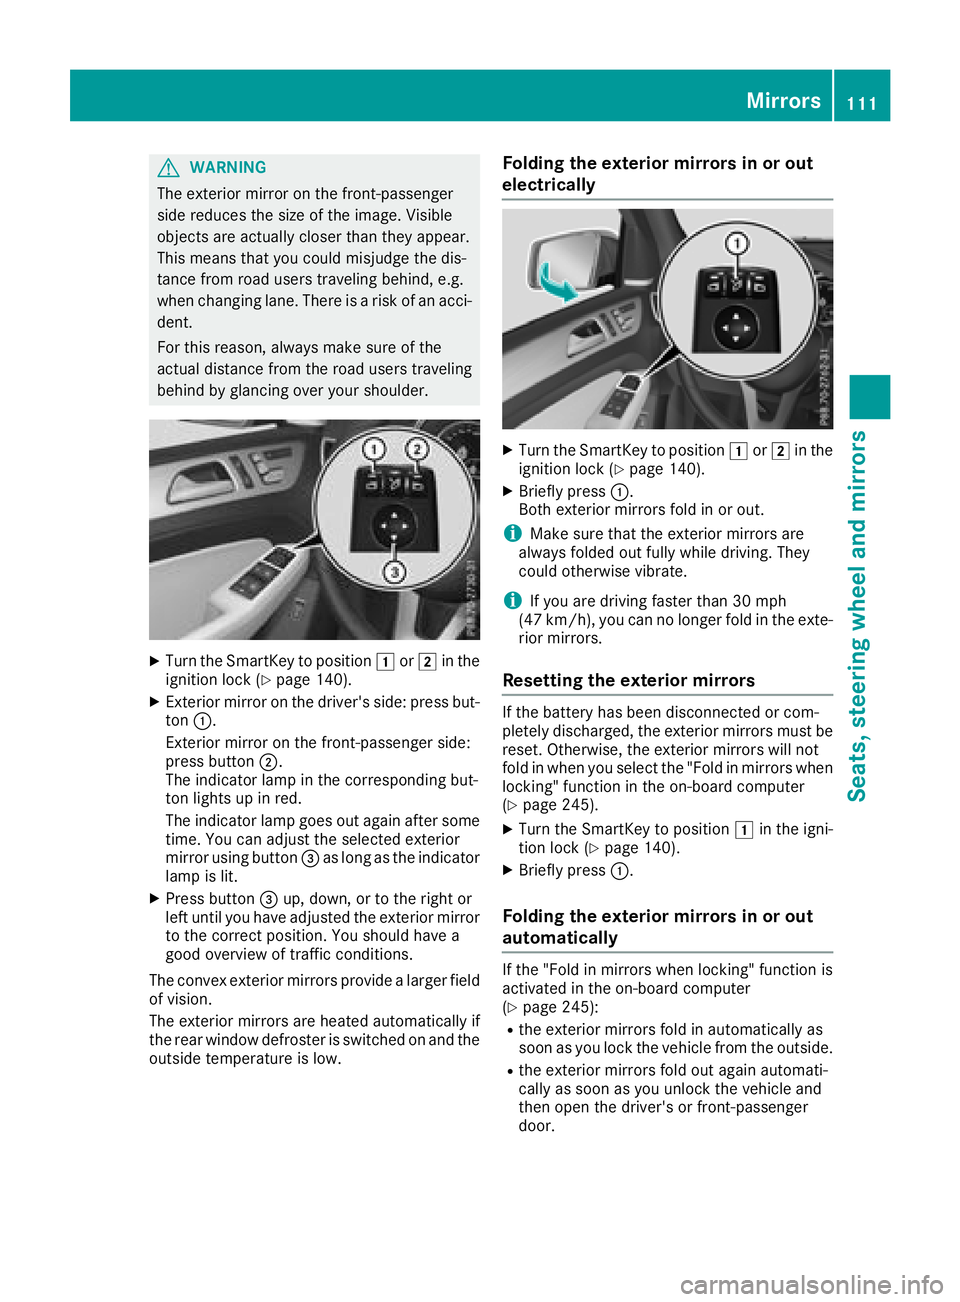
XTurn the SmartKey to position 1or2 in the
ignition lock (Ypage 140).
XExterior mirror on the driver's side: press but-
ton :.
Exterior mirror on the front-passenger side:
press button ;.
The indicator lamp in the corresponding but-
ton lights up in red.
The indicator lamp goes out again after some
time. You can adjust the selected exterior
mirror using button =as long as the indicator
lamp is lit.
XPress button =up, down, or to the right or
left until you have adjusted the exterior mirror
to the correct position. You should have a
good overview of traffic conditions.
The convex exterior mirrors provide a larger field of vision.
The exterior mirrors are heated automatically if
the rear window defroster is switched on and the
outside temperature is low.
Folding the exterior mirrors in or out
electrically
XTurn the SmartKey to position 1or2 in the
ignition lock (Ypage 140).
XBriefly press :.
Both exterior mirrors fold in or out.
iMake sure that the exterior mirrors are
always folded out fully while driving. They
could otherwise vibrate.
iIf you are driving faster than 30 mph
(47 km/h), you can no longer fold in the exte-
rior mirrors.
Resetting the exterior mirrors
If the battery has been disconnected or com-
pletely discharged, the exterior mirrors must be
reset. Otherwise, the exterior mirrors will not
fold in when you select the "Fold in mirrors when
locking" function in the on-board computer
(
Ypage 245).
XTurn the SmartKey to position 1in the igni-
tion lock (Ypage 140).
XBriefly press :.
Folding the exterior mirrors in or out
automatically
If the "Fold in mirrors when locking" function is
activated in the on-board computer
(
Ypage 245):
Rthe exterior mirrors fold in automatically as
soon as you lock the vehicle from the outside.
Rthe exterior mirrors fold out again automati-
cally as soon as you unlock the vehicle and
then open the driver's or front-passenger
door.
Mirrors111
Seats, steering wheel and mirrors
Z
Page 117 of 398

Exterior lighting
General notes
For reasons of safety, Mercedes-Benz recom-
mends that you drive with the lights switched on
even during the daytime. In some countries,
operation of the headlamps varies due to legal
requirements and self-imposed obligations.
Setting the exterior lighting
Setting options
Exterior lighting can be set using:
Rthe light switch
Rthe combination switch (Ypage 116)
Rthe on-board computer (Ypage 243)
Light switch
Operation
1 WLeft-hand standing lamps
2XRight-hand standing lamps
3TParking lamps, license plate and
instrument cluster lighting
4cAutomatic headlamp mode, controlled
by the light sensor
5 LLow-beam/high-beam headlamps
BRRear fog lamp
If you hear a warning tone when you leave the
vehicle, the lights may still be switched on.
XTurn the light switch to c.
The exterior lighting (except the parking/stand-
ing lamps) switches off automatically if you:
Rremove the SmartKey from the ignition lock
Ropen the driver's door with the SmartKey in
position uin the ignition lock
Automatic headlamp mode
c is the favored light switch position. The
light setting is automatically selected according
to the brightness of the ambient light (excep-
tion: poor visibility due to weather conditions
such as fog, snow or spray):
RSmartKey in position 1in the ignition lock:
the parking lamps are switched on/off auto-
matically depending on the brightness of the
ambient light.
RWith the engine running (USA only): if you
have switched on the Daytime Running
Lightsfunction in the on-board computer,
the daytime running lamps or the parking
lamps and low-beam headlamps are switched on or off automatically depending on the
brightness of the ambient light.
XTo switch on automatic headlamp mode:
turn the light switch to c.
GWARNING
When the light switch is set to Ã, the low-
beam headlamps may not be switched on
automatically if there is fog, snow or other
causes of poor visibility due to the weather
conditions such as spray. There is a risk of an
accident.
In such situations, turn the light switch to
L.
The automatic headlamp mode is only an aid.
The driver is responsible for the vehicle's light-
ing at all times.
Canada only:
The daytime running lamps improve the visibility
of your vehicle during the day. The daytime run-
ning lamps function is required by law in Can-
ada. It cannot therefore be deactivated.
When the engine is running and the vehicle is
stationary: if you move the selector lever from a
driving position to P, the daytime running
lamps/low-beam headlamps go out after three
minutes.
When the engine is running, the vehicle is sta-
tionary and in bright ambient light: if you turn the
light switch to the Tposition, the daytime
running lamps and parking lamps switch on.
If the engine is running and you turn the light
switch to L, the manual settings take prec-
edence over the daytime running lamps.
USA only:
Exterior lighting115
Lights and windshield wipers
Z
Page 122 of 398
Automa tic interi orlighting control
XTo switch on: set theswitch to center posi-
tion B.
XTo switch off :set th eswitch to th e|
position .
The interior lighting automatically switches on if
you:
Runloc kth evehicl e
Ropenadoor
Rremove th eSmartKey from th eignition loc k
The interior lighting is switched on for aset time
when th eSmartKey is remove dfrom th eignition
lock. This delaye dswitch-off can be adjusted via
th emultimedia system (see Digital Operator' s
Manual).
Crash-responsive eme rgency lighting
The interior lighting is activated automatically if
thevehicl eis involved in an accident.
XTo switch off th ecrash-responsive emer-
gency lighting: press thehazard warning
lamp button.
or
XLoc kand then unloc kth evehicl eusin gth e
SmartKey.
Replacing bulbs (vehicles with LED
headla mps)
The fron tand rear ligh tclusters of your vehicl e
are equipped wit hlight-emitting diodes. Do no t
replace th evehicle's bulbs yourself .Contac t a
qualified specialis tworkshop whic hhas th enec-
essary specialis tknowledge and tools to carry
out th ewor krequired.
Lamps are an important aspect of vehicl esafety.
You mus ttherefor emak esur ethat these func-
tion correctl yat all times .Hav eth eheadlamp
setting checke dregularly.
Replacing bulbs (vehicles with halo-
gen headla mps)
Import ant safety notes
GWARNIN G
Bulbs, lamp sand connectors can get ver yhot
when operating .If you chang e abulb, you
could burn yourself on these components.
There is aris kof injury.
Allow these component sto cool down before
changing abulb.
Do no tuse abulb if it has been dropped or if it s
glas stub ehas been scratched.
The bulb may explod eif:
Ryou touch it
Rit is hot
Ryou dro pit
Ryou scratch it
Use bulbs only in closed lamp sthat hav ebeen
designed for this purpose .Only instal lspar e
bulbs of th esam etyp eand th especifie dvolt-
age.
Marks on th eglas stub ereduce th eservic elife
of th ebulbs .Do no ttouch th eglas stub ewit h
your bare hands. If necessary, clean th eglas s
tub ewhen cold wit halcohol or spirit and rub it
off wit h alint-free cloth .
Protect bulbs from moisture during operation .
Do no tallow bulbs to come int ocontact wit h
liquids.
Replac eonly th ebulbs listed (
Ypage 120).
Hav eth ebulbs that you canno treplace yourself
replace dat aqualified specialist workshop .
If you require assistanc ereplacing bulbs ,con-
sult aqualified specialist workshop .
If th ene wbulb still does no tligh tup, consult a
qualified specialist workshop .
Headlamps and lights are an important aspect of
vehicl esafety. You mus tthere for
ema
k esur e
that these function correctl yat all times .Hav e
th eheadlamp setting checke dregularly.
Overview ofbulb replacement - bulb
types
You can replace th efollowin gbulbs .The bulb
typ ecan be foun din th elegend .
120Replacing bulbs (vehicles with halogen headlamps)
Lights and windshield wipers
Page 126 of 398
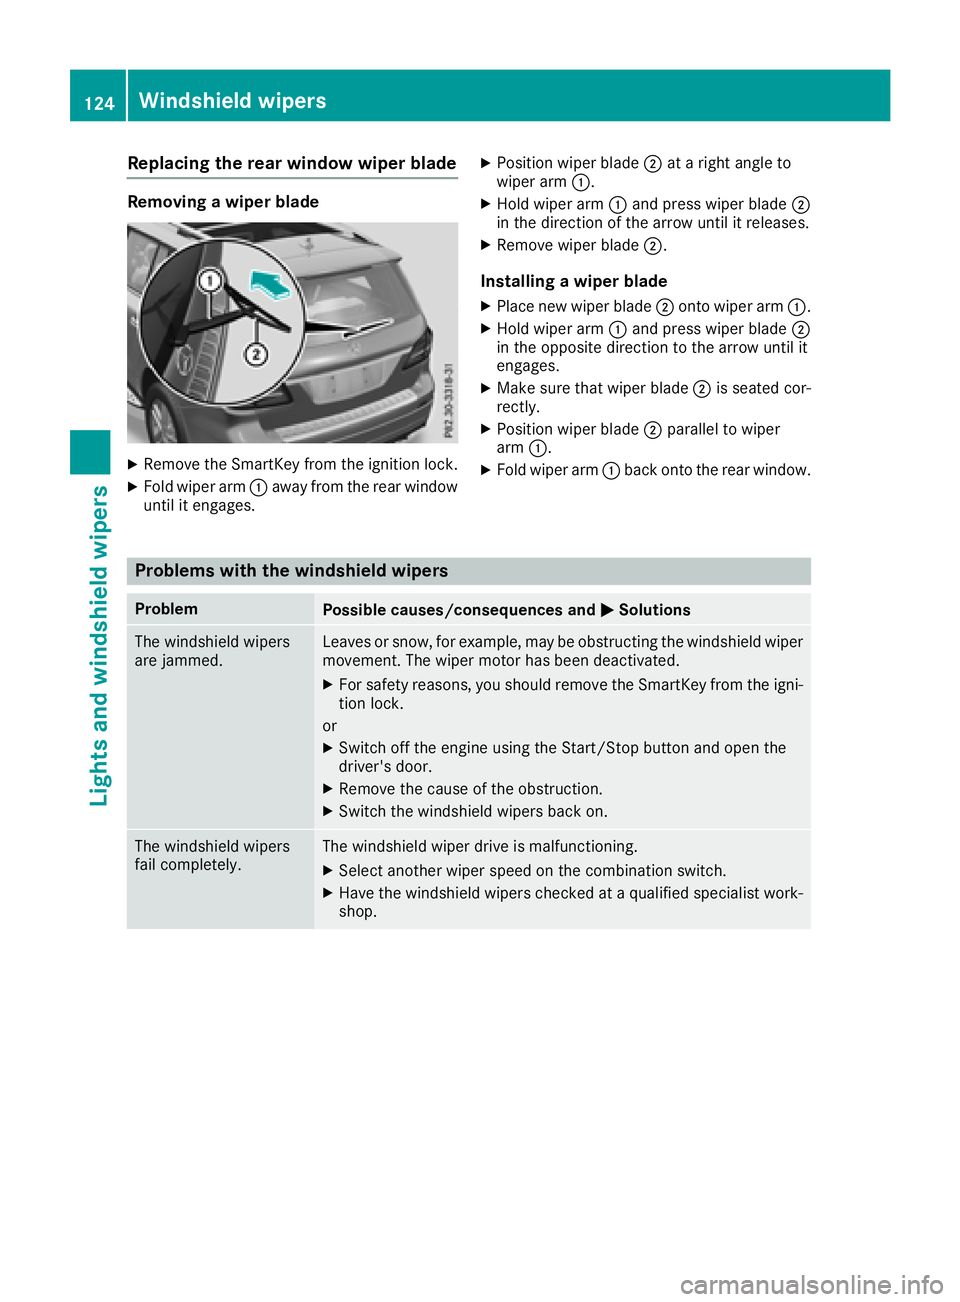
Replacing the rear window wiper blade
Removing a wiper blade
XRemove the SmartKey from the ignition lock.
XFold wiper arm:away from the rear window
until it engages.
XPosition wiper blade ;at a right angle to
wiper arm :.
XHold wiper arm :and press wiper blade ;
in the direction of the arrow until it releases.
XRemove wiper blade ;.
Installing a wiper blade
XPlace new wiper blade ;onto wiper arm :.
XHold wiper arm :and press wiper blade ;
in the opposite direction to the arrow until it
engages.
XMake sure that wiper blade ;is seated cor-
rectly.
XPosition wiper blade ;parallel to wiper
arm :.
XFold wiper arm :back onto the rear window.
Problems with the windshield wipers
ProblemPossible causes/consequences and MSolutions
The windshield wipers
are jammed.Leaves or snow, for example, may be obstructing the windshield wiper
movement. The wiper motor has been deactivated.
XFor safety reasons, you should remove the SmartKey from the igni-
tion lock.
or
XSwitch off the engine using the Start/Stop button and open the
driver's door.
XRemove the cause of the obstruction.
XSwitch the windshield wipers back on.
The windshield wipers
fail completely.The windshield wiper drive is malfunctioning.
XSelect another wiper speed on the combination switch.
XHave the windshield wipers checked at a qualified specialist work-
shop.
124Windshield wipers
Lights and windshield wipers