2018 MERCEDES-BENZ GLS SUV interior lights
[x] Cancel search: interior lightsPage 122 of 398
Automa tic interi orlighting control
XTo switch on: set theswitch to center posi-
tion B.
XTo switch off :set th eswitch to th e|
position .
The interior lighting automatically switches on if
you:
Runloc kth evehicl e
Ropenadoor
Rremove th eSmartKey from th eignition loc k
The interior lighting is switched on for aset time
when th eSmartKey is remove dfrom th eignition
lock. This delaye dswitch-off can be adjusted via
th emultimedia system (see Digital Operator' s
Manual).
Crash-responsive eme rgency lighting
The interior lighting is activated automatically if
thevehicl eis involved in an accident.
XTo switch off th ecrash-responsive emer-
gency lighting: press thehazard warning
lamp button.
or
XLoc kand then unloc kth evehicl eusin gth e
SmartKey.
Replacing bulbs (vehicles with LED
headla mps)
The fron tand rear ligh tclusters of your vehicl e
are equipped wit hlight-emitting diodes. Do no t
replace th evehicle's bulbs yourself .Contac t a
qualified specialis tworkshop whic hhas th enec-
essary specialis tknowledge and tools to carry
out th ewor krequired.
Lamps are an important aspect of vehicl esafety.
You mus ttherefor emak esur ethat these func-
tion correctl yat all times .Hav eth eheadlamp
setting checke dregularly.
Replacing bulbs (vehicles with halo-
gen headla mps)
Import ant safety notes
GWARNIN G
Bulbs, lamp sand connectors can get ver yhot
when operating .If you chang e abulb, you
could burn yourself on these components.
There is aris kof injury.
Allow these component sto cool down before
changing abulb.
Do no tuse abulb if it has been dropped or if it s
glas stub ehas been scratched.
The bulb may explod eif:
Ryou touch it
Rit is hot
Ryou dro pit
Ryou scratch it
Use bulbs only in closed lamp sthat hav ebeen
designed for this purpose .Only instal lspar e
bulbs of th esam etyp eand th especifie dvolt-
age.
Marks on th eglas stub ereduce th eservic elife
of th ebulbs .Do no ttouch th eglas stub ewit h
your bare hands. If necessary, clean th eglas s
tub ewhen cold wit halcohol or spirit and rub it
off wit h alint-free cloth .
Protect bulbs from moisture during operation .
Do no tallow bulbs to come int ocontact wit h
liquids.
Replac eonly th ebulbs listed (
Ypage 120).
Hav eth ebulbs that you canno treplace yourself
replace dat aqualified specialist workshop .
If you require assistanc ereplacing bulbs ,con-
sult aqualified specialist workshop .
If th ene wbulb still does no tligh tup, consult a
qualified specialist workshop .
Headlamps and lights are an important aspect of
vehicl esafety. You mus tthere for
ema
k esur e
that these function correctl yat all times .Hav e
th eheadlamp setting checke dregularly.
Overview ofbulb replacement - bulb
types
You can replace th efollowin gbulbs .The bulb
typ ecan be foun din th elegend .
120Replacing bulbs (vehicles with halogen headlamps)
Lights and windshield wipers
Page 137 of 398
Problems with the rear window defroster
ProblemPossible causes/consequences andMSolutions
The rear window
defroster has deactiva-
ted prematurely or can-
not be activated.The battery has not been sufficiently charged.
XSwitch off any consumers that are not required, e.g. reading lamps,
interior lighting or the seat heating.
When the battery is sufficiently charged, the rear window defroster
can be activated again.
Switching air-recirculation mode
on/off
General notes
You can deactivate the flow of fresh air if
unpleasant odors are entering the vehicle from
outside. The air already inside the vehicle will
then be recirculated.
If you switch on air-recirculation mode, the win-
dows can fog up more quickly, in particular at
low temperatures. Only use air-recirculation
mode briefly to prevent the windows from fog-
ging up.
Activating/deactivating
XTurn the SmartKey to position 2in the igni-
tion lock (Ypage 140).
XTo activate: press thedbutton.
The indicator lamp in the dbutton lights
up.
iIn the event of high pollution levels (3-zone
automatic climate control only) or at high out-
side temperatures, air-recirculation mode is
automatically activated. When air-recircula-
tion mode is activated automatically, the indi-
cator lamp in the dbutton is not lit.
Outside air is added after about 30 minutes.
XTo deactivate: press thedbutton.
The indicator lamp in the dbutton goes
out.
iAir-recirculation mode deactivates auto-
matically:
Rafter approximately five minutes at outside
temperatures below approximately 41 ‡
(5 †)
Rafter approximately five minutes if cooling
with air dehumidification is deactivated
Rafter approximately 30 minutes at outside
temperatures above approximately 41 ‡ (5 †) if the "Cooling with air dehumidifi-
cation" function is activated
Switching the residual heat on or off
General notes
The residual heat function is only available on
vehicles for Canada.
It is possible to make use of the residual heat of
the engine to continue heating the stationary
vehicle for up to 30 minutes after the engine has
been switched off. The heating time depends on
the set interior temperature.
Activating/deactivating
XTo activate: press theÌorÁ button.
The indicator lamp in the ÌorÁ button
lights up.
iThe blower will run at a low speed regardless
of the airflow setting.
iIf you activate the residual heat function at
high temperatures, only the ventilation will be
activated. The blower runs at medium speed.
XTo deactivate: press theÌorÁ but-
ton.
The indicator lamp in the ÌorÁ button
goes out.
Residual heat is deactivated automatically:
Rafter approximately 30 minutes
Rwhen the ignition is switched on
Rif the battery voltage drops
Ionization
Ionization is used to purify the air in the vehicle
interior and attain an improved interior climate.
Operating the climate control systems135
Climate control
Page 144 of 398
ignite if in contact with the exhaust system or
parts of the engine that heat up. There is a risk
of fire.
Carry out regular checks to make sure that
there are no flammable foreign materials in
the engine compartment or in the exhaust
system.
General notes
Vehicles with a gasoline engine:the catalytic
converter is preheated for up to 30 seconds
after a cold start. The sound of the engine may
change during this time.
Automatic transmission
XShift the transmission to position j
(Ypage 148).
The transmission position indicator on the
multifunction display shows j
(
Ypage 149).
iYou can start the engine in transmission
position jand i.
Starting procedure with the SmartKey
XTo start a diesel engine: turn the SmartKey
to position 2in the ignition lock
(
Ypage 140).
The % preglow indicator lamp in the instru-
ment cluster lights up.
XTurn the SmartKey to position 3in the igni-
tion lock (Ypage 140) and release it as soon
as the engine is running.
iVehicles with a diesel engine: you can
start the engine without preglow if the engine
is warm.
Using KEYLESS-GO to start the engine
The Start/Stop button can be used to start the
vehicle without inserting the SmartKey into the
ignition lock. The Start/Stop button must be
inserted in the ignition lock and the SmartKey
must be in the vehicle. This mode for starting the
engine operates independently of the ECO
start/stop automatic engine start function.
XDepress the brake pedal and keep it
depressed.
XPress the Start/Stop button once
(Ypage 140).
Vehicles with a gasoline engine: the engine
starts.
Vehicles with a diesel engine: preglow is
activated and the engine starts.
Starting procedure via smartphone
Observe the important safety notes on starting
the engine (Ypage 141).
You can also start your engine via your smart-
phone from outside the vehicle. In this case, the
previously selected climate control setting is
activated. In this way you can cool or heat the
interior of the vehicle before starting the jour-
ney.
Only start the engine via your smartphone if it is
safe to start and run the engine where your vehi-
cle is parked.
Observe the legal stipulations in the area where your vehicle is parked. Engine start via smart-
phone may be limited to certain countries or
regions.
You can execute a maximum of two consecutive
starting attempts via your smartphone. If you
insert the SmartKey into the ignition lock, you
can carry out two more starting attempts.
Once you have started the engine, you can
switch the engine off via your smartphone at any
time.
You can only start the engine via your smart-
phone if:
Rthe SmartKey is in the ignition lock
Rpark position jis selected
Rthe accelerator pedal is not depressed
Rthe anti-theft alarm system is not activated
Rthe panic alarm is not activated
Rthe hazard warning lamps are switched off
Rthe hood is closed
Rthe doors are closed and locked
Rthe windows and sliding sunroof are closed
Also make sure that:
Rthe fuel tank is sufficiently filled
Rthe starter battery is sufficiently charged
142Driving
Driving and parking
Page 147 of 398
Automa tic engine start
The engin estart sautomatically if:
Ryou switch off th eECO start/sto pfunction by
pressing th eECO butto n
Rin transmission position Dor Nthebrak e
pedal is release dand th eHOLD function is no t
active
Ryou depress th eaccelerato rpedal
Ryou engage revers egear R
Ryou mov eth etransmission out of position P
Ryou switch to theSport Plu sor Sport drive
program (Mercedes-AM Gvehicles)
Ryou activat emanual gearshifting (Mercedes-
AM Gvehicles)
Ryou switch to th eOffroa ddrive program
(vehicles without Off-Road Engineering pack- age)
Ryou switch to th eOffroa dor Offroa dPlu s
drive program (vehicles wit hOff-Road Engi-
neering package)
Ryou unfasten your seat belt or open th edriv-
er' sdoor
Rth evehicl estart sto rol l
Rthebrak esystem require sthis
Rth etemperature in th evehicl einterior devi-
ate sfrom th eset range
Rth esystem detects moisture on th ewind-
shield when th eair-conditioning system is
switched on
Rth ebattery's condition of charge is to olow
Shifting th etransmission to position Pdoes no t
start th eengine.
Deactivating oractivating the ECO
start/stop function
All vehicles (excep tMercedes-AM G vehi-
cles)
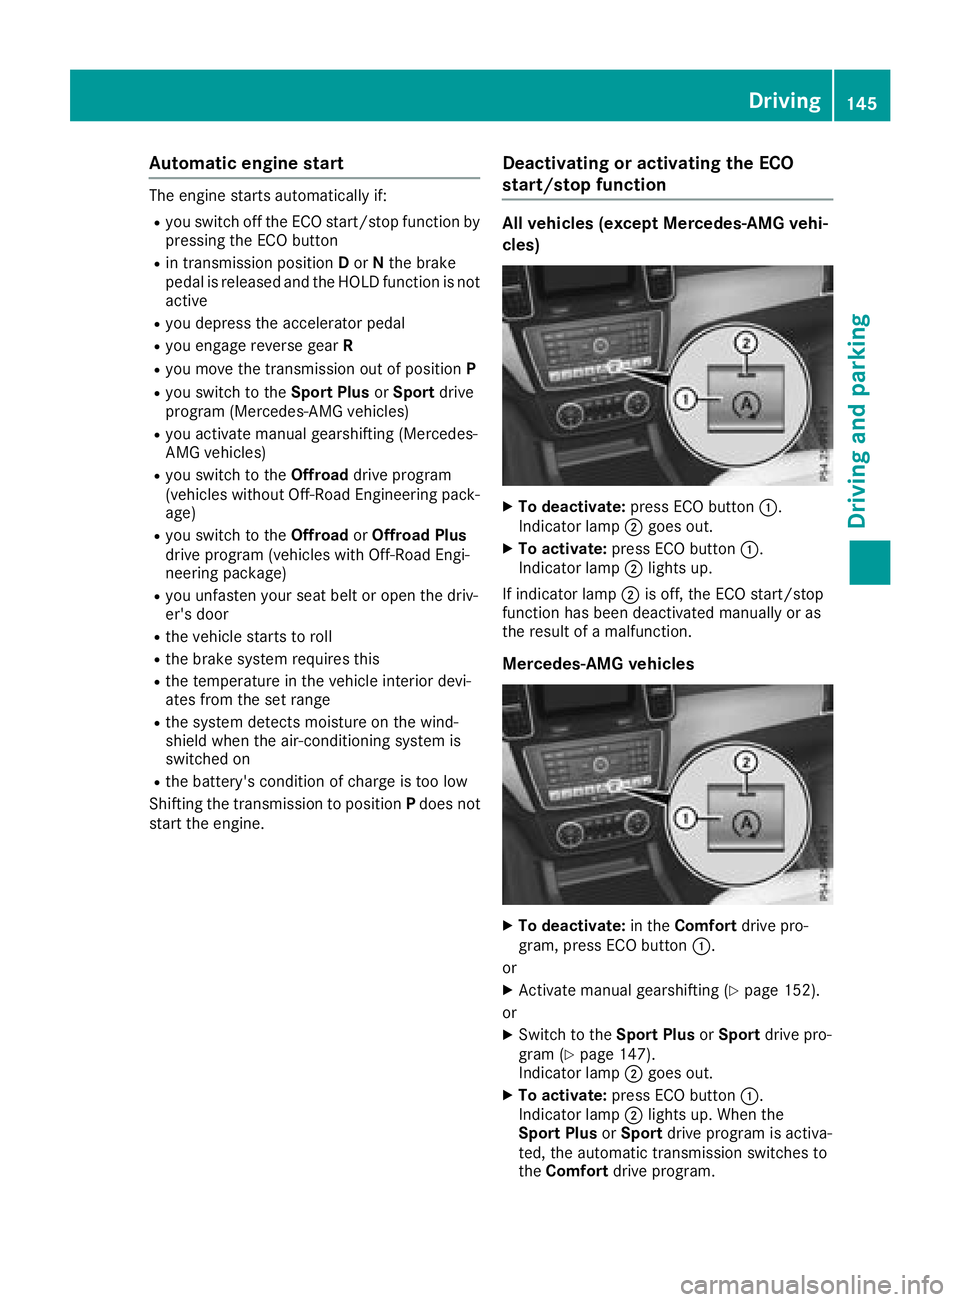
XTo deactivate: press ECO butto n:.
Indicato rlamp ;goe sout .
XTo activate: press ECO butto n:.
Indicato rlamp ;lights up.
If indicator lamp ;is off ,th eECO start/sto p
function has been deactivated manually or as
th eresult of amalfunction .
Mercedes-AM G vehicles
XTo deactivate: in theComfor tdrive pro -
gram ,press ECO butto n:.
or
XActivat emanual gearshifting (Ypage 152).
or
XSwitc hto th eSport Plu sor Sport drive pro -
gram (Ypage 147).
Indicato rlamp ;goes out .
XTo activate: press ECO butto n:.
Indicato rlamp ;lights up. When th e
Sport Plu sor Sport drive program is activa-
ted, th eautomatic transmission switches to
th eComfor tdrive program .
Driving145
Driving and parking
Z
Page 230 of 398
Most U.S. states and all Canadian provinces
require by law:
RSafety chains between the towing vehicle and
the trailer. The chains should be cross-wound
under the trailer drawbar. They must be fas-
tened to the vehicle's trailer coupling, not to
the bumper or the axle.
Leave enough play in the chains to make tight
cornering possible.
RA separate brake system for certain types of
trailer.
RSafety switch for braked trailers. Check the
specific legal requirements applicable to your
state.
If the trailer becomes detached from the tow-
ing vehicle, the safety feature triggers the
trailer brakes.
Towing a trailer
There are numerous legal requirements con-
cerning the towing of a trailer, e.g. speed restric-
tions. Make sure that your car/trailer combina-tion complies with the local regulations:
Rin your place of residence
Rin the location to which you are driving
The police and local authorities can provide reli-
able information.
Observe the following when towing a trailer:
RTo gain driving experience and to become
accustomed to the new handling characteris-
tics, you should practice the following in a
traffic-free location:
-cornering
-stopping
-backing up
RBefore driving, check:
-trailer tow hitch
-safety switch for braked trailers
-safety chains
-electrical connections
-lights
-wheels
RAdjust the exterior mirrors to provide an
unobstructed view of the rear section of the
trailer.
RIf the trailer has electronically controlled
brakes, pull away carefully. Brake manually using the brake controller and check whether
the brakes function correctly.
RSecure any objects on the trailer to prevent
the cargo from slipping when the vehicle is in
motion.
RWhen you couple up a trailer, check at regular
intervals that the load is firmly secured. If the
trailer is equipped with trailer lights and
brakes, check the trailer to ensure that these
are working.
RBear in mind that the handling will be less
stable when towing a trailer than when driving
without one. Avoid sudden steering move-
ments.
RThe vehicle/trailer combination is heavier,
accelerates more slowly, has a decreased
gradient climbing capability and a longer
braking distance.
It is more susceptible to side winds and
requires more careful steering.
RIf possible, do not brake suddenly, but instead
depress the brake pedal moderately at first so
that the trailer can activate its brakes. Then
increase the pressure on the brake pedal.
RIf the automatic transmission repeatedly
shifts between gears on uphill or downhill gra-
dients, shift to a lower gear using the left-hand
steering wheel paddle shifter.
A lower gear and lower speed reduce the risk
of engine failure.
RWhen driving downhill, shift to a lower gear to
utilize the engine's braking effect.
Avoid continuous brake application as this
may overheat the vehicle brakes and, if instal-
led, the trailer brakes.
RIf the coolant temperature increases dramat-
ically while the air-condit ioning system is
switched on, switch off the air-conditioning
system.
Coolant heat can also be dissipated by open-
ing the windows and switching the ventilation blower and the interior temperature to the
highest level.
RWhen overtaking, pay particular attention to
the extended length of your vehicle/trailer
combination.
Due to the length of the vehicle/trailer com-
bination, you require additional road space in
relation to the vehicle you are overtaking
before you can change back to the original
lane.
228Towing a trailer
Driving and parking
Page 326 of 398
Clearing the memory
Make sure that you clear the memory of the
integrated garage door opener before selling the
vehicle.
XTurn the SmartKey to position2in the igni-
tion lock (Ypage 140).
XPress and hold buttons ;and ?.
Indicator lamp :initially lights up yellow and
then green.
XRelease buttons ;and ?.
The memory of the integrated garage door
opener in the rear-view mirror is cleared.
Floormats
GWARNING
Objects in the driver's footwell can restrict the pedal travel or obstruct a depressed pedal.
The operating and road safety of the vehicle is
jeopardized. There is a risk of an accident.
Make sure that all objects in the vehicle are
stowed correctly, and that they cannot enter
the driver's footwell. Install the floormats
securely and as specified in order to ensure
sufficient clearance for the pedals. Do not use
loose floormats and do not place floormats on
top of one another.
XDriver's seat/front-passenger seat: slide
the respective seat back.
XRear seats: slide the corresponding front
seat forwards.
XTo install: place the floormat in the footwell.
XPress studs :onto retainers ;.
XTo remove:pull the floormat from retain-
ers ;.
XRemove the floormat.
Infrared reflective windshield
The infrared reflecting glass prevents the vehi-
cle interior from becoming too hot. It also blocks
radio waves up into the gigahertz range.
To enable operation of radio-controlled equip-
ment, e.g. toll recording systems, areas on the
windshield are permeable to radio waves :. In
these areas, you can install radio-controlled sys-
tems.
These areas can best be seen from outside the
vehicle by observing the light reflected off the
windshield.
324Features
Stowage and features