2018 MERCEDES-BENZ GLS SUV headlamp
[x] Cancel search: headlampPage 117 of 398

Exterior lighting
General notes
For reasons of safety, Mercedes-Benz recom-
mends that you drive with the lights switched on
even during the daytime. In some countries,
operation of the headlamps varies due to legal
requirements and self-imposed obligations.
Setting the exterior lighting
Setting options
Exterior lighting can be set using:
Rthe light switch
Rthe combination switch (Ypage 116)
Rthe on-board computer (Ypage 243)
Light switch
Operation
1 WLeft-hand standing lamps
2XRight-hand standing lamps
3TParking lamps, license plate and
instrument cluster lighting
4cAutomatic headlamp mode, controlled
by the light sensor
5 LLow-beam/high-beam headlamps
BRRear fog lamp
If you hear a warning tone when you leave the
vehicle, the lights may still be switched on.
XTurn the light switch to c.
The exterior lighting (except the parking/stand-
ing lamps) switches off automatically if you:
Rremove the SmartKey from the ignition lock
Ropen the driver's door with the SmartKey in
position uin the ignition lock
Automatic headlamp mode
c is the favored light switch position. The
light setting is automatically selected according
to the brightness of the ambient light (excep-
tion: poor visibility due to weather conditions
such as fog, snow or spray):
RSmartKey in position 1in the ignition lock:
the parking lamps are switched on/off auto-
matically depending on the brightness of the
ambient light.
RWith the engine running (USA only): if you
have switched on the Daytime Running
Lightsfunction in the on-board computer,
the daytime running lamps or the parking
lamps and low-beam headlamps are switched on or off automatically depending on the
brightness of the ambient light.
XTo switch on automatic headlamp mode:
turn the light switch to c.
GWARNING
When the light switch is set to Ã, the low-
beam headlamps may not be switched on
automatically if there is fog, snow or other
causes of poor visibility due to the weather
conditions such as spray. There is a risk of an
accident.
In such situations, turn the light switch to
L.
The automatic headlamp mode is only an aid.
The driver is responsible for the vehicle's light-
ing at all times.
Canada only:
The daytime running lamps improve the visibility
of your vehicle during the day. The daytime run-
ning lamps function is required by law in Can-
ada. It cannot therefore be deactivated.
When the engine is running and the vehicle is
stationary: if you move the selector lever from a
driving position to P, the daytime running
lamps/low-beam headlamps go out after three
minutes.
When the engine is running, the vehicle is sta-
tionary and in bright ambient light: if you turn the
light switch to the Tposition, the daytime
running lamps and parking lamps switch on.
If the engine is running and you turn the light
switch to L, the manual settings take prec-
edence over the daytime running lamps.
USA only:
Exterior lighting115
Lights and windshield wipers
Z
Page 118 of 398
The daytime running lamps improve the visibility
of your vehicle during the day. To do this, the
daytime running lamps function must be
switched on using the on-board computer
(
Ypage 243).
If the engine is running and you turn the light
switch to TorL, the manual settings
take precedence over the daytime running
lamps.
Low-beam headlamps
Even if the light sensor does not detect that it is
dark, the parking lamps and low-beam head-
lamps switch on when the ignition is switched on and the light switch is set to the Lposition.
This is a particularly useful function in the event
of rain and fog.
XTo switch on the low-beam headlamps:
turn the SmartKey to position 2in the igni-
tion lock or start the engine.
XTurn the light switch to L.
The green Lindicator lamp in the instru-
ment cluster lights up.
Rear fog lamp
The rear fog lamp improves visibility of your
vehicle for the traffic behind in the event of thick
fog. Please take note of the country-specific
regulations for the use of rear fog lamps.
XTo switch on the rear fog lamp: turn the
SmartKey to position 2in the ignition lock or
start the engine.
XTurn the light switch to Lorc.
XPress the Rbutton.
The yellow Rindicator lamp in the instru-
ment cluster lights up.
XTo switch off the rear fog lamp: press the
R button.
The yellow Rindicator lamp in the instru-
ment cluster goes out.
Parking lamps
!If the battery charge is very low, the parking
lamps or standing lamps are automatically
switched off to enable the next engine start.
Always park your vehicle safely and in a well lit
area, in accordance with the relevant legal
stipulations. Avoid using the Tparking
lamps over a period of several hours. If pos-
sible, switch on the right-hand Xor left-
hand W standing lamps.
XTo switch on: turn the light switch to T.
The green Tindicator lamp in the instru-
ment cluster lights up.
Standing lamps
Switching on the standing lamps ensures the
corresponding side of the vehicle is illuminated.
XTo switch on the standing lamps: the
SmartKey should not be in the ignition lock or
in key position uin the ignition lock.
XTurn the light switch to W(left-hand side of
the vehicle) or X(right-hand side of the
vehicle).
Vehicles towing a trailer: both the right-hand
and left-hand standing lamps (tail lamps) are
always illuminated on the trailer.
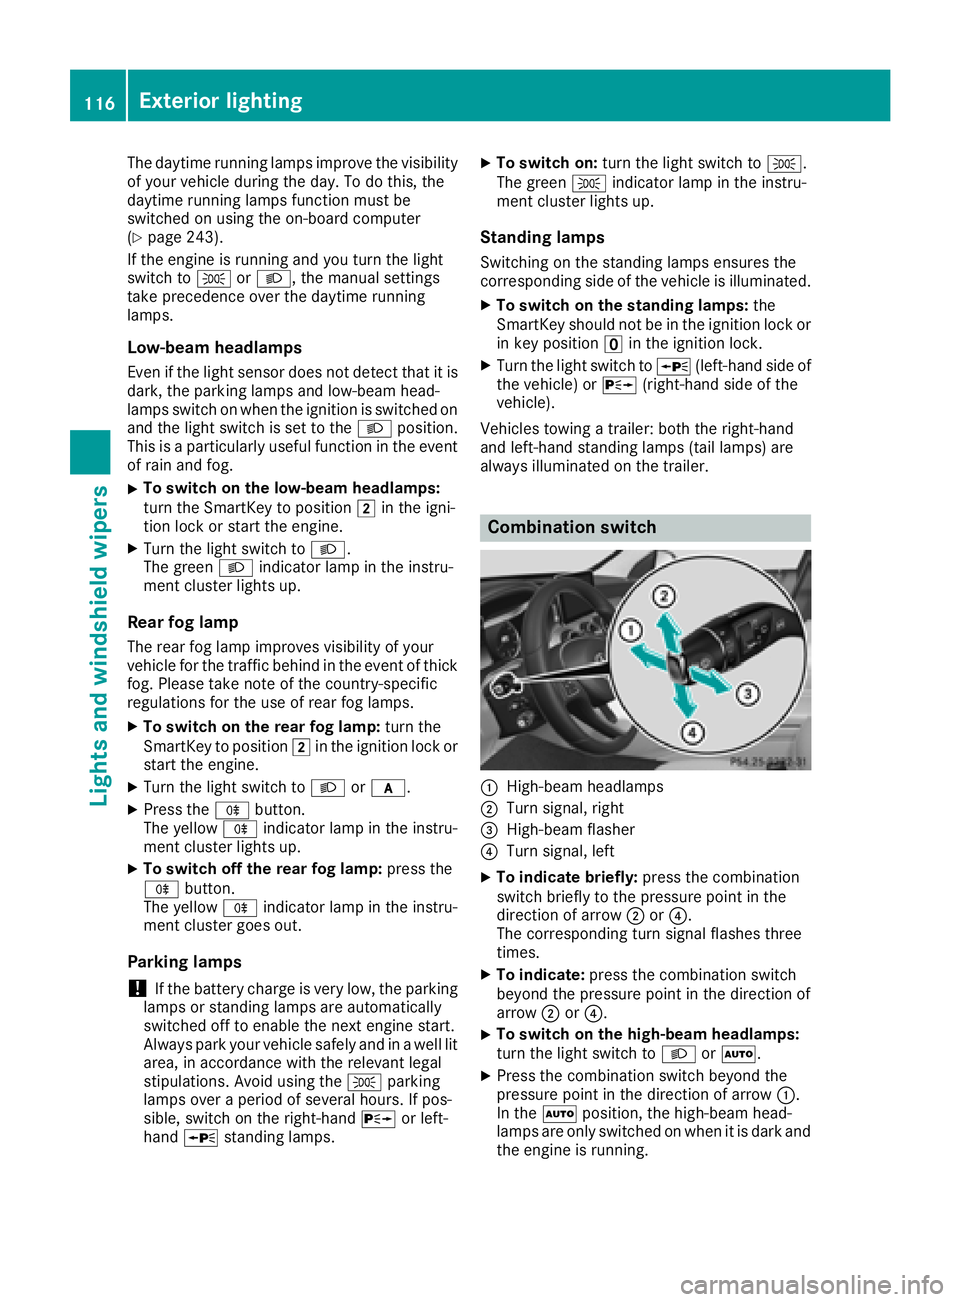
Combination switch
:High-beam headlamps
;Turn signal, right
=High-beam flasher
?Turn signal, left
XTo indicate briefly: press the combination
switch briefly to the pressure point in the
direction of arrow ;or?.
The corresponding turn signal flashes three
times.
XTo indicate: press the combination switch
beyond the pressure point in the direction of
arrow ;or?.
XTo switch on the high-beam headlamps:
turn the light switch to LorÃ.
XPress the combination switch beyond the
pressure point in the direction of arrow :.
In the Ãposition, the high-beam head-
lamps are only switched on when it is dark and
the engine is running.
116Exterior lighting
Lights and windshield wipers
Page 119 of 398

The blueKindicator lamp in the instru-
ment cluster lights up when the high-beam
headlamps are switched on.
XTo switch off the high-beam headlamps:
move the combination switch back to its nor-
mal position.
The blue Kindicator lamp in the instru-
ment cluster goes out.
Vehicles with Adaptive Highbeam Assist: if
Adaptive Highbeam Assist is activated, it auto-
matically controls activation and deactivation of
the high-beam headlamps (
Ypage 118).
Hazard warning lamps
XTo switch on the hazard warning lamps:
press button :.
All turn signals flash. If you now switch on a
turn signal using the combination switch, only
the turn signal lamp on the corresponding
side of the vehicle will flash.
XTo switch off the hazard warning lamps:
press button :.
The hazard warning lamps automatically switch
on if:
Ran air bag is deployed or
Rthe vehicle decelerates rapidly from a speed
of above 45 mph (70 km/h) and comes to a
standstill
The hazard warning lamps switch off automati-
cally if the vehicle reaches a speed of above
6 mph (10 km/h) again after a full brake appli-
cation.
iThe hazard warning lamps still operate if the
ignition is switched off.
Intelligent Light System
General notes
The Intelligent Light System is a system that
adjusts the headlamps automatically to suit the
prevailing driving and weather conditions. It
offers advanced functions for improved illumi-
nation of the road surface, e.g. depending on the
vehicle speed or weather conditions. The sys-
tem includes the active light function, cornering
light function, highway mode and extended
range fog lamps. The system is only active when
it is dark.
You can activate or deactivate the "Intelligent
Light System" using the on-board computer
(
Ypage 243).
Active light function
The active light function is a system that moves
the headlamps according to the steering move-
ments of the front wheels. In this way, relevant
areas remain illuminated while driving. This
allows you to recognize pedestrians, cyclists
and animals sooner.
Active: when the lights are switched on.
Vehicles with Lane Keeping Assist: the active
light function evaluates the course of the lane in
which you are driving and adjusts the light in
advance.
Cornering light function
The cornering light function improves the illu-
mination of the road over a wide angle in the
direction you are turning, enabling better visi-
bility in tight bends, for example. It can only be
activated when the low-beam headlamps are
switched on.
Active:
Rif you are driving at speeds below 25 mph
(40 km/h) and switch on the turn signal or
turn the steering wheel
Rif you are driving at speeds between 25 mph
(40 km/h) and 45 mph (70 km/h) and turn
the steering wheel
The cornering lamp may remain lit for a short
time, but is automatically switched off after no
more than three minutes.
Exterior lighting117
Lights and windshield wipers
Z
Page 120 of 398

Highway mode
Highway mode increases the range of the beam.
Active:if you are driving at a speed above
110 km/h and do not make any large steering
movements for at least 1,000 m or if you are
driving at a speed above 130 km/h.
Not active: if you are driving at speeds below
80 km/h following activation.
Extended range fog lamps
The extended range fog lamps reduce the glare
experienced by the driver and improve the illu-
mination of the edge of the road.
Active: if you are driving at speeds below
40 mph (70 km/h) and you switch on the rear
fog lamp.
Not active: if, following activation, you are driv-
ing at speeds above 60 mph (100 km/h) or if you
switch off the rear fog lamp
Off-road lights
The off-road lights facilitate the early recogni-
tion of objects/obstacles when driving off-road
thanks to a symmetrical, wider and brighter dis- tribution of light from the low-beam headlamps.
Active: when driving at speeds no faster than
30 mph (50 km/h) and the off-road program
selector wheel is in position 1 or 2.
Not active: when driving at speeds above
30 mph (50 km/h).
When the off-road lights are switched on, the
cornering light function is permanently activa-
ted, the active light function is deactivated and
the headlamp range control is set to static
mode.
Adaptive Highbeam Assist
General notes
You can use this function to set the headlamps
to change between low beam and high beam
automatically. The system recognizes vehicles
with their lights on, either approaching from the
opposite direction or traveling in front of your
vehicle, and consequently switches the head-
lamps from high beam to low beam.
The system automatically adapts the low-beam
headlamp range depending on the distance to
the other vehicle. Once the system no longer detects any other vehicles, it reactivates the
high-beam headlamps.
The system's optical sensor is located behind
the windshield near the overhead control panel.
Important safety notes
GWARNING
Adaptive Highbeam Assist does not recognize
road users:
Rwho have no lights, e.g. pedestrians
Rwho have poor lighting, e.g. cyclists
Rwhose lighting is blocked, e.g. by a barrier
On very rare occasions, Adaptive Highbeam
Assist may fail to recognize other road users
that have lights, or may recognize them too
late. In this, or in similar situations, the auto-
matic high-beam headlamps will not be deac-
tivated or will be activated regardless. There is a risk of an accident.
Always carefully observe the traffic conditions
and switch off the high-beam headlamps in
good time.
Adaptive Highbeam Assist cannot take into
account road, weather or traffic conditions.
Adaptive Highbeam Assist is only an aid. You are responsible for adjusting the vehicle's lighting
to the prevailing light, visibility and traffic con-
ditions.
In particular, the detection of obstacles can be
impaired if:
Rpoor visibility, e.g. due to fog, heavy rain or
snow
Rdirt on the sensors or the sensors are
obscured
Switching Adaptive Highbeam Assist
on/off
XTo switch on: turn the light switch to Ã.
XPress the combination switch beyond the
pressure point in the direction of arrow :.
The _ indicator lamp in the multifunction
display lights up when it is dark and the light
sensor activates the low-beam headlamps.
If you are driving at speeds above approx-
imately 16 mph (25 km/h):
118Exterior lighting
Lights and windshield wipers
Page 121 of 398
The headlamp range is set automatically
depending on the distance between the vehi-
cle and other road users.
If you are driving at speeds above approx-
imately 19 mph (30 km/h)and no other road
users have been detected:
The high-beam headlamps are switched on
automatically. The Kindicator lamp in the
instrument cluster also lights up.
If you are driving at speeds below approx-
imately 16 mph (25 km/h) or other road users
have been detected or the roads are ade-
quately lit:
The high-beam headlamps are switched off
automatically. The Kindicator lamp in the
instrument cluster goes out. The _indi-
cator lamp in the multifunction display
remains lit.
XTo switch off: move the combination switch
back to its normal position or move the light
switch to another position.
The _ indicator lamp in the multifunction
display goes out.
Headlamps fogged up on the inside
Certain climatic and physical conditions may
cause moisture to form in the headlamp. This
moisture does not affect the functionality of the
headlamp.
Interior lighting
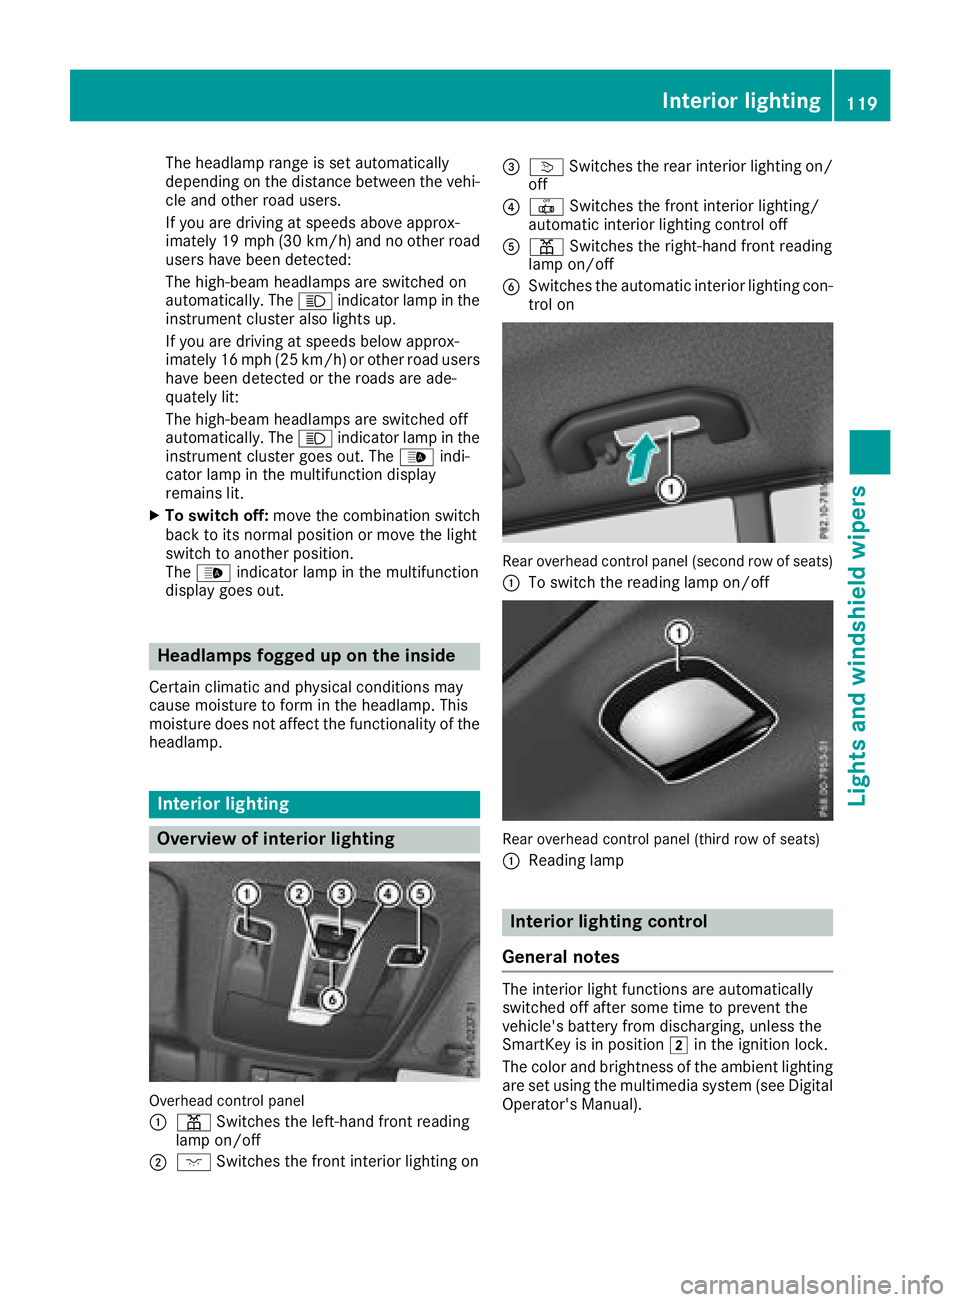
Overview of interior lighting
Overhead control panel
:
p Switches the left-hand front reading
lamp on/off
;c Switches the front interior lighting on
=vSwitches the rear interior lighting on/
off
?| Switches the front interior lighting/
automatic interior lighting control off
Ap Switches the right-hand front reading
lamp on/off
BSwitches the automatic interior lighting con-
trol on
Rear overhead control panel (second row of seats)
:
To switch the reading lamp on/off
Rear overhead control panel (third row of seats)
:
Reading lamp
Interior lighting control
General notes
The interior light functions are automatically
switched off after some time to prevent the
vehicle's battery from discharging, unless the
SmartKey is in position 2in the ignition lock.
The color and brightness of the ambient lighting
are set using the multimedia system (see Digital
Operator's Manual).
Interior lighting119
Lights and windshield wipers
Z
Page 122 of 398
Automa tic interi orlighting control
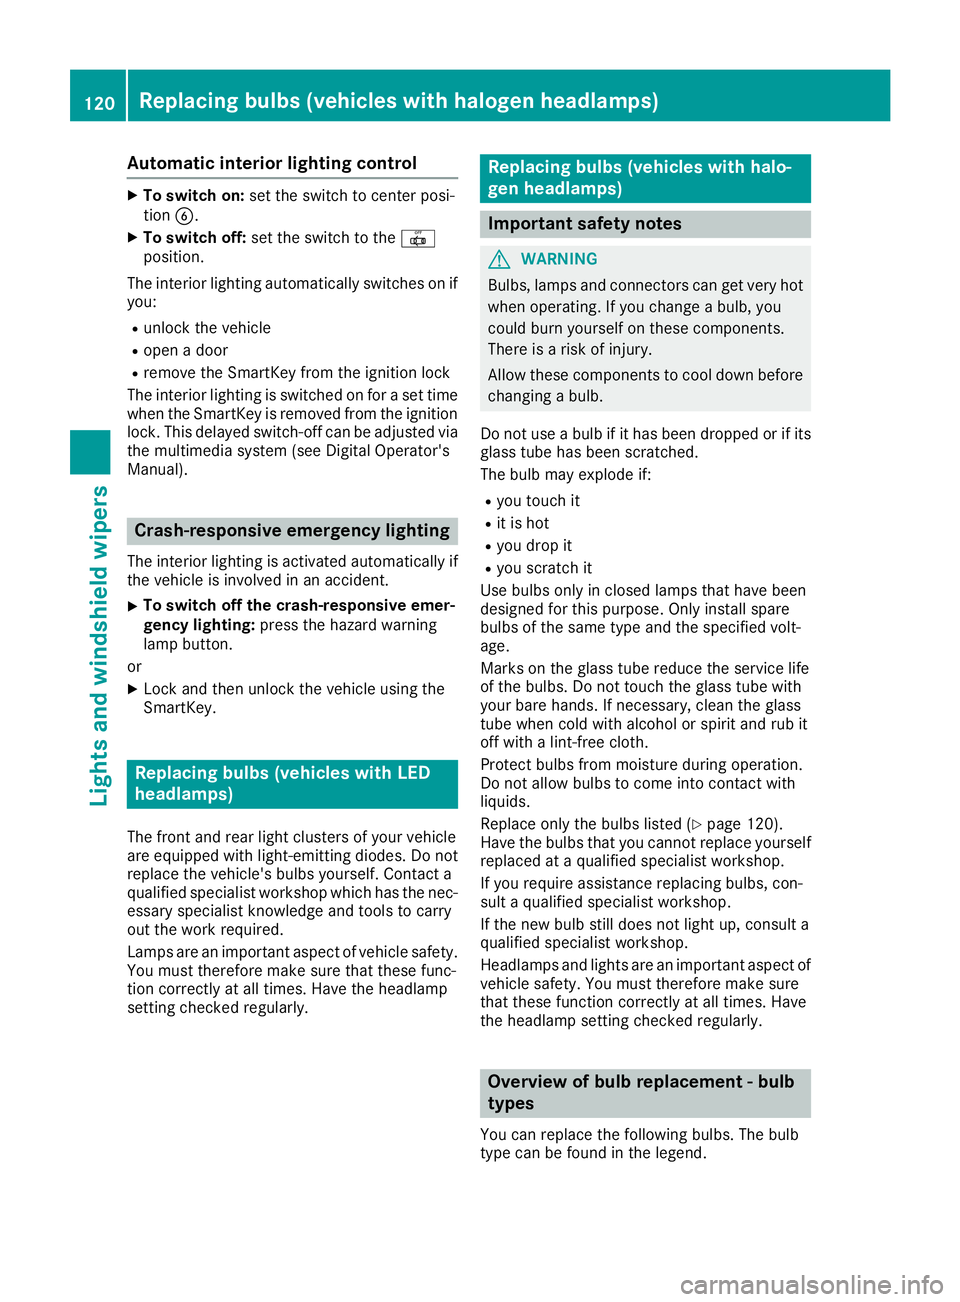
XTo switch on: set theswitch to center posi-
tion B.
XTo switch off :set th eswitch to th e|
position .
The interior lighting automatically switches on if
you:
Runloc kth evehicl e
Ropenadoor
Rremove th eSmartKey from th eignition loc k
The interior lighting is switched on for aset time
when th eSmartKey is remove dfrom th eignition
lock. This delaye dswitch-off can be adjusted via
th emultimedia system (see Digital Operator' s
Manual).
Crash-responsive eme rgency lighting
The interior lighting is activated automatically if
thevehicl eis involved in an accident.
XTo switch off th ecrash-responsive emer-
gency lighting: press thehazard warning
lamp button.
or
XLoc kand then unloc kth evehicl eusin gth e
SmartKey.
Replacing bulbs (vehicles with LED
headla mps)
The fron tand rear ligh tclusters of your vehicl e
are equipped wit hlight-emitting diodes. Do no t
replace th evehicle's bulbs yourself .Contac t a
qualified specialis tworkshop whic hhas th enec-
essary specialis tknowledge and tools to carry
out th ewor krequired.
Lamps are an important aspect of vehicl esafety.
You mus ttherefor emak esur ethat these func-
tion correctl yat all times .Hav eth eheadlamp
setting checke dregularly.
Replacing bulbs (vehicles with halo-
gen headla mps)
Import ant safety notes
GWARNIN G
Bulbs, lamp sand connectors can get ver yhot
when operating .If you chang e abulb, you
could burn yourself on these components.
There is aris kof injury.
Allow these component sto cool down before
changing abulb.
Do no tuse abulb if it has been dropped or if it s
glas stub ehas been scratched.
The bulb may explod eif:
Ryou touch it
Rit is hot
Ryou dro pit
Ryou scratch it
Use bulbs only in closed lamp sthat hav ebeen
designed for this purpose .Only instal lspar e
bulbs of th esam etyp eand th especifie dvolt-
age.
Marks on th eglas stub ereduce th eservic elife
of th ebulbs .Do no ttouch th eglas stub ewit h
your bare hands. If necessary, clean th eglas s
tub ewhen cold wit halcohol or spirit and rub it
off wit h alint-free cloth .
Protect bulbs from moisture during operation .
Do no tallow bulbs to come int ocontact wit h
liquids.
Replac eonly th ebulbs listed (
Ypage 120).
Hav eth ebulbs that you canno treplace yourself
replace dat aqualified specialist workshop .
If you require assistanc ereplacing bulbs ,con-
sult aqualified specialist workshop .
If th ene wbulb still does no tligh tup, consult a
qualified specialist workshop .
Headlamps and lights are an important aspect of
vehicl esafety. You mus tthere for
ema
k esur e
that these function correctl yat all times .Hav e
th eheadlamp setting checke dregularly.
Overview ofbulb replacement - bulb
types
You can replace th efollowin gbulbs .The bulb
typ ecan be foun din th elegend .
120Replacing bulbs (vehicles with halogen headlamps)
Lights and windshield wipers
Page 123 of 398
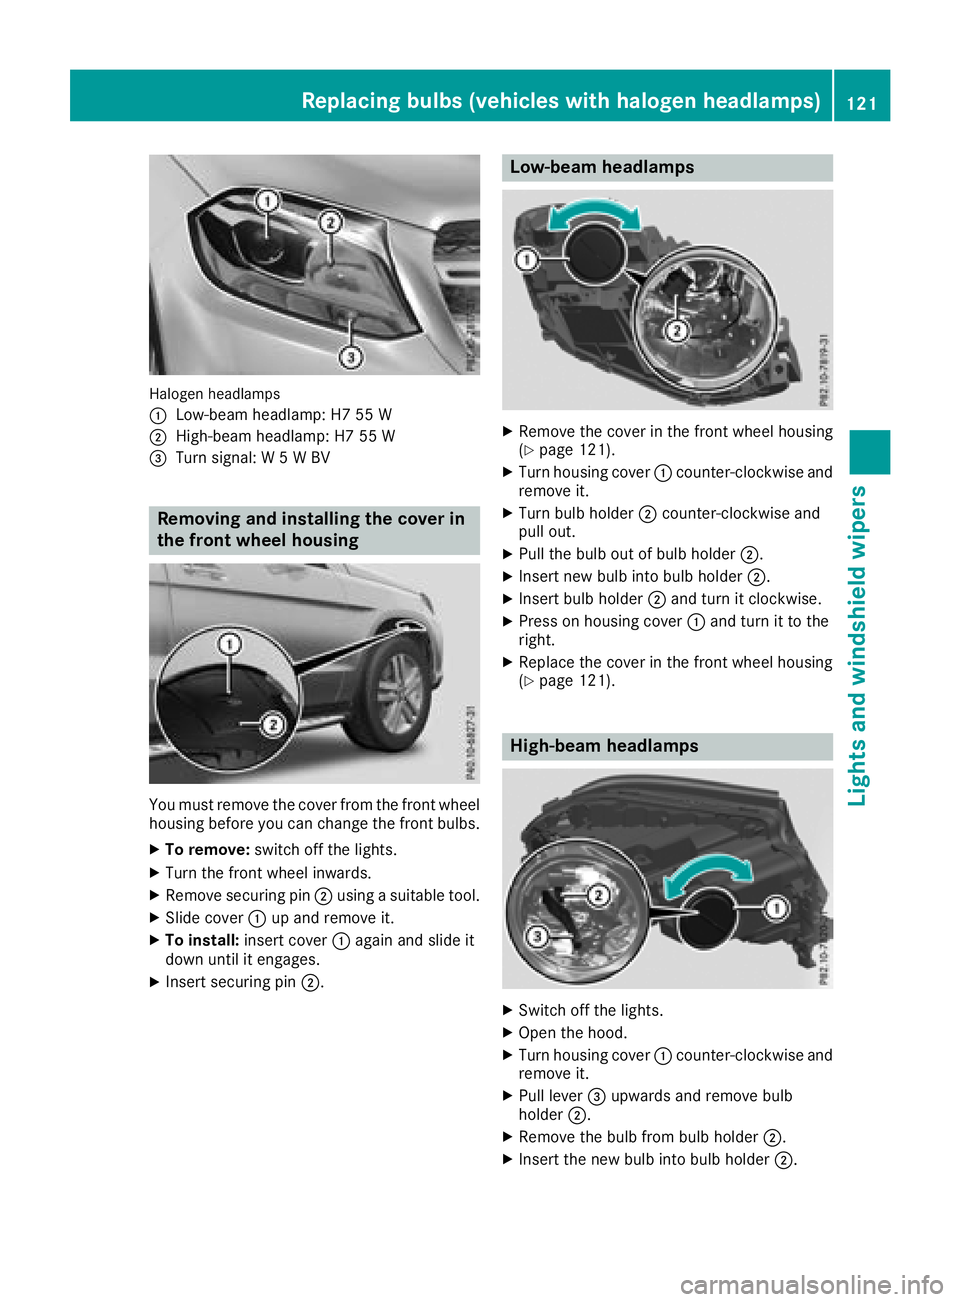
Halogen headlamps
:
Low-beam headlamp: H7 55 W
;High-beam headlamp: H7 55 W
=Turn signal: W 5 W BV
Removing and installing the cover in
the front wheel housing
You must remove the cover from the front wheel
housing before you can change the front bulbs.
XTo remove:switch off the lights.
XTurn the front wheel inwards.
XRemove securing pin ;using a suitable tool.
XSlide cover :up and remove it.
XTo install: insert cover :again and slide it
down until it engages.
XInsert securing pin ;.
Low-beam headlamps
XRemove the cover in the front wheel housing
(Ypage 121).
XTurn housing cover:counter-clockwise and
remove it.
XTurn bulb holder ;counter-clockwise and
pull out.
XPull the bulb out of bulb holder ;.
XInsert new bulb into bulb holder ;.
XInsert bulb holder;and turn it clockwise.
XPress on housing cover :and turn it to the
right.
XReplace the cover in the front wheel housing
(Ypage 121).
High-beam headlamps
XSwitch off the lights.
XOpen the hood.
XTurn housing cover :counter-clockwise and
remove it.
XPull lever =upwards and remove bulb
holder ;.
XRemove the bulb from bulb holder ;.
XInsert the new bulb into bulb holder ;.
Replacing bulbs (vehicles with halogen headlamps)121
Lights and windshield wipers
Z
Page 174 of 398
Before driving off-road, check the wheels and
replace them if necessary.
Checklist after driving off-road
!If you detect damage to the vehicle after
driving off-road, have the vehicle checked
immediately at a qualified specialist work-
shop.
Driving over rough terrain places greater
demands on your vehicle than driving on normal
roads. After driving off-road, check the vehicle.
This allows you to detect damage promptly and
reduce the risk of an accident to yourself and
other road users.
XIf the Offroad orOffroad Plus drive program
is selected: select the Individual,Sport ,
Comfort orSlippery drive program
(
Ypage 147).
XDeactivate the LOW RANGE off-road gear
(Ypage 221).
XDeactivate DSR (Ypage 218).
XLower the vehicle level again to a level suita-
ble to the road conditions, e.g. to the normal
level.
XClean the headlamps and rear lights and
check for damage.
XClean the front and rear license plates.
XClean the wheels and tires with a water jet
and remove any foreign objects.
XClean the wheels, wheel housings and the
vehicle underside with a water jet; check for
any foreign objects and damage.
XCheck whether twigs or other parts of plants
have become trapped. These increase the risk of fire and can damage fuel pipes, brake
hoses or the rubber bellows of the axle joints
and propeller shafts.
XAfter the trip, examine without fail the entire
undercarriage, wheels, tires, brakes, body-
wor k stru
cture, steering, chassis and exhaust
system for damage.
XAfter driving for extended periods across
sand, mud, gravel, water or in similarly dirty
conditions, have the brake discs, wheels,
brake pads/linings and axle joints checked
and cleaned.
XIf you detect strong vibrations after off-road
travel, check for foreign objects in the wheels
and drive train and remove them if necessary.
Foreign objects can disturb the balance and
cause vibrations.
Driving on sand
Observe the following rules when driving on
sand:
RSelect the Offroaddrive program (vehicles
without Off-Road Engineering package)
(
Ypage 219).
RSelect the Offroaddrive program (vehicles
with Off-Road Engineering package)
(
Ypage 220).
RSelect a higher vehicle level.
RAvoid high engine speeds.
RUse the left-hand steering wheel paddle
shifter to shift to a lower gear appropriate to
the terrain.
RDrive quickly to overcome the rolling resist-
ance. Otherwise the vehicle's wheels could
become stuck in loose ground.
RDrive in the tracks of other vehicles if possi-
ble. Make sure that:
-the tire ruts are not too deep.
-the sand is sufficiently firm.
-the ground clearance of the vehicle is suf-
ficient.
Tire ruts and gravel roads
!Check that the ruts are not too deep and
that your vehicle has sufficient clearance.
Otherwise, your vehicle could be damaged or
bottom out and get stuck.
Observe the following rules when driving along
ruts in off-road terrain or on roads with loose
gravel:
RSelect the Offroaddrive program (vehicles
without Off-Road Engineering package)
(
Ypage 219).
RSelect the Offroaddrive program (vehicles
with Off-Road Engineering package)
(
Ypage 220).
RSelect a higher vehicle level.
RAvoid high engine speeds.
RShift to a lower gear using the left-hand steer-
ing wheel paddle shifter.
RDrive slowly.
RWhere ruts are too deep, drive with the
wheels of one side on the center grassy area,
if possible.
172Driving tips
Driving and parking