2018 MERCEDES-BENZ GLS SUV warning
[x] Cancel search: warningPage 119 of 398

The blueKindicator lamp in the instru-
ment cluster lights up when the high-beam
headlamps are switched on.
XTo switch off the high-beam headlamps:
move the combination switch back to its nor-
mal position.
The blue Kindicator lamp in the instru-
ment cluster goes out.
Vehicles with Adaptive Highbeam Assist: if
Adaptive Highbeam Assist is activated, it auto-
matically controls activation and deactivation of
the high-beam headlamps (
Ypage 118).
Hazard warning lamps
XTo switch on the hazard warning lamps:
press button :.
All turn signals flash. If you now switch on a
turn signal using the combination switch, only
the turn signal lamp on the corresponding
side of the vehicle will flash.
XTo switch off the hazard warning lamps:
press button :.
The hazard warning lamps automatically switch
on if:
Ran air bag is deployed or
Rthe vehicle decelerates rapidly from a speed
of above 45 mph (70 km/h) and comes to a
standstill
The hazard warning lamps switch off automati-
cally if the vehicle reaches a speed of above
6 mph (10 km/h) again after a full brake appli-
cation.
iThe hazard warning lamps still operate if the
ignition is switched off.
Intelligent Light System
General notes
The Intelligent Light System is a system that
adjusts the headlamps automatically to suit the
prevailing driving and weather conditions. It
offers advanced functions for improved illumi-
nation of the road surface, e.g. depending on the
vehicle speed or weather conditions. The sys-
tem includes the active light function, cornering
light function, highway mode and extended
range fog lamps. The system is only active when
it is dark.
You can activate or deactivate the "Intelligent
Light System" using the on-board computer
(
Ypage 243).
Active light function
The active light function is a system that moves
the headlamps according to the steering move-
ments of the front wheels. In this way, relevant
areas remain illuminated while driving. This
allows you to recognize pedestrians, cyclists
and animals sooner.
Active: when the lights are switched on.
Vehicles with Lane Keeping Assist: the active
light function evaluates the course of the lane in
which you are driving and adjusts the light in
advance.
Cornering light function
The cornering light function improves the illu-
mination of the road over a wide angle in the
direction you are turning, enabling better visi-
bility in tight bends, for example. It can only be
activated when the low-beam headlamps are
switched on.
Active:
Rif you are driving at speeds below 25 mph
(40 km/h) and switch on the turn signal or
turn the steering wheel
Rif you are driving at speeds between 25 mph
(40 km/h) and 45 mph (70 km/h) and turn
the steering wheel
The cornering lamp may remain lit for a short
time, but is automatically switched off after no
more than three minutes.
Exterior lighting117
Lights and windshield wipers
Z
Page 120 of 398

Highway mode
Highway mode increases the range of the beam.
Active:if you are driving at a speed above
110 km/h and do not make any large steering
movements for at least 1,000 m or if you are
driving at a speed above 130 km/h.
Not active: if you are driving at speeds below
80 km/h following activation.
Extended range fog lamps
The extended range fog lamps reduce the glare
experienced by the driver and improve the illu-
mination of the edge of the road.
Active: if you are driving at speeds below
40 mph (70 km/h) and you switch on the rear
fog lamp.
Not active: if, following activation, you are driv-
ing at speeds above 60 mph (100 km/h) or if you
switch off the rear fog lamp
Off-road lights
The off-road lights facilitate the early recogni-
tion of objects/obstacles when driving off-road
thanks to a symmetrical, wider and brighter dis- tribution of light from the low-beam headlamps.
Active: when driving at speeds no faster than
30 mph (50 km/h) and the off-road program
selector wheel is in position 1 or 2.
Not active: when driving at speeds above
30 mph (50 km/h).
When the off-road lights are switched on, the
cornering light function is permanently activa-
ted, the active light function is deactivated and
the headlamp range control is set to static
mode.
Adaptive Highbeam Assist
General notes
You can use this function to set the headlamps
to change between low beam and high beam
automatically. The system recognizes vehicles
with their lights on, either approaching from the
opposite direction or traveling in front of your
vehicle, and consequently switches the head-
lamps from high beam to low beam.
The system automatically adapts the low-beam
headlamp range depending on the distance to
the other vehicle. Once the system no longer detects any other vehicles, it reactivates the
high-beam headlamps.
The system's optical sensor is located behind
the windshield near the overhead control panel.
Important safety notes
GWARNING
Adaptive Highbeam Assist does not recognize
road users:
Rwho have no lights, e.g. pedestrians
Rwho have poor lighting, e.g. cyclists
Rwhose lighting is blocked, e.g. by a barrier
On very rare occasions, Adaptive Highbeam
Assist may fail to recognize other road users
that have lights, or may recognize them too
late. In this, or in similar situations, the auto-
matic high-beam headlamps will not be deac-
tivated or will be activated regardless. There is a risk of an accident.
Always carefully observe the traffic conditions
and switch off the high-beam headlamps in
good time.
Adaptive Highbeam Assist cannot take into
account road, weather or traffic conditions.
Adaptive Highbeam Assist is only an aid. You are responsible for adjusting the vehicle's lighting
to the prevailing light, visibility and traffic con-
ditions.
In particular, the detection of obstacles can be
impaired if:
Rpoor visibility, e.g. due to fog, heavy rain or
snow
Rdirt on the sensors or the sensors are
obscured
Switching Adaptive Highbeam Assist
on/off
XTo switch on: turn the light switch to Ã.
XPress the combination switch beyond the
pressure point in the direction of arrow :.
The _ indicator lamp in the multifunction
display lights up when it is dark and the light
sensor activates the low-beam headlamps.
If you are driving at speeds above approx-
imately 16 mph (25 km/h):
118Exterior lighting
Lights and windshield wipers
Page 122 of 398

Automa tic interi orlighting control
XTo switch on: set theswitch to center posi-
tion B.
XTo switch off :set th eswitch to th e|
position .
The interior lighting automatically switches on if
you:
Runloc kth evehicl e
Ropenadoor
Rremove th eSmartKey from th eignition loc k
The interior lighting is switched on for aset time
when th eSmartKey is remove dfrom th eignition
lock. This delaye dswitch-off can be adjusted via
th emultimedia system (see Digital Operator' s
Manual).
Crash-responsive eme rgency lighting
The interior lighting is activated automatically if
thevehicl eis involved in an accident.
XTo switch off th ecrash-responsive emer-
gency lighting: press thehazard warning
lamp button.
or
XLoc kand then unloc kth evehicl eusin gth e
SmartKey.
Replacing bulbs (vehicles with LED
headla mps)
The fron tand rear ligh tclusters of your vehicl e
are equipped wit hlight-emitting diodes. Do no t
replace th evehicle's bulbs yourself .Contac t a
qualified specialis tworkshop whic hhas th enec-
essary specialis tknowledge and tools to carry
out th ewor krequired.
Lamps are an important aspect of vehicl esafety.
You mus ttherefor emak esur ethat these func-
tion correctl yat all times .Hav eth eheadlamp
setting checke dregularly.
Replacing bulbs (vehicles with halo-
gen headla mps)
Import ant safety notes
GWARNIN G
Bulbs, lamp sand connectors can get ver yhot
when operating .If you chang e abulb, you
could burn yourself on these components.
There is aris kof injury.
Allow these component sto cool down before
changing abulb.
Do no tuse abulb if it has been dropped or if it s
glas stub ehas been scratched.
The bulb may explod eif:
Ryou touch it
Rit is hot
Ryou dro pit
Ryou scratch it
Use bulbs only in closed lamp sthat hav ebeen
designed for this purpose .Only instal lspar e
bulbs of th esam etyp eand th especifie dvolt-
age.
Marks on th eglas stub ereduce th eservic elife
of th ebulbs .Do no ttouch th eglas stub ewit h
your bare hands. If necessary, clean th eglas s
tub ewhen cold wit halcohol or spirit and rub it
off wit h alint-free cloth .
Protect bulbs from moisture during operation .
Do no tallow bulbs to come int ocontact wit h
liquids.
Replac eonly th ebulbs listed (
Ypage 120).
Hav eth ebulbs that you canno treplace yourself
replace dat aqualified specialist workshop .
If you require assistanc ereplacing bulbs ,con-
sult aqualified specialist workshop .
If th ene wbulb still does no tligh tup, consult a
qualified specialist workshop .
Headlamps and lights are an important aspect of
vehicl esafety. You mus tthere for
ema
k esur e
that these function correctl yat all times .Hav e
th eheadlamp setting checke dregularly.
Overview ofbulb replacement - bulb
types
You can replace th efollowin gbulbs .The bulb
typ ecan be foun din th elegend .
120Replacing bulbs (vehicles with halogen headlamps)
Lights and windshield wipers
Page 125 of 398

Switching the rear window wiper on/
off
Combination switch
:
èRear window wiper switch
2bWipes with washer fluid
3ISwitches on intermittent wiping
40 Switches off intermittent wiping
5b Wipes with washer fluid
XTurn the SmartKey to position 1or2
(Ypage 140).
XTurn switch :on the combination switch to
the corresponding position.
When the rear window wiper is switched on,
the icon appears in the instrument cluster.
Replacing the wiper blades
Important safety notes
GWARNING
If the windshield wipers begin to move while
you are changing the wiper blades, you could be trapped by the wiper arm. There is a risk of
injury.
Always switch off the windshield wipers and
ignition before changing the wiper blades.
!To avoid damaging the wiper blades, make
sure that you touch only the wiper arm of the
wiper.
!Never open the hood/tailgate if a wiper arm
has been folded away from the windshield/
rear window.
Never fold a windshield wiper arm without a
wiper blade back onto the windshield/rear
window. Hold the windshield wiper arm firmly when
you change the wiper blade. If you release the
wiper arm without a wiper blade and it falls
onto the windshield/rear window, the wind-
shield/rear window may be damaged by the
force of the impact.
Mercedes-Benz recommends that you have
the wiper blades changed at a qualified spe-
cialist workshop.
Changing the windshield wiper blades
Removing the wiper blades
XRemove the SmartKey from the ignition lock.
XFold the wiper arm away from the windshield.
XFirmly press release knob
:and pull wiper
blade ;upwards from the wiper arm in the
direction of the arrow.
Installing the wiper blades
XPosition new wiper blade :in the retainer on
the wiper arm and slide it into place in the
direction of the arrow.
The wiper blade audibly engages.
XMake sure that the wiper blade is seated cor- rectly.
XFold the wiper arm back onto the windshield.
Windshield wipers123
Lights and windshield wipers
Z
Page 138 of 398
The ionization of the interior air is odorless and
cannot be perceived directly in the vehicle inte-
rior.
You can switch ionization on and off via the mul-
timedia system (see the Digital Operator's Man-
ual).
Ionization can only be operated when the auto-
matic climate control is switched on. The side air
vent on the driver's side must be open.
Setting the air vents
Important safety notes
GWARNING
Very hot or very cold air can flow from the air
vents. This could result in burns or frostbite in
the immediate vicinity of the air vents. There
is a risk of injury.
Make sure that all vehicle occupants always
maintain a sufficient distance to the air out-
lets. If necessary, redirect the airflow to
another area of the vehicle interior.
In order to ensure the direct flow of fresh air
through the air vents into the vehicle interior,
please observe the following notes:
Rkeep the air inlet grille on the hood and in the
engine compartment on the front-passenger
side free of blockages, such as ice, snow or
leaves.
Rnever cover the air vents or air intake grilles in
the vehicle interior.
iFor virtually draft-free ventilation, adjust the
sliders of the air vents to the center position.
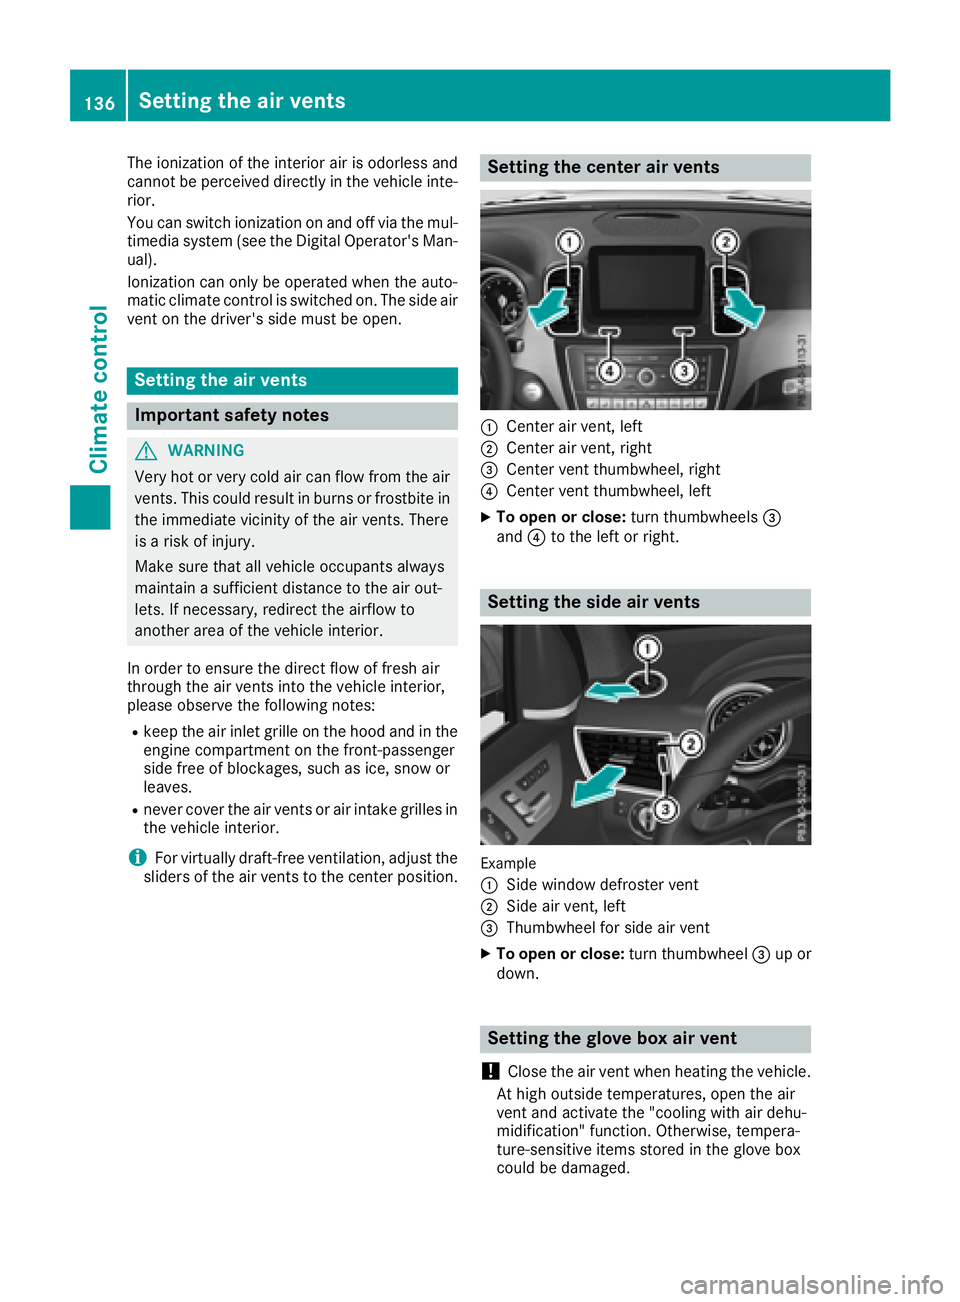
Setting the center air vents
:Center air vent, left
;Center air vent, right
=Center vent thumbwheel, right
?Center vent thumbwheel, left
XTo open or close: turn thumbwheels=
and ?to the left or right.
Setting the side air vents
Example
:
Side window defroster vent
;Side air vent, left
=Thumbwheel for side air vent
XTo open or close: turn thumbwheel=up or
down.
Setting the glove box air vent
!
Close the air vent when heating the vehicle.
At high outside temperatures, open the air
vent and activate the "cooling with air dehu-
midification" function. Otherwise, tempera-
ture-sensitive items stored in the glove box
could be damaged.
136Setting the air vents
Climate control
Page 143 of 398

Key positions with KEYLESS-GO
:Start/Stopbutto n
;Ignition loc k
As soo nas th eignition is switched on ,all th e
indicator lamps in th einstrumen tcluste rligh t
up. Further information on situation swher ean
indicator lamp either fails to go out after starting
th eengin eor lights up while driving
(
Ypage 281).
If Start/Sto pbutto n: has no tyet been
pressed, this correspond sto th eSmartKey
bein gremove dfrom th eignition .
XTo switch on th epower supply :press
Start/Sto pbutto n: once.
The power suppl yis switched on .You can no w
activat eth ewindshield wipers, for example .
The power suppl yis switched off again if:
Rth edriver' sdoor is opened and
Ryou press Start/Sto p: butto ntwice when in
this position
XTo switch on th eignition: press Start/Sto p
butto n: twice.
The ignition is switched on .
If you press Start/Sto pbutto n: once when
in this position ,th eignition is deactivated
again .
Removing the Start/S topbutton
You can remove th eStart/Sto pbutto nfrom th e
ignition loc kand start th evehicl eas normal
usin gth eSmartKey.
It is possible to switch between KEYLESS-GO
mod eand ke yoperation only when th etrans -
mission is in position j.
XRemove Start/Stopbutto n: from ignition
loc k;. You do no
thave to remove th eStart/Sto pbut -
to nfrom th eignition loc kwhen you leav eth e
vehicle. You should, however ,always tak eth e
SmartKey wit hyou when leaving th evehicle. As
lon gas th eSmartKey is in th evehicle:
Rth evehicl ecan be started usin gth eStart /
Stop butto n
Rtheelectrically powered equipmen tcan be
operate d
Starting the engine
Important safety notes
GWARNIN G
If children are lef tunsupervised in th evehicle,
they could:
Ropen th edoors, thus endangering other
people or road users.
Rget out and disrupt traffic.
Roperate th evehicle's equipment.
Additionally, children could set th evehicl ein
motion if, for example ,they:
Rrelease th eparking brake.
Rshiftin gth eautomatic transmission out of
park positio nP
RStart th eengine.
Ther eis aris kof an acciden tand injury.
When leaving th evehicle, always tak eth e
SmartKey wit hyou and loc kth evehicle. Never
leav echildren or animals unattended in th e
vehicle. Always keep th eSmartKey out of
reac hof children .
GWARNING
Combustion engines emit poisonous exhaust
gase ssuc has carbon monoxide. Inhalin g
these exhaust gase sleads to poisoning .Ther e
is aris kof fatal injury. Therefore never leav e
th eengin erunnin gin enclosed spaces with-
out sufficien tventilation .
GWARNING
Flammable materials introduce dthroug h
environmental influence or by animals can
Driving141
Driving and parking
Z
Page 144 of 398

ignite if in contact with the exhaust system or
parts of the engine that heat up. There is a risk
of fire.
Carry out regular checks to make sure that
there are no flammable foreign materials in
the engine compartment or in the exhaust
system.
General notes
Vehicles with a gasoline engine:the catalytic
converter is preheated for up to 30 seconds
after a cold start. The sound of the engine may
change during this time.
Automatic transmission
XShift the transmission to position j
(Ypage 148).
The transmission position indicator on the
multifunction display shows j
(
Ypage 149).
iYou can start the engine in transmission
position jand i.
Starting procedure with the SmartKey
XTo start a diesel engine: turn the SmartKey
to position 2in the ignition lock
(
Ypage 140).
The % preglow indicator lamp in the instru-
ment cluster lights up.
XTurn the SmartKey to position 3in the igni-
tion lock (Ypage 140) and release it as soon
as the engine is running.
iVehicles with a diesel engine: you can
start the engine without preglow if the engine
is warm.
Using KEYLESS-GO to start the engine
The Start/Stop button can be used to start the
vehicle without inserting the SmartKey into the
ignition lock. The Start/Stop button must be
inserted in the ignition lock and the SmartKey
must be in the vehicle. This mode for starting the
engine operates independently of the ECO
start/stop automatic engine start function.
XDepress the brake pedal and keep it
depressed.
XPress the Start/Stop button once
(Ypage 140).
Vehicles with a gasoline engine: the engine
starts.
Vehicles with a diesel engine: preglow is
activated and the engine starts.
Starting procedure via smartphone
Observe the important safety notes on starting
the engine (Ypage 141).
You can also start your engine via your smart-
phone from outside the vehicle. In this case, the
previously selected climate control setting is
activated. In this way you can cool or heat the
interior of the vehicle before starting the jour-
ney.
Only start the engine via your smartphone if it is
safe to start and run the engine where your vehi-
cle is parked.
Observe the legal stipulations in the area where your vehicle is parked. Engine start via smart-
phone may be limited to certain countries or
regions.
You can execute a maximum of two consecutive
starting attempts via your smartphone. If you
insert the SmartKey into the ignition lock, you
can carry out two more starting attempts.
Once you have started the engine, you can
switch the engine off via your smartphone at any
time.
You can only start the engine via your smart-
phone if:
Rthe SmartKey is in the ignition lock
Rpark position jis selected
Rthe accelerator pedal is not depressed
Rthe anti-theft alarm system is not activated
Rthe panic alarm is not activated
Rthe hazard warning lamps are switched off
Rthe hood is closed
Rthe doors are closed and locked
Rthe windows and sliding sunroof are closed
Also make sure that:
Rthe fuel tank is sufficiently filled
Rthe starter battery is sufficiently charged
142Driving
Driving and parking
Page 145 of 398

GWARNING
Limbs could be crushed or trapped if the
engine is started unintentionally during ser-
vice or maintenance work. There is a risk of
injury.
Always secure the engine against uninten-
tional starting before carrying out mainte-
nance or repair work.
Make sure that the engine cannot be started via
your smartphone before carrying out mainte-
nance or repairs. You can prevent an engine
start via your smartphone, for example, if you:
Rswitch on the hazard warning lamps
Rdo not lock the doors
Ropen the hood
Pulling away
General notes
GWARNING
If the engine speed is above the idling speed
and you engage transmission position Dor R,
the vehicle could pull away suddenly. There is
a risk of an accident.
When engaging transmission position Dor R,
always firmly depress the brake pedal and do not simultaneously accelerate.
Depress the accelerator carefully when pulling
away.
The vehicle locks centrally once you have pulled
away. The locking knobs in the doors drop down.
You can open the doors from the inside at any
time.
You can also deactivate the automatic locking
feature (
Ypage 244).
It is only possible to shift the transmission from
position Pto the desired position if you depress
the brake pedal. Only then is the parking lock
released. If you do not depress the brake pedal,
the DIRECT SELECT lever can still be moved but the parking lock remains engaged.
iUpshifts take place at higher engine speeds
after a cold start. This helps the catalytic con-
verter to reach its operating temperature
more quickly. Information on the automatic release of the
electric parking brake (
Ypage 163).
Pulling away with a trailer
To ensure that you do not roll backwards when
pulling away on an uphill slope, engage the elec-
tric parking brake.
XPress and hold handle
:.
The electric parking brake continues to brake
and prevent the vehicle from rolling back-
wards.
The red F(USA only) or !(Canada
only) indicator lamp in the instrument cluster remains on.
XDepress the accelerator pedal.
XAs soon as the vehicle/trailer combination isheld by the driving force of the engine, release
lever :.
the electric parking brake is released.
The red F(USA only) or !(Canada
only) indicator lamp in the instrument cluster goes out.
Hill start assist
Hill start assist helps you when pulling away for-
wards or in reverse on an uphill gradient. It holds
the vehicle for a short time after you have
removed your foot from the brake pedal. This
gives you enough time to move your foot from
the brake pedal to the accelerator pedal and to
depress it before the vehicle begins to roll.
GWARNING
After a short time, hill start assist will no lon-
ger brake your vehicle and it could roll away.
There is a risk of an accident and injury.
Therefore, quickly move your foot from the
brake pedal to the accelerator pedal. Never
Driving143
Driving and parking
Z