2018 MERCEDES-BENZ GLS roof
[x] Cancel search: roofPage 310 of 398
Roof carrier
Important safety notes
G WARNING
When you load the roof, the center of gravity
of the vehicle rises and the driving character-
istics change. If you exceed the maximum roof
load, the driving characteristics, as well as
steering and braking, will be greatly impaired.
There is a risk of an accident.
Never exceed the maximum roof load and
adjust your driving style.
! Mercedes-Benz recommends that you only
use roof carriers that have been tested and
approved for Mercedes-Benz vehicles. This
helps to prevent damage to the vehicle.
Position the load on the roof carrier in such a
way that the vehicle will not sustain damage
even when it is in motion.
Depending on the vehicle equipment, ensure
that when the roof carrier is installed you can: R
raise the sliding sunroof fully R
open the panorama roof with power tilt/
sliding panel fully R
open the tailgate fully
You will find information on the maximum roof
load in the "Technical data" section
( Y
page 392).
An incorrectly secured roof carrier or roof load
may become detached from the vehicle. You
must therefore ensure that you observe the roof
carrier manufacturer's installation instructions.
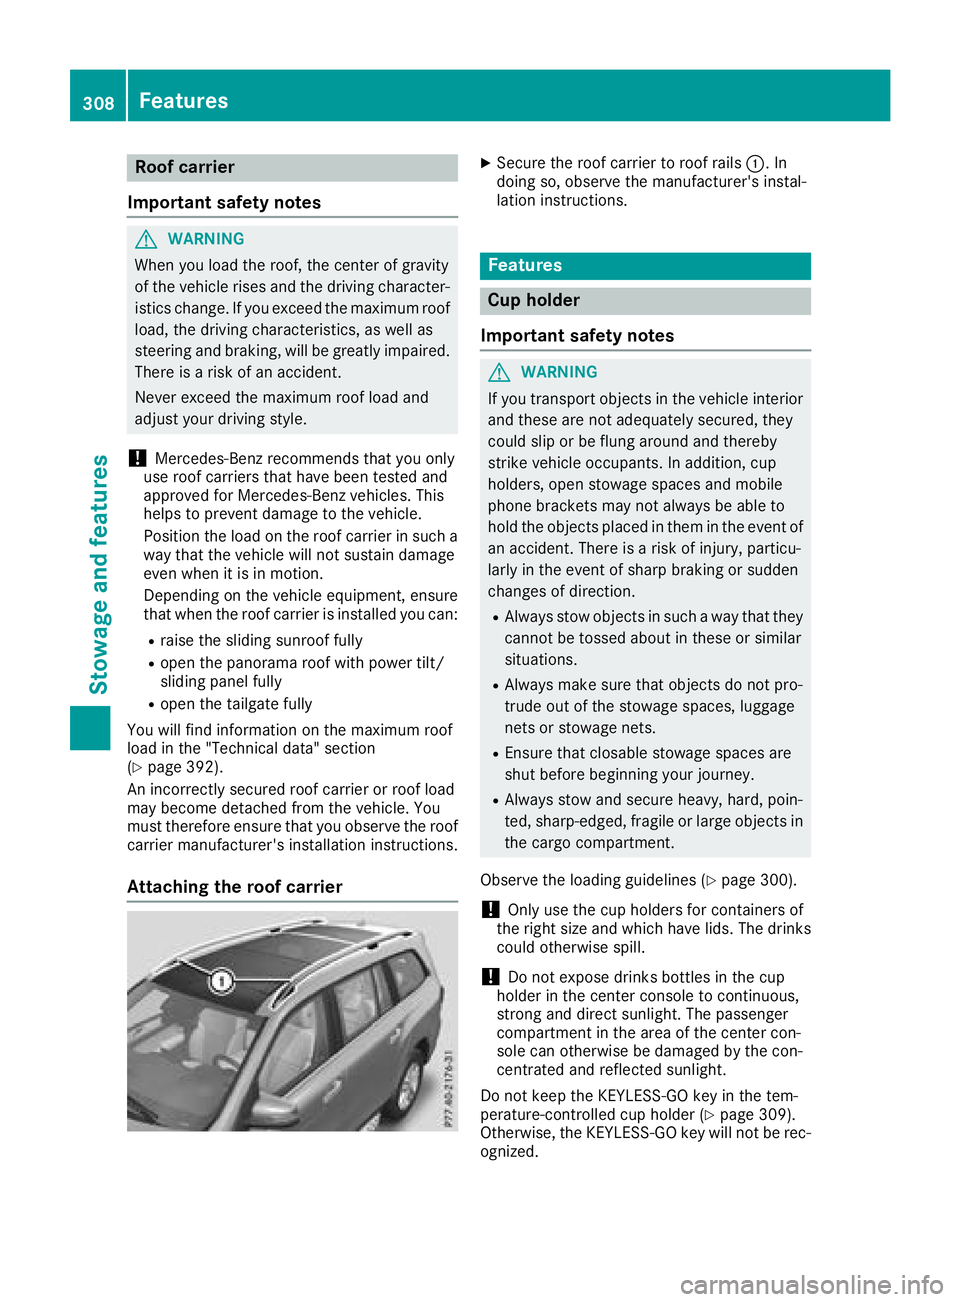
Attaching the roof carrier X
Secure the roof carrier to roof rails �C . In
doing so, observe the manufacturer's instal-
lation instructions.
Features
Cup holder
Important safety notes
G WARNING
If you transport objects in the vehicle interior
and these are not adequately secured, they
could slip or be flung around and thereby
strike vehicle occupants. In addition, cup
holders, open stowage spaces and mobile
phone brackets may not always be able to
hold the objects placed in them in the event of
an accident. There is a risk of injury, particu-
larly in the event of sharp braking or sudden
changes of direction. R
Always stow objects in such a way that they
cannot be tossed about in these or similar
situations. R
Always make sure that objects do not pro-
trude out of the stowage spaces, luggage
nets or stowage nets. R
Ensure that closable stowage spaces are
shut before beginning your journey. R
Always stow and secure heavy, hard, poin-
ted, sharp-edged, fragile or large objects in
the cargo compartment.
Observe the loading guidelines ( Y
page 300).
! Only use the cup holders for containers of
the right size and which have lids. The drinks
could otherwise spill.
! Do not expose drinks bottles in the cup
holder in the center console to continuous,
strong and direct sunlight. The passenger
compartment in the area of the center con-
sole can otherwise be damaged by the con-
centrated and reflected sunlight.
Do not keep the KEYLESS-GO key in the tem-
perature-controlled cup hol der ( Y
page 309).
Otherwise, the KEYLESS-GO key will not be rec-
ognized.308
Features
Stowage and features
Page 333 of 398
To avoid damage to the vehicle, deactivate
Distance Pilot DISTRONIC and the HOLD
function in the following or similar situations: R
when towing the vehicle R
in the car wash
! Never clean your vehicle in a Touchless
Automatic Car Wash as these use special
cleaning agents. These cleaning agents can
damage the paintwork or plastic parts.
! Make sure that: R
the side windows and the sliding sunroof
are fully closed. R
that the blower of the ventilation/heating
system is switched off (OFF button has
been pressed). R
the windshield wiper switch is at position
�Z .
The vehicle may otherwise be damaged.
! In car washes with a towing mechanism,
make sure that the automatic transmission is
in transmission position �\\ ; otherwise, the
vehicle could be damaged. R
Vehicles with a SmartKey:
Do not remove the SmartKey from the igni-
tion lock. Do not open the driver's door or
front-passenger door when the engine is
switched off. Otherwise, the automatic
transmission selects park position �] auto-
matically and locks the wheels. You can
prevent this by shifting the automatic trans-
mission to �\\ beforehand.R
Vehicles with KEYLESS-GO:
Do not open the driver's door or front-
passenger door when the engine is
switched off. Otherwise, the automatic
transmission selects park position �] auto-
matically and locks the wheels.
Observe the following to make sure that the
automatic transmission stays in position �\\ :X
Make sure the vehicle is stationary and the
ignition is switched off. X
Turn the SmartKey to position in the ignition
lock �H ( Y
page 140).
Use the SmartKey instead of the Start/Stop
button on vehicles with KEYLESS-GO. X
Depress and hold the brake pedal. X
Shift the automatic transmission to position
�\\ . X
Release the brake pedal. X
Release the electric parking brake. X
Switch off the ignition and leave the SmartKey
in the ignition lock.
You can wash the vehicle in an automatic car
wash from the very start.
If the vehicle is very dirty, pre-wash it before
cleaning it in an automatic car wash.
After using an automatic car wash, wipe off wax
from the windshield and the wiper blades. This
will prevent smears and reduce wiping noises
caused by residue on t he windshield.
Washing by hand In some countries, washing by hand is only
allowed at specially equipped washing bays.
Observe the legal requirements in all countries
concerned. X
Do not use hot water and do not wash the
vehicle in direct sunlight. X
Use a soft sponge to clean. X
Use a mild cleaning agent, such as a car
shampoo approved by Mercedes-Benz. X
Thoroughly hose down the vehicle with a gen-
tle jet of water. X
Do not point the water jet directly towards the
air inlets. X
Use plenty of water and rinse out the sponge
frequently. X
Rinse the vehicle with clean water and dry
thoroughly with a chamois. X
Do not let the cleaning agent dry on the paint-
work.
When using the vehicle in winter, remove all
traces of road salt deposits carefully and as
soon as possible.
Power washers
G WARNING
The water jet from a circular jet nozzle (dirt
blasters) can cause invisible exterior damage
to the tires or chassis components. Compo-
nents damaged in this way may fail unexpect-
edly. There is a risk of an accident.
Do not use power washers with circular jet
nozzles to clean the vehicle. Have damaged
tires or chassis components replaced imme-
diately. Care 331
Maintenance and care Z
Page 334 of 398

! Always maintain a distance of at least
11.8 in (30 cm) between the vehicle and the
power washer nozzle. Information about the
correct distance is available from the equip-
ment manufacturer.
Move the power washer nozzle around when
cleaning your vehicle.
Do not aim directly at any of the following: R
tires R
door gaps, roof gaps, joints, etc. R
electrical components R
battery R
plug-type couplings R
lights R
seals R
trim R
ventilation slots
Damaged seals or electrical components can
lead to leaks or failures.
! Vehicles with decorative foil: parts of your
vehicle are covered with decorative foil. Main-
tain a distance of at least 27.5 in (70 cm)
between the foil-wrapped parts of the vehicle
and the nozzle of the high pressure cleaner.
Information about the correct distance is
available from the equipment manufacturer.
Move the power washer nozzle around when
cleaning your vehicle.
The water temperature of the high-pressure
cleaner must not exceed 140 °F (60 °C).
Cleaning the paintwork
! Do not affix: R
stickers R
films R
magnetic plates or similar items
to painted surfaces. You could otherwise
damage the paintwork.
Scratches, corrosive deposits, areas affected by
corrosion and damage caused by inadequate
care cannot always be completely repaired. In
such cases, visit a qualified specialist workshop. X
Remove dirt immediately, where possible,
while avoiding rubbing too hard. X
Soak insect remains with insect remover and
rinse off the treated areas afterwards. X
Soak bird droppings with water and rinse off
the treated areas afterwards. X
Remove coolant, brake fluid, tree resin, oils,
fuels and greases by rubbing gently with a
cloth soaked in petroleum ether or lighter
fluid. X
Use tar remover to remove tar stains. X
Use silicone remover to remove wax.
If water no longer forms "beads" on the paint
surface, use the paint care products recommen-
ded and approved by Mercedes-Benz. This is the
case approximately every three to five months,
depending on the climate conditions and the
care product used.
If dirt has penetrated the paint surface or if the
paint has become dull, the paint cleaner recom-
mended and approved by Mercedes-Benz
should be used.
Do not use these care products in the sun or on
the hood while the hood is hot. X
Use a suitable touch-up stick, e.g. MB Touch-
Up Stick, to repair slight damage to the paint-
work quickly and provisionally.
Matte finish care
! Never polish the vehicle or the light alloy
wheels. Polishing causes the finish to shine.
! The following can give the paint a glossy
appearance and thus reduce the matt effect: R
Rubbing hard with unsuitable agents R
Washing the vehicle in direct sunlight
! Never use paint cleaner, buffing or polishing
products, or gloss preserver, e.g. wax, for the
purpose of paintwork care. These products
are only suitable for high-gloss surfaces. Their
use on vehicles with matte paintwork leads to
considerable surface damage or, more spe-
cifically, to shiny, spotted areas.
Always have paintwork repairs carried out at a
qualified specialist workshop.
! Only use automatic car washes which cor-
respond to the latest technological stand-
ards. Never use wash programs which finish
by treating the vehicle with hot wax.
Observe these notes if your vehicle has a clear
matte finish. This will help you to avoid damage
to the paintwork due to incorrect treatment.
These notes also apply to light alloy wheels with
a clear matt finish.332
Care
Maintenance and care
Page 358 of 398
MOExtended tires (tires with run-flat
properties) With MOExtended tires (tires with run flat char-
acteristics), you can continue to drive your vehi-
cle even if there is a total loss of pressure in one
or more tires.
MOExtended tires may only be used in conjunc-
tion with an active tire pressure loss warning
system or with an active tire pressure monitor
and on wheels specifically tested by Mercedes-
Benz.
Notes on driving with MOExtended tires with a
flat tire ( Y
page 340).
i Vehicles equipped with MOExtended tires
are not equipped with a TIREFIT kit at the fac-
tory. It is therefore recommended that you
additionally equip your vehicle with a TIREFIT
kit if you mount tires that do not feature run-
flat properties, e.g. winter tires. A TIREFIT kit
may be obtained from a qualified specialist
workshop.
Winter operation
General notes Have your vehicle winter-proofed at a qualified
specialist workshop at the onset of winter.
Observe the notes in the "Changing a wheel"
section ( Y
page 374).
Driving with summer tires At temperatures below 45 ‡ (+7 †), the elas-
ticity of summer tires and therefore also the
traction and braking capability are reduced con-
siderably. Change the tires on your vehicle to
M+S tires. Using summer tires at very cold tem-
peratures could cause cracks to form, thereby
damaging the tires permanently. Mercedes-
Benz cannot accept responsibility for this type
of damage.
G WARNING
Damaged tires can cause tire inflation pres-
sure loss. As a result, you could lose control of
your vehicle. There is a risk of accident.
Check the tires regularly for signs of damage
and replace any damaged tires immediately. M+S tires
G WARNING
M+S tires with a tire tread depth of less than
�
Page 363 of 398
a corresponding warning message will appear in
the multifunction display.
You can recognize the tire pressure loss warning
by the Run Flat Indicator Active Press
'OK' to Restart message which appears in
the Service menu of the multifunction display.
Information on the message display can be
found in the "Restarting the tire pressure loss
warning system" section ( Y
page 361).
Important safety notes The tire pressure warning system does not warn
you of an incorrectly set tire pressure. Observe
the notes on the recommended tire pressure
( Y
page 357).
The tire pressure loss warning does not replace
the need to regularly check the tire pressure. An
even loss of pressure on several tires at the
same time cannot be detected by the tire pres-
sure loss warning system.
The tire pressure monitor is not able to warn you
of a sudden loss of pressure, e.g. if the tire is
penetrated by a foreign object. In the event of a
sudden loss of pressure, bring the vehicle to a
halt by braking carefully. Avoid abrupt steering
movements.
The function of the tire pressure loss warning
system is limited or delayed if: R
snow chains are mounted on your vehicle's
tires. R
road conditions are wintry. R
you are driving on sand or gravel. R
you adopt a very sporty driving style (corner-
ing at high speeds or driving with high rates of
acceleration). R
you are driving with a heavy load (in the vehi-
cle or on the roof).
Restarting the tire pressure loss warn-
ing system Restart the tire pressure loss warning system if
you have: R
changed the tire pressure R
changed the wheels or tires R
mounted new wheels or tires X
Before restarting, make sure that the tire
pressures are set properly on all four tires for
the respective operating conditions.
The recommended tire pressure can be found
on the Tire and Loading Information placard on the B-pillar. Additionally, a tire pressure
table is attached to the fuel filler flap. The tire
pressure loss warning system can only give
reliable warnings if you have set the correct
tire pressure. If an incorrect tire pressure is
set, these incorrect values will be monitored. X
Also observe the notes in the section on tire
pressures ( Y
page 357). X
Make sure that the SmartKey is in position �H
in the ignition lock ( Y
page 140).X
Press the �Y or �e button on the steering
wheel to select the Service menu.X
Press the �c or �d button to select
Tire Pressure . X
Press the �v button.
The Run Flat Indicator Active Press
'OK' to Restart message appears in the
multifunction display.
If you wish to confirm the restart: X
Press the �v button.
The Tire Pressure Now OK? message
appears in the multifunction display. X
Press the �c or �d button to select Yes .X
Press the �v button.
The Run Flat Indicator Restarted mes-
sage appears in the multifunction display.
After a teach-in period, the tire pressure loss
warning system will monitor the set tire pres-
sures of all four tires.
If you wish to cancel the restart: X
Press the �8 button.
or X
When the Tire Pressure Now OK? message
appears, press the �c or �d button to
select Cancel . X
Press the �v button.
The tire pressure values stored at the last
restart will continue to be monitored.
Tire pressure monitor
General notes
If a tire pressure monitor is installed, the vehi-
cle's wheels have sensors that monitor the tire
pressures in all four tires. The tire pressure mon-
itor warns you if the pressure drops in one or
more of the tires. The tire pressure monitor only
functions if the corresponding sensors are
installed in all wheels. Tire pressure 361
Wheels and tires Z
Page 376 of 398
Sidewall The part of the tire between the tread and the
bead.
Weight of optional extras The combined weight of those optional extras
that weigh more than the replaced standard
parts and more than 2.3 kg (5 lbs). These
optional extras, such as high-performance
brakes, level control, a roof rack or a high-per-
formance battery, are not included in the curb
weight and the weight of the accessories.
TIN (Tire Identification Number) This is a unique identifier which can be used by
a tire manufacturer to identify tires, for example
for a product recall, and thus identify the pur-
chasers. The TIN is made up of the manufactur-
er's identity code, tire size, tire type code and
the manufacturing date.
Load bearing index The load bearing index (also load index) is a code
that contains the maximum load bearing capa-
city of a tire.
Traction Traction is the result of friction between the tires
and the road surface.
TWR (Tongue Weight Rating) The TWR specifies the maximum permissible
weight that the ball coupling of the trailer tow
hitch can support.
Treadwear indicators Narrow bars (tread wear bars) that are distrib-
uted over the tire tread. If the tire tread is level
with the bars, the wear limit of �
Page 395 of 398
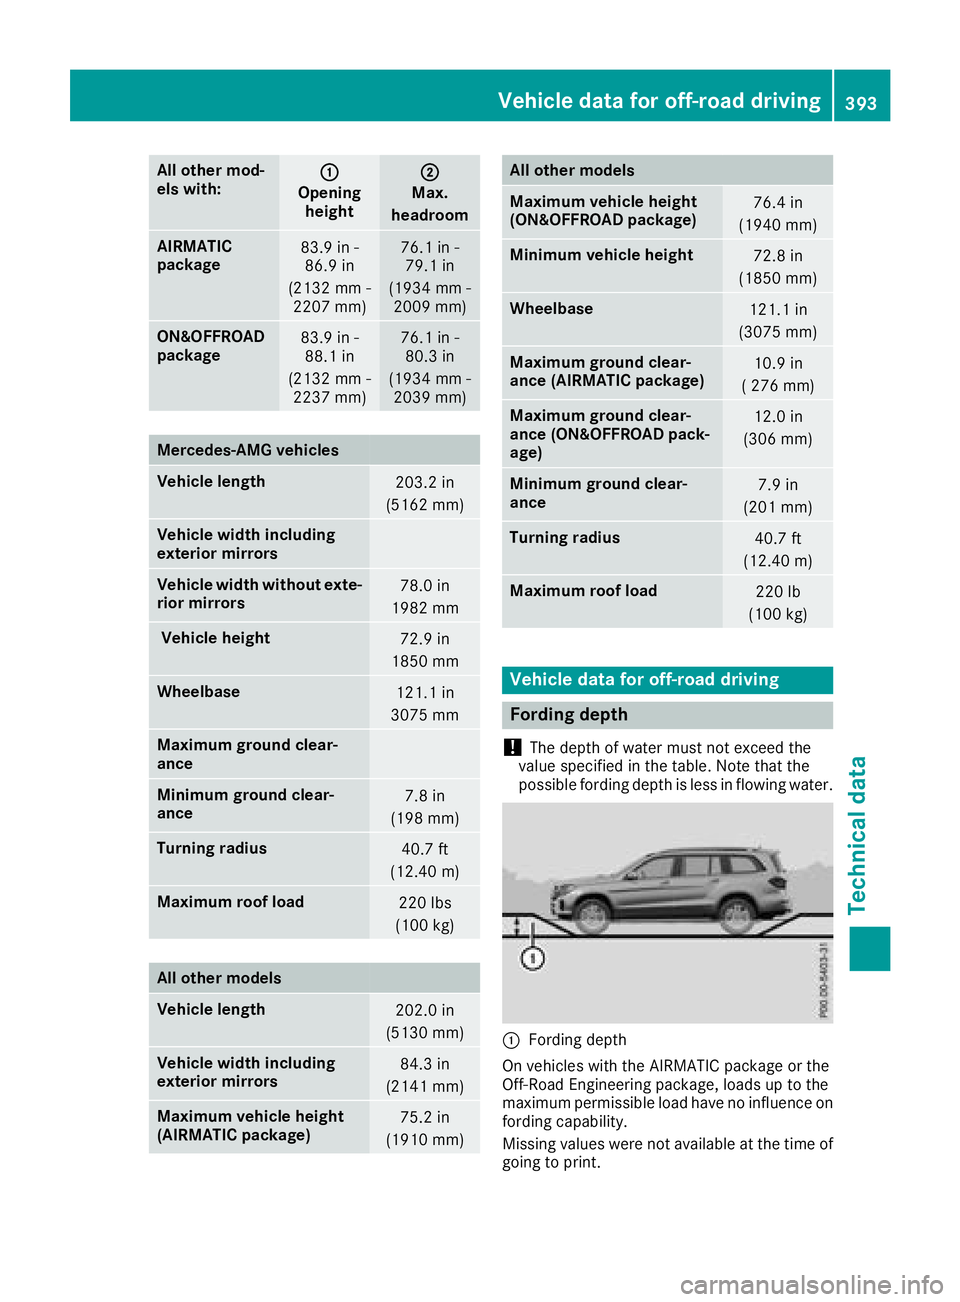
All other mod -
els with: �C
Opening
height �D
Max.
headr oom
AIRMATIC
package 83.9 in -
86.9 in
(2132 mm -
2207 mm ) 76.1 in -
79.1 in
(1934 mm -
2009 mm )
ON&O FFROAD
package 83.9 in -
88.1 in
(2132 mm -
2237 mm ) 76.1 in -
80.3 in
(1934 mm -
2039 mm )
Merc edes ‑ AMG vehicles
Vehicle length
203.2 in
(5162 mm)
Vehicle width including
exterior mirrors
Vehicle width without exte-
rior mirrors 78.0 in
1982 mm
Vehicle height
72.9 in
1850 mm
Wheelbase
121.1 in
3075 mm
Maximum ground clear-
ance
Minimum ground clear-
ance 7.8 in
(198 mm)
Turning radius
40.7 ft
(12.40 m)
Maximum roof load
220 lbs
(100 kg)
All other models
Vehicle length
202.0 in
(5130 mm)
Vehicle width including
exterior mirrors 84.3 in
(2141 mm)
Maximum vehicle height
(AIRMATIC package) 75.2 in
(1910 mm) All other models
Maximum vehicle height
(ON&OFFROAD package) 76.4 in
(1940 mm)
Minimum vehicle height
72.8 in
(1850 mm)
Wheelbase
121.1 in
(3075 mm)
Maximum ground clear-
ance (AIRMATIC package) 10.9 in
( 276 mm)
Maximum ground clear-
ance (ON&OFFROAD pack-
age) 12.0 in
(306 mm)
Minimum ground clear-
ance 7.9 in
(201 mm)
Turning radius
40.7 ft
(12.40 m)
Maximum roof load
220 lb
(100 kg)
Vehicle data for off-road driving
Fording depth
! The depth of water must not exceed the
value specified in the table. Note that the
possible fording depth is less in flowing water.
�C
Fording depth
On vehicles with the AIRMATIC package or the
Off-Road Engineering package, loads up to the
maximum permissible load have no influence on
fording capability.
Missing values were not available at the time of
going to print.Vehicle data for off-road driving 393
Technical data Z