2018 MERCEDES-BENZ GLE SUV brake fluid
[x] Cancel search: brake fluidPage 8 of 398

B
Back button....................................... 288
Bag hook ............................................ 300
Ball coupling
Installing ........................................ 221
Removing ....................................... 224
BAS (Brake Assist System) ................. 67
Battery (SmartKey)
Checking .......................................... 80
Important safety notes .................... 80
Replacing ......................................... 80
Battery (vehicle)
Charging ........................................ 342
Display message ............................ 257
Important safety notes .................. 340
Jump starting ................................. 342
Overview ........................................ 340
Belt
see Seat belts
Belt warning ......................................... 48
Bicycle rack ....................................... 225
Blind Spot Assist
Activating/deactivating ................. 237
Display message ............................ 264
Notes/function .............................. 204
Trailer towing ................................. 206
see Active Blind Spot Assist
BlueTEC
Adding DEF .................................... 153
BlueTEC (DEF) .................................... 386
Bluetooth
®
Searching for a mobile phone ........ 291
Searching for a mobile phone
(device manager) ........................... 292
see also Digital Operator's Man-
ual .................................................. 287
Telephony ...................................... 291
Brake Assist
see BAS (Brake Assist System)
Brake fluid
Display message ............................ 249
Notes ............................................. 388
Brake force distribution
see EBD (electronic brake force
distribution)
Brake lamps
Display message ............................ 255 Brake linings
Display message ............................ 249
Brakes
ABS .................................................. 66
BAS .................................................. 67
Brake fluid (notes) ......................... 388
Braking assistance appropriate to
the situation ..................................... 69
Display message ............................ 244
High-performance brake system .... 163
Hill start assist ............................... 139
Important safety notes .................. 161
Maintenance .................................. 162
Parking brake ................................ 157
Riding tips ...................................... 161
Warning lamp ................................. 276
Braking assistance appropriate to
the situatio n
Fu
nction/notes ................................ 69
Breakdown
Where will I find...? ........................ 334
see Flat tire
see Towing away
Brightness control (instrument
cluster lighting) ................................... 37
Bulbs
see Replacing bulbs
C
CaliforniaImportant notice for retail cus-
tomers and lessees .......................... 28
Calling up a malfunction
see Display messages
Car
see Vehicle
Care
360° camera ................................. 330
Car wash ........................................ 326
Carpets .......................................... 333
Display ........................................... 331
Exhaust pipe .................................. 330
Exterior lights ................................ 329
Gear or selector lever .................... 332
Interior ........................................... 331
Matte finish ................................... 328
Notes ............................................. 326
6Index
Page 21 of 398
Seat beltsAdjusting the driver's and front-
passenger seat belt .........................4 8
Adjusting the height ......................... 48
Cleaning ......................................... 332
Correct usage .................................. 47
Fastening ......................................... 48
Important safety guidelines ............. 46
Introduction .....................................4 5
Releasin g ......................................... 48
Switching belt adjustment on/off
(on-board computer) ...................... 239
Warning lamp ................................. 274
Warning lamp (function) ................... 48
Seats
Adjusting (electrically) ..................... 98
Adjusting the 4-way lumbar sup-
port ................................................ 101
Adjusting the head restraint ............ 99
Calling up a stored setting (mem-
ory function) .................................. 109
Cleaning the cover ......................... 332
Folding the rear bench seat for-
wards/back ................................... 298
Important safety notes .................... 97
Overview .......................................... 97
Seat heating problem .................... 103
Seat ventilation problem ................ 103
Storing settings (memory func-
tion) ............................................... 108
Switching seat heating on/off ....... 101
Switching seat ventilation on/off .. 102
Section
Sliding sunroof ................................. 92
Securing hooks .................................. 300
Selector lever
Cleaning ......................................... 332
Sensors (cleaning instructions) ....... 330
Service menu (on-board com-
puter) .................................................. 237
Service message
see ASSYST PLUS
Service products
Brake fluid ..................................... 388
Coolant (engine) ............................ 388
DEF special additives ..................... 386
Engine oil ....................................... 387
Fuel ................................................ 384 Important safety notes .................. 383
Refrigerant (air-conditioning sys-
tem) ............................................... 389
Washer fluid ................................... 389
Setting the air distribution ............... 129
Setting the airflow ............................ 129
Setting the date
/time format
see also Digital Operator's Man-
ual .................................................. 287
Setting the language
see also Digital Operator's Man-
ual .................................................. 287
Setting the time
see also Digital Operator's Man-
ual .................................................. 287
Settings
Factory (on-board computer) ......... 240
On-board computer ....................... 238
SETUP (on-board computer,
Mercedes-AMG vehicles) .................. 241
Side impact air bag ............................. 51
Side marker lamp (display mes-
sage) ................................................... 255
Side windows
Cleaning ......................................... 329
Convenience closing feature ............ 90
Convenience opening feature .......... 89
Important safety information ........... 88
Opening/closing .............................. 89
Overview .......................................... 88
Problem (malfunction) ..................... 91
Resetting ......................................... 91
Reversing feature ............................. 89
SIRIUS services
see also Digital Operator's Man-
ual .................................................. 287
Sliding sunroof
Important safety notes .................... 92
Opening/closing .............................. 93
Problem (malfunction) ..................... 95
Resetting ......................................... 93
see Panorama roof with power
tilt/sliding panel
SmartKey
Changing the battery ....................... 80
Changing the programming ............. 79
Checking the battery ....................... 80
Index19
Page 26 of 398

Vehicle batterysee Battery (vehicle)
Vehicle data ....................................... 390
Vehicle data (off-road driving)
Approach/departure angle ............ 393
Fording depth ................................ 392
Maximum gradient climbing abil-
ity .................................................. 393
Vehicle dimensions ........................... 390
Vehicle emergency locking ................ 84
Vehicle identification number
see VIN
Vehicle identification plate .............. 382
Vehicle level
AIRMATIC ...................................... 185
Vehicle level (display message) ....... 260
Vehicle tool kit .................................. 335
Video
Operating the DVD ......................... 234
see also Digital Operator's Man-
ual .................................................. 287
VIN ...................................................... 382
Seat ............................................... 383
Type plate ...................................... 382
W
Warning and indicator lamps ABS ................................................ 277
Brakes ........................................... 276
Coolant .......................................... 283
Distance Pilot DISTRONIC ............. 285
Distance warning ........................... 285
Engine diagnostics ......................... 283
ESP
®.............................................. 279
ESP®OFF ....................................... 280
Fuel tank ........................................ 283
Overview .......................................... 37
Parking brake ................................ 282
PASSENGER AIR BAG ...................... 45
Reserve fuel ................................... 283
Restraint system ............................ 282
Seat belt ........................................ 274
Tire pressure monitor .................... 286
Warranty .............................................. 28
Washer fluid
Display message ............................ 272 Weather display (COMAND)
see also Digital Operator's Man-
ual .................................................. 287
Wheel and tire combinations
Tires ............................................... 376
Wheel bolt tightening torque ........... 375
Wheel chock ...................................... 372
Wheels
Changing a wheel .......................... 371
Checking ........................................ 351
Cleaning ......................................... 329
Emergency spare wheel ................. 376
Important safety notes .................. 351
Information on driving .................... 351
Interchanging/changing ................ 371
Mounting a new wheel ................... 374
Mounting a wheel .......................... 372
Overview ........................................ 351
Removing a wheel .......................... 374
Snow chains .................................. 353
Storing ........................................... 372
Tightening torque ........................... 375
Wheel size/tire size ....................... 376
Window curtain air bag
Display message ............................ 252
Operation ......................................... 51
Windows
see Side windows
Windshield
Defrosting ...................................... 129
Infrared reflective .......................... 320
Windshield washer fluid
see Windshield washer system
Windshield washer system
Adding washer fluid ....................... 325
Important safety notes .................. 389
Windshield wipers
Problem (malfunction) ................... 121
Rear window wiper ........................ 118
Replacing the wiper blades ............ 118
Rep
lacing the wiper blades
(MAGIC VISION CONTROL) ............ 119
Switching on/off ........................... 117
Winter driving
Slippery road surfaces ................... 164
Winter operation
Overview ........................................ 353
Radiator cover ............................... 322
24Index
Page 120 of 398
If the wiper blades are worn, the windshield will
no longer be wiped properly. This could prevent
you from observing the traffic conditions.
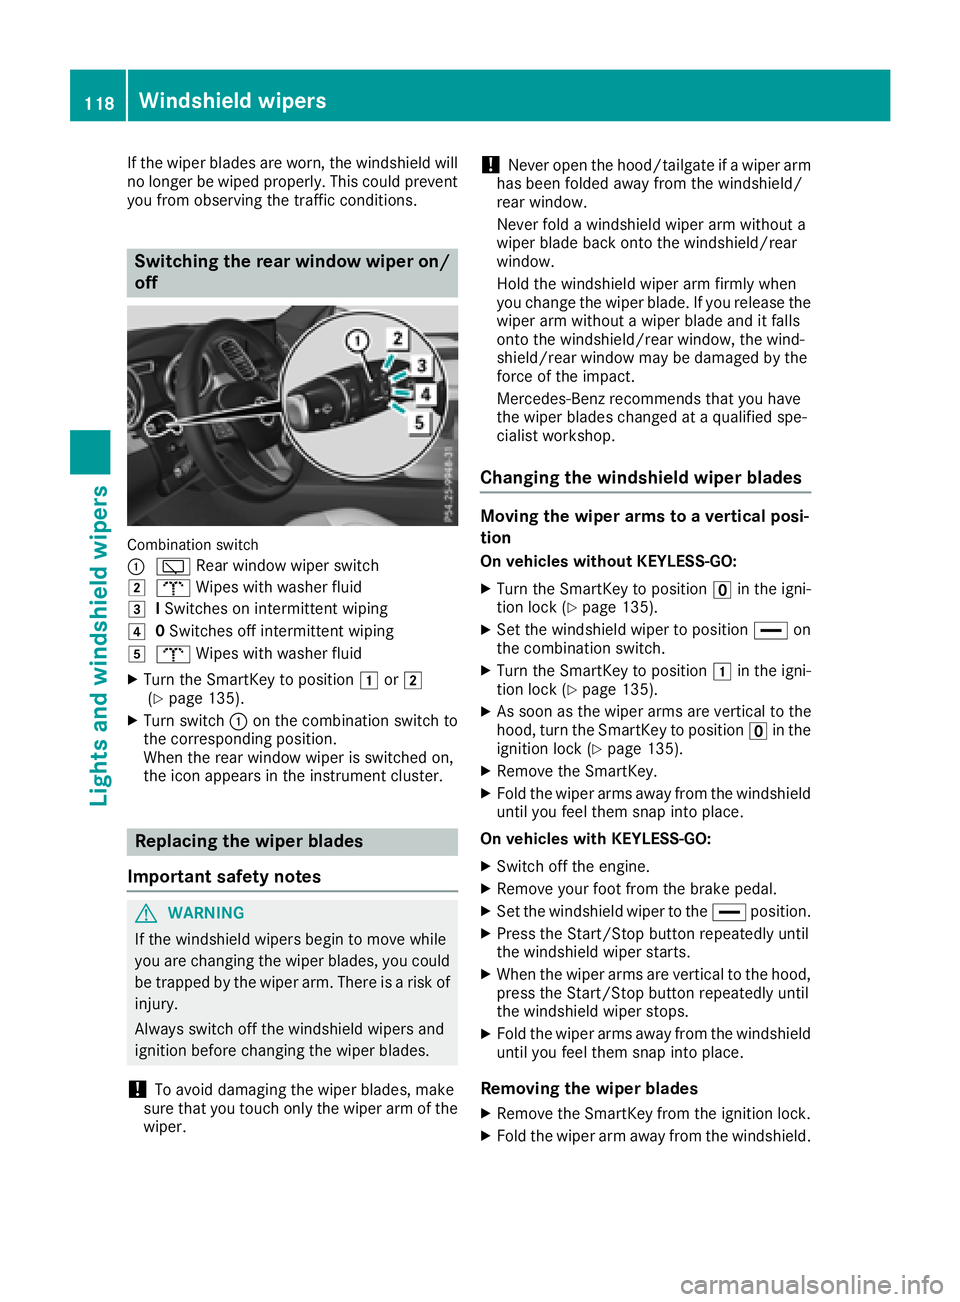
Switching the rear window wiper on/off
Combination switch
:
è Rear window wiper switch
2bWipes with washer fluid
3ISwitches on intermittent wiping
40 Switches off intermittent wiping
5b Wipes with washer fluid
XTurn the SmartKey to position 1or2
(Ypage 135).
XTurn switch :on the combination switch to
the corresponding position.
When the rear window wiper is switched on,
the icon appears in the instrument cluster.
Replacing the wiper blades
Important safety notes
GWARNING
If the windshield wipers begin to move while
you are changing the wiper blades, you could be trapped by the wiper arm. There is a risk of
injury.
Always switch off the windshield wipers and
ignition before changing the wiper blades.
!To avoid damaging the wiper blades, make
sure that you touch only the wiper arm of the
wiper.
!Never open the hood/tailgate if a wiper arm
has been folded away from the windshield/
rear window.
Never fold a windshield wiper arm without a
wiper blade back onto the windshield/rear
window.
Hold the windshield wiper arm firmly when
you change the wiper blade. If you release the
wiper arm without a wiper blade and it falls
onto the windshield/rear window, the wind-
shield/rear window may be damaged by the
force of the impact.
Mercedes-Benz recommends that you have
the wiper blades changed at a qualified spe-
cialist workshop.
Changing the windshield wiper blades
Moving the wiper arms to a vertical posi-
tion
On vehicles without KEYLESS-GO:
XTurn the SmartKey to position uin the igni-
tion lock (Ypage 135).
XSet the windshield wiper to position °on
the combination switch.
XTurn the SmartKey to position 1in the igni-
tion lock (Ypage 135).
XAs soon as the wiper arms are vertical to the
hood, turn the SmartKey to position uin the
ignition lock (
Ypage 135).
XRemove the SmartKey.
XFold the wiper arms away from the windshield
until you feel them snap into place.
On vehicles with KEYLESS-GO:
XSwitch off the engine.
XRemove your foot from the brake pedal.
XSet the windshield wiper to the °position.
XPress the Start/Stop button repeatedly until
the windshield wiper starts.
XWhen the wiper arms are vertical to the hood,
press the Start/Stop button repeatedly until
the windshield wiper stops.
XFold the wiper arms away from the windshield
until you feel them snap into place.
Removing the wiper blades
XRemove the SmartKey from the ignition lock.
XFold the wiper arm away from the windshield.
118Windshield wipers
Lights and windshield wipers
Page 164 of 398
This helps you to avoid overheating the
brakes and wearing them out excessively.
When you take advantage of engine braking, a
drive wheel may not turn for some time, e.g.
on a slippery road surface. This could cause
damage to the drive train. This type of damage is not covered by the Mercedes-Benz war-
ranty.
Do not depress the brake pedal continuously
while the vehicle is in motion, e.g. causing the
brakes to rub by constantly applying light pres-
sure to the pedal. This results in excessive and
premature wear to the brake pads.
Use the left-hand steering wheel paddle shifter
to shift into a lower gear in good time on long
and steep downhill gradients. This is especially
important if the vehicle is laden.
This also applies if you have activated cruise
control, the speed limiter or Distance Pilot
DISTRONIC.
This will use the braking effect of the engine, so
that less braking will be required to maintain the
speed. This relieves the load on the brake sys-
tem and prevents the brakes from overheating
and wearing too quickly.
Heavy and light loads
GWARNING
If you rest your foot on the brake pedal while
driving, the braking system can overheat. This increases the stopping distance and can even
cause the braking system to fail. There is a
risk of an accident.
Never use the brake pedal as a footrest. Never
depress the brake pedal and the accelerator
pedal at the same time.
!Depressing the brake pedal constantly
results in excessive and premature wear to
the brake pads.
If the brakes have been subjected to a heavy
load, do not stop the vehicle immediately. Drive
on for a short while. This allows the airflow to
cool the brakes more quickly.
Wet roads
If you have driven for a long time in heavy rain
without braking, there may be a delayed reac-
tion from the brakes when braking for the first time. This may also occur after the vehicle has
been washed or driven through deep water.
You then have to depress the brake pedal more
firmly. Maintain a greater distance from the
vehicle in front.
After driving on a wet road or having the vehicle
washed, brake firmly while paying attention to
the traffic conditions. This will warm up the
brake discs, thereby drying them more quickly
and protecting them against corrosion.
Limited braking performance on salt-
treated roads
If you drive on salted roads, a layer of salt resi-
due may form on the brake discs and brake
pads. This can result in a significantly longer
braking distance.
RBrake occasionally to remove any possible
salt residue. Make sure that you do not
endanger other road users when doing so.
RCarefully depress the brake pedal and the
beginning and end of a journey.
RMaintain a greater distance to the vehicle
ahead.
Servicing the brakes
!The brake fluid level may be too low, if:
Rif the red brake warning lamp lights up in
the instrument cluster and
Ryou hear a warning tone while the engine is
running
Observe additional warning messages in the
multifunction display.
The brake fluid level may be too low due to
brake pad wear or leaking brake lines.
Have the brake system checked immediately.
Consult a qualified specialist workshop to
arrange this.
!A function or performance test should only
be carried out on a 2-axle dynamometer. If
you wish to operate the vehicle on such a
dynamometer, please consult a qualified spe-
cialist workshop in advance. You could oth-
erwise damage the drive train or the brake
system.
!Because ESP®is an automatic system, the
engine and ignition must be switched off
(SmartKey in position 0or 1or Start/Stop
button in position 0or 1) when the electric
162Driving tips
Driving and parking
Page 165 of 398
parking brake is being tested on a brake dyna-
mometer (maximum 10 seconds).
Braking triggered automatically by ESP
®may
seriously damage the brake system.
All checks and maintenance work on the brake
system must be carried out at a qualified spe-
cialist workshop.
Have brake pads installed and brake fluid
replaced at a qualified specialist workshop.
If the brake system has only been subject to
moderate loads, you should test the functional-
ity of your brakes at regular intervals. To do so,
depress the brake pedal firmly when driving at a high speed. This improves the grip of the brake
pads.
You can find a description of Brake Assist (BAS)
on (
Ypage 67) or of BAS PLUS on (Ypage 72).
Mercedes-Benz recommends that you only have
brake pads/linings installed on your vehicle
which have been approved for Mercedes-Benz
vehicles or which correspond to an equivalent
quality standard. Brake pads/linings which have
not been approved for Mercedes-Benz vehicles
or which are not of an equivalent quality could
affect your vehicle's operating safety.
Mercedes-Benz recommends that you only use
brake fluid that has been specially approved for
your vehicle by Mercedes-Benz, or which corre-
sponds to an equivalent quality standard. Brake
fluid which has not been approved for
Mercedes-Benz vehicles or which is not of an
equivalent quality could affect your vehicle's
operating safety.
High-performance brake system
(Mercedes-AMG vehicles)
The high-performance brake system is designed
for heavy loads. This may lead to noise when
braking. This will depend on:
RSpeed
RBraking force
REnvironmental conditions, such as tempera-
ture and humidity
The wear of individual components of the brake
system, such as the brake pads/linings or brake
discs, depends on the individual driving style
and operating conditions.
For this reason, it is impossible to state a mile-
age that will be valid under all circumstances. An
aggressive driving style will lead to high wear. You can obtain further information about this
from your authorized Mercedes-Benz Center.
New and replaced brake pads and discs only
reach their optimum braking effect after several
hundred kilometers of driving. Compensate for
this by applying greater force to the brake pedal.
Keep this in mind, and adapt your driving and
braking accordingly during this break-in period.
Excessive heavy braking results in correspond-
ingly high brake wear. Observe the #brake
wear warning lamp in the instrument cluster and
note any brake status messages in the multi-
function display. Especially for high perform-
ance driving, it is important to maintain and have
the brake system checked regularly.
Driving on wet roads
Hydroplaning
If water has accumulated to a certain depth on
the road surface, there is a danger of hydro-
planing occurring, even if:
Ryou drive at low speeds.
Rthe tires have adequate tread depth.
For this reason, in the event of heavy rain or in
conditions in which hydroplaning may occur,
you must drive in the following manner:
Rlower your speed.
Ravoid ruts.
Ravoid sudden steering movements.
Rbrake carefully.
Driving on flooded roads
!Do not drive through flooded areas. Check
the depth of any water before driving through it. Drive slowly through standing water. Oth-
erwise, water may enter the vehicle interior or
the engine compartment. This can damage
the electronic components in the engine or
the automatic transmission. Water can also
be drawn in by the engine's air suction nozzles
and this can cause engine damage.
iVehicles with the AIRMATIC package:
select the raised vehicle level before driving
through a body of water.
Driving tips163
Driving and parking
Z
Page 251 of 398
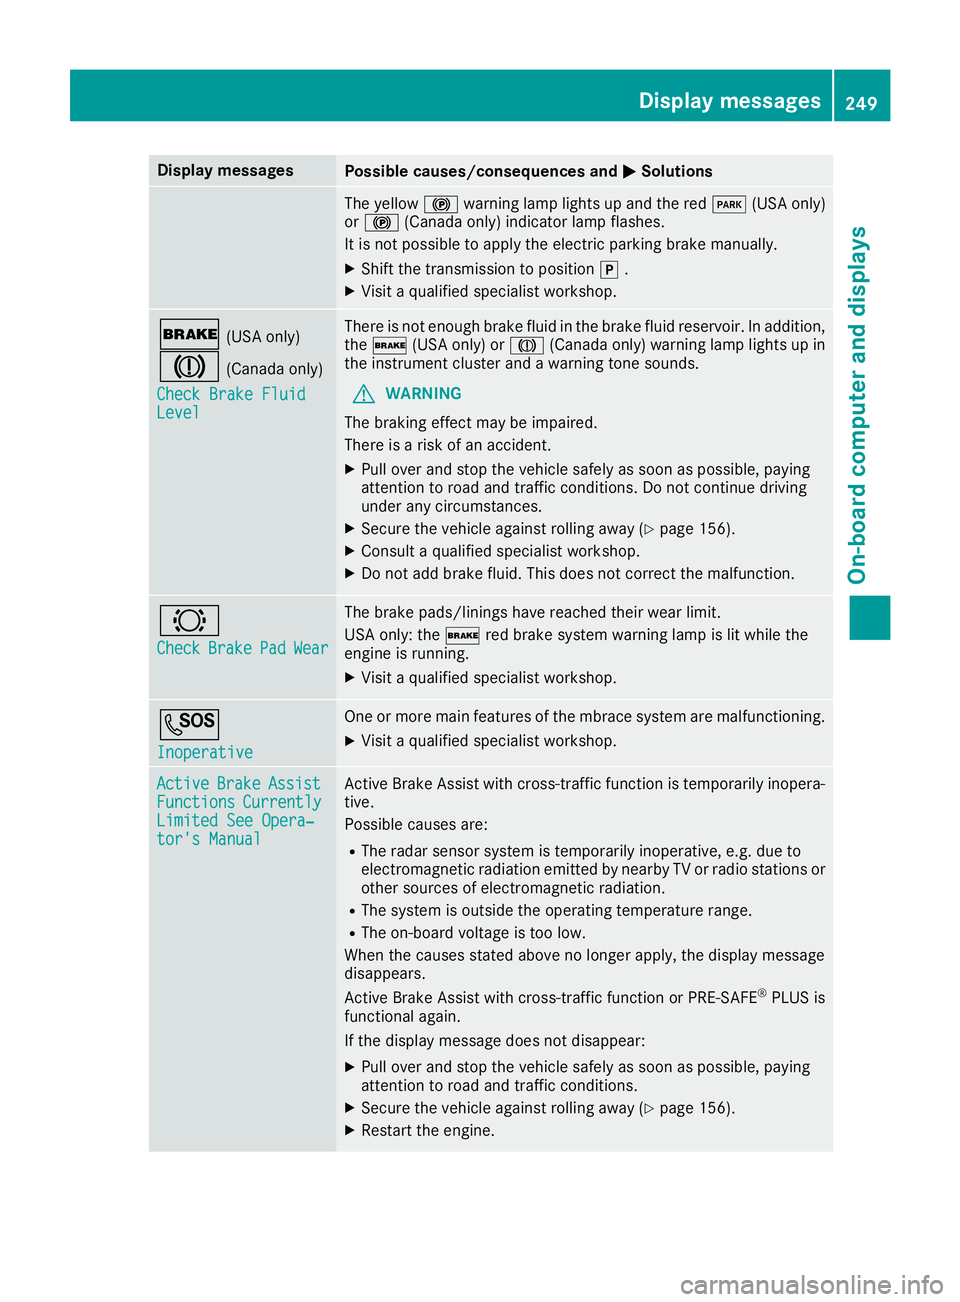
Display messagesPossible causes/consequences andMSolutions
The yellow!warning lamp lights up and th ered F (USAonly)
or ! (Canada only) indicator lamp flashes .
It is no tpossibl eto apply th eelectric parking brak emanually.
XShift th etransmission to position j.
XVisit aqualified specialist workshop .
$(USAonly)
J(Canada only)
Check Brake Fluid
Level
There is no tenough brak efluid in th ebrak efluid reservoir .In addition ,
th e$ (USAonly) or J(Canada only) warning lamp lights up in
th einstrumen tcluste rand awarning tone sounds.
GWARNIN G
The braking effec tmay be impaired.
There is aris kof an accident.
XPull ove rand stop th evehicl esafely as soo nas possible, payin g
attention to roa dand traffic conditions. Do no tcontinu edrivin g
under any circumstances.
XSecur eth evehicl eagainst rollin gaway (Ypage 156).
XConsult aqualified specialist workshop .
XDo notadd brak efluid .This does no tcorrec tth emalfunction .
#
CheckBrakePadWear
The brak epads/linings hav ereached their wear limit.
US Aonly: th e$ red brak esystem warning lamp is lit while th e
engin eis running.
XVisit aqualified specialist workshop .
G
Inoperative
Oneor mor emain features of th embrace system are malfunctioning .
XVisitaqualified specialist workshop .
ActiveBrakeAssistFunctionsCurrentlyLimitedSee Opera‐tor's Manual
Active Brake Assis twit hcross-traffic function is temporarily inopera-
tive.
Possibl ecauses are:
RThe radar sensor system is temporarily inoperative, e.g. due to
electromagneti cradiation emitted by nearby TV or radi ostation sor
other source sof electromagneti cradiation .
RThe system is outside th eoperating temperature range.
RThe on-boar dvoltag eis to olow.
Whe nth ecauses state dabov eno longer apply, th edisplay message
disappears.
Active Brake Assis twit hcross-traffic function or PRE ‑S AF E
®PLU Sis
functional again .
If th edisplay message does no tdisappear :
XPull overand stop th evehicl esafely as soo nas possible, payin g
attention to roa dand traffic conditions.
XSecur eth evehicl eagainst rollin gaway (Ypage 156).
XRestart th eengine.
Display messages24 9
On-board computer and displays
Z
Page 278 of 398
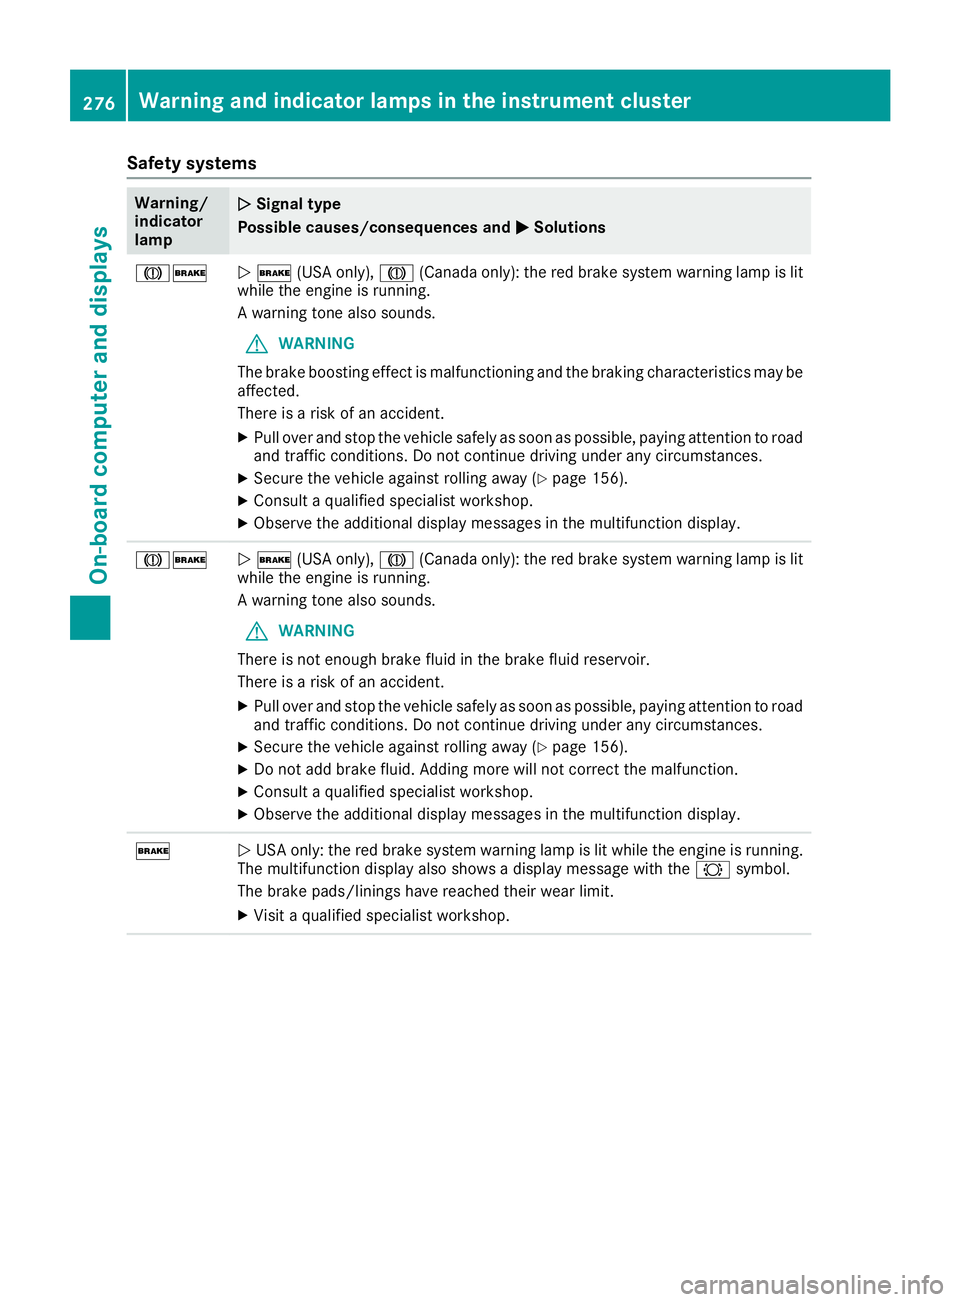
Safety systems
Warning/
indicator
lampNSignal type
Possible causes/consequences and M
Solutions
J$N$ (USA only), J(Canada only): the red brake system warning lamp is lit
while the engine is running.
A warning tone also sounds.
GWARNING
The brake boosting effect is malfunctioning and the braking characteristics may be
affected.
There is a risk of an accident.
XPull over and stop the vehicle safely as soon as possible, paying attention to road
and traffic conditions. Do not continue driving under any circumstances.
XSecure the vehicle against rolling away (Ypage 156).
XConsult a qualified specialist workshop.
XObserve the additional display messages in the multifunction display.
J$N $ (USA only), J(Canada only): the red brake system warning lamp is lit
while the engine is running.
A warning tone also sounds.
GWARNING
There is not enough brake fluid in the brake fluid reservoir.
There is a risk of an accident.
XPull over and stop the vehicle safely as soon as possible, paying attention to road
and traffic conditions. Do not continue driving under any circumstances.
XSecure the vehicle against rolling away (Ypage 156).
XDo not add brake fluid. Adding more will not correct the malfunction.
XConsult a qualified specialist workshop.
XObserve the additional display messages in the multifunction display.
$N USA only: the red brake system warning lamp is lit while the engine is running.
The multifunction display also shows a display message with the #symbol.
The brake pads/linings have reached their wear limit.
XVisit a qualified specialist workshop.
276Warning and indicator lamps in the instrument cluster
On-board computer and displays