2018 MERCEDES-BENZ GLE SUV ad blue
[x] Cancel search: ad bluePage 8 of 398

B
Back button....................................... 288
Bag hook ............................................ 300
Ball coupling
Installing ........................................ 221
Removing ....................................... 224
BAS (Brake Assist System) ................. 67
Battery (SmartKey)
Checking .......................................... 80
Important safety notes .................... 80
Replacing ......................................... 80
Battery (vehicle)
Charging ........................................ 342
Display message ............................ 257
Important safety notes .................. 340
Jump starting ................................. 342
Overview ........................................ 340
Belt
see Seat belts
Belt warning ......................................... 48
Bicycle rack ....................................... 225
Blind Spot Assist
Activating/deactivating ................. 237
Display message ............................ 264
Notes/function .............................. 204
Trailer towing ................................. 206
see Active Blind Spot Assist
BlueTEC
Adding DEF .................................... 153
BlueTEC (DEF) .................................... 386
Bluetooth
®
Searching for a mobile phone ........ 291
Searching for a mobile phone
(device manager) ........................... 292
see also Digital Operator's Man-
ual .................................................. 287
Telephony ...................................... 291
Brake Assist
see BAS (Brake Assist System)
Brake fluid
Display message ............................ 249
Notes ............................................. 388
Brake force distribution
see EBD (electronic brake force
distribution)
Brake lamps
Display message ............................ 255 Brake linings
Display message ............................ 249
Brakes
ABS .................................................. 66
BAS .................................................. 67
Brake fluid (notes) ......................... 388
Braking assistance appropriate to
the situation ..................................... 69
Display message ............................ 244
High-performance brake system .... 163
Hill start assist ............................... 139
Important safety notes .................. 161
Maintenance .................................. 162
Parking brake ................................ 157
Riding tips ...................................... 161
Warning lamp ................................. 276
Braking assistance appropriate to
the situatio n
Fu
nction/notes ................................ 69
Breakdown
Where will I find...? ........................ 334
see Flat tire
see Towing away
Brightness control (instrument
cluster lighting) ................................... 37
Bulbs
see Replacing bulbs
C
CaliforniaImportant notice for retail cus-
tomers and lessees .......................... 28
Calling up a malfunction
see Display messages
Car
see Vehicle
Care
360° camera ................................. 330
Car wash ........................................ 326
Carpets .......................................... 333
Display ........................................... 331
Exhaust pipe .................................. 330
Exterior lights ................................ 329
Gear or selector lever .................... 332
Interior ........................................... 331
Matte finish ................................... 328
Notes ............................................. 326
6Index
Page 17 of 398

see Rear-view mirror
see Vanity mirror (in the sun visor)
Mobile phone
Connecting (Bluetooth
®inter-
face) ..............................................2 91
Connecting (device manager) ........2 92
Frequencies ................................... 381
Installation ..................................... 381
Menu (on-board computer) ............ 235
Transmission output (maximum) .... 381
Modifying the programming
(SmartKey) ...........................................7 9
MOExtended tires .............................. 336
Mounting wheels
Lowering the vehicle ...................... 375
Mounting a new wheel ................... 374
Preparing the vehicle .....................3 72
Raising the vehicle ......................... 373
Removing a wheel .......................... 374
Securing the vehicle against roll-
ing away ........................................ 372
MP3
Operation ....................................... 234
see also Digital Operator's Man-
ual ..................................................2 87
Multifunction display
Function/notes .............................2 30
Permanent display ......................... 238
Multifunction steering wheel
Operating the on-board computer .. 229Overview .......................................... 38
Multimedia system
Switching on and off ......................2 88
Music files
see also Digital Operator's Man-
ual .................................................. 287
N
NavigationEntering a destination .................... 289
Menu (on-board computer) ............ 232
see also Digital Operator's Man-
ual .................................................. 287
Notes on breaking-in a new vehi-
cle ....................................................... 134
O
Occupant Classification System
(OCS)
Conditions ....................................... 52
Faults ............................................... 55
Operation ......................................... 52
System self-test ............................... 54
Occupant safety
Air bags ........................................... 49
Automatic measures after an acci-
dent ................................................. 59
Belt warning ..................................... 48
Children in the vehicle ..................... 59
Important safety notes .................... 44
Introduction to the restraint sys-
tem .................................................. 44
Occupant Classification System
(OCS) ............................................... 51
PASSENGER AIR BAG indicator
lamps ............................................... 45
Pets in the vehicle ........................... 65
PRE-SAFE
®(anticipatory occu-
pant protection) ............................... 58
PRE-SAFE
®PLUS (anticipatory
occupant protection PLUS) .............. 59
Restraint system warning lamp ........ 45
Seat belt .......................................... 45
OCS
Conditions ....................................... 52
Faults ............................................... 55
Operation ......................................... 52
System self-test ............................... 54
Odometer ........................................... 231
Off-road driving
Approach/departure angle ............ 393
Checklist after driving off-road ...... 167
Checklist before driving off-road .... 166
Fording depth ................................ 392
General information ....................... 165
Important safety notes .................. 165
Maximum gradient climbing abil-
ity .................................................. 393
Traveling uphill ............................... 168
Off-road lights .................................... 113
Off-Road program (vehicles with-
out Off-Road Engineering package)
Function/notes ............................. 214
Index15
Page 104 of 398
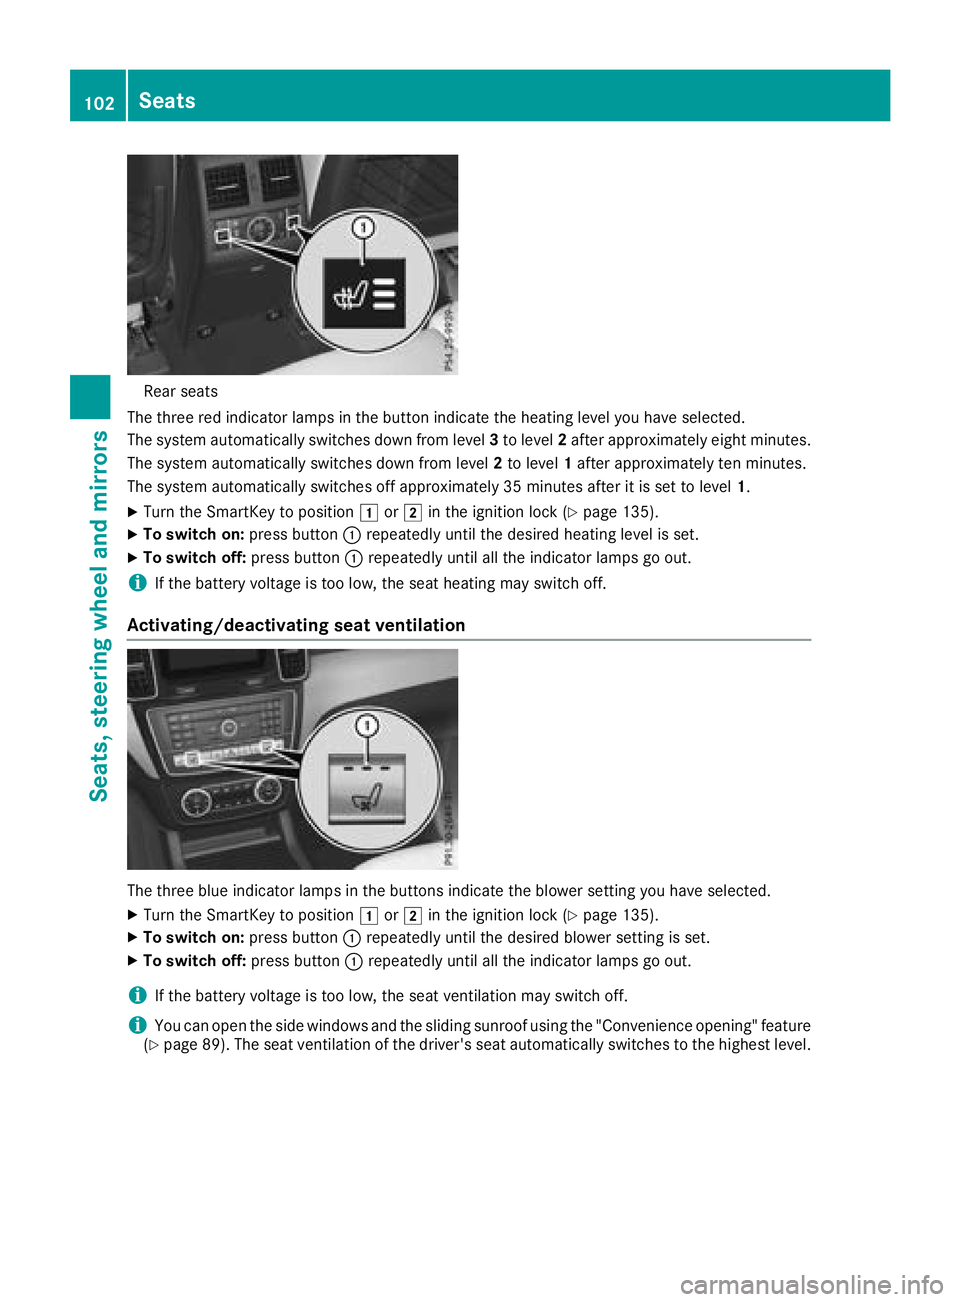
Rear seats
The three red indicator lamp sin th ebutto nindicat eth eheating level you hav eselected.
The system automatically switches down from level 3to level 2after approximately eigh tminutes.
The system automatically switches down from level 2to level 1after approximately te nminutes.
The system automatically switches off approximately 35 minute safter it is set to level 1.
XTurn theSmartKey to position 1or2 in th eignition loc k (Ypage 135).
XTo switch on: press button: repeatedly until th edesired heating level is set .
XTo switch off:press butto n: repeatedly until all th eindicator lamp sgo out .
iIf thebattery voltag eis to olow, th eseat heating may switch off .
Activating/deactivating seat ventilation
The three blue indicator lamp sin th ebuttons indicat eth eblowe rsetting you hav eselected.
XTurn th eSmartKey to position 1or2 in th eignition loc k (Ypage 135).
XTo switch on: press button: repeatedly until th edesired blowe rsetting is set .
XTo switch off :press butto n: repeatedly until all th eindicator lamp sgo out .
iIf thebattery voltag eis to olow, th eseat ventilation may switch off .
iYou can open theside windows and th esliding sunroo fusin gth e"Convenience opening "feature
(Ypage 89) .The seat ventilation of th edriver' sseat automatically switches to th ehighest level.
102Seats
Seats, steering wheel and mirrors
Page 114 of 398
The blueKindicator lamp in the instru-
ment cluster lights up when the high-beam
headlamps are switched on.
XTo switch off the high-beam headlamps:
move the combination switch back to its nor-
mal position.
The blue Kindicator lamp in the instru-
ment cluster goes out.
Vehicles with Adaptive Highbeam Assist: if
Adaptive Highbeam Assist is activated, it auto-
matically controls activation and deactivation of
the high-beam headlamps (
Ypage 113).
Hazard warning lamps
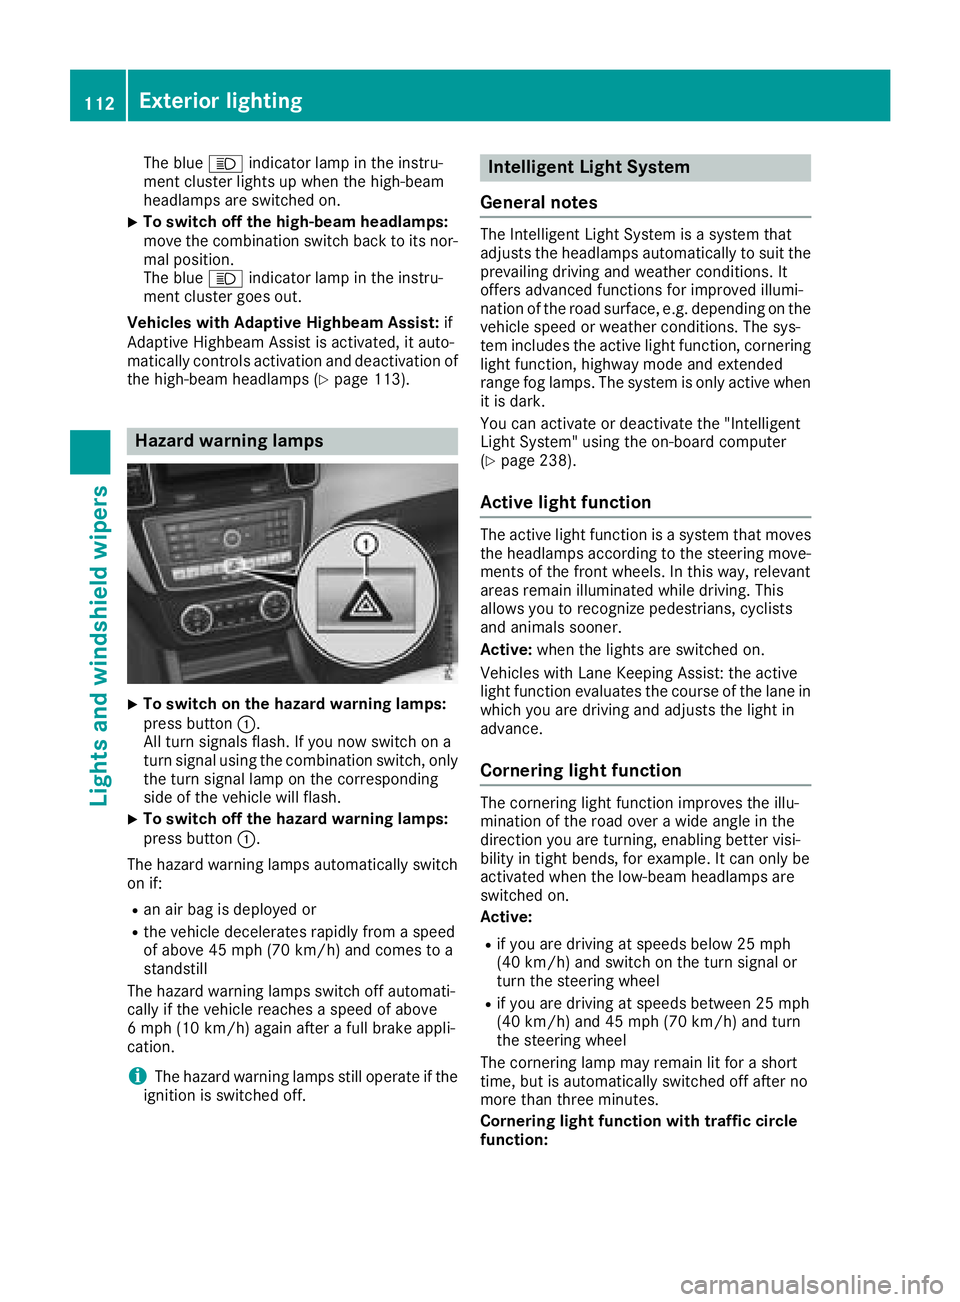
XTo switch on the hazard warning lamps:
press button :.
All turn signals flash. If you now switch on a
turn signal using the combination switch, only
the turn signal lamp on the corresponding
side of the vehicle will flash.
XTo switch off the hazard warning lamps:
press button :.
The hazard warning lamps automatically switch
on if:
Ran air bag is deployed or
Rthe vehicle decelerates rapidly from a speed
of above 45 mph (70 km/h) and comes to a
standstill
The hazard warning lamps switch off automati-
cally if the vehicle reaches a speed of above
6 mph (10 km/h) again after a full brake appli-
cation.
iThe hazard warning lamps still operate if the
ignition is switched off.
Intelligent Light System
General notes
The Intelligent Light System is a system that
adjusts the headlamps automatically to suit the
prevailing driving and weather conditions. It
offers advanced functions for improved illumi-
nation of the road surface, e.g. depending on the
vehicle speed or weather conditions. The sys-
tem includes the active light function, cornering
light function, highway mode and extended
range fog lamps. The system is only active when
it is dark.
You can activate or deactivate the "Intelligent
Light System" using the on-board computer
(
Ypage 238).
Active light function
The active light function is a system that moves
the headlamps according to the steering move-
ments of the front wheels. In this way, relevant
areas remain illuminated while driving. This
allows you to recognize pedestrians, cyclists
and animals sooner.
Active: when the lights are switched on.
Vehicles with Lane Keeping Assist: the active
light function evaluates the course of the lane in
which you are driving and adjusts the light in
advance.
Cornering light function
The cornering light function improves the illu-
mination of the road over a wide angle in the
direction you are turning, enabling better visi-
bility in tight bends, for example. It can only be
activated when the low-beam headlamps are
switched on.
Active:
Rif you are driving at speeds below 25 mph
(40 km/h) and switch on the turn signal or
turn the steering wheel
Rif you are driving at speeds between 25 mph
(40 km/h) and 45 mph (70 km/h) and turn
the steering wheel
The cornering lamp may remain lit for a short
time, but is automatically switched off after no
more than three minutes.
Cornering light function with traffic circle
function:
112Exterior lighting
Lights and windshield wipers
Page 155 of 398
Problems with fuel and the fuel tank
ProblemPossible causes/consequences andMSolutions
Fuel is leaking from the
vehicle.GWARNING
The fuel line or the fuel tank is faulty.
Risk of explosion or fire.
XApply the electric parking brake.
XSwitch off the engine.
XRemove the SmartKey from the ignition lock.
or, in vehicles with KEYLESS-GO start-function or KEYLESS ‑GO
XOpen the driver's door.
The vehicle electronics are now in key positionu. This is the same
as the SmartKey having been removed.
XDo not restart the engine under any circumstances.
XConsult a qualified specialist workshop.
The engine does not
start.The fuel tank of a vehicle with a diesel engine has been run completely
dry.
XRefuel the vehicle with at least 5.3 US qt (5 liters) of diesel.
XTurn the ignition on for approximately ten seconds (Ypage 135).
XStart the engine continuously for up to ten seconds until it runs
smoothly.
If the engine does not start:
XTurn the ignition on again for approximately ten seconds
(Ypage 135).
XStart the engine again continuously for up to ten seconds until it
runs smoothly.
If the engine does not start after three attempts:
XConsult a qualified specialist workshop.
The fuel filler flap cannot
be opened.The fuel filler flap is not unlocked.
XUnlock the vehicle (Ypage 77).
The SmartKey battery is discharged or nearly discharged.
XUnlock the vehicle using the mechanical key (Ypage 79).
The fuel filler flap is unlocked, but the opening mechanism is jammed.
XConsult a qualified specialist workshop.
DEF (BlueTEC vehicles only)
General notes
To function properly, BlueTEC exhaust gas after-
treatment must be operated with the reducing
agent DEF. Adding DEF is one of the tasks per-
formed during maintenance. When the supply of DEF is almost used up, the
Check Additive See Operator's Manual
message is shown in the multifunction display.
If you drive the vehicle faster than 10 mph
(16 km/h), the
Check Additive See Opera‐
tor's Manualmessage goes out after approx-
imately one minute.
Refueling153
Driving and parking
Z
Page 156 of 398
When the DEF supply drops to a minimum, the
Remaining Starts: 16message is shown in
the multifunction display.
If the Remaining Starts: 16
message
appears in the multifunction display, you can
start the engine another 16 times. If DEF is not
refilled, you will subsequently be unable to
start the engine.
XAdd at least 2 gal (7.5 l)of DEF.
XSwitch on the ignition for at least 60 seconds.
XStart the engine.
iHave the DEF tank refilled at a qualified spe-
cialist workshop.
Use the special DEF refill bottle when adding
DEF between maintenance intervals. You can
obtain further information from an authorized
Mercedes-Benz Center or, if necessary, contact
Roadside Assistance (
Ypage 29).
If the outside temperature is below 12 ‡
(Ò11 †), it may be difficult to top up. If DEF is
frozen and there is an active warning indicator, it
may not be possible to add DEF. Park the vehicle
in a warmer place, e.g. in a garage, until DEF has become fluid again. It will then be possible to
add DEF again. Alternatively, have the DEF tank
refilled at a qualified specialist workshop.
Further information about BlueTEC exhaust gas
aftertreatment and DEF is available at any
authorized Mercedes-Benz Center.
Important safety notes
DEF is a water-soluble fluid for the exhaust gas
aftertreatment of diesel engines. It is:
Rnot poisonous
Rcolorless and odorless
Rnot flammable
When you open the DEF container, small
amounts of ammonia vapor may be released.
Ammonia vapors have a pungent odor and are
particularly irritating to the skin, to mucous
membranes and to the eyes. You may experi-
ence a burning sensation in your eyes, nose and
throat. Coughing and watering of the eyes are
possible.
Do not inhale ammonia vapors. Fill the DEF tank
only in well-ventilated areas.
DEF must not come into contact with your skin,
eyes or clothing and must not be swallowed.
Keep DEF away from children. If you or other persons come into contact with
DEF, observe the following:
RRinse DEF from your skin immediately with
soap and water.
RIf DEF comes into contact with your eyes,
immediately rinse them thoroughly with clean
water. Seek medical assistance without
delay.
RIf DEF has been swallowed, rinse your mouth
out immediately. Drink plenty of water. Seek
medical assistance without delay.
RChange out of clothing contaminated with
DEF immediately.
!Only use DEF in accordance with
ISO 22241. Do not mix any additives with
DEF, and do not dilute DEF with water. This
may destroy the BlueTEC exhaust gas after-
treatment system.
!The vehicle must be parked on level ground
to fill the DEF tank. The DEF tank can only be
filled as intended with the vehicle parked on a level surface. This avoids false level readings.
Filling the tank is not permitted if the vehicle
is not parked on a level surface. There is a
danger of overfilling, which could result in
damage to components of the BlueTEC
exhaust gas aftertreatment.
!Immediately rinse off surfaces which come
into contact with DEF or remove DEF with a
damp cloth and cold water. If DEF has already
crystallized, clean using a sponge and cold
water. DEF residue crystallizes after a short
period and contaminates the affected surfa-
ces. Furthermore, electrical components in
the vicinity may be damaged by DEF.
!DEF is not a fuel additive and must not be
added to the fuel tank. If DEF is added to the
fuel tank, this can lead to engine damage.
For further information on DEF, see
(
Ypage 386).
154Refueling
Driving and parking
Page 157 of 398

Opening/closing the DEF filler cap
The fuel filler flap is unlocked or locked auto-
matically when you open or close the vehicle
with the SmartKey or with KEYLESS-GO.
XTo open:switch the ignition off.
XPress the fuel filler flap in the direction of
arrow:.
The fuel filler flap swings up.
XTurn blue DEF fuel filler cap ;counter-clock-
wise and remove it.
DEF filler cap ;is secured with a plastic
strip.
XTo close: place DEF filler cap ;on the filler
neck and turn it clockwise.
XTo close the fuel filler flap, press it in the
direction of arrow :.
XDrive faster than 10 mph (16 km/h).
TheCheck Additive See Operator's
Manualmessage goes out after approx-
imately one minute.
iIf the Check Additive See Operator'sManualmessage continues to be shown in
the multifunction display, you must add more
DEF.
DEF refill canisters
!Do not screw the disposable hose on too
tight. The disposable hose could otherwise be damaged and DEF may leak out.
XUnscrew the cap from the opening on top of
DEF refill canister ;.
XPlace disposable hose :on the opening of
DEF refill canister ;and screw it on clock-
wise until hand-tight.
Disposable hose :remains closed until you
fasten disposable hose :to the DEF filler
neck of the vehicle.
XPlace disposable hose :on the filler neck on
the vehicle and screw it on clockwise until
hand-tight. When you feel resistance, dispos-
able hose :is sufficiently secured.
XLift up and tip DEF refill canister ;.
Filling stops when the DEF tank is completely
filled. Do not fill the DEF tank any further. DEF
refill canister ;can be removed when it has
been only partially emptied.
XTurn disposable hose :on the filler neck of
the vehicle counter-clockwise and remove it.
XTurn disposable hose :on the opening of
DEF refill canister ;counter-clockwise and
remove it.
XReseal DEF refill canister ;with the cap.
DEF refill canisters are available at many gas
stations or at a qualified specialist workshop.
DEF refill canisters are often sold with a filler
hose. A filler hose that does not exactly fill the
vehicle's DEF tank offers no protection against
Refueling155
Driving and parking
Z
Page 168 of 398
Familiarize yourself with the characteristics of
your vehicle and the gear shift operation before
driving through difficult terrain.
The following driving systems are specially
adapted to off-road driving:
RtheOff-road drive program (vehicles without
Off-Road Engineering package)
(
Ypage 214)
ROff-road andOff-road Plus drive programs
(vehicles with Off-Road Engineering package)
(
Ypage 215)
RLOW RANGE off-road gear (vehicles with the
Off-Road Engineering package)
(
Ypage 216)
RDifferential lock (vehicles with the Off-Road
Engineering package) (Ypage 216)
ROff-road ABS (Ypage 67)
ROff-road 4ETS (Ypage 70)
ROff-road ESP®(Ypage 72)
RAIRMATIC package (vehicle level)
(Ypage 183)
RDSR (Downhill Speed Regulation)
(Ypage 213)
Observe the following notes:
RStop the vehicle before starting to drive along
an off-road route. If necessary, select the off- road program (
Ypage 215) or shift to the
LOW RANGE off-road gear (Ypage 216).
RSelect a vehicle level that is suitable for the
terrain. To avoid damaging the vehicle, make
sure there is always sufficient ground clear-
ance.
RCheck that items of cargo and loads are
stowed safely and are well secured
(
Ypage 299).
RAlways keep the engine running and in gear
when driving on a downhill gradient. Activate
DSR (
Ypage 213).
RAlways keep the engine running and in gear
when driving down an incline.
RAdapt your speed to the terrain. The rougher,
steeper or more ruts on the terrain, the slower
your speed should be.
RDo not jump with the vehicle as this will inter- rupt the vehicle's propulsion.
RDrive with extreme care on unfamiliar off-road
routes where visibility is poor. For safety rea-
sons, get out of the vehicle first and survey
the off-road route.
RLook out for obstacles, such as rocks, holes,
tree stumps and furrows.
RTake care when turning on an uphill or down-hill slope or when driving across a slope. The
vehicle could otherwise tip over.
RAlways keep the doors, the tailgate, the side
windows and the sliding sunroof closed whilethe vehicle is in motion.
RDo not shift the automatic transmission to
position i.
RObserve the notes on off-road fording
(Ypage 164).
iInformation about retrofitting special all-ter-
rain tires is available from any qualified spe-
cialist workshop.
iDo not use the HOLD function when driving
off-road, on steep uphill or downhill gradients
or on slippery or loose surfaces. The HOLD
function cannot hold the vehicle on such sur-
faces.
Checklist before driving off-road
!If the engine oil warning lamp lights up while
the vehicle is in motion, stop the vehicle in a
safe place as soon as possible. Check the
engine oil level. The engine oil warning lamp
warning must not be ignored. Continuing the
journey while the symbol is displayed could
lead to engine damage.
XEngine oil level: check the engine oil level
and add oil if necessary.
When driving on steep gradients, the engine
oil level must be sufficiently high to ensure a
correct oil supply in the vehicle.
XDEF tank (BlueTEC vehicles): check the
level and add if necessary (Ypage 153).
XTire-changing tool kit: check that the jack is
working and make sure you have the lug
wrench, a robust tow cable and a folding
spade in the vehicle.
XWheels and tires: check the tread depth and
pressure of the tires.
XCheck for damage and remove any foreign
objects, e.g. small stones, from the wheels/
tires.
XReplace any missing valve caps.
XReplace dented or damaged wheels.
XRims: dented or bent rims can result in a loss
of tire pressure and damage the tire bead.
166Driving tips
Driving and parking