Page 169 of 190
.
The following information is shown (if available):
Rname of the tropical storm and category
Rtime stamp
Rdirectional")
You can find out more information about cyclo-
nes in the Storm Guide (Ypage 168).
The following information is shown (if available):
Rname of the tropical storm and category
Rtime stamp
Rdirectional movement speed and path
Rmaximum wind speed
Propagation speed: the speed at which the
storm cell of a tropical cyclone is advancing.
A tropical storm is categorized according to
where it originated.
Region of origincategory
Atlantic, North
and South Pacific
OceansName of tropical low-
pressure system (Trop‐
ical Low Press.Sys.)
Atlantic, North
and South Pacific
OceansName of tropical storm
(Tropical Storm)
Atlantic, North
and South Pacific
OceansName of tropical storm
(Hurricane Category
3)
Displays hurricane cate-
gories 1 through 5
Northwestern
Pacific OceanName of tropical storm
(Tropical Low
Press. Sys.)
Northwestern
Pacific OceanName of tropical storm
(Tropical Cyclone)
Northwestern
Pacific OceanName of tropical storm
(Typhoon)
Northwestern
Pacific OceanName of tropical storm
(Super-Typhoon)
You can also see the time stamp for the weather
data on map scales of 50 miles and smaller.
The weather map shows wind directions and
wind speeds.
Legend (precipitation radar and storms)
XDisplay the menu on the weather map
(Ypage 164).
XTo selectView: turn and press the controller.
XSelectLegend.
iThe symbol for a tornadic storm is also valid
for a cyclone (mesocyclone).
Precipita-
tion typeColor scale
RainEleven shades from light to
heavy (light green to red)
MixedShades from light to heavy
(light purple to purple)
SnowShades from light to heavy
(light turquoise to turquoise)
Time stamp
The time stamp shows when the weather data
was created by the weather station.
A time stamp corresponds to the time at the
vehicle's current position. The changeover from
summer time to standard time is performed
automatically.
XDisplay the menu on the weather map
(Ypage 164).
XTo select View: turn and press the controller.
XSelectTime Stamp.
Changing to the information chart
XDisplay the menu on the weather map
(Ypage 164).
XTo select WeatherTable: turn and press the
controller.
Weather forecasts167
SIRIUS Weather
Page 170 of 190

Storm Watch Box
Storm watch areas for which there are storm
advisories are displayed as red areas on the
weather map.
XTo activate/deactivate the storm watch
area display on the map:display the menu
on the weather map (
Ypage 164).
XTo select View: turn and press the controller.
The list of display levels appears.
XSelect Storm Watch.
XSelectShow Sym. for Storm Areas onMap.
Storm watch areas are displayed Oor are
not displayed ªon the map.
XTo activate/deactivate the automatic dis-
play of storm advisories: selectDisplay
Storm Watch Automatically.
Storm advisories are automatically displayed
O or not displayed ªon the map.
XTo set the radius for storm advisories:
select 5 Miles
,50 Milesor 200 Miles.
Storm Guide
XTo display the storm guide: display the
menu on the weather map (Ypage 164).
XTo select Guide: turn and press the controller.
A menu appears. The current storm is high-
lighted. There is information about the storm
in the status bar.
XTo select Next: turn and press the controller.
The next storm is marked.
XSelect Previous.
The previous storm is highlighted.
XTo display storm details: selectDetails.
You see detailed information about the selec-
ted storm.
168Weather forecasts
SIRIUS Weather
Page 171 of 190

Your multimediasyste mequipment
These operatin ginstruction sdescribe all th e
standar dan doptional equipment of your multi-
media system, as available at th etime of going
to press. Country-specifi cdifference sare pos -
sible. Bear in min dthat your vehicle may no t
feature all function sdescribed here. Thi salso
applies to safety-relevan tsystems an dfunc-
tions.
Read th einformation on qualifie dspecialis t
workshop sin th evehicle Operator's Manual.
Overview
Important safet ynotes
GWARNING
The CD/DVD drive is aclass 1lase rproduct.
If you ope nth ehousin gof th eCD/DVD drive,
there is aris kof exposure to invisible lase r
radiation .Thi slase rradiation could damage
your retina. There is aris kof injury.
Never ope nth ehousing. Always hav emain -
tenanc ean drepair wor kcarrie dout at aquali -
fie dspecialis tworkshop .
GWARNING
If objects suc has headphones/headset sor
external audio/video sources are no tsecure d
in th epassenger compartment, they can be
flun garound an dhit vehicle occupants .There
is aris kof injury, fo rexample in th eevent of
sudden braking or asudden change in direc -
tion .
Always stow these items or similar objects
carefully so that they canno tbe flung around ,
fo rexample in alockable vehicle stowag e
compartment.
Equipment
Observ ethat arange of Rear Seat Entertain -
men tSystems are available fo rMercedes-Ben z
vehicles .In this Operator's Manual, th eRear
Seat Entertainmen tSyste mCode 86 4is used
fo rillustration purposes. If you hav e adifferen t
Rear Seat Entertainmen tSyste min your vehicle,
please refer to th emanufacturer's operatin g
instructions.
Component s
The Rear Seat Entertainmen tSyste mincludes :
Rtwoscreens fo rth erea rbehin dth efront-seat
head restraints
Rtw oremot econtrols
Rasingle drive (rear-compartmen tdrive)
RAU Xjack son bot hrea rscreens (AUX display)
RAU Xjack son th erea rdrive (AUX drive)
Rheadphone sfo reac hrea rscree n
Rtwoset sof cordless headphone s
Rear-compartment screens
:AUXjack s(AUX display)
;Display
Overview169
Rear Seat Entertainment System
Z
Page 172 of 190
 can be found in the rear-compartment drive (Ypage 171).
Remote control
Overview
:Switches the screen on or off
;Switches the button illumination on/off
=Selects the scre")
The same AUX jacks (AUX drive) can be found in the rear-compartment drive (Ypage 171).
Remote control
Overview
:Switches the screen on or off
;Switches the button illumination on/off
=Selects the screen for the remote control
?Selects a menu item
AConfirms a selection or setting
BSwitches the mute function on/off
CAdjusts the volume
DSkips, fast-forward and fast-rewind
ESelects a track; direct entry
FExits a menu (back)
iTwo remote controls are supplied for the US
and Canadian markets.
Selecting the screen for the remote con-
trol
You can use the remote control to operate either
of the two rear screens. To do so, the appropri-
ate rear screen must be selected.
XTo select the left-hand screen: turn thumb-
wheel =until LREAR (Ypage 170) is high-
lighted in the window.
XTo select the right-hand screen: turn
thumbwheel =until REAR Ris highlighted in
the window.
Switching the screen on/off
The switched-on rear compartment screens
switch off after 30 minutes if:
Rthe SmartKey in the ignition lock is in position u or1 (see the vehicle Operator's Manual)
Rthe SmartKey is not inserted
Before the screens switch off, they show a mes-
sage to this effect.
You can switch the screens back on. However,
this will discharge the starter battery.
XPoint the remote control at the rear-compart-
ment screen which has been selected for
remote operation.
XPress button :on the remote control
(Ypage 170).
The rear screen switches on or off.
Switching the button lighting on/off
XPress button ;on the remote control
(Ypage 170).
Depending on the previous status, the button
lighting is switched on or off.
iIf you do not use the remote control for
about 15 seconds, the button lighting
switches off automatically.
Switching the sound on or off
XPress button Bon the remote control
(Ypage 170).
The sound is switched on/off.
Selecting a menu/menu item and con-
firming your selection
XSelect a menu item using the =;
9: buttons on the remote control and
press the 9button to confirm.
170Overview
Rear Seat Entertainment System
Page 173 of 190
 jack for audio signal
(red)
=AUX, left-hand (L) jack for audio signal
(white)
?AUX, video (V) jack (yellow)
ADisc eject button
The AUX jacks")
CD/DVD drive and AUX jacks
:Disc slot
;AUX, right-hand (R) jack for audio signal
(red)
=AUX, left-hand (L) jack for audio signal
(white)
?AUX, video (V) jack (yellow)
ADisc eject button
The AUX jacks shown are for the AUX drive.
Identical jacks can be found on the right-hand
side of the rear-compartment screens (AUX dis-
play) (
Ypage 169).
Cordless headphones
Overview
XTo adjust the headphones: open both sides of the headphones.
XAdjust the headphones by pulling the headphone band in the direction of the arrow.
XTo switch the headphones on or off: press On or Off switch;.
XTo adjust the volume: turn volume control=until the desired volume is set. If you have con-
nected corded headphones to a rear-compartment screen, you can adjust the volume using the
remote control (
Ypage 170).
XTo check the battery condition of charge: check the state of the batteries using indicator
lamp :(Ypage 172).
The headphones automatically switch off if they have not received an audio signal for approximately
three minutes. This preserves the batteries.
Overview171
Rear Seat Entertainment System
Z
Page 174 of 190

Indicator lamp on the cordless head-
phones
The color of theindicator lamp shows:
Rwhether th edevice is switched on or off
Rth econdition of th einserted batterie s
LED dis-
pla yStatus
Gree nThe batteries are fine.
RedThe batteries are almost dis-
charged.
Lit continu-
ouslyThe headphones are switched
on and connecte dto ascreen.
Flashin gThe headphones are searching
for theconnection to ascreen.
No display
(dark)The headphones are switched
off or th ebatteries are dis-
charged.
The function of th eheadphones may be
impaired by other radio-base delectronic devi-
ce ssuc has mobile phones or laptops .
Selecting the screen for the cordless
headphones
XSlide switch:toL(left-han dscreen) or R
(right-hand screen) .
Connecting additional headphones
Up to two cordless headphones can be used at
thesam etime for eac hscreen.
You can also connec ton eadditional set of cor-
ded headphones to eac hof th etwo rear-com-
partmen tscreens (
Ypage 169). The socke tis
designed for headphones wit h a3.5mm stere o
jac kplug and an impedance of 32 ohms.
Replacing batteries
Notes
GWARNIN G
Batterie scontain toxic and corrosiv esubstan -
ces. If batterie sare swallowed, it can result in
severe healt hproblems. Ther eis aris kof fatal
injury.
Kee pbatterie sout of th ereac hof children .If
a battery is swallowed, seek medical attention
immediately.
HEnvironmental not e
Batteriescontain dangerous
substances. It is against th e
law to dispose of them wit h
th ehousehold rubbish. They
must be collecte dseparately
and recycle dto protect th e
environment.
Dispose of batterie sin an
environmentally friendly
manner. Tak edischarged
batterie sto aqualified spe-
cialist workshop or aspecial
collection poin tfor used bat -
teries.
Batterie sare require dfor th eremot econtrol
and for th etwo set sof cordless headphones.
XSwitc hto th eremot econtrol (Ypage 173).
XSwitchto cordless headphones
(Ypage 173).
172Overview
Rear Seat Entertainment System
Page 175 of 190

On the remote control
:Battery compartment
;Catch tab
=Battery compartment cover
?Retaining lugs
ABatteries
The remote control contains two type AAA, 1.5 V
batteries.
XTo open the battery compartment: remove
battery compartment cover =on the back of
the remote control.
XTo do so, press down retaining lug ;and
take off battery compartment cover =.
XRemove discharged batteriesAfrom the
tray.
XInsert the new batteries. Observe the polarity markings on the batteries and battery com-
partment when doing so.
Left-hand battery: the positive pole (+) must
face upwards.
Right-hand battery: the positive pole (+) must
face downwards.
XTo close the battery compartment: insert
battery compartment cover =starting with
retaining lugs ?into the battery compart-
ment and allow catch tab ;to engage in
place.
On the cordless headphones
The battery compartment is located on the left
headphone. The cordless headphones require
two type AAA, 1.5 V batteries.
XTo open the battery compartment: turn
battery compartment cover :counter-
clockwise and remove.
XRemove the discharged batteries from the
tray.
XInsert the new batteries. Observe the polarity markings on the batteries and battery tray
when doing so.
XTo close the battery compartment: replace
battery housing cover :and turn it clock-
wise until it engages.
If the batteries have been inserted correctly,
the indicator lamp will light up green when the
headphones are switched on.
iThe operating duration of the headphones
with a set of batteries is up to 40 hours.
Basic functions
Using headphones
You can use the cordless headphones supplied
and/or up to two sets of corded headphones
connected to the corresponding jack of the rear-
compartment screens (
Ypage 169).
Information on the cordless headphones
(
Ypage 171).
Basic functions173
Rear Seat Entertainment System
Z
Page 176 of 190

Using the main loudspeakers
This function is available in conjunction with the
multimedia system.
You can use the vehicle loudspeakers to listen to
a disc inserted in the rear-compartment drive.
To do so, disc mode (audio CD/audio DVD/
MP3) must be activated on at least one rear
screen.
The volume setting of the headphones does not
affect the main loudspeakers.
XTo set on the multimedia system:press the
$ button, for example, to switch on an
audio mode.
XTo select Information6slide and press
the controller.
A menu appears.
XTurn the controller until Rear Seat Enter‐tainment System: Audiois brought to the
front.
XPress the controller.
Selecting sound settings
You can select sound settings in the following
operating modes:
RAudio CD/MP3
RVideo DVD
RRadio (active media source in COMAND)
RAUX
XSwitch on an operating mode (e.g. CD mode)
(Ypage 175).
XSelect TrebleorBassusing
the :=; buttons on the remote
control and press the 9button to confirm.
An adjustment scale appears.
XSelect a setting using the 9:buttons
and press the 9button to confirm.
Multiple users
Simultaneous use of the rear-compart-
ment disc drive
The two rear-compartment screens can be oper- ated almost entirely independently from one
another. However, a conflict may occur in some
menus if the two screens are used simultane-
ously. The following functions affect both screens:
Rchanging playback options
Rselecting a track (from a track list or folder)
Rusing the play, pause and stop functions
Rfast forward and rewind or scrolling
Rcalling up the DVD menu and navigating
within it
Rsetting the language, subtitles and camera
angle
Rcalling up interactive DVD content
The following functions affect only one screen:
Rfunctions in audio and video mode
Rchanging picture settings
Rswitching between full screen and the menu
Switching between operating modes
When you exit an operating mode (e.g. CD
mode), the current setting is saved. If you call up
this operating mode again later, there are two
possibilities:
Rthe operating mode has been changed on the
other screen.
Rthe operating mode has not been changed.
In the first case, the operating mode appears as it is on the other screen.
In the second case, the setting appears on the
screen as it was when you last exited the oper-
ating mode.
Picture settings
Overview
You can select the picture settings in DVD and
AUX mode (Ypage 184).
Adjusting the brightness, contrast and
color
XSwitch to DVD mode (Ypage 179).
XTo show the menu: press the9button on
the remote control.
174Basic functions
Rear Seat Entertainment System
 1
1 2
2 3
3 4
4 5
5 6
6 7
7 8
8 9
9 10
10 11
11 12
12 13
13 14
14 15
15 16
16 17
17 18
18 19
19 20
20 21
21 22
22 23
23 24
24 25
25 26
26 27
27 28
28 29
29 30
30 31
31 32
32 33
33 34
34 35
35 36
36 37
37 38
38 39
39 40
40 41
41 42
42 43
43 44
44 45
45 46
46 47
47 48
48 49
49 50
50 51
51 52
52 53
53 54
54 55
55 56
56 57
57 58
58 59
59 60
60 61
61 62
62 63
63 64
64 65
65 66
66 67
67 68
68 69
69 70
70 71
71 72
72 73
73 74
74 75
75 76
76 77
77 78
78 79
79 80
80 81
81 82
82 83
83 84
84 85
85 86
86 87
87 88
88 89
89 90
90 91
91 92
92 93
93 94
94 95
95 96
96 97
97 98
98 99
99 100
100 101
101 102
102 103
103 104
104 105
105 106
106 107
107 108
108 109
109 110
110 111
111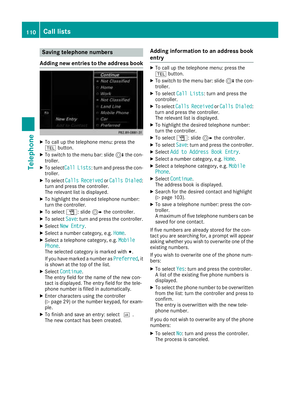 112
112 113
113 114
114 115
115 116
116 117
117 118
118 119
119 120
120 121
121 122
122 123
123 124
124 125
125 126
126 127
127 128
128 129
129 130
130 131
131 132
132 133
133 134
134 135
135 136
136 137
137 138
138 139
139 140
140 141
141 142
142 143
143 144
144 145
145 146
146 147
147 148
148 149
149 150
150 151
151 152
152 153
153 154
154 155
155 156
156 157
157 158
158 159
159 160
160 161
161 162
162 163
163 164
164 165
165 166
166 167
167 168
168 169
169 170
170 171
171 172
172 173
173 174
174 175
175 176
176 177
177 178
178 179
179 180
180 181
181 182
182 183
183 184
184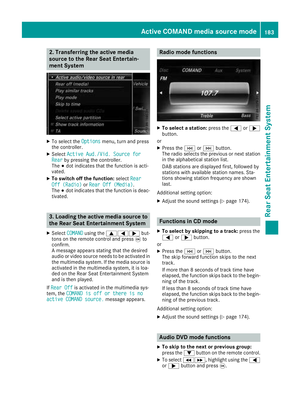 185
185 186
186 187
187 188
188 189
189