2018 MERCEDES-BENZ GLC stop start
[x] Cancel search: stop startPage 330 of 390
Mercedes-Benz car shampoo or cleaning
cloths.
Cleaning the side running board
! Do not clean the aluminum insert of the side
running board with alkaline or acid-based
cleaning agents, such as wheel cleaner. Do
not use acidic wheel cleaners to remove
brake dust. The aluminum inserts could oth-
erwise be damaged.
Cleaning the sensors
! If you clean the sensors with a power
washer, make sure that you keep a distance
of at least 11.8 in (30 cm) between the vehicle
and the power washer nozzle. Information
about the correct distance is available from
the equipment manufacturer.
X
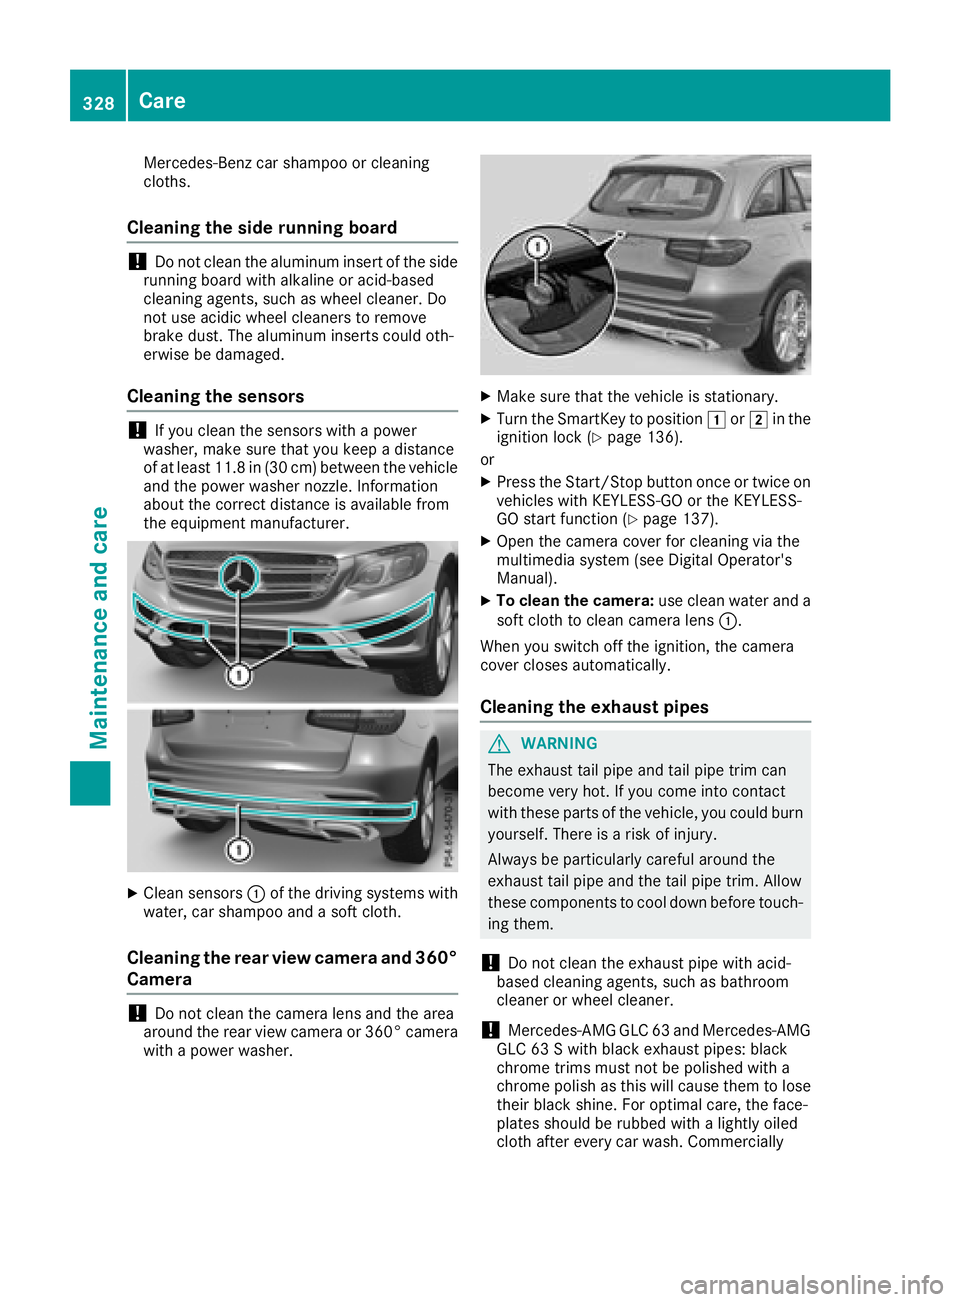
Clean sensors �C of the driving systems with
water, car shampoo and a soft cloth.
Cleaning the rear view camera and 360°
Camera
! Do not clean the camera lens and the area
around the rear view camera or 360° camera
with a power washer. X
Make sure that the vehicle is stationary. X
Turn the SmartKey to position �G or �H in the
ignition lock ( Y
page 136).
or X
Press the Start/Stop button once or twice on
vehicles with KEYLESS-GO or the KEYLESS-
GO start function ( Y
page 137).X
Open the camera cover for cleaning via the
multimedia system (see Digital Operator's
Manual). X
To clean the camera: use clean water and a
soft cloth to clean camera lens �C .
When you switch off the ignition, the camera
cover closes automatically.
Cleaning the exhaust pipes
G WARNING
The exhaust tail pipe and tail pipe trim can
become very hot. If you come into contact
with these parts of the vehicle, you could burn
yourself. There is a risk of injury.
Always be particularly careful around the
exhaust tail pipe and the tail pipe trim. Allow
these components to cool down before touch-
ing them.
! Do not clean the exhaust pipe with acid-
based cleaning agents, such as bathroom
cleaner or wheel cleaner.
! Mercedes ‑ AMG GLC 63 and Mercedes ‑ AMG
GLC 63 S with black exhaust pipes: black
chrome trims must not be polished with a
chrome polish as this will cause them to lose
their black shine. For optimal care, the face-
plates should be rubbed with a lightly oiled
cloth after every car wash. Commercially328
Care
Maintenance and care
Page 336 of 390
Flat tire
Preparing the vehicle Your vehicl e may be equipped with:R
MOExtended tires (tires wit h run-flat proper -
ties) ( Y
page 334)
Vehicl e preparation is no t necessar y on vehi-
cle s wit h MOExtended tiresR
a TIREFI T kit ( Y
page 333)
Vehicles equipped wit h MOExtended tires are
no t equipped wit h a TIREFI T kit at th e factory. It
is therefor e recommended that you additionally
equip your vehicl e wit h a TIREFI T kit if you moun t
tires that do no t feature run-flat properties, e.g.
winte r tires . A TIREFI T kit may be obtained from
a qualified specialist workshop.
Vehicles wit h an mbrace system (US A only) that
are no t equipped wit h a TIREFI T kit : in th e event
of a flat tire, contact th e Custome r Assistanc e
Cente r of th e mbrace emergenc y call system
( Y
page 308).
Information on changing and mounting wheels
( Y
page 370). X
Stop th e vehicl e on solid, non-slippery and
leve l ground , as far away as possible from
traffic. X
Switc h on th e hazard warning lamps.X
Secur e th e vehicl e against rollin g away
( Y
page 158).X
If possible , brin g th e fron t wheels int o th e
straight-ahead position .X
Switc h off th e engine.X
Remove th e SmartKey from th e ignition lock.
or, in vehicles wit h KEY LESS-GO start-function
o r KEYLESS ‑ GOX
Open th e driver' s door .
The vehicl e electronics are no w in position
�
Page 337 of 390
When replacing one or all tires, please observe
the following specifications for your vehicle's
tires: R
size R
the type and R
the "MOExtended" marking
If a tire has gone flat and cannot be replaced
with a MOExtended tire, a standard tire may be
used as a temporary measure. Make sure that
you use the proper size and type (summer or
winter tires).
Vehicles equipped with MOExtended tires are
not equipped with a TIREFIT kit at the factory. It
is therefore recommended that you additionally
equip your vehicle with a TIREFIT kit if you mount
tires that do not feature run-flat properties, e.g.
winter tires. A TIREFIT kit may be obtained from
a qualified specialist workshop.
Important safety notes
G WARNING
When driving in emergency mode, the driving
characteristics deteriorate, e.g. when corner-
ing, accelerating quickly and when braking.
There is a risk of an accident.
Do not exceed the stated maximum speed.
Avoid abrupt steering and driving maneuvers,
and driving over obstacles (curbs, potholes,
off-road). This applies in particular to a laden
vehicle.
Stop driving in emergency mode if: R
you hear banging noises. R
the vehicle starts to shake. R
you see smoke and smell rubber. R
ESP ®
is intervening constantly.R
there are tears in the sidewalls of the tire.
After driving in emergency mode, have the
wheel rims checked at a qualified specialist
workshop with regard to their further use. The
defective tire must be replaced in every case. TIREFIT kit
Important safety notes TIREFIT is a tire sealant.
You can use TIREFIT to seal punctures of up to
0.16 in (4 mm), particularly those in the tire
tread. You can use TIREFIT at outside tempera-
tures down to �
Page 349 of 390

Tow-starting (emergency engine
starting)
! Vehicles with automatic transmission must
not be tow-started. You could otherwise dam-
age the automatic transmission.
i You can find information on "Jump-starting"
under ( Y
page 341).
Fuses
Important safety notes
G WARNING
If you manipulate or bridge a faulty fuse or if
you replace it with a fuse with a higher amper-
age, the electric cables could be overloaded.
This could result in a fire. There is a risk of an
accident and injury.
Always replace faulty fuses with the specified
new fuses having the correct amperage.
Blown fuses must be replaced with fuses of the
same rating, which you can recognize by the
color and value. The fuse ratings are listed in the
fuse allocation chart.
The fuse allocation chart is on the fuse box in the
cargo compartment ( Y
page 348).
If a newly inserted fuse also blows, have the
cause traced and rectified at a qualified special-
ist workshop, e.g. an authorized Mercedes-Benz
Center.
! Only use fuses that have been approved for
Mercedes-Benz vehicles and which have the
correct fuse rating for the system concerned.
Otherwise, components or systems could be
damaged.
! Make sure that no moisture can enter the
fuse box when the cover is open.
! When closing the cover, make sure that it is
lying correctly on the fuse box. Moisture seep-
ing in or dirt could otherwise impair the oper-
ation of the fu ses.
T h e fuses in your vehicle serve to close down
faulty circuits. If a fuse blows, all the compo-
nents on the circuit and their functions stop
operating. Before changing a fuse Observe the important safety notes
( Y
page 347) X
Switch off the engine. X
Switch off all electrical consumers. X
Make sure that the ignition is switched off
( Y
page 137).
or X
When using the SmartKey, turn the SmartKey
to position �
Page 359 of 390
Information on the message display can be
found in the "Checking the tire pressure elec-
tronically" section ( Y
page 358).
Important safety notes
G WARNING
Each tire, including the spare (if provided),
should be checked at least once every two
weeks when cold and inflated to the pressure
recommended by the vehicle manufacturer
on the Tire and Loading Information placard
on the driver's door B-pillar or the tire pres-
sure label on the inside of the fuel filler flap. If
your vehicle has tires of a different size than
the size indicated on the Tire and Loading
Information placard or, if available, the tire
pressure label, you should determine the
proper tire pressure for those tires.
As an added safety feature, your vehicle has
been equipped with a tire pressure monitoring
system (TPMS) that illuminates a low tire pres-
sure telltale when one or more of your tires
are significantly underinflated. Accordingly,
when the low tire pressure telltale lights up,
you should stop and check your tires as soon
as possible, and inflate them to the proper
pressure. Driving on a significantly underin-
flated tire causes the tire to overheat and can
lead to tire failure.
Underinflation also reduces fuel efficiency
and tire tread life, and may affect the vehicle's
handling and stopping ability. Please note that
the TPMS is not a substitute for proper tire
maintenance, and it is the driver's responsi-
bility to maintain correct tire pressure, even if
underinflation has not reached the level to
trigger illumination of the TPMS low tire pres-
sure telltale.
Your vehicle has also been equipped with a
TPMS malfunction indicator to indicate when
the system is not operating properly. The
TPMS malfunction indicator is combined with
the low tire pressure telltale. When the sys-
tem detects a malfunction, the warning lamp
will flash for approximately a minute and then
remain continuously illuminated. This sequence will be repeated every time the vehi-
cle is started as long as the malfunction
exists. When the malfunction indicator is illu-
minated, the system may not be able to detect
or signal low tire pressure as intended.
TPMS malfunctions may occur for a variety of
reasons, including the installation of incom-
patible replacement or alternate tires or
wheels on the vehicle that prevent the TPMS
from functioning properly. Always check the
TPMS malfunction telltale after replacing one
or more tires or wheels on your vehicle to
ensure that the replacement or alternate Tires
and wheels allow the TPMS to continue to
function properly.
It is the driver's responsibility to set the tire
pressure to that recommended for cold tires
which is suitable for the operating situation
( Y
page 352). Note that the correct tire pressure
for the current operating situation must first be
taught-in to the tire pressure monitor. If a sub-
stantial loss of pressure occurs, the warning
threshold for the warning message is aligned to
the taught-in reference values. Restart the tire
pressure monitor after adjusting the pressure of
the cold tires ( Y
page 358). The current pres-
sures are saved as new reference values. As a
result, a warning message will appear if the tire
pressure drops significantly.
The tire pressure monitor does not warn you of
an incorrectly set tire pressure. Observe the
notes on the recommended tire pressure
( Y
page 352).
The tire pressure monitor is not able to warn you
of a sudden loss of pressure, e.g. if the tire is
penetrated by a foreign object. In the event of a
sudden loss of pressure, bring the vehicle to a
halt by braking carefully. Avoid abrupt steering
movements.
The tire pressure monitor has a yellow warning
lamp in the instrument cluster for indicating
pressure loss or a malfunction. Whether the
warning lamp flashes or lights up indicates
whether a tire pressure is too low or the tire
pressure monitor is malfunctioning: R
if the warning lamp is lit continuously, the tire
pressure on one or more tires is significantlyTire pressure 357
Wheels and tires Z
Page 372 of 390
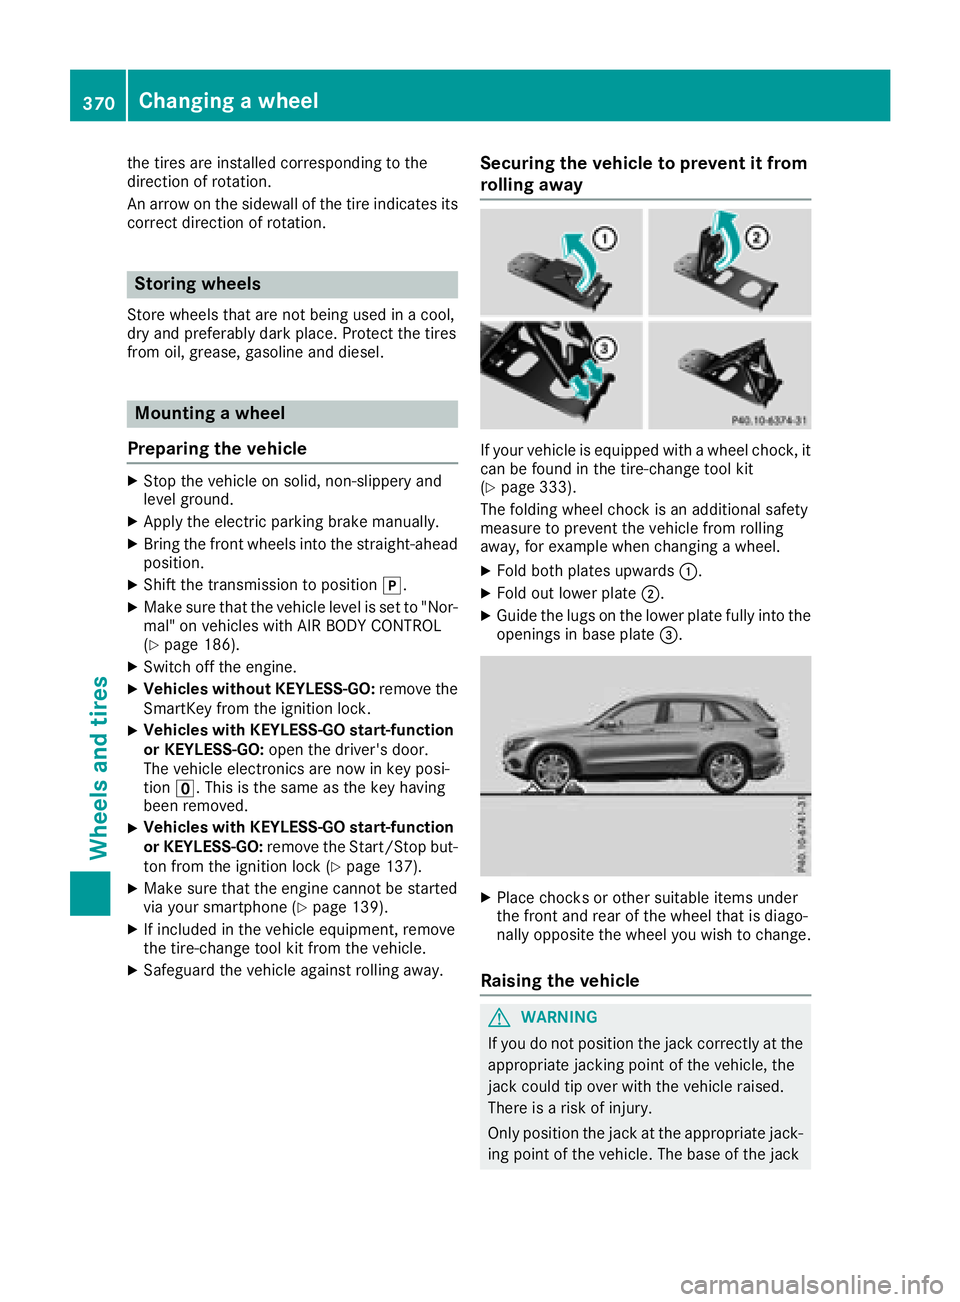
the tires are installed corresponding to the
direction of rotation.
An arrow on the sidewall of the tire indicates its
correct direction of rotation.
Storing wheels Store wheels that are not being used in a cool,
dry and preferably dark place. Protect the tires
from oil, grease, gasoline and diesel.
Mounting a wheel
Preparing the vehicle X
Stop the vehicle on solid, non-slippery and
level ground. X
Apply the electric parking brake manually. X
Bring the front wheels into the straight-ahead
position. X
Shift the transmission to position �] .X
Make sure that the vehicle level is set to "Nor-
mal" on vehicles with AIR BODY CONTROL
( Y
page 186).X
Switch off the engine. X
Vehicles without KEYLESS-GO: remove the
SmartKey from the ignition lock. X
Vehicles with KEYLESS-GO start-function
or KEYLESS-GO: open the driver's door.
The vehicle electronics are now in key posi-
tion �