Page 108 of 506

Folding there ar seat backrest back
* NO
TEDama getothe seat belt
The seat belt could become trapped and thus
damaged when folding back the seat back‐
re st.
#Make sure that the seat belt is not trap‐
ped when folding back the seat back‐
re st.
If th e seat backrest is not engaged and loc ked,
th is will be shown in the multifunction display in
th e instrument clus ter.
#Mo vethe driver's or front passenger seat for‐
wa rds, if necessar y.
#Fold cor responding seat backrest 1back
until it engages.
Left and right seat backrests: ifth e seat
backrest is not cor rectly engaged, this will be
shown in the multifunction display in the
instrument clus ter.
Center seat backres t:ifth e seat backrest is
not cor rectly engaged, red lock verification
indicator 2will be visible. Lo
cking the center rear seat backrest
Lock the center seat backrest if youwa ntto
secure the cargo compartment from unauthor‐
ized access. The center seat backrest can then
only be folded forw ard toget her with the left seat
backrest.
Bo th seat backrests must be engaged and joined
to ge ther.
10 6
Seats and stowing
Page 109 of 506
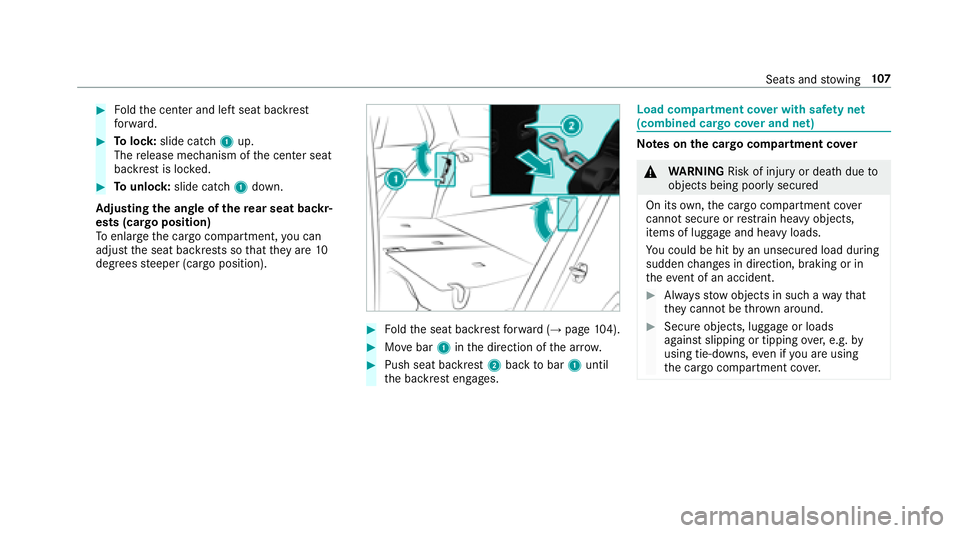
#Foldthe center and left seat backrest
fo rw ard.
#To lock: slide catch 1up.
The release mechanism of the center seat
backrest is loc ked.
#To unlock :slide catch 1down.
Ad justing the angle of the rear seat backr‐
ests (cargo position)
To enlar gethe cargo compartment, you can
adjust the seat backrests so that they are 10
degrees steeper (cargo position).
#Fo ldthe seat backrest forw ard (→page 104).
#Mo vebar 1inthe direction of the ar row.
#Push seat backrest 2back tobar 1until
th e backrest engages.
Load compartment co ver with saf ety net
(combined cargo co ver and net)
Note s onthe cargo compa rtment co ver
&
WARNING Risk of injury or death dueto
objects being poorly secured
On its own,the cargo compartment co ver
cannot secure orrestra in heavy objects,
items of luggage and heavy loads.
Yo u could be hit byan unsecured load during
sudden changes in direction, braking or in
th eev ent of an accident.
#Alw aysstow objects in such a wayth at
th ey cannot be thro wn around.
#Secure objects, luggage or loads
against slipping or tipping over,e.g. by
using tie-do wns,eve n if you are using
th e cargo compartment co ver.
Seats and stowing 10
7
Page 110 of 506
*NO
TEDama getothe cargo compart‐
ment co ver when loading theve hicle
The cargo compartment co ver may be dam‐
aged when loading theve hicle.
#Do not place any objects abo vethe
lo we r edge of the side windo wsor on
th e cargo compartment co ver.
The cargo compartment co ver and the saf etyne t
fo rm the combined cargo co ver and net.
When the cargo compartment co ver is clipped
in, there should be no objects in the cargo com‐
partment obstructing the down wards mo vement
of the co ver when theta ilgate is being closed.
The cargo compartment co ver will otherwise be
ra ised again automaticall y. Extending/r
etra cting the cargo compa rt‐
ment co ver
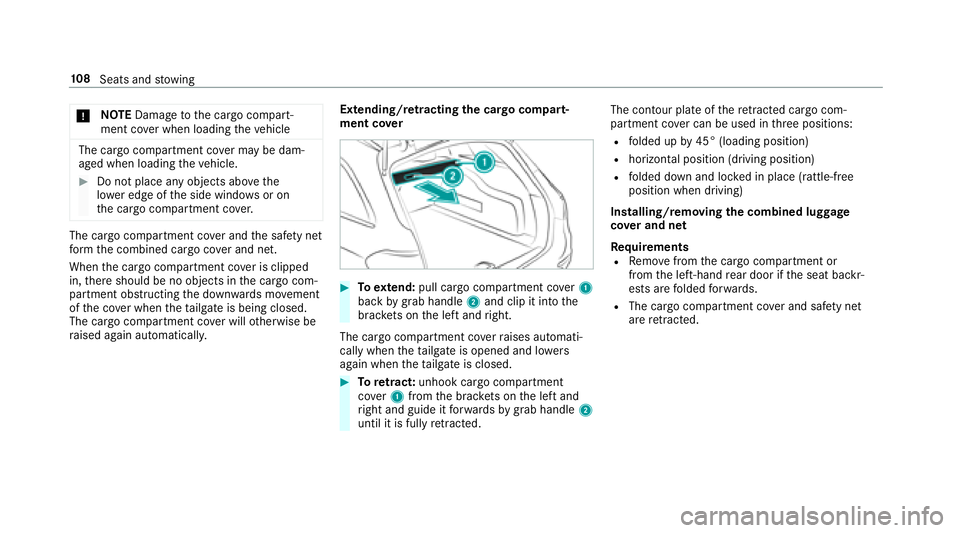
#To extend: pull cargo compartment co ver1
back bygrab handle 2and clip it into the
brac kets on the left and right.
The cargo compartment co verra ises automati‐
cally when theta ilgate is opened and lo wers
again when theta ilgate is closed.
#To retract: unhook cargo compa rtment
co ver1 from the brac kets on the left and
ri ght and guide it forw ards bygrab handle 2
until it is fully retracted. The contour plate of
there tracted cargo com‐
pa rtment co ver can be used in thre e positions:
Rfolded up by45° (loading position)
Rhorizontal position (driving position)
Rfolded down and loc ked in place (rattle-free
position when driving)
Installing/removing the combined luggage
co ver and net
Requ irements
RRemo vefrom the cargo compartment or
from the left-hand rear door if the seat backr‐
ests are folded forw ards.
RThe cargo compartment co ver and saf etyne t
ar ere tracted.
10 8
Seats and stowing
Page 111 of 506
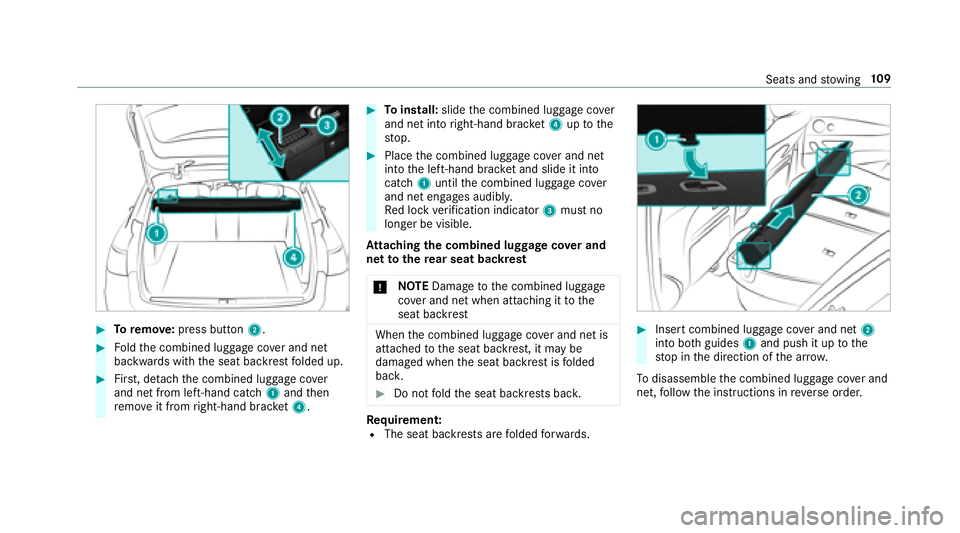
#Toremo ve:press button 2.
#Foldthe combined luggage co ver and net
backwards with the seat backrest folded up.
#Fir st, de tach th e combined luggage co ver
and net from left-hand cat ch1 and then
re mo veit from right-hand brac ket4.
#To install: slidethe combined luggage co ver
and net into right-hand brac ket4 uptothe
st op.
#Place the combined luggage co ver and net
into the left-hand brac ket and slide it into
catch 1until the combined luggage co ver
and net engages audibl y.
Re d lock verification indicator 3must no
longer be visible.
At tachin gth e combined luggage co ver and
net tothere ar seat backrest
* NO
TEDama getothe combined luggage
co ver and net when attaching it tothe
seat backrest
When the combined luggage co ver and net is
attached tothe seat backrest, it may be
damaged when the seat backrest is folded
bac k.
#Do not fold the seat backrests bac k.
Requirement:RThe seat backrests are folded forw ards.
#Insert combined luggage co ver and net 2
into bo thguides 1and push it up tothe
st op in the direction of the ar row.
To disassemble the combined luggage co ver and
net, follow the instructions in reve rse order.
Seats and stowing 10
9
Page 112 of 506
Attachin gth e saf ety net
&
WARNING Risk of injury duetopoorly
secured objects
On its own,the saf etyne tcanno tsecur eor
re stra in heavy objects, items of luggage or
heavy loads.
Yo u could behit byan unsecured load during
sudden changes in direction, braking or in
th eev ent of an accident. There is an
increased risk of injury or even fata l injur y.
#Alwaysstow objects in such a wayth at
th ey cannot be thro wn around.
#Secure objects, luggage or loads
against slipping or tipping over,e.g. by
using lashing mater ial,even if you are
using the saf etynet.
Fo r saf etyre asons, alw ays use a saf etyne twhen
transporting aload.
Damaged saf etynets can no lon ger fulfill their
pr otective functions and must be replaced. Visit
a qu alified specialist workshop.
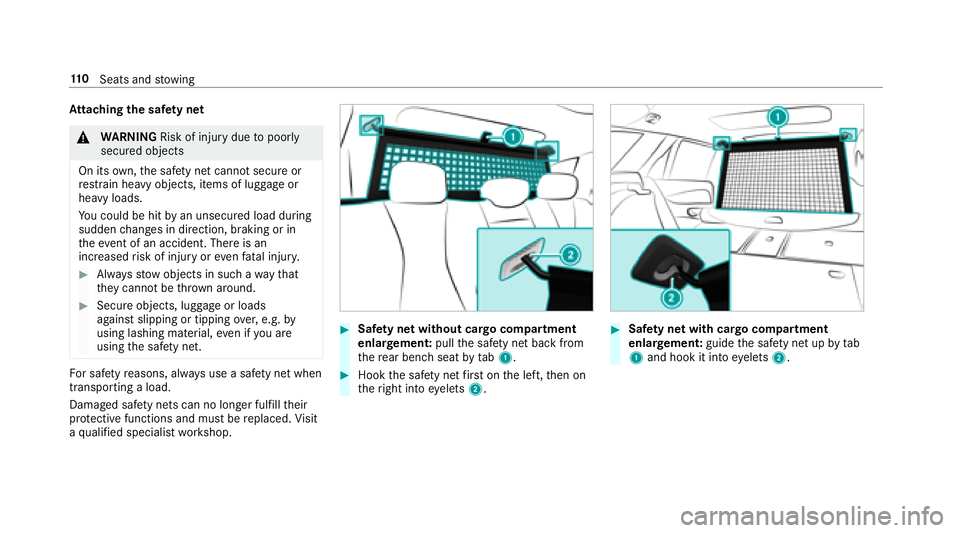
#Saf ety net without cargo compartment
enlar gement: pullthe saf etyne tbac kfrom
th ere ar bench seatbytab1.
#Hook the saf etyne tfirs t on the left, then on
th eright into eyelets 2.
#Safety net with cargo compartment
enlar gement: guidethe saf etyne tup bytab
1 and hook it into eyelets 2.
110
Seats and stowing
Page 113 of 506
Overview ofthe tie-down eyes
1Tie-down eyes
Re lated topic:
Loading guidelines (
→page 101).
Overview of bag hoo ks
&
WARNING Risk of injury when using bag
hooks with heavy objects
The bag hooks cannot restra in heavy objects
or items of luggage.
Objects or items of luggage could be throw n
around and thereby hit vehicle occupants
when braking or abruptly changing direc‐
tions.
#Only hang light objects on the bag
hooks.
#Ne ver hang hard, sharp-edged or fragile
objects on the bag hooks.
The bag hook can bear a maximum load of
6.6 lbs (3 kg). Do not use it tosecure a load.1Bag hook
% Obser vethe no tes on loading theve hicle
(
→page 101).
EA SY-PAC K load-secu ring kit
Note s onthe EAS Y-PA CK load-securing kit
The EA SY-PAC K load-securing kit allows youto
use your cargo co mpartment for a variet yof pur‐
Seats and stowing 111
Page 114 of 506
poses. The components are located underthe
cargo compart mentfloor.
1Bag containing the brac kets and luggage
holder
2Te lescopic rod Inserting
the brac kets in tothe load rail
#Insert brac ket1 into the center of load rail
5.
#Press release knob 3and slide brac ket1
into the desired position in load rail5.
#Let go of release knob 3.
#Press locking button 4.
Brac ket1 is lo cked in load rail5.
#If necessar y,fold tie-down eye2 upwards.
Te nsioning the luggage holder
Re quirements:
RThe luggage holder is used tosecure loads
against the side wall of the cargo compart‐
ment topreve ntthem from moving around.
ROnly secure loads with a maximum weight of
15 .4 lbs (7 kg) and which are small enough
fo rth e luggage holder totightly and properly
secure them.
11 2
Seats and stowing
Page 115 of 506
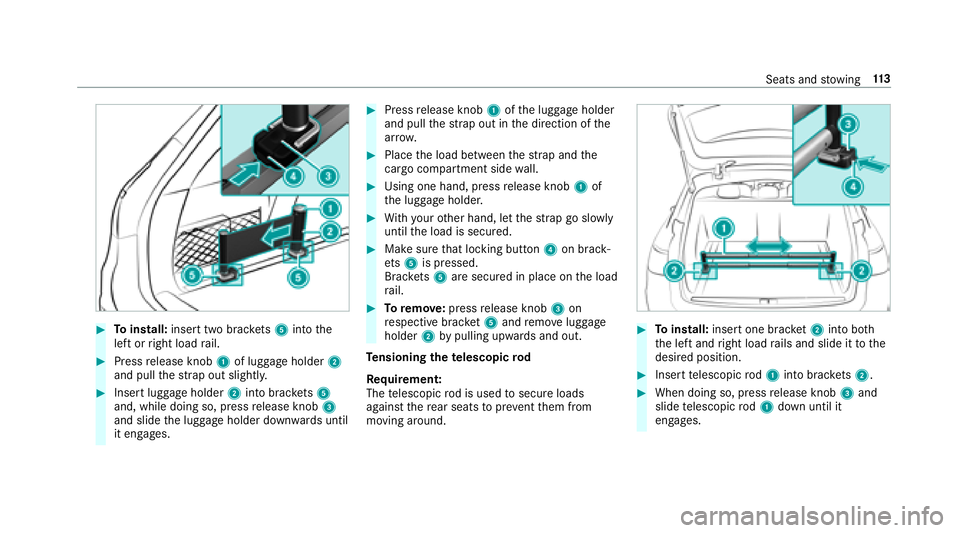
#Toinstall: insert two brac kets 5 into the
left or right load rail.
#Press release knob 1of luggage holder 2
and pull thest ra p out slightl y.
#Insert luggage holder 2into brac kets 5
and, while doing so, press release knob 3
and slide the luggage holder down wards until
it engages.
#Press release knob 1ofthe luggage holder
and pull thest ra p out in the direction of the
ar row .
#Place the load between thest ra p and the
cargo compart ment sidewall.
#Using one hand, press release knob 1of
th e luggage holder.
#Wi th your other hand, let thest ra p go slowly
until the load is secured.
#Make sure that locking button 4on brack‐
et s5 is pressed.
Brac kets 5 are secured in place on the load
ra il.
#To remo ve:press release knob 3on
re spective brac ket5 and remo veluggage
holder 2bypulling upwards and out.
Te nsioning thete lescopic rod
Re quirement:
The telescopic rod is used tosecure loads
against there ar seats topreve ntthem from
moving around.
#To install: insert one brac ket2 into bo th
th e left and right load rails and slide it tothe
desired position.
#Insert telescopic rod1 into brac kets 2.
#When doing so, press release knob 3and
slide telescopic rod1 down until it
engages.
Seats and stowing 11
3