2018 MERCEDES-BENZ E-CLASS COUPE clock
[x] Cancel search: clockPage 118 of 593

St
ow age spaces in theve hicle interior Overview of
the front stowage compa rt‐
ments 1
Stow age compartment in the doors
2 Stow age/telephone compartment in the
armrest with multimedia connections and
stow age compartment, e.g. for an MP3
pla yer
3 Stow age compartment in the front cent re
console wi tha USB port (depending on the
ve hicle's equipment)
4 Glovebox Locking and unlocking
thegl ove box #
Turn the emer gency key a quarter turn clock‐
wise 2(to lock) or anti-clockwise 1(to
unlock). Opening
the spectacles compa rtment #
Press button 1. Through-loading
feature in there ar ben ch
seat Fo
lding there ar seat backrest forw ards &
WARNING Risk of accident and inju ryif
th ere ar ben chseat/rear seat and seat
backrest are not engaged
If th ere ar ben chseat/rear seat and seat
backrest are not engaged, they could fold for‐ Seats and
stowing 11 5
Page 181 of 593
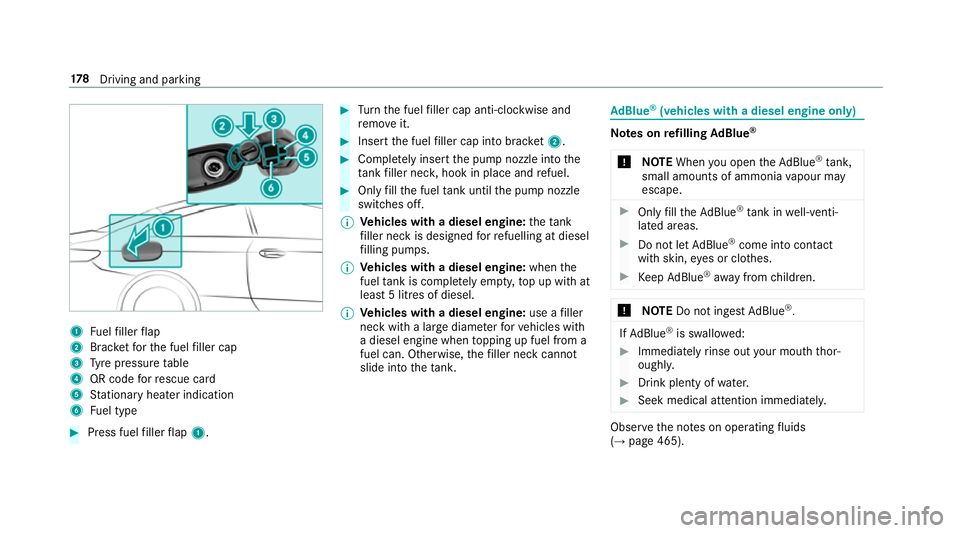
1
Fuelfiller flap
2 Brac ketfo rth e fuel filler cap
3 Tyre pressure table
4 QR code forre scue card
5 Stationary heater indication
6 Fuel type #
Press fuel filler flap 1. #
Turn the fuel filler cap anti-clockwise and
re mo veit. #
Insert the fuel filler cap into brac ket2. #
Comp lete ly inse rtthe pump nozzle into the
ta nk filler nec k,hook in place and refuel. #
Only fill th e fuel tank until the pump nozzle
switches off.
% Vehicles with a diesel engine: theta nk
fi ller neck is designed forre fuelling at diesel
fi lling pumps.
% Vehicles with a diesel engine: whenthe
fuel tank is compl etely em pty, top up with at
least 5 litres of diesel.
% Vehicles with a diesel engine: use afiller
neck with a lar gediame terfo rve hicles with
a diesel engine when topping up fuel from a
fuel can. Otherwise, thefiller neck cannot
slide into theta nk. Ad
Blue ®
(vehicles with a diesel engine on ly) Note
s onrefilling AdBlue ®
* NOTEWhen you open theAd Blue ®
tank,
small amounts of ammonia vapour may
escape. #
Only fill th eAd Blue ®
tank in well-venti‐
lated areas. #
Do not let AdBlue ®
come into contact
wi th skin, eyes or clo thes. #
Keep AdBlue ®
aw ay from children. *
NOTEDo not ingest AdBlue ®
. If
Ad Blue ®
is swallo wed: #
Immediately rinse out your mouth thor‐
oughl y. #
Drink plenty of water. #
Seek medical attention immediately. Obser
vethe no tes on operating fluids
(→ page 465). 17 8
Driving and pa rking
Page 183 of 593
Opening
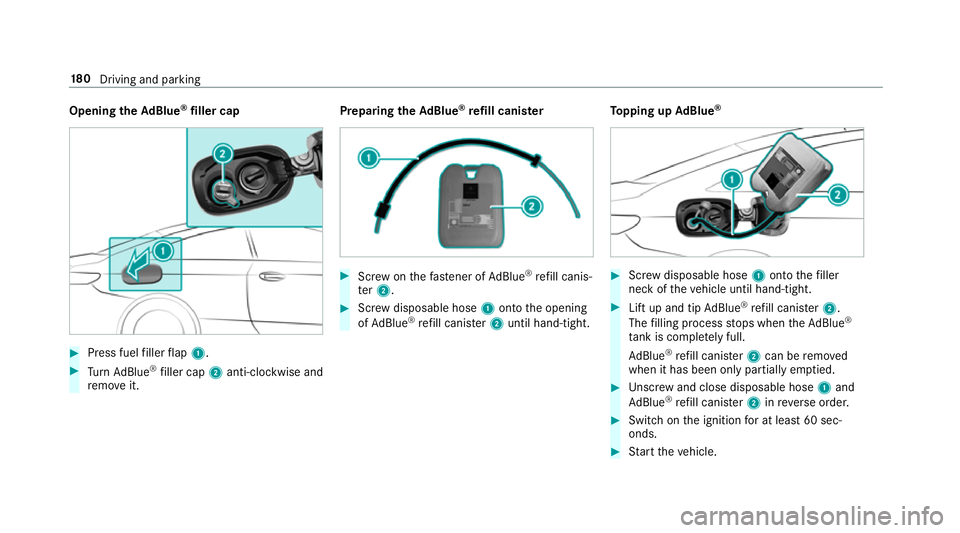
theAd Blue ®
filler cap #
Press fuel filler flap 1. #
Turn AdBlue ®
filler cap 2anti-clockwise and
re mo veit. Preparing
theAd Blue ®
re fill canis ter #
Screw onthefast ener of AdBlue ®
re fill canis‐
te r2. #
Screw disposable hose 1onto the opening
of Ad Blue ®
re fill canis ter2 until hand-tight. To
pping up AdBlue ® #
Screw disposable hose 1onto thefiller
neck of theve hicle until hand-tight. #
Lift up and tip AdBlue ®
re fill canis ter2.
The filling process stops when theAd Blue ®
ta nk is compl etely full.
Ad Blue ®
re fill canis ter2 can be remo ved
when it has been only partially em ptied. #
Unscr ew and close disposable hose 1and
Ad Blue ®
re fill canis ter2 inreve rse order. #
Switch on the ignition for at least 60 sec‐
onds. #
Start theve hicle. 18 0
Driving and pa rking
Page 259 of 593

The operation of
thefo llowing sy stems depends
on the trailer being connected cor rectly:
R Active Lane Keeping Assist
R ESP ®
R Parking Assist PARKTRONIC
R Active Parking Assist
R Blind Spot Assist or Active Blind Spot Assi st
Coupling up a trailer
* NO
TEDama getotheve hicle battery due
to full dischar ge Charging
the trailer battery using the po wer
supply of the trailer can damage theve hicle
batter y. #
Do not use theve hicle's po wer supply
to charge the trailer batter y.#
Remo vethe co ver from the ball head and
st ore it in a safe place (→ page113). #
Position the trailer on a le vel sur face behind
th eve hicle and couple it up totheve hicle. #
Open the soc ket cap. #
Inse rtthe plug with lug 1in groo ve3 on
th e soc ket. #
Turn the ba yonet coupling 2clockwise as
fa r as it will go. #
Let the cap engage. #
Secure the cable tothe trailer with cable ties
(only if you are using an adap ter cable). #
Make sure that the cable is alw ays slack for
ease of mo vement during cornering. #
Push the combination switch upwards/down‐
wa rds and check whe ther the cor responding
turn signal light on the trailer is flashing. A display message may appear on
the multifunc‐
tion display even if the trailer has been connec‐
te d cor rectly:
R LEDs ha vebeen ins talled in the trailer light‐
ing sy stem
R the cur rent has fallen below the trailer light‐
ing sy stem's minimum cur rent (50 mA)
% Accessories can be connected tothe perma‐
nent po wer supp lyup to180W, and tothe
po we r supp lythat is swit ched on via the igni‐
tion loc k.
Un coupling a trailer &
WARNING Risk of being crushed and
becoming trapped when uncoupling a
trailer
When uncoupling a trailer wi than engaged
ine rtia-activated brake, your hand may
become trapped between theve hicle and the
trailer dr awbar. #
Do not uncouple trailers with an
engaged overrun brake. 256
Driving and pa rking
Page 294 of 593
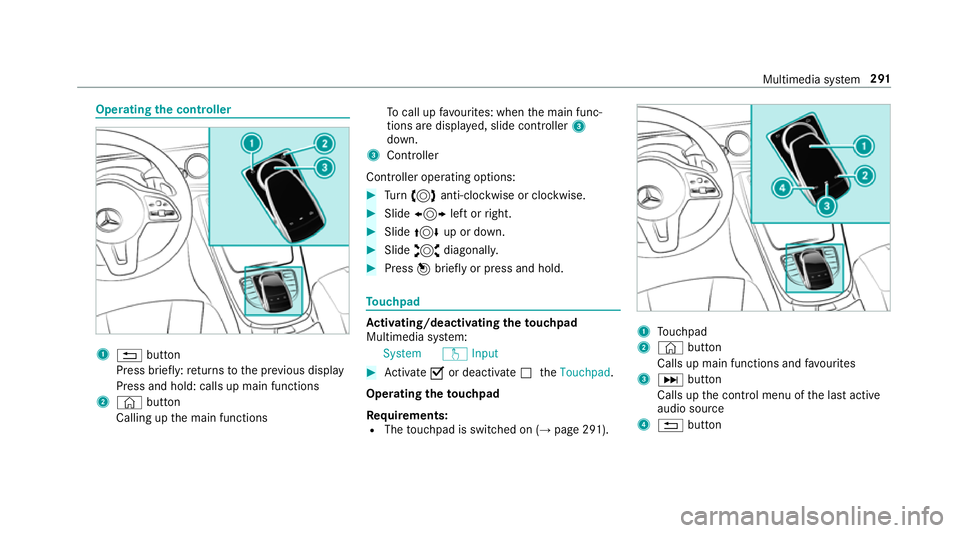
Operating
the controller 1
% button
Press brief ly:re turns tothe pr evious display
Press and hold: calls up main functions
2 © button
Calling up the main functions To
call up favo urites: when the main func‐
tions are displa yed, slide controller 3
down.
3 Controller
Controller operating options: #
Turn 3 anti-clockwise or clo ckwise. #
Slide 1 left orright. #
Slide 4 up or down. #
Slide 2 diagonally. #
Press 7brief lyor press and hold. To
uchpad Ac
tivating/deactivating the touchpad
Multimedia sy stem:
System wInput #
Activate Oor deacti vate ª theTouchpad .
Operating theto uchpad
Re quirements:
R The touchpad is swit ched on (→ page 291). 1
Touchpad
2 © button
Calls up main functions and favo urites
3 D button
Calls up the control menu of the last active
audio source
4 % button Multimedia sy
stem 291
Page 336 of 593

Setting
the map scale
Re quirements:
R The map is shown.
Multimedia sy stem:
Navigation #
Tozoom in: swipe down on theTo uch Con‐
trol.
or #
Turn the controller anti-clockwise.
or #
Movetwo fingers apart on theto uchpad. #
Tozoom out: swipe up on theTo uch Control.
or #
Turn the controller clockwise.
or #
Movetwo fingers toge ther on theto uchpad.
% You can set the unit of measurement of the
map scale (→ page 304). Moving
the map
Multimedia sy stem:
Navigation ZOption sM ap menu #
Alternativel y,ifth e map is displa yed in full
screen mode, press the cent ral control ele‐
ment.
The map menu appears. #
Select "Mo vemap" in map menu 2
(→ page 332). #
Swipe in any direction on theTo uch Control
or touchpad.
or #
Slide the controller in any direction.
The map mo ves in the cor responding direc‐
tion under the crosshair. The fur ther you
mo veyour finger away from thest arting posi‐
tion on theto uchpad, thefast erthe map
mo ves. Selecting
the map orientation
Multimedia sy stem:
Navigation ZOption sM ap menu #
Alternativel y,ifth e map is displa yed in full
screen mode, press the cent ral control ele‐
ment.
The map menu appears. #
In map menu 3, select N,2D or
3D( →page 332).
R N:the 2D map view is displa yed so that
no rth is alw ays at theto p.
R 2D: the 2D map view is aligned tothe
direction of tra vel.
R 3D: the 3D map view is aligned tothe
direction of tra vel.
Selecting POI symbols
Multimedia sy stem:
Navigation ZOption sM ap content
POIs include filling stations and ho tels which can
be displa yed as symbols on the map, forex am‐
ple. Not all POIs are available everywhere. #
Select POI symbols .
The #dot indicates the cur rent setting. Multimedia sy
stem 333
Page 409 of 593
&
WARNING Risk offire and injury from
engine oil
If engine oil comes into con tact wi thhot
component parts in the engine compart‐
ment, it may ignite. #
Make sure that no engine oil is spilled
next tothefiller opening. #
Allow the engine tocool off and thor‐
oughly clean the engine oil from compo‐
nent parts before starting theve hicle. *
NO
TEEngine dama gecaused byan
incor rect oil filter, incor rect oil or addi‐
tives #
Do not use engine oils or oil filters
which do not cor respond tothe specifi‐
cations explicitly prescribed forthe
service inter vals. #
Do not alter the engine oil or oil filter in
order toachie velonger change inter vals
th an presc ribed. #
Do not use additives. #
Follow the instructions in the service
inter val display rega rding the oil
ch ange. *
NO
TEDama gecaused bytopping up too
much engine oil To
o much engine oil can damage the engine
or the catalytic con verter. #
Have excess engine oil remo ved at a
qu alified specialist workshop. #
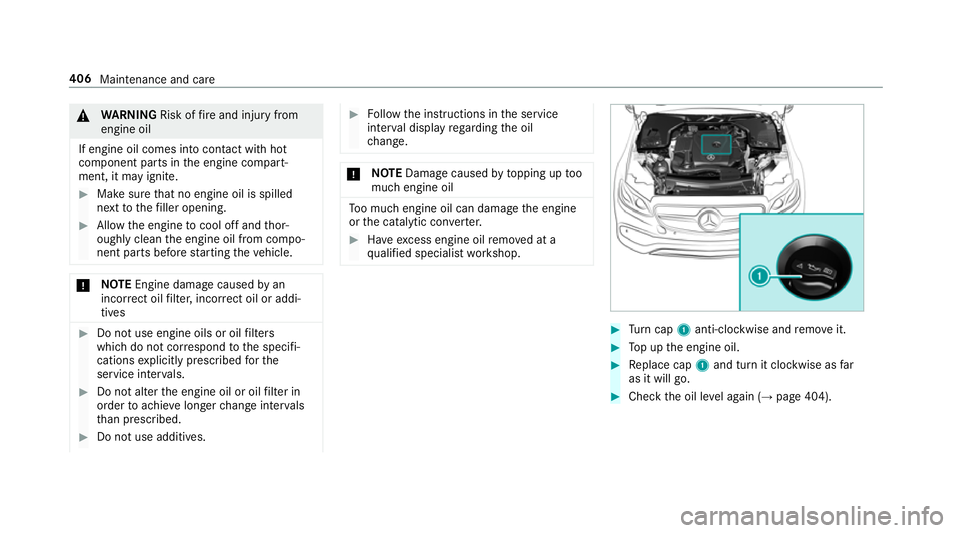
Turn cap 1anti-clockwise and remo veit. #
Top up the engine oil. #
Replace cap 1and turn it clockwise as far
as it will go. #
Check the oil le vel again (→ page 404). 406
Maintenance and care
Page 410 of 593
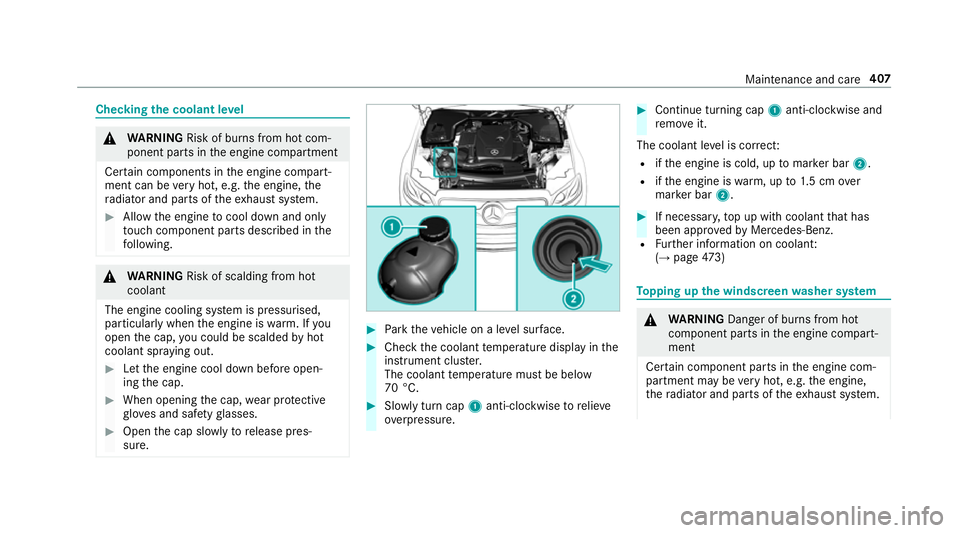
Checking
the coolant le vel &
WARNING Risk of bu rns from hot com‐
ponent parts in the engine compartment
Cer tain components in the engine compart‐
ment can be very hot, e.g. the engine, the
ra diator and parts of theex haust sy stem. #
Allow the engine tocool down and only
to uch co mponent parts described in the
fo llowing. &
WARNING Risk of scalding from hot
coolant
The engine cooling sy stem is pressurised,
particularly when the engine is warm. If you
open the cap, you could be scalded byhot
coolant spr aying out. #
Let the engine cool down before open‐
ing the cap. #
When opening the cap, wear pr otective
gl ove s and saf etygl asses. #
Open the cap slowly torelease pres‐
sure. #
Park theve hicle on a le vel sur face. #
Check the coolant temp erature display in the
instrument clus ter.
The coolant temp erature must be below
70 °C. #
Slowly turn cap 1anti-clockwise torelie ve
ov erpressure. #
Continue turning cap 1anti-clockwise and
re mo veit.
The coolant le vel is cor rect:
R ifth e engine is cold, up tomar ker bar 2.
R ifth e engine is warm, up to1.5 cm over
mar ker bar 2. #
If necessar y,top up with coolant that has
been appr ovedby Mercedes-Benz.
R Further information on coolant:
(→ page 473) To
pping up the windsc reen washer sy stem &
WARNING Danger of bu rns from hot
component parts in the engine compart‐
ment
Cer tain component parts in the engine com‐
partment may be very hot, e.g. the engine,
th era diator and parts of theex haust sy stem. Maintenance and care
407