2018 MERCEDES-BENZ E-CLASS COUPE fuel
[x] Cancel search: fuelPage 335 of 593

Map and compass
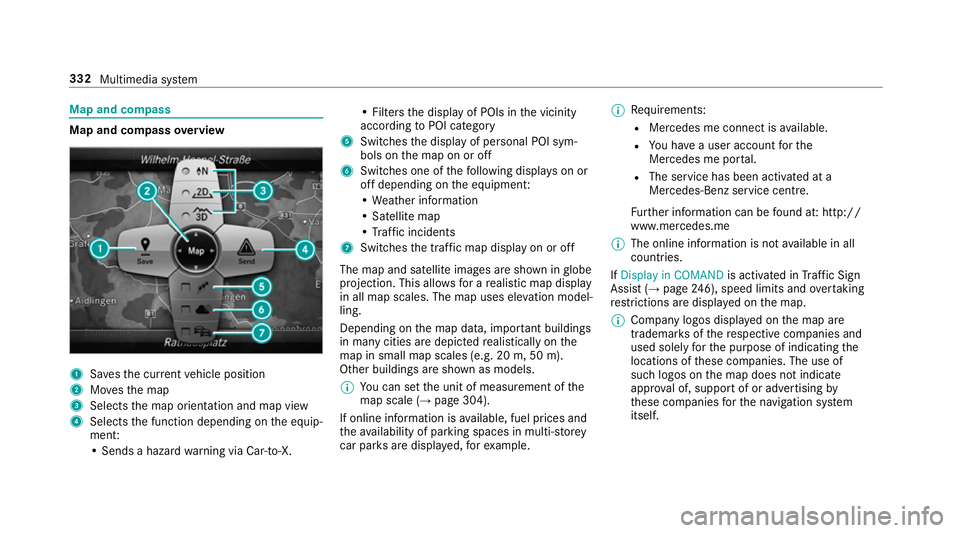
Map and compass
overview 1
Savesth e cur rent vehicle position
2 Movesth e map
3 Selects the map orientation and map view
4 Selects the function depending on the equip‐
ment:
• Sends a hazard warning via Car-to-X. • Filters
the display of POIs in the vicinity
according toPOI category
5 Switches the display of personal POI sym‐
bols on the map on or off
6 Switches one of thefo llowing displa yson or
off depending on the equipment:
• We ather information
• Satellite map
• Traf fic incidents
7 Switches the tra ffic map display on or off
The map and satellite images are shown in globe
projection. This allo wsfor a realistic map display
in all map scales. The map uses ele vation model‐
ling.
Depending on the map data, impor tant buildings
in ma nycities are depicted realistically on the
map in small map scales (e.g. 20 m, 50 m).
Other buildings are shown as models.
% You can set the unit of measurement of the
map scale (→ page 304).
If online information is available, fuel prices and
th eav ailability of parking spaces in multi-s torey
car pa rks are displa yed, forex ample. %
Requirements:
R Mercedes me connect is available.
R You ha vea user account forthe
Mercedes me por tal.
R The service has been activated at a
Mercedes-Benz service centre.
Fu rther information can be found at: http://
www.mercedes.me
% The online information is not available in all
countries.
If Display in COMAND is activated inTraf fic Sign
Assi st (→page 246), speed limits and overtaking
re strictions are displ ayed on the map.
% Company logos displa yed on the map are
trademar ksofthere spective companies and
used solely forth e purpose of indicating the
locations of these companies. The use of
such logos on the map does not indicate
appr oval of, suppo rtof or advertising by
th ese companies forth e navigation sy stem
itself. 332
Multimedia sy stem
Page 406 of 593

&
WARNING Risk of inju ryfrom touching
co mp onent parts under voltage
The ignition sy stem and the fuel injection
sy stem workunder high voltage. If youto uch
co mp onent parts which are under voltage,
yo u could recei vean electric shoc k. #
Neverto uch co mponents of the ignition
sy stem or the fuel injection sy stem
when the ignition is switched on. &
WARNING Risk of bu rns from hot com‐
ponent parts in the engine compartment
Cer tain components in the engine compart‐
ment can be very hot, e.g. the engine, the
ra diator and parts of theex haust sy stem. #
Allow the engine tocool down and only
to uch co mponent parts described in the
fo llowing. &
WARNING Risk of inju ryfrom using the
windscreen wipers while the engine bon‐
net is open
When the engine bonn etis open, and the
windscreen wipers are set in motion, you can
be trapped bythe wiper linkage. #
Alw ays switch off the windscreen wip‐
ers and ignition before opening the
engine bonn et. #
Toopen: pullthe le ver1 torelease the
bonn et. Maintenance and care
403
Page 414 of 593

Note
s on paint work/matt finish paint workcare Obser
vethefo llowing information: Cleaning and car
eA voiding paintwork damage
Pa intwork R
Insect remains: soak with insect remo ver and rinse off the
trea ted areas af terw ards.
R Bird droppings: soak with water and rinse off af terw ards.
R Tree resin, oils, fuels and greases: remo veby rubbing gen‐
tly wi tha clo thsoaked in petroleum ether or lighter fluid.
R Coolant and brake fluid: remo vewith a damp clo thand
clean water.
R Tarst ains: use tarre mo ver.
R Wax: use silicone remo ver. R
Do not attach sticke rs,fi lms or similar.
R Remo vedirt immediatel y,where possible. Maintenance and care
411
Page 429 of 593

&
WARNING Risk of accident due tothe
specified tyre pressure not being ach‐
ie ved
If th e specified tyre pressure is not achie ved
af te r a brief drive, the tyre is too badly dam‐
aged. The tyre sealant cannot repair the tyre
in this ins tance.
Dama ged tyres and a tyre pressure that is
to o low can significantly impair braking and
handling characteristics. #
Do not drive on. #
Consult a qualified specialist workshop. Countries
that ha veMercedes-Benz
Service24h: you will find a sticke r with thete le‐
phone number, e.g. on the B‑pillar on the driver's
side. #
Cor rect the tyre pressure if it is still at least
13 0 kPa (1.3 bar/19 psi). See the tyre pres‐
sure table on the fuel filler flap forva lues. #
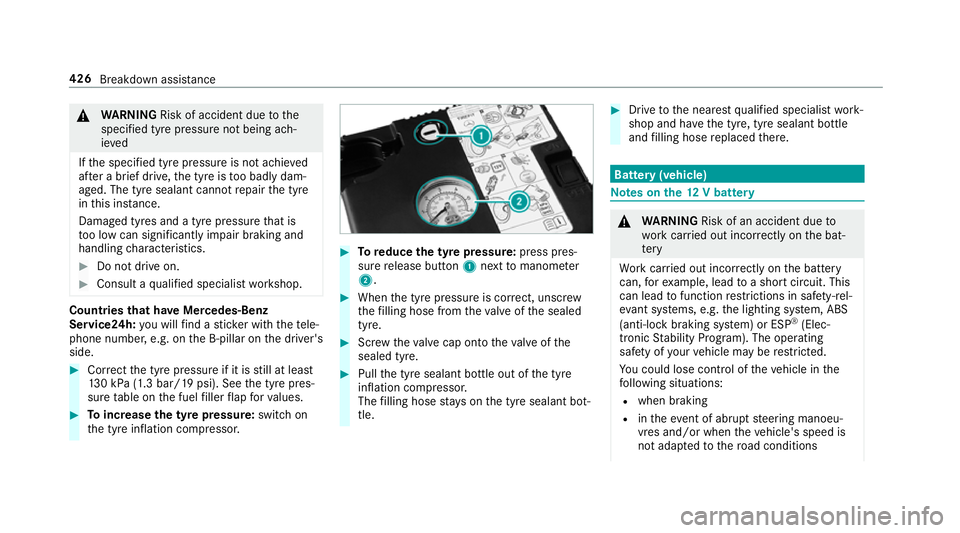
Toincrease the ty repressure: switch on
th e tyre inflation compressor. #
Toreduce the tyre pressure: press pres‐
su re re lease button 1next tomanome ter
2 . #
When the tyre pressure is cor rect, unscr ew
th efilling hose from theva lve of the sealed
tyre. #
Screw theva lve cap onto theva lve of the
sealed tyre. #
Pull the tyre sealant bottle out of the tyre
inflation compressor.
The filling hose stay s on the tyre sealant bot‐
tle. #
Drive tothe nearest qualified specialist work‐
shop and ha vethe tyre, tyre sealant bottle
and filling hose replaced there. Batte
ry(vehicle) Note
s onthe12 V battery &
WARNING Risk of an accident due to
wo rkcar ried out incor rectly on the bat‐
te ry
Wo rkcar ried out incor rectly on the battery
can, forex ample, lead toa short circuit. This
can lead tofunction restrictions in saf ety-re l‐
eva nt sy stems, e.g. the lighting sy stem, ABS
(anti-lock braking sy stem) or ESP ®
(Elec‐
tronic Stability Prog ram). The operating
saf ety of your vehicle may be restricted.
Yo u could lose cont rol of theve hicle in the
fo llowing situations:
R when braking
R intheeve nt of ab rupt steering manoeu‐
vres and/or when theve hicle's speed is
not adap tedto thero ad conditions 426
Breakdown assis tance
Page 433 of 593

All
vehicles
* NO
TEDama gecaused bynumerous or
ex tended attem ptsto start the engine Nume
rous or extended attem ptsto start the
engine may damage the catalytic con verter
due tonon-combu sted fuel. #
Avoid numerous and extended attem pts
to start the engine. Obser
vethefo llowing points during starting
assis tance and when charging the battery:
R Only use undamaged jump lead/charging
cables with a suf ficient cross-section and
insula tedte rm inal clamps.
R Non- insulated parts of thete rm inal clamps
must not come into con tact wi thother me tal
parts while the jump lead/charging cable is
connected tothe battery/jump-s tart connec‐
tion point.
R The jump lead/charging cable must not
come into contact wi thany parts which may
mo vewhen the engine is running. R
Alw ays make sure that nei ther you nor the
battery is elect rostatically charge d.
R Keep away from fire and naked flames.
R Do not lean overth e batter y.
Obser vethe additional following points when
ch arging the battery:
R Only use battery charge rs tested and
appr oved for Mercedes-Benz.
R Read the battery charge r's operating instruc‐
tions before charging the batter y.
Obser vethe additional following points during
st arting assis tance:
R Starting assis tance may only be pr ovided
using batteries with a nominal voltage of
12 V.
R The vehicles must not touch.
R Petrol engine: only acceptstarting assis‐
ta nce if the engine and exhaust sy stem are
cold. St
arting assi stance and charging the12 V
battery Re
quirements:
R The vehicle is secured with the electric park‐
ing brake.
R Vehicles with automatic transmission: the
transmission is in position j.
R The ignition and all electrical consumers are
switched off.
R The bonnet is open. 430
Breakdown assi stance
Page 446 of 593

#
Check whe ther the wheel or valve has a
leak. #
Ifyo u are unable torectify the damage,
conta ct aqualified specialist workshop. Information on
there commended tyre pressure
fo rth eve hicle's factor y-fitted tyres can be found
on the tyre pressure table on the inside of the
fuel filler flap (→ page443).
Use a suitable pressu regauge tocheck the tyre
pressure. The outer appearance of a tyre does
not permit any reliable conclusion about the tyre
pressure.
Ve hicles with a tyre pressure monitoring sys‐
te m: you can also check the tyre pressure using
th e on-board computer.
Only cor rect tyre pressures when the tyres are
cold. Conditions for cold tyres:
R The vehicle has been par ked with the tyres
out of direct sunlight for at least thre e hours.
R The vehicle has tr avelled less than 1.6 km.
A rise in the tyre temp erature of 10°C increases
th e tyre pressure byappr ox.10 kPa (0.1 bar/ 1.
5 psi). Take this into account when checking
th e tyre pressure of warm tyres.
Tr ailer operation no tes
Alw ays inflate there ar axle tyres tothere com‐
mended tyre pressures on the tyre pressure
ta ble for increased load. Ty
re pressure table The tyre pressure
table is on the inside of the
fuel filler flap. The tyre pressure
table sho ws there commended
tyre pressure for all tyres appro vedfo rth is vehi‐
cle. The recommended tyre pressures apply for
cold tyres under various operating conditions,
i.e. loading and/or speed of theve hicle.
If one or more tyre sizes precede a tyre pres‐
sure, the tyre pressure information following is
only valid forth ose tyre sizes. Wheels and tyres
443
Page 447 of 593

If
th e preceding tyre sizes are complemented by
th e+ symbol, the tyre pressure information
fo llowing sho wsalternative tyre pressures.
These tyre pressures may impr oveyour vehicle's
ri de comfort. Fuel consum ption may then
increase slightl y.
The load conditions "partially laden" and "fully
laden" are defined in theta ble for dif fere nt num‐
be rs of passengers and amounts of luggage. The
actual number of seats may dif fer from this.
Be sure toalso obse rveth efo llowing fur ther
re lated subjects:
R Notes on tyre pressure (→ page442) Ty
re pressure moni toring sy stem Fu
nction of the ty repressure moni toring sys‐
tem
The sy stem checks the tyre pressure and the
tyre temp erature of the tyres fitted totheve hicle
by means of a tyre pressu resensor.
New tyre pressure sensors, e.g. in winter tyres,
are automatically taught-in during thefirs t jour‐
ney they are used. The tyre pressure and
the tyre temp erature
appear in the multifunction display
(→ page 444).
If th ere is a subs tantial pressure loss or if the
tyre temp erature is excessive, you will be
wa rned in thefo llowing ways:
R via display messa ges (→ page 515)
R viatheh warning lamp in the instrument
clus ter (→ page 541)
The tyre pressu remonitoring sy stem is only an
aid. It is the driver's responsibility toset the tyre
pressure tothere commended cold tyre pressure
suitable forth e operating situation. Set the tyre
pressure for cold tyres using a tyre pressu re
ga uge. Notethat the cor rect tyre pressure for
th e cur rent operating situation mu stfirs t be
ta ught-in tothe tyre pressure monitoring sys‐
te m.
In most cases, the tyre pressure monitoring sys‐
te m will auto maticallyupdate the new refere nce
va lues af teryo u ha vechanged the tyre pressure.
Yo u can, ho wever,also update there fere nce val‐
ues byrestarting the tyre pressure monitoring
sy stem manually (→ page445). Sy
stem limitations
The sy stem may be impaired or may not function
in thefo llowing situations:
R ifth e tyre pressure is set incor rectly
R ifth ere is a sudden pressure loss caused, for
ex ample, byafo re ign object penetrating the
tyre
R ifth ere is a malfunction caused byano ther
ra dio signal source
Make sure toobser vethefo llowing fur ther rela‐
te d subjec t:
R notes on tyre pressure (→ page442)
Checking the ty repressure with the tyre
pressure moni toring sy stem
Requ irements:
R The ignition is switched on.
On-board computer: Service Tyres
One of thefo llowing displa ysappears:
R Cur rent tyre pressure and tyre temp erature
of the individual wheels: 444
Wheels and tyres
Page 453 of 593

#
Therefore, only use tyre types and sizes
appr ovedfo ryo ur vehicle model. #
Obser vethe tyre load-bearing capacity
ra ting and speed rating requ iredfor
yo ur vehicle. *
NO
TEVehicle and tyre damage thro ugh
tyre types and sizes that ha venot been
appr oved Fo
r saf etyre asons, on lyuse tyres, wheels
and accessories which ha vebeen specially
appr ovedby Mercedes-Benz foryo ur vehicle.
These tyres are specially adap tedto the con‐
trol sy stems, such as ABS, ESP ®
and
4MATIC, and mar ked as follo ws:
R MO = Mercedes-Benz Original
R MOE = Mercedes-Benz Original Extended
(run-flat tyres only for cer tain wheels)
R MO1 = Mercedes-Benz Original (only cer‐
tain AMG tyres) Cer
tain characteristics, such as handling,
ve hicle noise emissions, fuel consum ption,
et c. may otherwise be adversely af fected.
Fu rthermore, other tyre sizes could result in
th e tyres rubbing against the body and axle
components when loaded. This could result
in damage tothe tyre or theve hicle.
Only use tyres, wheels and accessories that
ha ve been checked and recommended by
Mercedes-Benz. *
NO
TERisk todriving saf ety from retrea‐
ded tyres Re
treaded tyres are nei ther tested nor rec‐
ommended byMercedes-Benz, since pr evi‐
ous damage cannot alw ays be de tected on
re treaded tyres.
Fo rth is reason driving saf ety cannot be guar‐
anteed. #
Do not use used tyres if you ha veno
information about their pr evious usage. *
NO
TEPossible damage towheels or
tyres when driving over obs tacles Lar
gewheels ha vea lo wer tyre section width.
The lo werth e tyre section width, the greater
is therisk of damage towheels or tyres when
driving over obs tacles. #
Avoid obs tacles or drive pa rticular ly
carefully. *
NO
TEDama getoelectronic component
parts from the use of tyre-fitting tools Ve
hicles with a tyre pressure monitoring
sy stem: electronic component parts are
located in the wheel. Tyre-fitting tools should
not be applied in the area of theva lve.
The tools could damage the electronic com‐
ponent parts. #
Have the tyres changed at a qualified
specialist workshop onl y. 450
Wheels and tyres