2018 MERCEDES-BENZ E-CLASS COUPE buttons
[x] Cancel search: buttonsPage 144 of 593
Ad
justing the outside mir rors #
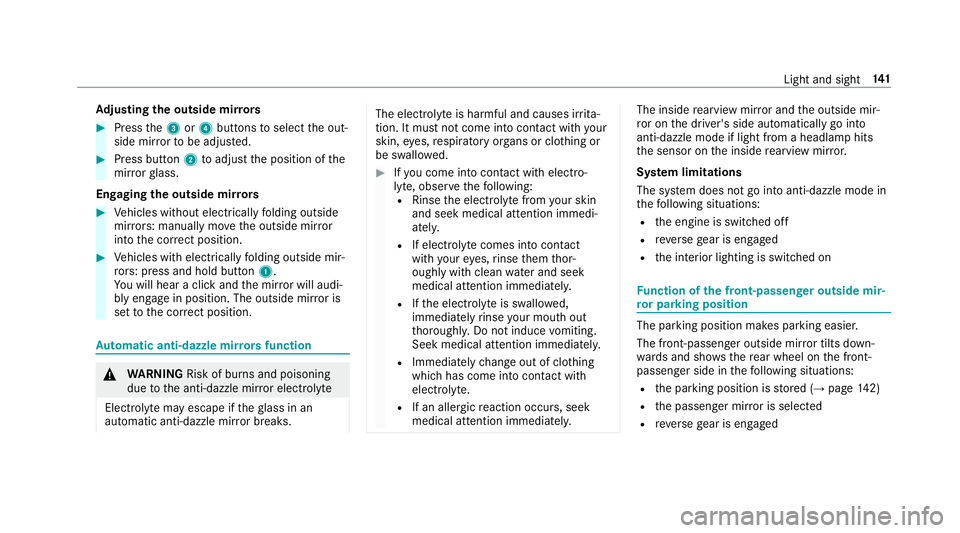
Press the3 or4 buttons toselect the out‐
side mir rorto be adjus ted. #
Press button 2toadjust the position of the
mir rorgl ass.
Engaging the outside mir rors #
Vehicles without electrically folding outside
mir rors: manually mo vethe outside mir ror
into the cor rect position. #
Vehicles with electrically folding outside mir‐
ro rs: press and hold button 1.
Yo u will hear a click and the mir ror will audi‐
bly engage in position. The outside mir ror is
set tothe cor rect position. Au
tomatic anti-dazzle mir rors function &
WARNING Risk of bu rns and poisoning
due tothe anti-dazzle mir ror electrolyte
Electrolyte may escape if theglass in an
automatic anti-dazzle mir ror breaks. The electrolyte is harmful and causes ir
rita‐
tion. It mu stnot come into contact wi thyour
skin, eyes,respiratory organs or clo thing or
be swallo wed. #
Ifyo u come into contact with electro‐
ly te , obser vethefo llowing:
R Rinse the electrolyte from your skin
and seek medical attention immedi‐
atel y.
R If electrolyte comes into contact
with your eyes, rinse them thor‐
oughly with clean water and seek
medical attention immediately.
R Ifth e electrolyte is swallo wed,
immediately rinse your mouth out
th oroughly. Do not induce vomiting.
Seek medical attention immediately.
R Immedia tely ch ange out of clo thing
which has come into con tact wi th
electrolyte.
R If an allergic reaction occurs, seek
medical attention immediatel y. The inside
rearview mir ror and the outside mir‐
ro r on the driver's side automatically go into
anti-dazzle mode if light from a headlamp hits
th e sensor on the inside rearview mir ror.
Sy stem limitations
The sy stem does not go into anti-dazzle mode in
th efo llowing situations:
R the engine is switched off
R reve rsege ar is engaged
R the interior lighting is switched on Fu
nction of the front-passenger outside mir‐
ro r parking position The pa
rking position makes parking easier.
The front-passenger outside mir ror tilts down‐
wa rds and sho ws there ar wheel on the front-
passenger side in thefo llowing situations:
R the parking position is stored (→ page142)
R the passenger mir ror is selected
R reve rsege ar is engaged Light and sight
141
Page 148 of 593

Overview of climate control sy
stems Note
s on climate control An interior air
filter must alw ays be used so that
th e air conditioning sy stem, pollution le vel moni‐
to ring and the air filtering function workcor‐
re ctly. Ma kesure that thefilter is ins talled cor‐
re ctly and thefilter housing in the engine com‐
partment is closed cor rectly using the cap and
alw ays tightly sealed when in operation. Use fil‐
te rs recommended and appr ovedby Mercedes-
Benz. Alw ays ha veservice workcar ried out at a
qu alified specialist workshop. THERMATIC control panel
overview The indicator lamps on
the buttons indicate that
th e cor responding function is activated. 1
w Setsthete mp erature, left
2 _ Setsthe air distribution
3 H Setsthe air flow or switches off climate
control
4 Ã Sets climate control toautomatic
mode (→ page147)
5 ¬ Defrosts the windscreen 6
Vehicles without a stationary heater: t
calls up the air conditioning menu
Ve hicles with a stationary heater: !calls
up the air conditioning menu, switches the
re sidual heat on/off (→ page148)
7 ¤ Switches there ar wind owheater
on/off
8 Vehicles without a stationary heater: 0
swit ches the synchronisation on/off
(→ page 148)
Ve hicles with a stationary heater: &
swit ches thest ationary heater on/off
(→ page 150)
9 g Switches ai r-re circulation mode on/off
(→ page 148)
A ¿ Switches the A/C function on/off
(→ page 147)
B w Setsthete mp erature, right THERMOT
RONIC control panel overview The indicator lamps on
the buttons indicate that
th e cor responding function is activated. Climate
control 14 5
Page 149 of 593

1
w Setsthete mp erature, left
2 _ Setsthe air distribution, left
3 H Setsthe air flow or switches off climate
control
4 Ã Sets climate control toautomatic
mode (→ page147)
5 ¬ Defrosts the windscreen
6 ! Calls up the air conditioning menu Switches
residual heat on/off (→ page148)
7 ¤ Switches there ar wind owheater
on/off
8 Vehicles without a stationary heater:
¿ switches the A/C function on/off
(→ page 147)
Ve hicles with a stationary heater: &
swit ches thest ationary heater on/off
(→ page 150)
9 g Switches ai r-re circulation mode on/off
(→ page 148)
A _ Setsthe air distribution, right
B w Setsthete mp erature, right
Re ar operating unit
Yo u can set thete mp erature forth e entire rear
compartment using buttons 1or3. 1
Sets thete mp erature
2 Display
3 Sets thete mp erature Operating
the clima tecont rol sy stem Switching clima
tecont rol on/off #
Toswitch on: setthe air flow toleve l 1 or
higher using theH button. #
Toswitch off: setthe air flow toleve l 0 using
th eH button. 14 6
Climate cont rol
Page 155 of 593

Setting
thest ationary heater/stationary ven‐
tilation via remo tecont rol
Re quirements:
R The fuel tank is filled toat least reser vefuel
le ve l.
Switching on immedia tely #
Press and hold theu button. Setting
the departu retime #
Brie fly press theu button. #
Press the, or. button repeatedly
until the time tobe changed appears on the
displa y. #
Press theu and^ buttons simultane‐
ousl y.
The Îsymbol on there mo tecontrol displ ay
fl ashes. #
Press the, and. buttons toset the
desired departure time. #
Press theu and^ buttons simultane‐
ousl y.
The new departure time will be stored.
Up tothre e departure times can be stored. #
Toactivate the departu retime: select the
desired departure time and press and hold
th eu button.
The Ísymbol, the departure time and,
depending on the selected departure time,
th e letter A, BorCappear on the displa y. #
Todeactivate the departure time: select
th e desired departure time and press and
hold the^ button.
OFF will appear on the displa y. #
Tocheck thest atus of thest ationary
heater: briefly press theu button.
Switching off immediately #
Press and hold the^ button.
Overview of there mo tecont rol displa ys(sta‐
tiona ryheater/stationary ventilation) 1
Stationary ventilation switched on
2 Stationary heater swit ched on 15 2
Climate cont rol
Page 185 of 593
*
NO
TEDama getotheve hicle due toit
ro lling away #
Alw ays secure theve hicle against roll‐
ing away. #
Bring theve hicle toast andstill byapplying
th e brake pedal. #
On uphill or downhill gradients, turn the front
wheels so that theve hicle rolls towa rdsthe
ke rb if it starts moving. #
App lythe electric parking brake. #
Enga getransmission position jin a station‐
ary vehicle with the brake pedal applied
(→ page 172). #
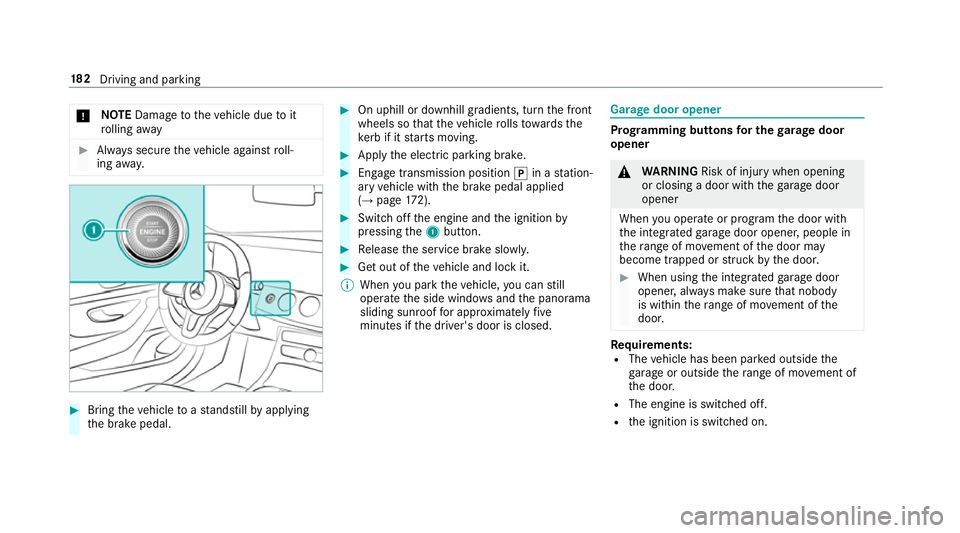
Switch off the engine and the ignition by
pressing the1 button. #
Release the service brake slowl y. #
Get out of theve hicle and lock it.
% When you park theve hicle, you can still
opera tethe side windo wsand the panorama
sliding sunroof for appro ximately five
minutes if the driver's door is closed. Garage door opener
Prog
ramming buttons for the garage door
opener &
WARNING Risk of inju rywhen opening
or closing a door with thega rage door
opener
When you operate or program the door with
th e integrated garage door opener, people in
th era nge of mo vement of the door may
become trapped or stru ck bythe door. #
When using the integrated garage door
opener, alw ays make sure that nobody
is within thera nge of mo vement of the
door. Re
quirements:
R The vehicle has been par ked outside the
ga rage or outside thera nge of mo vement of
th e door.
R The engine is switched off.
R the ignition is switched on. 18 2
Driving and pa rking
Page 186 of 593
%
The garage door opener function is alw ays
av ailable when the ignition is switched on. #
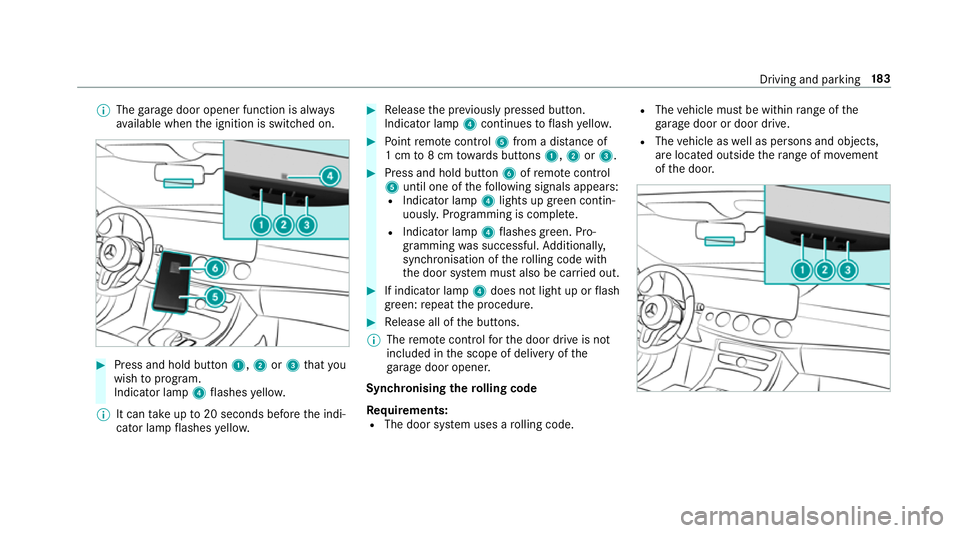
Press and hold button 1,2or3 that you
wish toprog ram.
Indicator lamp 4flashes yello w.
% It can take up to20 seconds before the indi‐
cator lamp flashes yello w. #
Release the pr eviously pressed button.
Indicator lamp 4continues toflash yello w. #
Point remo tecontrol 5from a di stance of
1 cm to8 cm towa rds buttons 1,2or3. #
Press and hold button 6ofremo tecontrol
5 until one of thefo llowing signals appears:
R Indicator lamp 4lights up green contin‐
uousl y.Programming is comple te.
R Indicator lamp 4flashes green. Pro‐
gramming was successful. Additionall y,
synchronisation of thero lling code with
th e door sy stem must also be car ried out. #
If indicator lamp 4does not light up or flash
green: repeat the procedure. #
Release all of the buttons.
% The remo tecontrol forth e door drive is not
included in the scope of delivery of the
ga rage door opener.
Synchronising thero lling code
Re quirements:
R The door sy stem uses a rolling code. R
The vehicle must be within range of the
ga rage door or door drive.
R The vehicle as well as persons and objects,
are located outside thera nge of mo vement
of the door. Driving and parking
18 3
Page 188 of 593
#
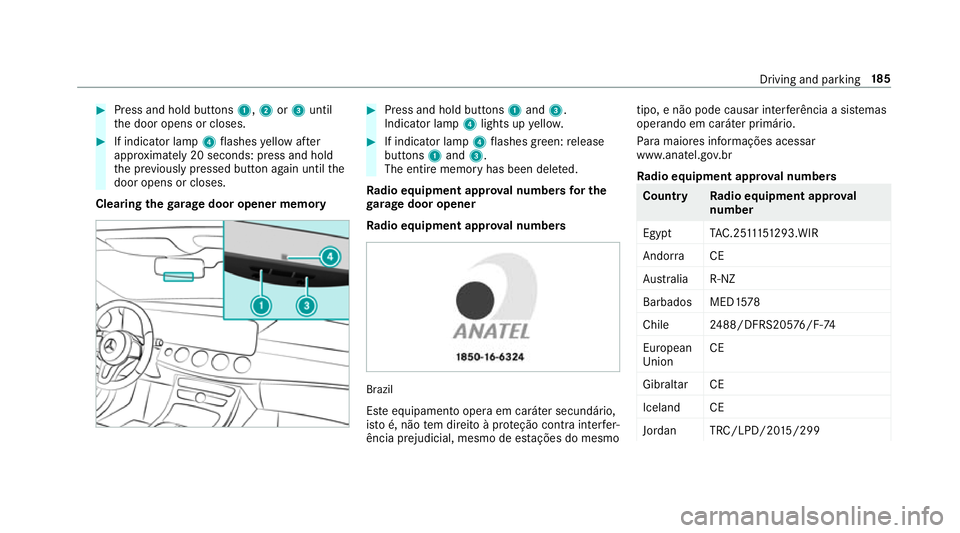
Press and hold buttons 1,2or3 until
th e door opens or closes. #
If indicator lamp 4flashes yellow af ter
appr oximately 20 seconds: press and hold
th e pr eviously pressed button again until the
door opens or closes.
Clearing thega rage door opener memo ry #
Press and hold buttons 1and 3.
Indicator lamp 4lights up yello w. #
If indicator lamp 4flashes green: release
buttons 1and 3.
The entire memo ryhas been dele ted.
Ra dio equipment appr oval numbers for the
ga rage door opener
Ra dio equipment appr oval numbers Brazil
Es te equipamento opera em caráter secundário,
is to é, não tem direito à pr oteção contra inter fer‐
ência prejudicial, mesmo de es tações do mesmo tipo, e não pode causar inter
ferê ncia a si stemas
operando em caráter primário.
Pa ra maio res informações acessar
www.anatel.go v.br
Ra dio equipment appr oval numbers Countr
yRadio equipment appr oval
number
Egyp tT AC.25 111 51293.WIR
Andor ra CE
Au stra lia R-NZ
Barbados MED1 578
Chile 2488/DFRS205 76/F-74
European
Union CE
Gibral tarCE
Iceland CE
Jordan TRC/LPD/20 15/299 Driving and pa
rking 18 5
Page 204 of 593
Fu
nction of Adaptive Brake Lights Ad
aptive Brake Lights warnfollowing traf fic in an
emergency braking situation wi th thefo llowing
actions:
R Byflashing the brake lamps
R By activating the hazard warning lights
If th eve hicle is braked sharply from speeds
abo ve50 km/h, the brake lamps flash rapidl y.
This pr ovides traf fic tr avelling behind you with an
ev en more noticeable warning.
If th eve hicle is tr avelling at speeds of more than
70 km/h at the beginning of the brake applica‐
tion, the hazard warning lights switch on once
th eve hicle is stationar y.When you pull away
again, the hazard warning lights will switch off
automatically at appr oximately 10km/h. Yo u
can also switch off the hazard warning lights
using the hazard warning button. Cruise control and limiter
Fu
nction of cruise control
Cruise cont rolre gulates the speed totheva lue
selec tedby the driver. If
yo u accelerate toove rtake, forex ample, the
st ored speed is not dele ted. If youre mo veyour
fo ot from the accelera tor pedal af terov ertaking,
cruise control will resume speed regulation back
to thestored speed.
Cruise contro l is operated using the cor respond‐
ing steering wheel buttons. You can store any
speed abo ve20 km/h up tothe maximum speed
or up tothe set winter tyre limit.
If yo ufa ilto adapt your driving style, cruise con‐
trol can neither reduce therisk of an accident
nor override the la wsof ph ysics. It cannot take
into account road, weather or traf fic conditions.
Cruise control is only an aid. You are responsible
fo r maintaining a safe dis tancetotheve hicle in
front, forve hicle speed, for braking in good time
and forst ay ing in lane.
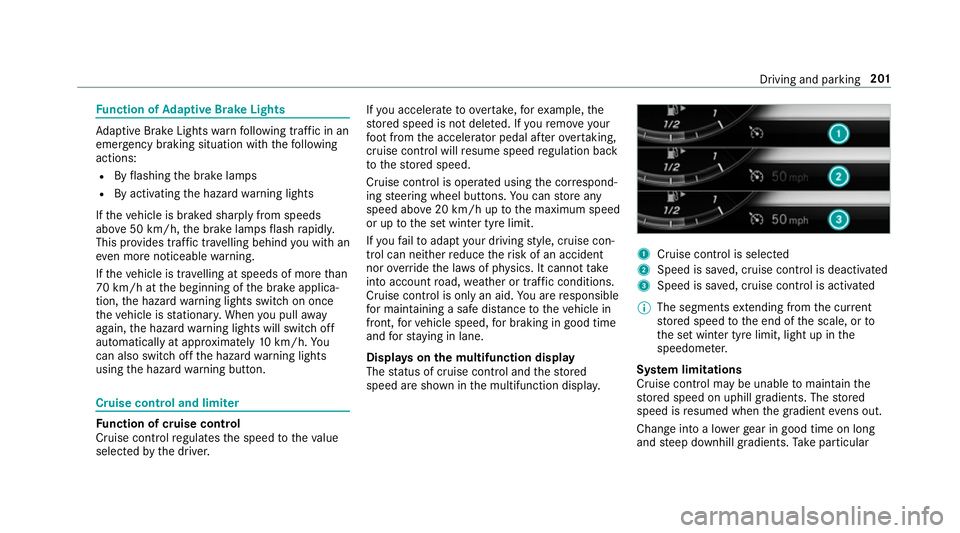
Displa yson the multifunction display
The status of cruise control and thestored
speed are shown in the multifunction displa y. 1
Cruise cont rol is selec ted
2 Speed is sa ved, cruise control is deactivated
3 Speed is sa ved, cruise control is activated
% The segments extending from the cur rent
st ored speed tothe end of the scale, or to
th e set winter tyre limit, light up in the
speedome ter.
Sy stem limitations
Cruise control may be unable tomaintain the
st ored speed on uphill gradients. The stored
speed is resumed when the gradient evens out.
Change into a lo werge ar in good time on long
and steep downhill gradients. Take particular Driving and parking
201