2018 MERCEDES-BENZ E-CLASS COUPE tyre pressure
[x] Cancel search: tyre pressurePage 330 of 486

#Correct the tire pressure if it is still at least
13 0 kPa (1.3 bar/19 psi). See theTire and
Loading Info rmation placard on the driver's
side B‑pillar or the tire pressure table in the
fuel filler flap forva lues.
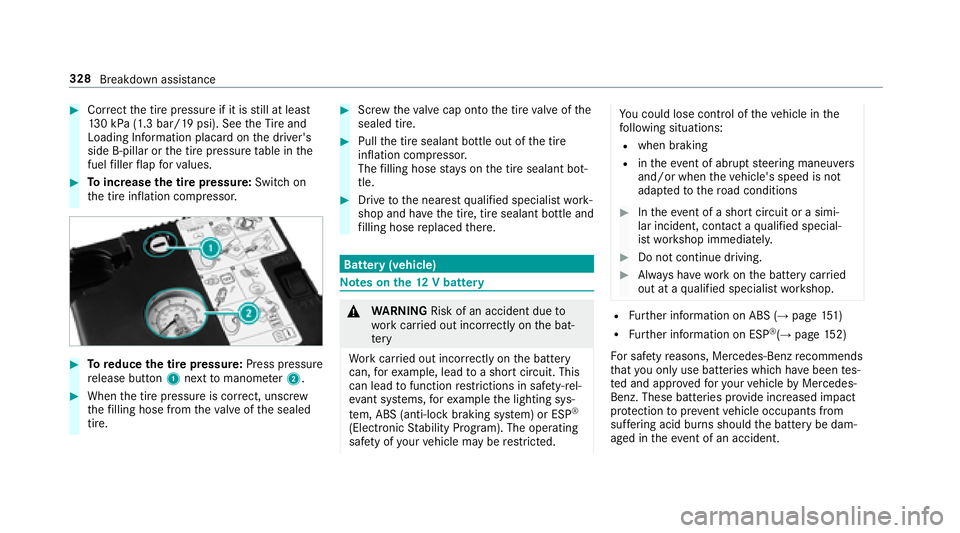
#To increase the tire pressure: Switchon
th e tire inflation compressor.
#To reduce the tire pressure: Press pressure
re lease button 1next tomanome ter2.
#When the tire pressure is cor rect, unscr ew
th efilling hose from theva lve of the sealed
tire.
#Scr ew theva lve cap onto the tire valve of the
sealed tire.
#Pull the tire sealant bottle out of the tire
inflation compressor.
The filling hose stay s on the tire sealant bot‐
tle.
#Drive tothe nearest qualified specialist work‐
shop and ha vethe tire, tire sealant bottle and
fi lling hose replaced there.
Bat tery (vehicle)
Note s onthe12 V battery
&
WARNING Risk of an accident due to
wo rkcar ried out incor rectly on the bat‐
te ry
Wo rkcar ried out incor rectly on the battery
can, forex ample, lead toa short circuit. This
can lead tofunction restrictions in saf ety-re l‐
eva nt sy stems, forex ample the lighting sys‐
te m, ABS (anti-lock braking system) or ESP
®
(Elect ronic Stability Prog ram). The operating
saf etyof your vehicle may be restricted.
Yo u could lose cont rol of theve hicle in the
fo llowing situations:
Rwhen braking
Rin theeve nt of ab rupt steering maneuvers
and/or when theve hicle's speed is not
adap tedto thero ad conditions
#In theeve nt of a short circuit or a simi‐
lar incident, contact a qualified special‐
ist workshop immediately.
#Do not continue driving.
#Alw ays ha vewo rkon the battery car ried
out at a qualified specialist workshop.
RFu rther information on ABS (→page 151)
RFu rther information on ESP®(→page 152)
Fo r saf etyre asons, Mercedes-Benz recommends
th at you only use batte ries which ha vebeen tes‐
te d and appr oved foryo ur vehicle byMercedes-
Benz. These batteries pr ovide inc reased impact
pr otection toprev ent vehicle occupants from
suf fering acid bu rns should the battery be dam‐
aged in theev ent of an accident.
328
Breakdown assis tance
Page 344 of 486

Noise or unusual handling characteristics
While driving, pay attention tovibrations, noises
and unusual handling characteristics, e.g. pulling
to one side. This may indicate that the wheels or
tires are damaged. If you suspect that a tire is
defective, reduce your speed immediatel y.Stop
th eve hicle as soon as possible tocheck the
wheels and tires for dama ge. Hidden tire dam‐
age could also be causing the unusual handling
ch aracteristics. If youfind no signs of damage,
ha ve the tires and wheels checked at a qualified
specialist workshop.
Re gular checking of wheels and tires
&
WARNING Risk of accident from dam‐
aged tires
Dama ged tires can cause tire pressure loss.
As a result, you could lose cont rol of your
ve hicle.
#Check the tires regularly for signs of
dama geand replace any damaged tires
immediatel y.
&
WARNING Risk of aquaplaning due to
insuf ficient tire tread
Insuff icient tire tread will result in reduced
tire grip. The tire tread is no longer able to
dissipate water.
This means that in heavy rain or slush the
ri sk of hydroplaning is increased, in particu‐
lar if vehicle speed is not adap tedto suit the
conditions.
If th e tire pressure is too high or too lo w,
tires may exhibit dif fere nt le vels of wear at
dif fere nt locations on the tire conta ct sur‐
fa ce.
#Thus, you should regularly check the
tread de pth and the condition of the tire
conta ct surf ace across the entire width
of all tires.
Minimum tread dep thfor:
RSummer tires: âin (3 mm)
RM+S tires: ãin (4 mm)
#For saf etyre asons, replace the tires
before the legally prescribed limit for
th e minimum tread dep thisreached.
Car ryout thefo llowing checks on all wheels reg‐
ularly, at least once a month or as requ ired, e.g.
prior toa long journey or driving off- road:
RCheck the tire pressure (→page 343).
RVisual check of wheels and tires for dama ge.
RCheck theva lve caps.
The valves must be pr otected against mois‐
ture and dirt bytheva lve caps appr oved
especially foryo ur vehicle byMercedes-Benz.
RVisual check of the tread dep thand the tire
conta ct surf ace across the entire width.
The minimum tread dep thfor summer tires is
â in (3 mm) and for winter tires ãin
(4 mm).
34 2
Wheels and tires
Page 345 of 486

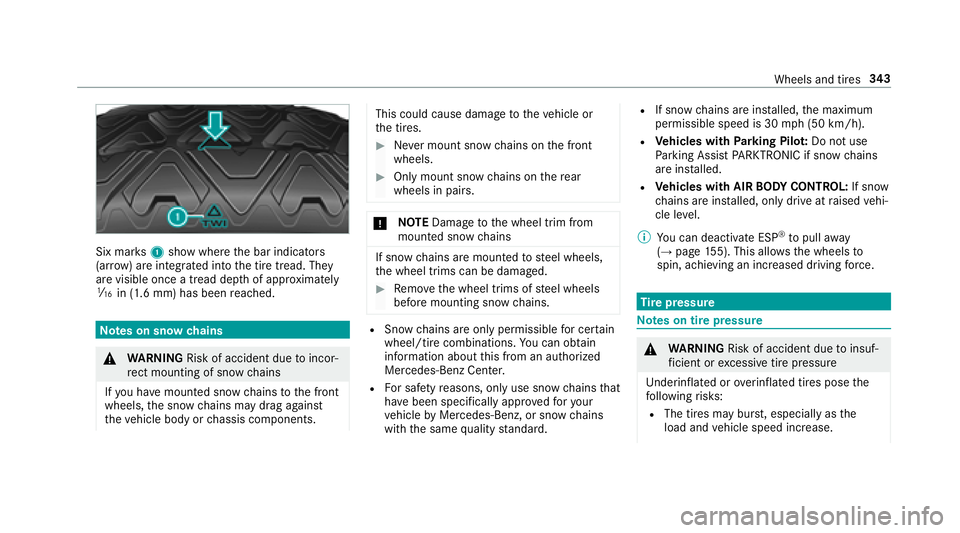
Six marks1 show where the bar indicators
(ar row ) are integrated into the tire tread. They
are visible once a tread dep thof appr oximately
á in (1.6 mm) has been reached.
Note s on snow chains
&
WARNING Risk of accident due toincor‐
re ct mounting of snow chains
If yo u ha vemounted snow chains tothe front
wheels, the snow chains may drag against
th eve hicle body or chassis components.
This could cause damage totheve hicle or
th e tires.
#Ne ver mount snow chains on the front
wheels.
#Only mount snow chains on there ar
wheels in pairs.
* NO
TEDama getothe wheel trim from
mounted snow chains
If snow ch ains are mounte dto steel wheels,
th e wheel trims can be damaged.
#Re mo vethe wheel trims of steel wheels
before mounting snow chains.
RSn ow chains are only pe rmissible for cer tain
wheel/tire combinations. You can obtain
information about this from an authorized
Mercedes-Benz Center.
RFo r saf etyre asons, only use snow ch ainsthat
ha ve been specifically appr oved foryo ur
ve hicle byMercedes-Benz, or snow chains
with the same quality standard.
RIf snow ch ains are ins talled, the maximum
permissible speed is 30 mph (50 km/h).
RVehicles with Parking Pilo t:Do no t use
Pa rking Assist PARKTRONI Cif sn ow ch ains
are ins talled.
RVe hicles with AIR BODY CONT ROL:If snow
ch ains are ins talled, only drive at raised vehi‐
cle le vel.
% You can deactivate ESP
®to pull away
(→page 155). This allo wsthe wheels to
spin, achieving an increased driving forc e.
Tire pressure
Note s on tire pressure
&
WARNING Risk of accident due toinsuf‐
fi cient or excessive tire pressure
Underinfla ted or overinfla ted tires pose the
fo llowing risks:
RThe tires may bur st, especially as the
load and vehicle speed increase.
Wheels and tires 34
3
Page 353 of 486

#Step 1: locatethest atement "The combined
we ight of occupants and cargo should ne ver
exc eed XXX kgor XXX lbs." ("The combined
we ight of occupants and cargo should ne ver
exc eed XXX kgor XXX lbs.") on your vehicle's
Ti re and Loading Info rmation placard.
#Ste p 2: determ ine the combined weight of
th e driver and passengers who will be tra vel‐
ing in your vehicle.
#Ste p 3: subtract the combined weight of the
driver and passengers from XXX kgor
XXX lbs.
#Ste p 4: there sulting figure equals the per‐
missible cargo and luggage load capacity. For
ex ample: If "XXX" equals 1400 lbs and there
are five occupants in your vehicle with a
we ight of 150 lbs each, the maximum cargo
and luggage load capacity is 650 lbs (1400 -
75 0 (5 x 150) = 650 lbs).
#Ste p 5: determ ine the combined weight of
luggage and cargo that theve hicle will be
car rying. For saf etyre asons, this we ight may
not safely exceed theav ailable cargo and lug‐
ga ge load capacity calculated in step 4. Even if
you ha vecalculated thetot al load care‐
full y,yo u should still make sure that the maxi‐
mum permissible gross mass and the permissi‐
ble axle load rating of your vehicle are not excee‐
ded. De tails can be found on theve hicle identifi‐
cation plate.
#Ha ve your loaded vehicle – including driver,
occupants and load – weighed on a vehicle
we ighbridge.
The measured values may not exceed the
maximum permissible values stated on the
ve hicle identification plate.
Fu rther related subjects:
RCalculation example for de term ining the max‐
imum load (→page 351)
RTi re and Loading Info rmation placard
(→page 349)
RTi re pressure table (→page 345)
RVe hicle identification plate
Calculation example for de term ining the
ma ximum load
The following table sho wsexamples of how to
calculate tota l and load capacities with varying
seating con figurations and dif fere nt numbe rs
and sizes of occupants. The following examples
use a maximum load of 1500 lbs (680 kg).This
is for illustration purposes on ly.Make sure
yo u are using the actual load limit foryo ur vehi‐
cle stated on your vehicle's Tire and Loading
Info rmation placard (
→page 349).
The higher thewe ight of all the occupants, the
smaller the maximum load for lug gage .
Wheels and tires 351