2018 MERCEDES-BENZ E-CLASS COUPE inflation pressure
[x] Cancel search: inflation pressurePage 326 of 486
RIf driving on, observethefo llowing no tes.
Driving distance possible in limp-home mode
af te r the pressure loss warning:
Load condition Driving distance pos‐
sible in limp-homemode
Pa rtially laden 50 miles (80 km)
Fu lly laden 19miles (30 km)
RThe driving dis tance possible in li mp-home
mode may vary depending on the driving
st yle.
RMaximum permissible speed 50 mph
(80 km/h).
If a tire has gone flat and cannot be replaced
with an MOEx tended tire, you can use a stand‐
ard tire as a temp orary measure.
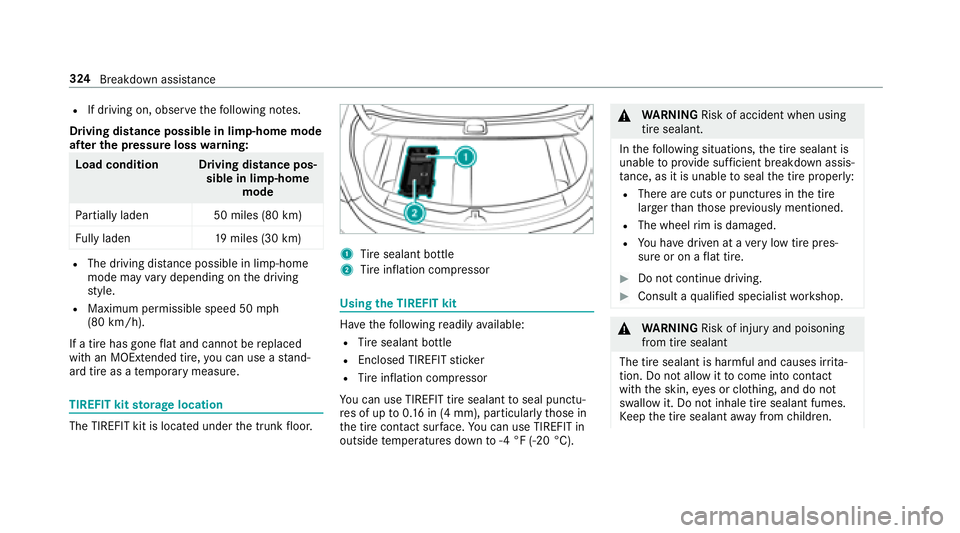
TIREFIT kit storage location
The TIREFIT kit is located under the trunk floor.
1Ti re sealant bottle
2Tire inflation compressor
Using the TIREFIT kit
Ha ve thefo llowing readily available:
RTire sealant bottle
REnclosed TIREFIT sticke r
RTire inflation compressor
Yo u can use TIREFIT tire sealant toseal punctu‐
re s of up to0.16 in (4 mm), particular lythose in
th e tire conta ct surface.You can use TIREFIT in
outside temp eratures down to-4 °F (-20 °C).
&
WARNING Risk of accident when using
tire sealant.
In thefo llowing situations, the tire sealant is
unable toprov ide suf ficient breakdown assis‐
ta nce, as it is unable toseal the tire proper ly:
RThere are cuts or punctures in the tire
lar gerth an those pr eviously mentioned.
RThe wheel rim is dama ged.
RYo u ha vedriven at a very low tire pres‐
sure or on a flat tire.
#Do not continue driving.
#Consult a qualified specialist workshop.
&
WARNING Risk of injury and poisoning
from tire sealant
The tire sealant is harmful and causes ir rita ‐
tion. Do not allow it tocome into contact
wi th th e skin, eyes or clo thing, and do not
swallow it. Do not inhale tire sealant fumes.
Ke ep the tire sealant away from children.
324
Breakdown assis tance
Page 328 of 486
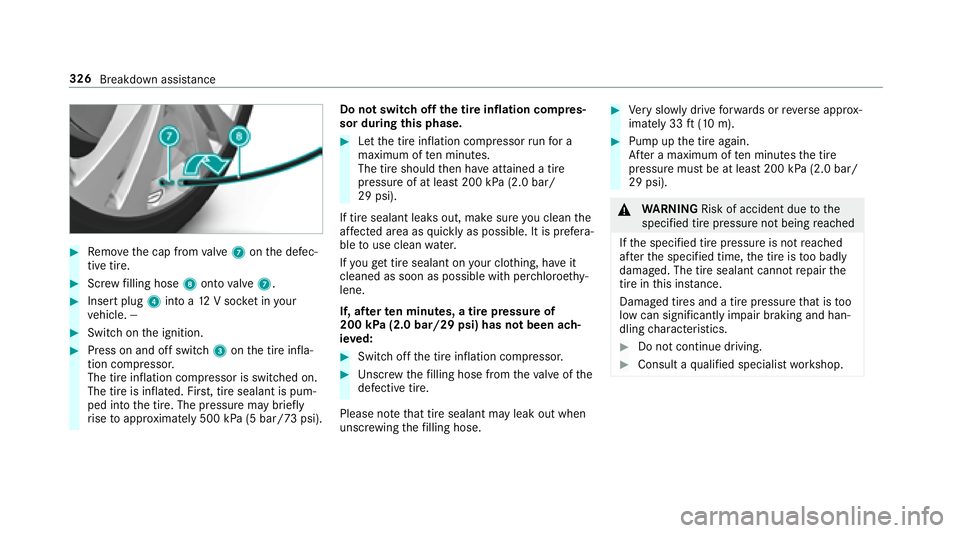
#Remo vethe cap from valve 7 onthe defec‐
tive tire.
#Scr ew filling hose 8onto valve 7.
#Insert plug 4into a 12V soc ket in your
ve hicle. ‑‑
#Switch on the ignition.
#Press on and off switch 3onthe tire infla‐
tion compressor.
The tire inflation compressor is switched on.
The tire is inflated. Fir st, tire sealant is pum‐
ped into the tire. The pressure may brief ly
ri se toappr oximately 500 kPa (5 bar/73 psi). Do not switch off
the tire inflation compres‐
sor du ring this phase.
#Let the tire inflation compressor runfo r a
maximum of ten minu tes.
The tire should then ha veattained a tire
pressure of at least 200 kPa (2.0 bar/
29 psi).
If tire sealant leaks out, make sure you clean the
af fected area as quickly as possible. It is prefera‐
ble touse clean water.
If yo uge t tire sealant on your clo thing, ha veit
cleaned as soon as possible with per chloroe thy‐
lene.
If, af terte n minutes, a tire pressure of
200 kPa (2.0 bar/29 psi) has not been ach‐
ie ve d:
#Switch off the tire inflation compressor.
#Un scr ew thefilling hose from theva lve of the
defective tire.
Please no tethat tire sealant may leak out when
unscr ewing thefilling hose.
#Ve ry slowly drive forw ards or reve rse appr ox‐
imately 33 ft(10 m).
#Pump up the tire again.
Af ter a maximum of ten minu testh e tire
pressure must be at least 200 kPa (2.0 bar/
29 psi).
& WARNING Risk of accident due tothe
specified tire pressure not being reached
If th e specified tire pressure is not reached
af te rth e specified time, the tire is too badly
damaged. The tire sealant cannot repair the
tire in this ins tance.
Dama ged tires and a tire pressure that is too
low can significantly impair braking and han‐
dling characteristics.
#Do not continue driving.
#Consult a qualified specialist workshop.
326
Breakdown assis tance
Page 329 of 486
If, afterte n minutes, a tire pressure of
200 kPa (2.0 bar/29 psi) has been achie ved:
&
WARNING Risk of accident from driving
wi th sealed tires
A tire temp orarily sealed with tire sealant
impairs the handling characteristics and is
not suitable for higher speeds.
#Ad apt your dr ivingst yle according lyand
drive carefull y.
#Do notexceed the specified maximum
speed with a tire that has been repaired
using tire sealant.
#Obser vethe maximum permissible speed for
a tire sealed with tire sealant 50 mph
(80 km/h).
#Af fix th e upper section of the TIREFIT sticke r
to the instrument clus ter where it will be eas‐
ily seen bythe driver. *
NO
TEStaining caused byleaking tire
sealant
Af ter use, excess tire sealant may leak out
from thefilling hose.
#Therefore, place thefilling hose in the
plastic bag that con tained the TIREFIT
kit.
+ENVIRONMEN TALNO TEEnvironmental
pollution caused byenvironmen tally ir re‐
sponsible disposal
Ti re sealant contains polluta nts.
#Have the tire sealant bottle disposed of
professionall y,e.g. at an authorized
Mercedes-Benz Center.
#Switch off the tire inflation compressor.
#Un scr ew thefilling hose from theva lve of the
defective tire.
#St ow th e tire sealant bottle and the tire infla‐
tion compressor.
#Pull away immediatel y.
#Stop af ter driving for app roxima tely ten
minutes and check the tire pressure using
th e tire inflation compressor.
The tire pressure must now be at least
13 0 kPa (1.3 bar/19 psi).
&
WARNING Risk of accident due tothe
specified tire pressure not being reached
If th e specified tire pressure is not reached
af te r a brief drive, the tire is too badly dam‐
aged. The tire sealant cannot repair the tire
in this ins tance.
Dama ged tires and tire pressure that is too
low can significantly impair the braking prop‐
erties and the handling characteristics.
#Do not continue driving.
#Consult a qualified specialist workshop.
In cases such as the one mentioned abo ve, con‐
ta ct an au thorized Mercedes-Benz Center. Or
call 1-800-FOR-MERC edes (inthe USA) or
1-800-387-0 100 (in Canada).
Breakdown assis tance 327
Page 330 of 486
#Correct the tire pressure if it is still at least
13 0 kPa (1.3 bar/19 psi). See theTire and
Loading Info rmation placard on the driver's
side B‑pillar or the tire pressure table in the
fuel filler flap forva lues.
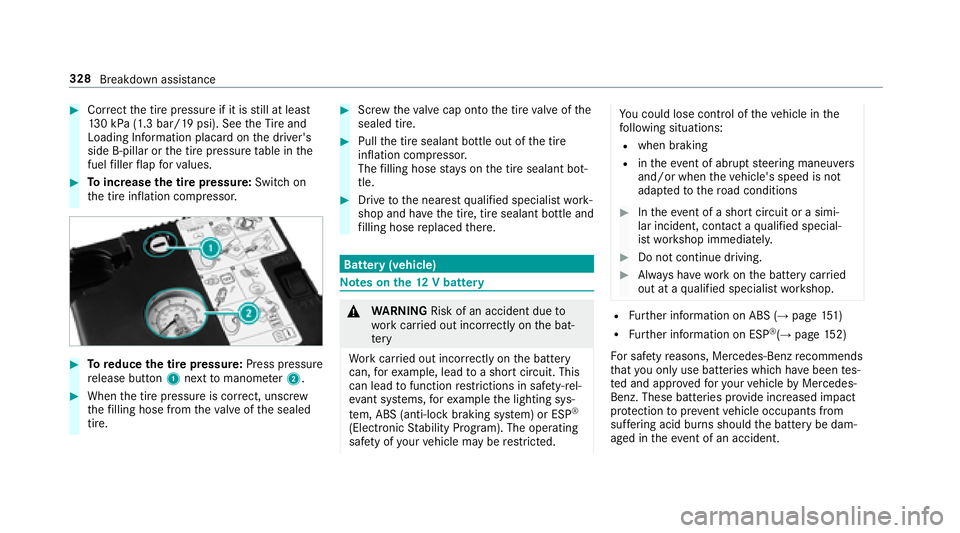
#To increase the tire pressure: Switchon
th e tire inflation compressor.
#To reduce the tire pressure: Press pressure
re lease button 1next tomanome ter2.
#When the tire pressure is cor rect, unscr ew
th efilling hose from theva lve of the sealed
tire.
#Scr ew theva lve cap onto the tire valve of the
sealed tire.
#Pull the tire sealant bottle out of the tire
inflation compressor.
The filling hose stay s on the tire sealant bot‐
tle.
#Drive tothe nearest qualified specialist work‐
shop and ha vethe tire, tire sealant bottle and
fi lling hose replaced there.
Bat tery (vehicle)
Note s onthe12 V battery
&
WARNING Risk of an accident due to
wo rkcar ried out incor rectly on the bat‐
te ry
Wo rkcar ried out incor rectly on the battery
can, forex ample, lead toa short circuit. This
can lead tofunction restrictions in saf ety-re l‐
eva nt sy stems, forex ample the lighting sys‐
te m, ABS (anti-lock braking system) or ESP
®
(Elect ronic Stability Prog ram). The operating
saf etyof your vehicle may be restricted.
Yo u could lose cont rol of theve hicle in the
fo llowing situations:
Rwhen braking
Rin theeve nt of ab rupt steering maneuvers
and/or when theve hicle's speed is not
adap tedto thero ad conditions
#In theeve nt of a short circuit or a simi‐
lar incident, contact a qualified special‐
ist workshop immediately.
#Do not continue driving.
#Alw ays ha vewo rkon the battery car ried
out at a qualified specialist workshop.
RFu rther information on ABS (→page 151)
RFu rther information on ESP®(→page 152)
Fo r saf etyre asons, Mercedes-Benz recommends
th at you only use batte ries which ha vebeen tes‐
te d and appr oved foryo ur vehicle byMercedes-
Benz. These batteries pr ovide inc reased impact
pr otection toprev ent vehicle occupants from
suf fering acid bu rns should the battery be dam‐
aged in theev ent of an accident.
328
Breakdown assis tance
Page 349 of 486

Further related subjects:
RNo tes on tire pressure (→page 343)
RTire pressure table (→page 345)
RTire and Loading Info rmation placard
(→page 349)
Ti re pressure moni toring sy stem
Fu nction of the tire pressure moni toring sys‐
te m
&
DANG ER Risk of accident due toincor‐
re ct tire pressure
Every tire, including the spare (if pr ovided),
should be checked when cold at least once a
month and inflated tothe pressure recom‐
mended bytheve hicle manufacturer (see
Ti re and Loading Info rmation placard on the
B-pillar on the driver ’sside or the tire pres‐
sure label on the inside of the fuel filler flap
of your vehicle). If your vehicle has tires of a
dif fere nt size than the size indicated on the
Ti re and Loading Info rmation placard or the
tire pressure table, you need todeterm ine
th e proper tire pressure forth ose tires.
As an added saf etyfe ature, your vehicle has
been equipped with a tire pressure monitor‐
ing sy stem (TPMS) that illuminates a low tire
pressure indicator lamp when one or more of
yo ur tires are signif icantly underinflated.
Ac cording ly, if the low tire pressure indicator
lamp lights up, you should stop and check
yo ur tires as soon as possible, and inflate
th em tothe proper pressure. Driving on a
significantly underinflated tire causes the tire
to ove rheat and can lead totire failure.
Un derinflation also increases fuel consump‐
tion and reduces tire tread life, and may
af fect theve hicle's handling and braking abil‐
ity. Please no tethat the TPMS is not a substi‐
tute for proper tire maintenance, and it is the
driver's responsibility tomaintain cor rect tire
pressure, even if underinflation has not
re ached the le velto trig ger illumination of
th e TPMS low tire pressure indicator lamp.
Yo ur vehicle has also been equipped with a
TPMS malfunction indicator toindicate whenthe sy stem is not operating proper ly. The
TPMS malfunction indica tor is combined with
th e low tire pressure indicator lamp. When
th e sy stem de tects a malfunction, the indica‐
to r lamp will flash for app roxima tely a minute
and then remain continuously illumina ted.
This sequence will continue upon subsequent
ve hicle start-ups as long as the malfunction
ex ists.
When the malfunction indicator is illumina‐
te d, the sy stem may not be able todetect or
signal low tire pressure as intended. TPMS
malfunctions may occur for a variet yof rea‐
sons, including the ins tallation of incompati‐
ble replacement or alternate tires or wheels
on theve hicle that pr eventthe TPMS from
functioning properly.
Alw aysch eck the TPMS malfunction warning
lamp af terre placing one or more tires or
wheels on your vehicle toensure that the
re placement or alternate tires and wheels
allow the TPMS tocontinue tofunction prop‐
erly.
Wheels and tires 34
7
Page 479 of 486
Voice commands (Voice Cont rol Sys‐
te m) ..................................................... 226
Through-loading feature
see Seat
Ti e-d owney es ............................................ 98
Time Manual time setting ............................. 237
Setting Da ylight Saving Time (Sum‐
mer) ..................................................... 237
Setting the time and date automati‐
cally ..................................................... 236
Setting the time zone .......................... 236
Setting the time/date form at .............. 237
TIN (Tire Identification Number) ............3 55
Ti re and Loading Information placard ... 349
Ti re ch aracteristics ................................. 357
Ti re inflation compressor
see TIREFIT kit
Ti re information table .............................349
Ti re labeling ............................................ .354
Character istics .................................... 357
DO T,Tire Identification Number (TIN)
.............................................................3 55Load index ...........................................3
57
Load rating .......................................... 357
Maximum tire load .............................. 356
Maximum tire pressure ....................... 356
Overview ............................................. 354
Speed rating ........................................ 357
Te mp erature grade .................. .....
....... 354
Ti re Quality Grading ............................. 354
Ti re size designation ............................3 57
Tr action grade .................................... .354
Tr ead wear grade ................................ .354
Ti re load (maximum) .............................. .356
Ti re pressure ............................................ 324
Checking (manually) ............................ 346
Checking (tire pressure monito ring
sy stem) ............................................... 348
Maximum ............................................ 356
No tes .................................................. 343
Re starting the tire pressure monitor‐
ing sy stem .......................................... .349
Ti re pressure monitoring sy stem
(function) ............................................. 347
Ti re pressure table .............................. 345
Ti re pressure moni toring sy stem
Checking the tire pressure .................. 348 Fu
nction .............................................. 347
Re starting ............................................ 349
Te ch nical da ta..................................... 349
Tire pressure table .................................. 345
Tire Quality Grading ................................ 354
Tire tread ................................................. 342
Tire-change tool kit
Overview .............. ...
...........................
.365
TIREFIT kit ................................................ 324
St orage location ..................................3 24
Using ................................................... 324
TIREFIT kit see Tire pressure
Ti re s
Changing ............................................ .366
Changing hub caps .............................. 366
Cha racteristics .................................... 357
Checking ............................................. 342
Checking the tire pressure (man‐
ually) ................................................... 346
Checking the tire pressure (tire pres‐
sure monitoring sy stem) ..................... .348
Definitions ...........................................3 59
Index47
7