Page 116 of 486

Windshield wiper and windshield washer
sy stem
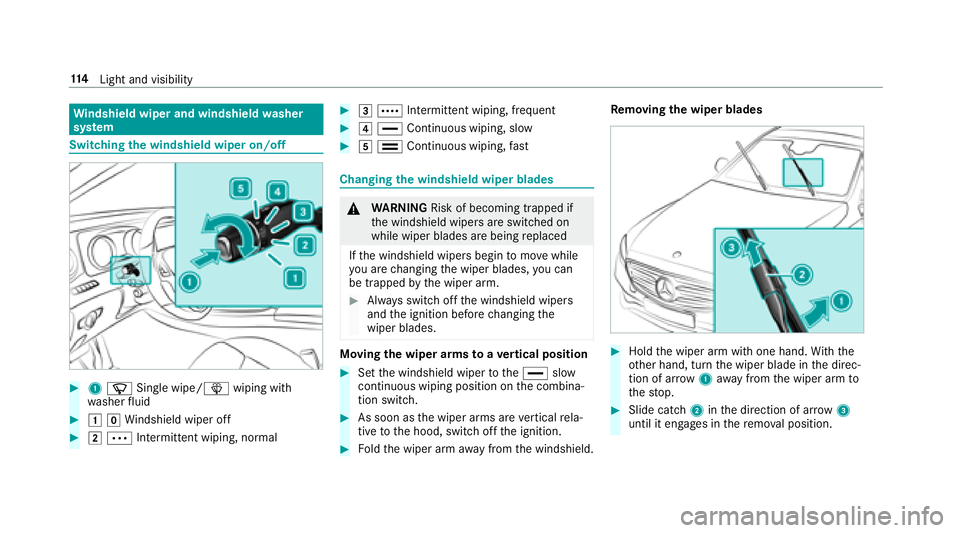
Switching the windshield wiper on/off
#1 í Single wipe/ îwiping with
wa sher fluid
#1gWi ndshield wiper off
#2Ä Intermittent wiping, normal
#3Å Intermittent wiping, frequent
#4° Continuous wiping, slow
#5¯ Continuous wiping,fast
Changing the windshield wiper blades
&
WARNING Risk of becoming trapped if
th e windshield wipers are switched on
while wiper blades are being replaced
If th e windshield wipers begin tomo vewhile
yo u are changing the wiper blades, you can
be trapped bythe wiper arm.
#Alw ays switch off the windshield wipers
and the ignition before changing the
wiper blades.
Moving the wiper arms toave rtical position
#Set the windshield wiper tothe° slow
continuous wiping position on the combina‐
tion switch.
#As soon as the wiper arms are vertical rela‐
tive tothe hood, switch off the ignition.
#Fo ldthe wiper arm away from the windshield. Re
moving the wiper blades
#Hold the wiper arm with one hand. With th e
ot her hand, turn the wiper blade in the direc‐
tion of ar row1away from the wiper arm to
th estop.
#Slide catch 2inthe direction of ar row 3
until it engages in there mo val position.
11 4
Light and visibility
Page 117 of 486
#Remo vethe wiper blade in the direction of
ar row 4away from the wiper arm. Installing
the wiper blades
#Insert the new wiper blade into the wiper
arm in the direction of ar row1.
#Slide catch 2inthe direction of ar row 3
until it engages in the locking position.
#Make sure that the wiper blade sits cor rectly.
#Fo ldthe wiper arm back onto the windshield.
Light and visibility 11
5
Page 118 of 486

Replacing the windshield wiper blades
(MAGIC VISION CONTROL)
& WARNING Risk of becoming trapped if
th e windshield wipers are switched on
while wiper blades are being replaced
If th e windshield wipers begin tomo vewhile
yo u are changing the wiper blades, you can
be trapped bythe wiper arm.
#Alw ays switch off the windshield wipers
and the ignition before changing the
wiper blades.
Re quirement:Rpowe r supp lyswitched on
Moving the wiper arms toave rtical position
#Set the windshield wiper tothe° slow
continuous wiping position on the combina‐
tion switch.
#As soon as the wiper arms are vertical rela‐
tive tothe hood, switch off the po wer supply. Re
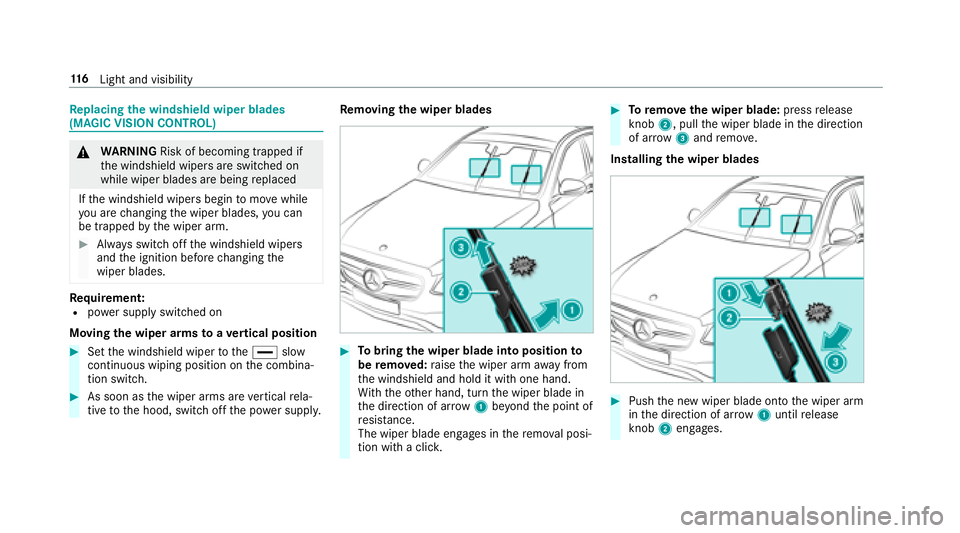
moving the wiper blades
#To bring the wiper blade into position to
be remo ved: raise the wiper arm away from
th e windshield and hold it with one hand.
Wi th th eot her hand, turn the wiper blade in
th e direction of ar row1beyond the point of
re sis tance.
The wiper blade engages in there mo val posi‐
tion with a clic k.
#Toremo vethe wiper blade: pressrelease
knob 2, pull the wiper blade in the direction
of ar row3and remo ve.
Installing the wiper blades
#Push the new wiper blade onto the wiper arm
in the direction of ar row1until release
knob 2engages.
116
Light and visibility
Page 119 of 486

#Pressthe wiper blade be yond the point of
re sis tance in the direction of ar row3on
th e wiper arm.
The wiper blade engages with a noticeable
click and is freely mo vable again.
#Lay the wiper arm back on the windshield.
Mir rors
Operating the outside mir rors
&
WARNING Risk of injury from adjusting
th eve hicle settings while theve hicle is in
motion
Yo u could lose cont rol of theve hicle in the
fo llowing situations:
Rifyo u adjust the driver's seat, the head
re stra int, thesteering wheel or the mir ror
while theve hicle is in motion
Rifyo ufa sten your seat belt while theve hi‐
cle is in motion
#Before starting the engine: adjust the
driver's seat, the head restra int, the
steering wheel or the mir ror and fasten
yo ur seat belt.
&
WARNING Risk of accident due tomis‐
judgment of dis tances when using the
passenger mir ror
The outside mir ror on the front passenger
side reflects objects on a smaller scale. The
objects in view are in fact closer than they
appear.
As a result, you may misjud gethe dis tance
between you and thero ad user driving
behind you, forex ample, when changing
lanes.
#Therefore, alw ays look over your shoul‐
der in order toensure that you are
aw are of the actual dis tance between
yo u and thero ad users driving behind
yo u.#To fold in or out: brieflypress button 1.
% Ifth e battery has been disconnected or com‐
ple tely discharged ,th e outside mir rors must
be reset. Only then will the automatic mir ror
fo lding function workproperly.
#To adjus t:select therequ ired mir ror using
button 3or4.
Light and visibility 11
7
Page 120 of 486

#Use button2toset the position of the mir‐
ro ryo u ha veselected.
An outside mir ror which has been pushed out of
position can be engaged in position again in the
fo llowing manner:
#Press and hold button 1.
Yo uwill hear a click and the mir ror audibly
engage in position. The mir ror is set in the
cor rect position.
Au tomatic anti-glare mir rors
&
WARNING Risk of burn s and poisoning
due tothe anti- glare mir ror electrolyte
Electrolyte may escape if theglass in an
automatic anti-glare mir ror breaks.
The electrolyte is harmful and causes ir rita ‐
tion. It must not come into contact wi thyour
skin, eyes,respiratory organs or clo thing or
be swallo wed.
#Ifyo u come into contact with electro‐
ly te , obser vethefo llowing:
RRinse the electrolyte from your skin
and seek medical attention immedi‐
atel y.
RIf electrolyte comes into contact
with your eyes, rinse them thor‐
oughly with clean water and seek
medical attention immediately.
RIf th e electrolyte is swallo wed,
immediately rinse your mouth out
th oroughl y.Do not induce vomiting.
Seek medical attention immediately.
RImmediate lych ange out of clo thing
which has come into con tact wi th
electrolyte.
RIf an allergic reaction occurs, seek
medical attention immediatel y.
The insiderearview mir ror and outside mir ror on
th e driver's side automatically go into anti- glare
mode if light from a headlamp hits the inside
re arview mir ror.
Sy stem limitations
The mir rors do not go into anti- glare mode in the
fo llowing situations:
Rth e engine is switched off
Rreve rsege ar is engaged
Rinterior lighting is switch ed on
Parking position of the passenger outside
mir ror
The parking position makes parking easier.
The passenger outside mir ror tilts down and
sho wsthere ar wheel on the front passenger
side if:
Rth e parking position is stored
Rth e passenger mir ror is selected
Rreve rsege ar is engaged
The passenger outside mir ror mo ves back toits
original position in thefo llowing situations:
Rifyo u shift the transmission toano ther trans‐
mission position
Rwhen driving fasterthan 9 mph (15 km/h)
Rifyo upr ess the button forth e outside mir ror
on the driver's side
11 8
Light and visibility
Page 121 of 486
Savingthe pa rking position of the passenger
outside mir ror
#To sto reusing reve rsege ar: select the
passenger outside mir ror using button 2.
#Engagereve rsege ar.
#Mo vethe passenger outside mir ror into the
desired parking position using button 1.
#Tocall up: selectthe passenger outside mir‐
ro r using button 2.
#Engagereve rsege ar.
The passenger outside mir ror mo vesto the
st ored parking position.
Ac tivating/deactivating the automatic mir ror
fo lding function
Multimedia sy stem:
,�9�H�K�L�F�O�H.î �9�H�K�L�F�O�H �6�H�W��
�W�L�Q�J�V.�$�X�W�R�P�� �0�L�U�U�R�U �)�R�O�G�L�Q�J
#Ac tivate Oor deacti vate ª the function.
Operating the sun visors
#Glare fromthe front: fold sun visor 1
down.
Light and visibility 11
9
Page 122 of 486
#Glare fromthe side: swing sun visor 1to
th e side.
#Slide sun visor 1horizon tally as required.
Infrared reflective windshield
The inf rare dre flective windshield is coated and
pr eve nts an excessive build-up of heat in the
ve hicle interior.
The coating shields theve hicle interior against
ra dio waves up into the gigahertz range.
Ra dio-cont rolled equipment, such as toll sys‐
te ms, can only be mounted on areas of the wind‐
shield which are permeable toradio wav es1. Areas permeable
toradio wav es1 are best visi‐
ble from outside theve hicle when the windshield
is illuminated using an extern al light source.
12 0
Light and visibility
Page 125 of 486

Climatestyle
Climate style function
In automatic mode you can select thefo llowing
climate style settings forth e driver's and front
passenger areas:
RFO CUS: high air flow , slightly cooler setting
RMEDIUM: medium air flow ,st andard setting
RDIFFUSE: low airflow , slightly warmer and
draft-free setting
Ad justing climate style
Requ irements
R3-zone automatic climate control is ins talled.
RThe à button has been pressed.
Multimedia sy stem:
,�9�H�K�L�F�O�H.b �&�O�L�P�D�W�H �&�R�Q�W�U�R�O.�&�O�L��
�P�D�W�H �0�R�G�H
#Select �)�2�&�8�6, �0�(�'�,�8�0 or�'�,�)�)�8�6�( .
Air distribution settings
The symbols in the display indicate which vents
th e air flow is being directed thro ugh:
R¯ Defros terve nt
RP Center and side air vents
RO Footwe llve nts
RS Center, side and foot we llve nts
Ra Defros ter and foot we llve nts
R_ Allvents
Rb Defros ter,middle and side air vents
RW Automatic air distribution
Ac tivating/deactivating the climate control
syn chro nization function via the control
panel
Climate control can be set centrally using the
synchronization function. The temp erature and
air distribution setting forth e driver's side is
adop ted automatically forth e front passenger
side.
#Press the0 button. The synchronization function is deactivated if
the
settings for one of theot her climate zones are
ch anged.
Ac tivating/deactivating the climate control
syn chro nization function using the multime‐
dia sy stem
Multimedia sy stem:
,�9�H�K�L�F�O�H.b �&�O�L�P�D�W�H �&�R�Q��
�W�U�R�O.�6�<�1�&
Climate control can be set cent rally using the
synchronization function. The temp erature set‐
ting is automatically adop tedfo r all climate
zones.
#Ac tivate Oor deacti vate ª the function.
Defrosting the windo ws
Windo ws fo gged up on the inside
#Press the à button.
#Ifth e windo wscontinue tofog up: press the
¬ button.
Climate control 12
3