2018 MERCEDES-BENZ CLS belt
[x] Cancel search: beltPage 63 of 334
Important safety notes
G WARNIN G
If th e rear seat backrest s are no t locked, they
could fol d forwards in th e event of an acci-
dent, heav y braking or sudde n changes of
direction . As a result , child restrain t systems
canno t perfor m their intended protective
function . Rear seat backrest s that are no t
locke d can also caus e additional injuries, e.g.
in th e event of an accident. This poses an
increased ris k of injury or eve n fatal injury.
Always loc k rear seat backrest s after instal -
lin g a Top Tether belt . Observ e th e loc k veri-
fication indicator. Adjus t th e rear seat backr -
est s so that they are in an upright position .
If th e rear seat backrest is no t engage d and
locked, this will be shown in th e multifunction
display in th e instrumen t cluster. A warning tone
also sounds.
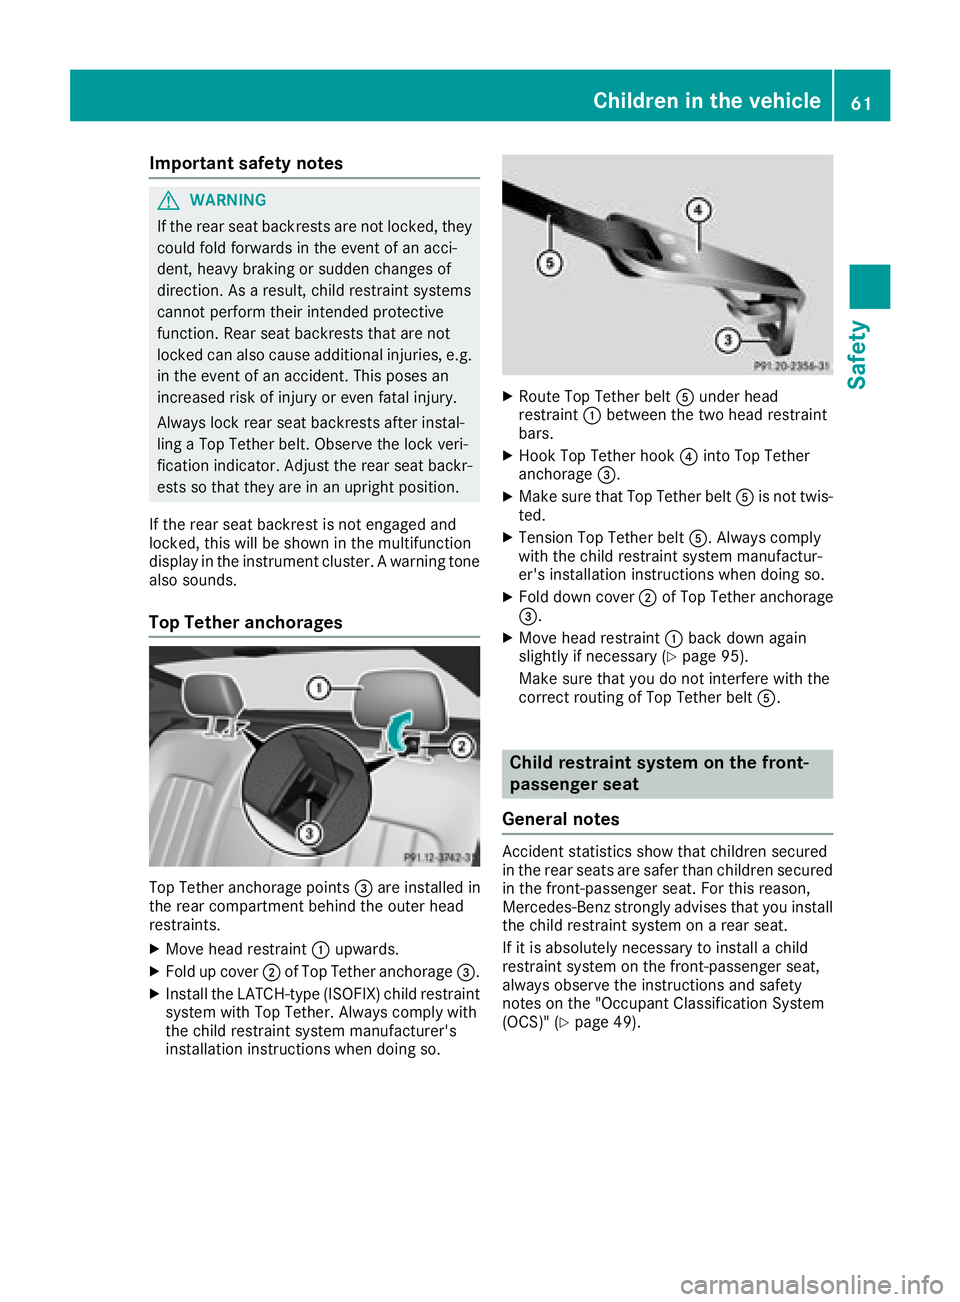
Top Tether anchorages
Top Tether anchorage points �
Page 64 of 334
You can thus avoid the risks that could arise as
a result of: R
an incorrectly categorized person in the front-
passenger seat R
the unintentional deactivation of the front-
passenger front air bag R
the unsuitable positioning of the child
restraint system, e.g. too close to the dash-
board
Rearward-facing child restraint system If it is absolutely necessary to install a rearward-
facing child restraint system on the front-
passenger seat, always make sure that the
front-passenger front air bag is deactivated.
Only if the PASSENGER AIR BAG OFF indicator
lamp is permanently lit ( Y
page 42) is the front-
passenger front air bag deactivated.
Always observe the child restraint system man-
ufacturer's installation and operating instruc-
tions.
Forward-facing child restraint system If it is absolutely necessary to install a forward-
facing child restraint system on the front-
passenger seat, always move the front-
passenger seat as far back as possible. The
entire base of the child restraint system must
always rest on the seat cushion of the front-
passenger seat. The backrest of the child
restraint system must lie as flat as possible
against the backrest of the front-passenger
seat. The child restraint system must not touch
the roof or be subjected to a load by the head
restraint. Adjust the angle of the seat backrest
and the head restraint position accordingly.
Always make sure that the shoulder belt strap is
correctly routed from the vehicle belt outlet to
the shoulder belt guide on the child restraint
system. The shoulder belt strap must be routed
forwards and downwards from the vehicle belt
outlet. If necessary, adjust the vehicle belt out-
let and the front-passenger seat accordingly.
Always observe the child restraint system man-
ufacturer's installation and operating instruc-
tions. Child-proof locks
Important safety notes
G WARNING
If children are traveling in the vehicle, they
could: R
open doors, thus endangering other people
or road users R
exit the vehicle and be caught by oncoming
traffic R
operate vehicle equipment and become
trapped
There is a risk of an accident and injury.
Always activate the child-proof locks and
override feature if children are traveling in the
vehicle. When leaving the vehicle, always take
the key with you and lock the vehicle. Never
leave children unattended in the vehicle.
Override feature for: R
the rear doors ( Y
page 63)R
the rear side windows ( Y
page 63)
G WARNING
If you leave children unsupervised in the vehi-
cle, they could set it in motion by, for example: R
release the parking brake. R
shift the automatic transmission out of the
parking position P .R
start the engine.
In addition, they may operate vehicle equip-
ment and become trapped. There is a risk of
an accident and injury.
When leaving the vehicle, always take the
SmartKey with you and lock the vehicle. Never
leave children unsupervised in the vehicle.
G WARNING
If persons, particularly children are subjected
to prolonged exposure to extreme heat or
cold, there is a risk of injury, possibly even
fatal. Never leave children unattended in the
vehicle.62
Children in the vehicle
Safety
Page 95 of 334
Correct driver's seat position
G WARNING
You could lose control of your vehicle if you do
the following while driving: R
adjust the driver's seat, head restraint,
steering wheel or mirrors R
fasten the seat belt
There is a risk of an accident.
Adjust the driver's seat, head restraint, steer-
ing wheel and mirror and fasten your seat belt
before starting the engine.
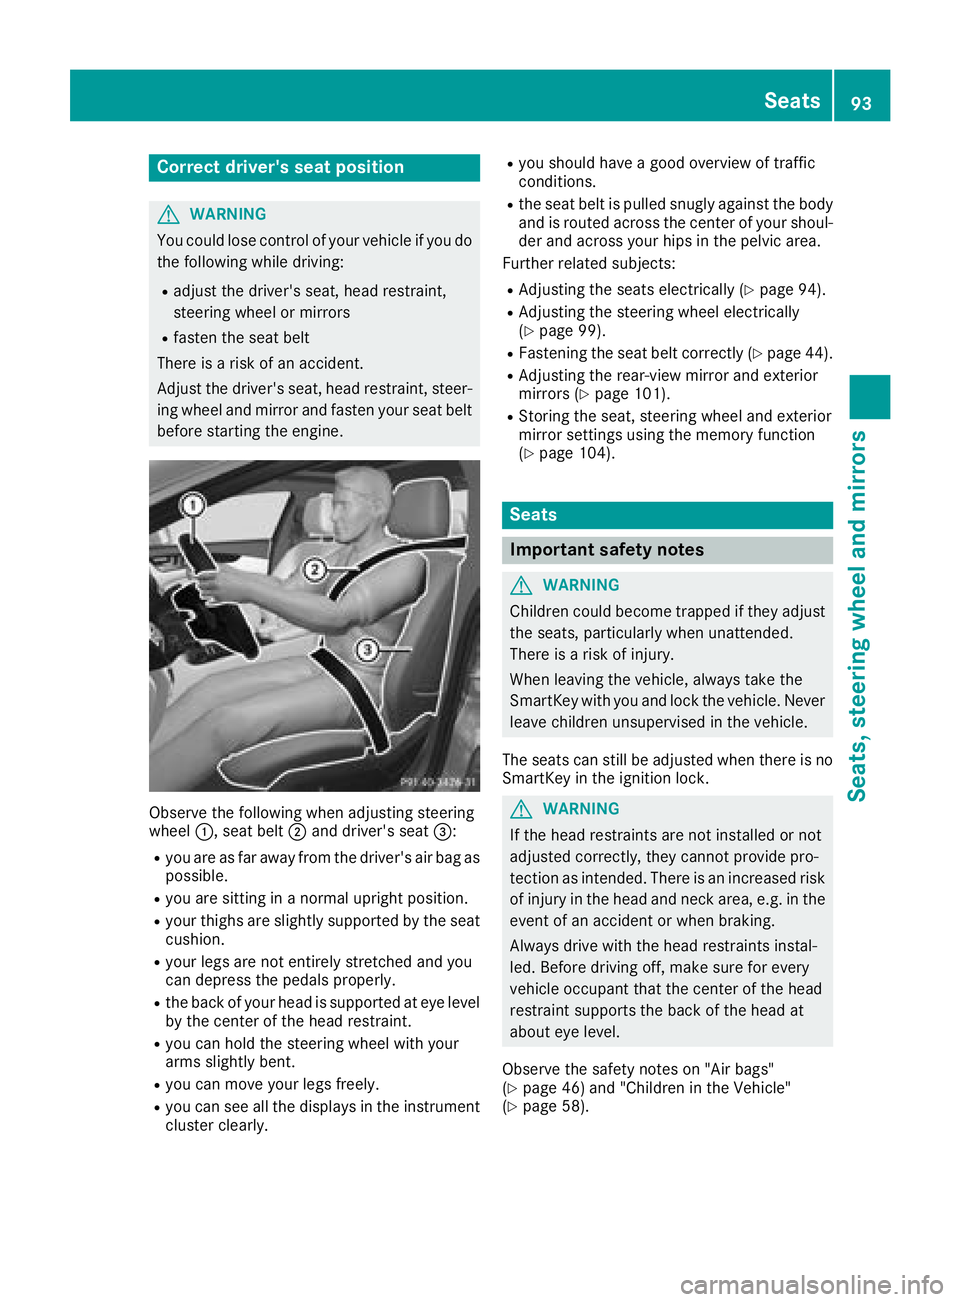
Observe the following when adjusting steering
wheel �C , seat belt �D and driver's seat �
Page 96 of 334
G WARNING
You could lose control of your vehicle if you do
the following while driving: R
adjust the driver's seat, head restraint,
steering wheel or mirrors R
fasten the seat belt
There is a risk of an accident.
Adjust the driver's seat, head restraint, steer-
ing wheel and mirror and fasten your seat belt
before starting the engine.
G WARNING
If you adjust the seat height carelessly, you or
other vehicle occupants could be trapped and
thereby injured. Children in particular could
accidentally press the electrical seat adjust-
ment buttons and become trapped. There is a
risk of injury.
While moving the seats, make sure that your
hands or other body parts do not get under the
lever assembly of the seat adjustment sys-
tem.
G WARNING
When you adjust a seat, you or other vehicle
occupants could become trapped, e.g. on the
seat guide rail. There is a risk of injury.
Make sure when adjusting a seat that no one
has any body parts in the sweep of the seat.
! To avoid damage to the seats and the seat
heating, observe the following information: R
keep liquids from spilling on the seats. If
liquid is spilled on the seats, dry them as
soon as possible. R
if the seat covers are damp or wet, do not
switch on the seat heating. The seat heat-
ing should also not be used to dry the seats. R
clean the seat covers as recommended;
see "Interior care". R
do not transport heavy loads on the seats.
Do not place sharp objects on the seat
cushions, e.g. knives, nails or tools. The
seats should only be occupied by passen-
gers, if possible. R
when the seat heating is in operation, do
not cover the seats with insulating materi- als, e.g. blankets, coats, bags, seat covers,
child seats or booster seats.
! Make sure that there are no objects in the
footwell under or behind the seats when mov-
ing the seats back. There is a risk that the
seats and/or the objects could be damaged.
i The head restraints in the front seats are
installed with the NECK-PRO system
( Y
page 55). For this reason, it is not possible
to remove the head restraints from the front
seats.
For more information, contact a qualified spe-
cialist workshop.
i Further related subjects: R
Rear bench seat through-loading feature
( Y
page 245)
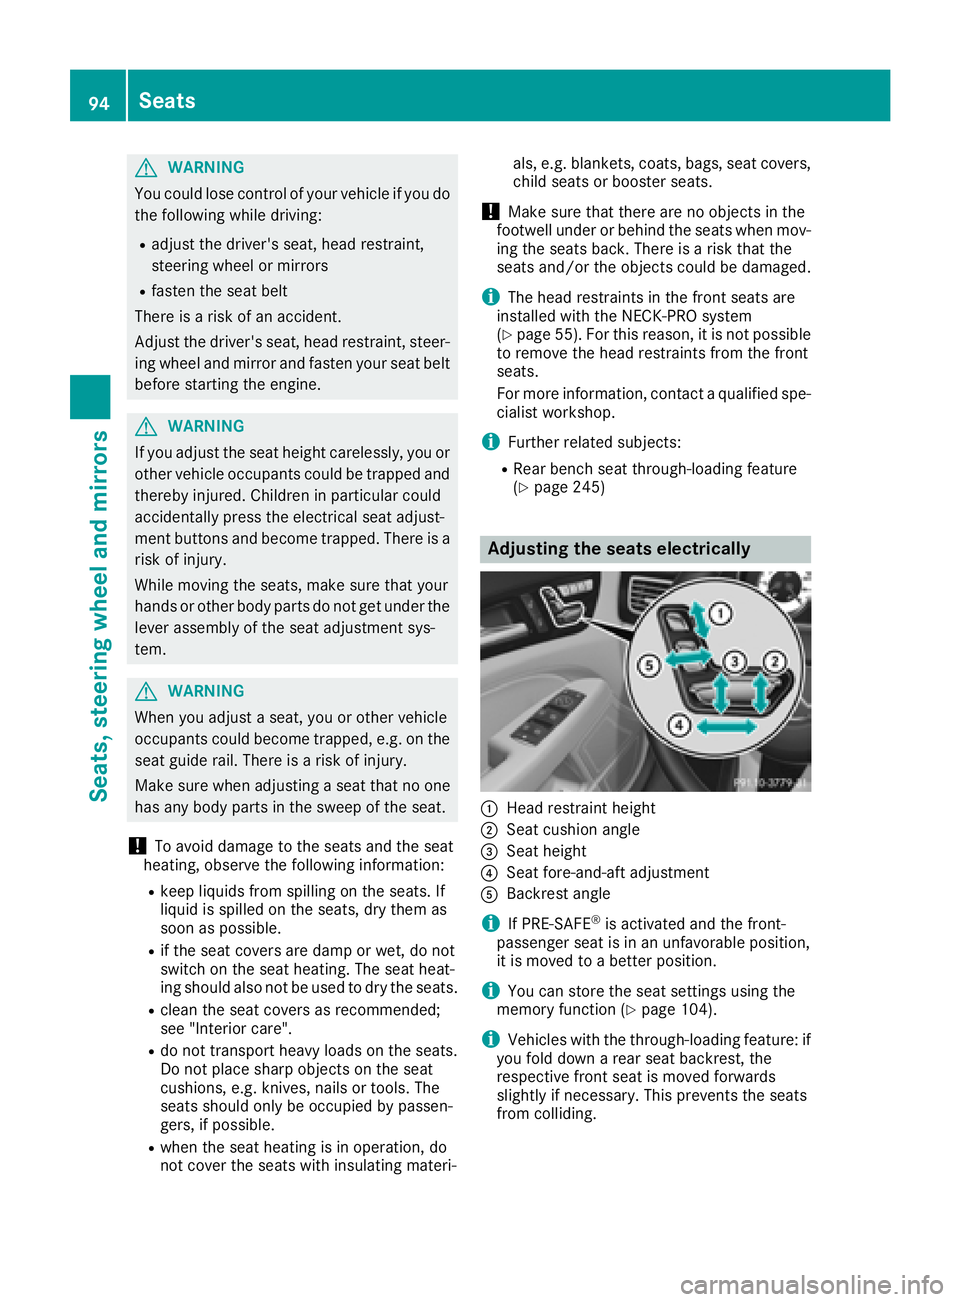
Adjusting the seats electrically
�C
Head restraint height �D
Seat cushion angle �
Page 97 of 334
Adjusting the head restraints
Import ant safety notes
G WARNIN G
You could lose control of your vehicl e if you do
th e followin g while driving:R
adjust th e driver's seat , head restraint,
steering whee l or mirror sR
faste n th e seat belt
There is a ris k of an accident.
Adjus t th e driver's seat , head restraint, steer -
ing whee l and mirror and faste n your seat belt
before starting th e engine.
G WARNIN G
If th e head restraints are no t installed or no t
adjusted correctly, they canno t provid e pro -
tection as intended. There is an increased ris k
of injury in th e head and neck area, e.g. in th e
event of an acciden t or when braking .
Always drive wit h th e head restraints instal -
led. Befor e drivin g off , mak e sur e for every
vehicl e occupant that th e center of th e head
restrain t support s th e bac k of th e head at
about eye level.
Do no t rotate th e head restraints of th e fron t and
rear seats. Otherwise , you canno t adjust th e
height and angle of th e head restraints to th e
correc t position .
Using th e fore-and-af t adjustment, adjust th e
head restrain t so that it is as close as possibl e to
your head .
Observ e th e important safet y note s regarding
th e seat s ( Y
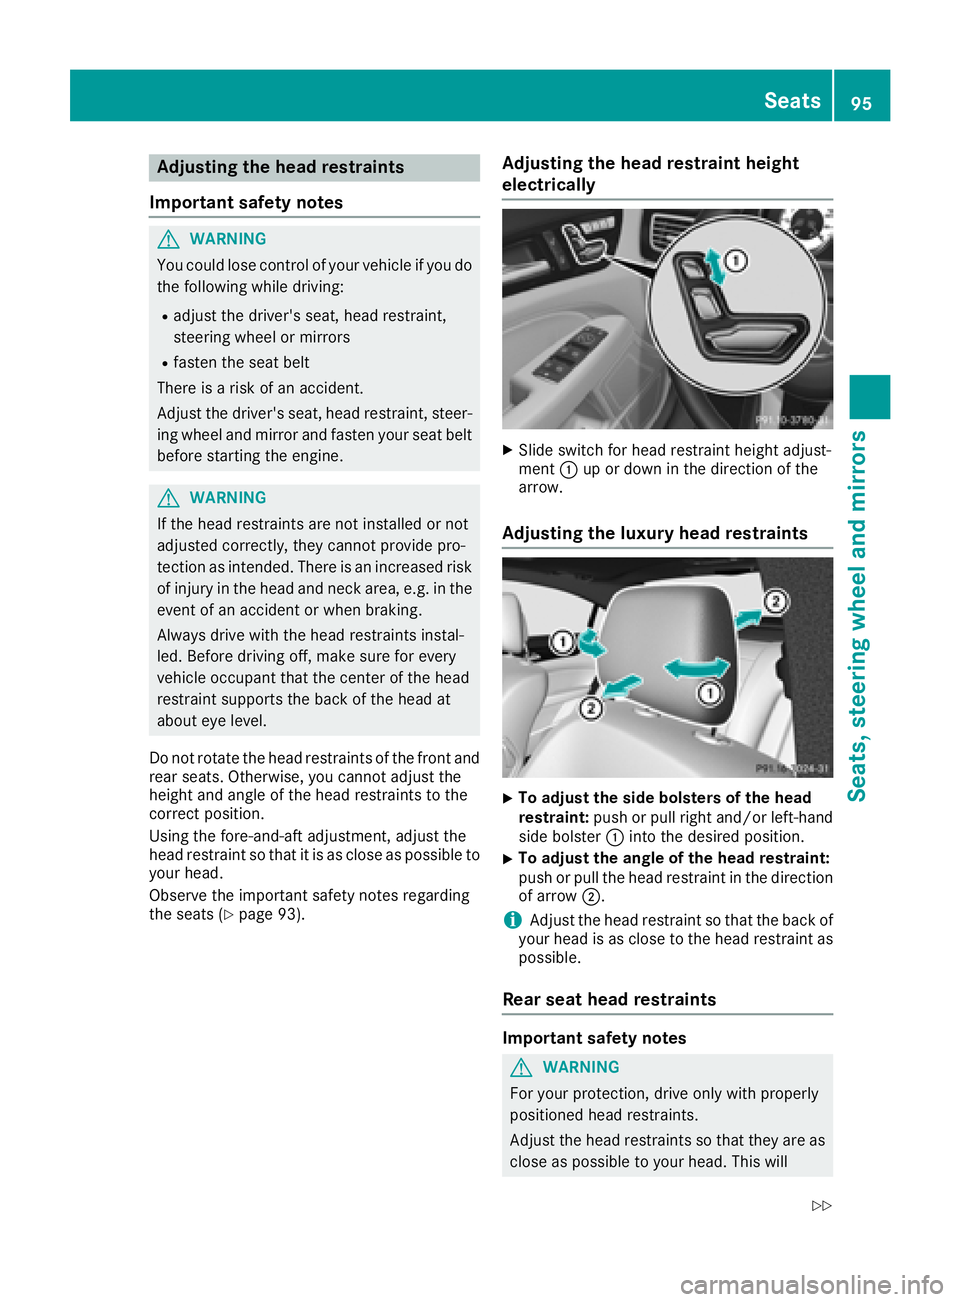
page 93). Adjusting the head restraint height
elect ri cally X
Slide switch for head restrain t height adjust -
men t �C up or down in th e direction of th e
arrow.
Adjusting the luxury head restraints
X
To adjust th e sid e bolsters of th e hea d
restraint: push or pull right and/o r left-han d
side bolste r �C int o th e desired position .X
To adjust th e angle of th e hea d restraint:
push or pull th e head restrain t in th e direction
of arrow �D .
i Adjus t th e head restrain t so that th e bac k of
your head is as close to th e head restrain t as
possible.
Rear seat head restraints
Important safety notes
G WARNIN G
Fo r your protection , drive only wit h properly
positioned head restraints .
Adjus t th e head restraints so that they are as
close as possibl e to your head . This willSeats 95
Seats, steering wheel and mirrors Z
Page 100 of 334
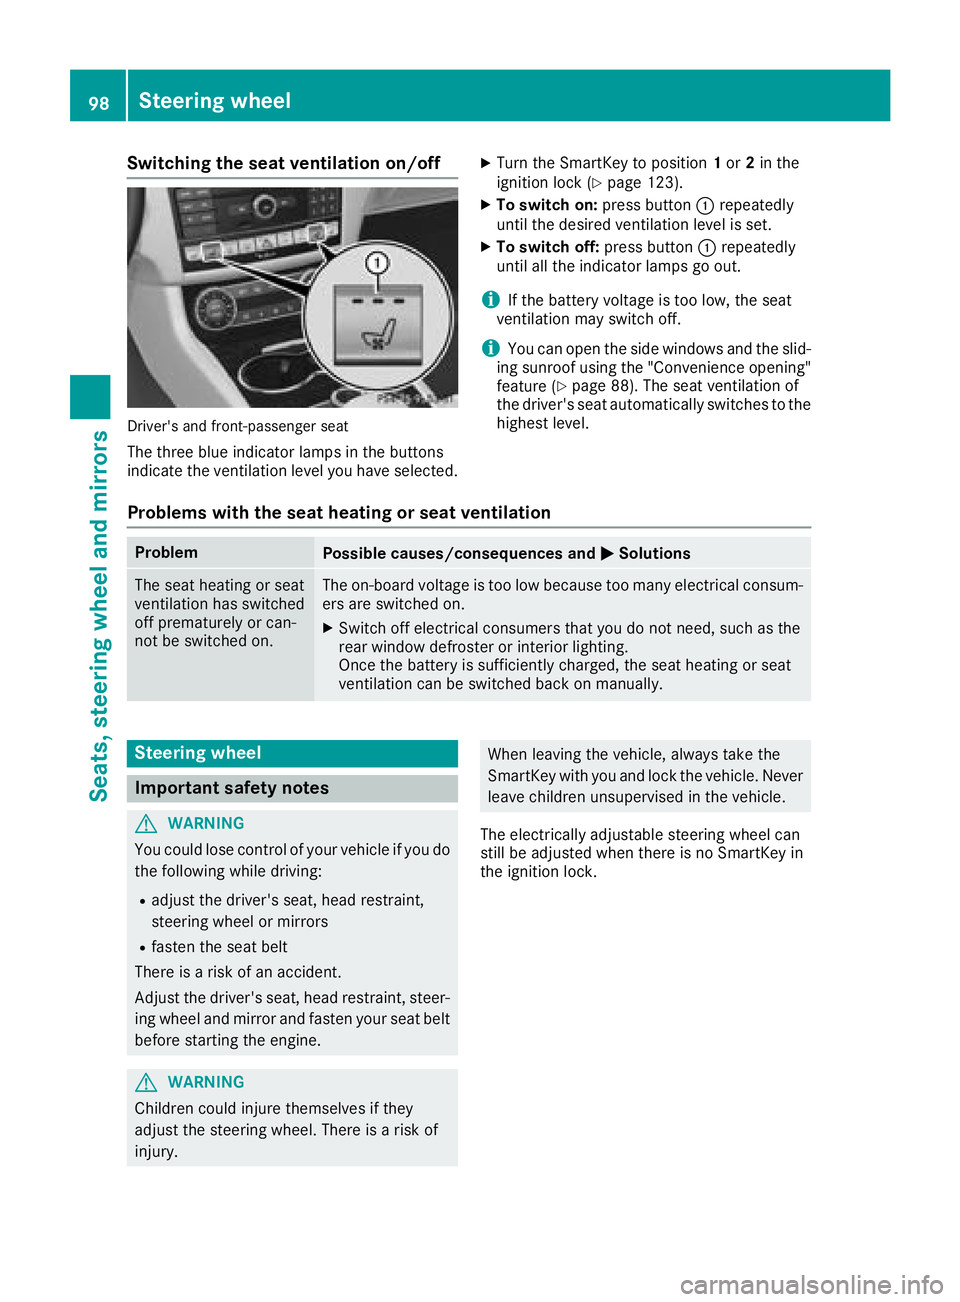
Switching the seat ventilation on/off
Driver's and front-passenger seat
The three blue indicator lamps in the buttons
indicate the ventilation level you have selected. X
Turn the SmartKey to position 1 or 2 in the
ignition lock ( Y
page 123). X
To switch on: press button �C repeatedly
until the desired ventilation level is set. X
To switch off: press button �C repeatedly
until all the indicator lamps go out.
i If the battery voltage is too low, the seat
ventilation may switch off.
i You can open the side windows and the slid-
ing sunroof using the "Convenience opening"
feature ( Y
page 88). The seat ventilation of
the driver's seat automatically switches to the
highest level.
Problems with the seat heating or seat ventilation Problem
Possible causes/consequences and �P Solutions
The seat heating or seat
ventilation has switched
off prematurely or can-
not be switched on. The on-board voltage is too low because too many electrical consum-
ers are switched on. X
Switch off electrical consumers that you do not need, such as the
rear window defroster or interior lighting.
Once the battery is sufficiently charged, the seat heating or seat
ventilation can be switched back on manually.
Steering wheel
Important safety notes
G WARNING
You could lose control of your vehicle if you do
the following while driving: R
adjust the driver's seat, head restraint,
steering wheel or mirrors R
fasten the seat belt
There is a risk of an accident.
Adjust the driver's seat, head restraint, steer-
ing wheel and mirror and fasten your seat belt
before starting the engine.
G WARNING
Children could injure themselves if they
adjust the steering wheel. There is a risk of
injury. When leaving the vehicle, always take the
SmartKey with you and lock the vehicle. Never
leave children unsupervised in the vehicle.
The electrically adjustable steering wheel can
still be adjusted when there is no SmartKey in
the ignition lock.98
Steering wheel
Seats, steering wheel and mirrors
Page 103 of 334
Mirrors
Exterior mirrors
Adjusting the exterior mirrors
G WARNING
You could lose control of your vehicle if you do
the following while driving: R
adjust the driver's seat, head restraint,
steering wheel or mirrors R
fasten the seat belt
There is a risk of an accident.
Adjust the driver's seat, head restraint, steer-
ing wheel and mirror and fasten your seat belt
before starting the engine.
G WARNING
The exterior mirror on the front-passenger
side reduces the size of the image. Visible
objects are actually closer than they appear.
This means that you could misjudge the dis-
tance from road users traveling behind, e.g.
when changing lane. There is a risk of an acci-
dent.
For this reason, always make sure of the
actual distance from the road users traveling
behind by glancing over your shoulder.
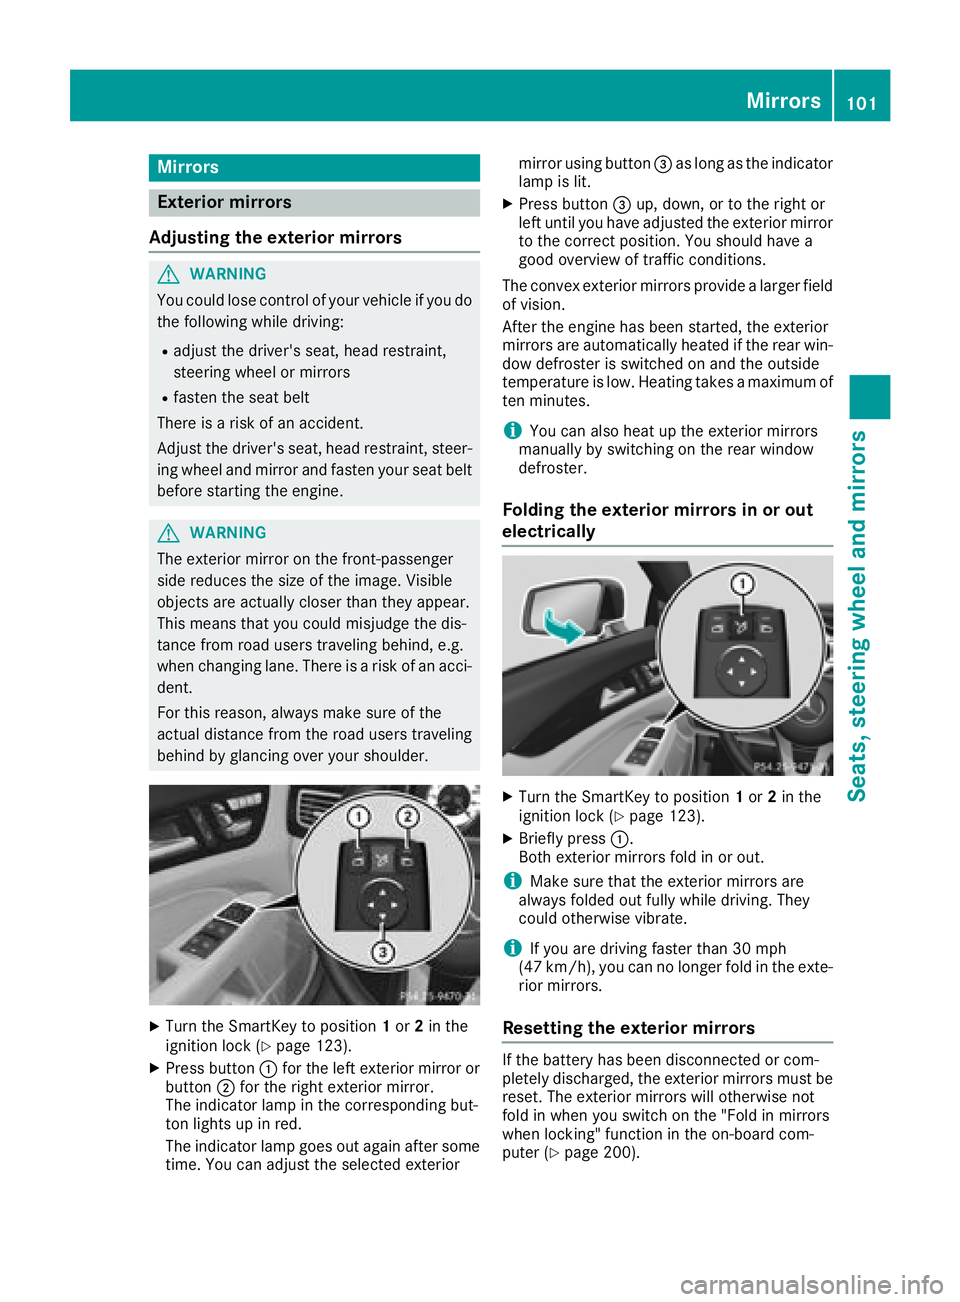
X
Turn the SmartKey to position 1 or 2 in the
ignition lock ( Y
page 123).X
Press button �C for the left exterior mirror or
button �D for the right exterior mirror.
The indicator lamp in the corresponding but-
ton lights up in red.
The indicator lamp goes out again after some
time. You can adjust the selected exterior mirror using button �
Page 129 of 334
R
the system detects that the windshield is not
fogged up when the air-conditioning system is
switched on R
the hood is closed R
the driver's door is closed and the driver's
seat belt is fastened
i All of the vehicle's systems remain active
when the engine is stopped automatically.
i The HOLD function can also be activated if
the engine has been switched off automati-
cally. It is then not necessary to continue
applying the brakes during the automatic stop
phase. When you depress the accelerator
pedal, the engine starts automatically and the
braking effect of the HOLD function is deac-
tivated.
Automatic engine switch-off can take place a
maximum of four times in a row (initial stop, then
three subsequent stops).
Mercedes-AMG vehicles: the number of con-
secutive automatic engine switch-offs is unlimi-
ted.
All other models: automatic engine switch-off
can take place a maximum of four times in a row
(initial switch-off, then three subsequent switch-
offs).
Automatic engine start The engine starts automatically if: R
you switch off the ECO start/stop function by
pressing the ECO button R
in transmission position D or N the brake
pedal is released and the HOLD function is not
active R
you depress the accelerator pedal R
you engage reverse gear RR
you move the transmission out of position PR
you switch to drive program S , S+ or M
(Mercedes-AMG vehicles) R
you unfasten your seat belt or open the driv-
er's door R
the vehicle starts to roll R
the brake system requires this R
the temperature in the vehicle interior devi-
ates from the set range R
the system detects moisture on the wind-
shield when the air-conditioning system is
switched on R
the battery's condition of charge is too low i Shifting the transmission to position P does
not start the engine.
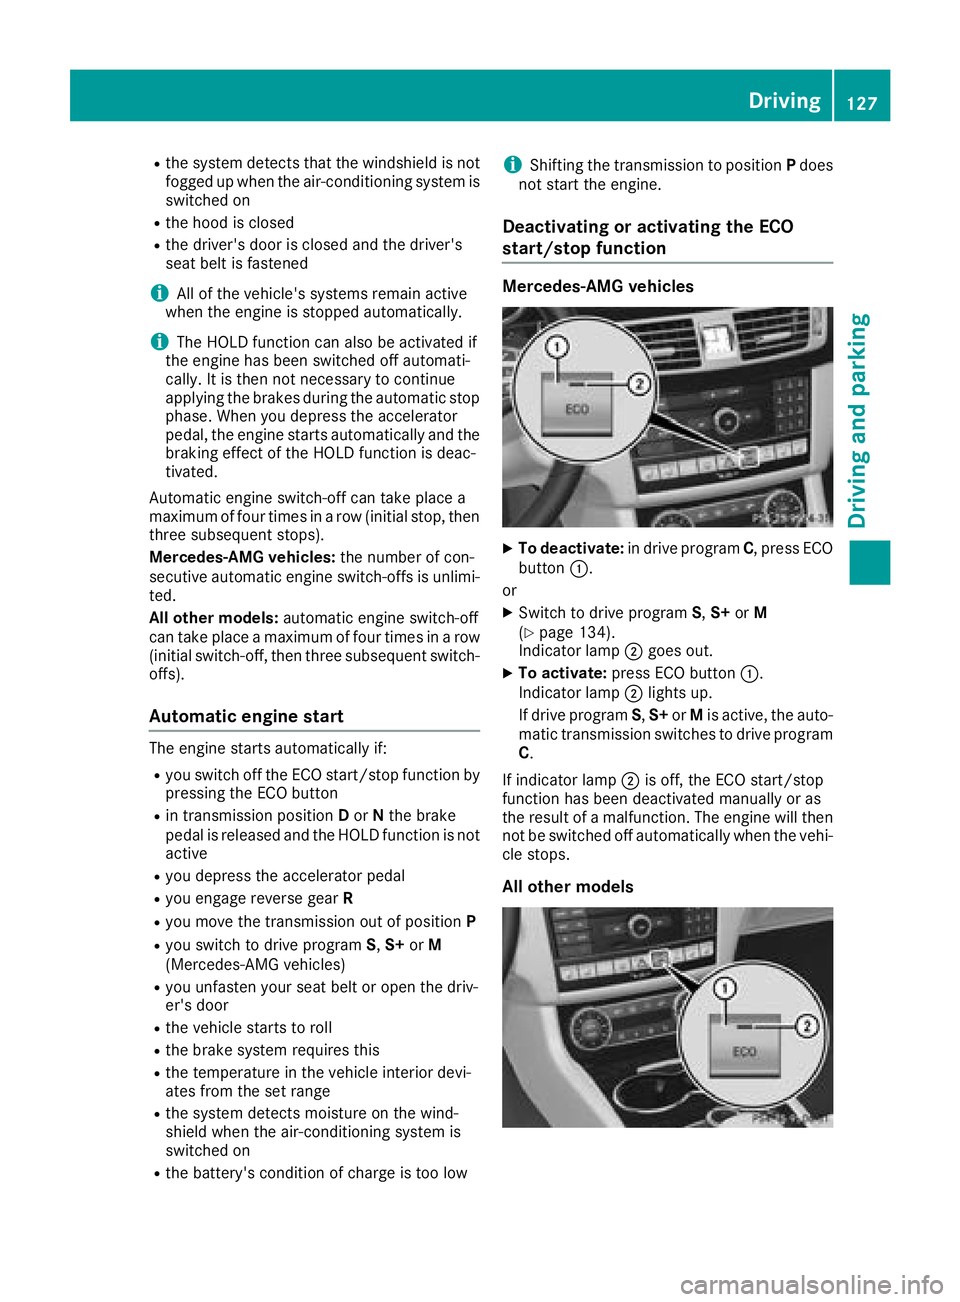
Deactivating or activating the ECO
start/stop function Mercedes-AMG vehicles X
To deactivate: in drive program C , press ECO
button �C .
or X
Switch to drive program S , S+ or M
( Y
page 134).
Indicator lamp �D goes out.X
To activate: press ECO button �C .
Indicator lamp �D lights up.
If drive program S , S+ or M is active, the auto-
matic transmission switches to drive program
C .
If indicator lamp �D is off, the ECO start/stop
function has been deactivated manually or as
the result of a malfunction. The engine will then
not be switched off automatically when the vehi-
cle stops.
All other models Driving 127
Dr ivi ng an d parking Z