2018 MERCEDES-BENZ CLS warning lights
[x] Cancel search: warning lightsPage 56 of 334

continue to perform their protective function for
the vehicle occupants in the event of a crash.
G WARNING
Emergency Tensioning Devices that have
deployed pyrotechnically are no longer opera-
tional and are unable to perform their inten-
ded protective function. This poses an
increased risk of injury or even fatal injury.
Have pyrotechnically triggered Emergency
Tensioning Devices replaced immediately at a
qualified specialist workshop.
An electric motor is used by PRE-SAFE ®
to trig-
ger the tightening of the seat belt in hazardous
situations. This procedure is reversible.
If Emergency Tensioning Devices are triggered
or air bags are deployed, you will hear a bang,
and a small amount of powder may also be
released. The �u restraint system warning
lamp lights up.
Only in rare cases will the bang affect your hear-
ing. The powder that is released generally does
not constitute a health hazard, but it may cause
short-term breathing difficulties in people with
asthma or other respiratory problems. Provided
it is safe to do so, you should leave the vehicle
immediately or open the window in order to pre-
vent breathing difficulties.
Air bags and pyrotechnic Emergency Tensioning
Devices (ETDs) contain perchlorate material,
which may require special handling and regard
for the environment. National guidelines must
be observed during disposal. In California, see
www.dtsc.ca.gov/HazardousWaste/
Perchlorate/index.cfm .
Method of operation During the first stage of a collision, the restraint
system control unit evaluates important physi-
cal data relating to vehicle deceleration or accel-
eration, such as: R
duration R
direction R
intensity
Based on the evaluation of this data, the
restraint system control unit triggers the Emer-
gency Tensioning Devices during a frontal or
rear collision. An Emergency Tensioning Device can only be
triggered, if: R
the ignition is switched on R
the components of the restraint system are
operational. You can find further information
under: "Restraint system warning lamp"
( Y
page 42) R
the belt tongue is engaged in the buckle on
the respective front-passenger seat
The Emergency Tensioning Devices in the rear
compartment are triggered independently of the
lock status of the seat belts.
If the restraint system control unit detects a
more severe accident, further components of
the restraint system are activated independ-
ently of each other in certain frontal collision
situations: R
Front air bags and driver's knee bag R
Window curtain air bag, if the system deter-
mines that deployment can offer additional
protection to that provided by the seat belt
The front-passenger front air bag is activated or
deactivated depending on the person on the
front-passenger seat. The front-passenger front
air bag can only deploy in an accident if the
PASSENGER AIR BAG OFF indicator lamp is off.
Observe the information on the PASSENGER AIR
BAG OFF indica tor lamp ( Y
page 42).
Your vehicle has two-stage front air bags. During
the first deployment stage, the front air bag is
filled with propellant gas to reduce the risk of
injuries. The front air bag is fully deployed with
the maximum amount of propellant gas if a sec-
ond deployment threshold is reached within a
few milliseconds.
The activation threshold of the Emergency Ten-
sioning Devices and the air bag are determined
by evaluating the rate of vehicle deceleration or
acceleration which occurs at various points in
the vehicle. This process is pre-emptive in
nature. Deployment should take place in good
time at the start of the collision.
The rate of vehicle deceleration or acceleration
and the direction of the force are essentially
determined by: R
the distribution of forces during the collision R
the collision angle R
the deformation characteristics of the vehicle R
the characteristics of the object with which
the vehicle has collided
Factors which can only be seen and measured
after a collision has occurred do not play a deci-54
Occupant safety
Safety
Page 66 of 334

Drivin g safet y systems
Overview of drivin g safet y systemsIn this section , you will fin d information about
th e followin g drivin g safet y systems :R
AB S ( A n ti-loc k B rakin g S ystem)
( Y
page 64)R
BA S ( B rak e A ssist S ystem) ( Y
page 65)R
BA S PLU S ( B rake A s sis t S ystem PLUS) wit h
Cross-Traffic Assis t ( Y
page 65)R
COLLISION PREVENTION ASSIST PLU S
( Y
page 67 )R
ES P ®
( E lectronic S t ability P r ogram)
( Y
page 69)R
EB D ( E lectroni c B rak e forc e D istribution )
( Y
page 72 )R
ADAPTIV E BRAKE ( Y
page 72 )R
PRE-SAF E ®
Brak e ( Y
page 72 )
Important safet y notesIf you fail to adapt your drivin g style or if you are
inattentive , th e drivin g safet y systems can nei-
ther reduce th e ris k of an acciden t no r override
th e laws of physics. Driving safet y systems are
merely aids designed to assist driving. You are
responsible fo r maintainin g th e distanc e to th e
vehicle in front, fo r vehicle speed, fo r braking in
goo d time, and fo r stayin g in lane. Always adapt
your drivin g style to suit th e prevailin g road and
weather condition s and maintain a saf e distanc e
from th e vehicle in front. Drive carefully.
The drivin g safet y systems described only wor k
as effectively as possible when there is ade-
quat e contact between th e tires and th e road
surface. Pay particular attention to th e informa-
tion regardin g tires , recommended minimum
tire tread depths etc. in th e "Wheels and tires "
section ( Y
page 292).
In wintr y drivin g conditions, always use winte r
tires (M+ S tires )a nd if necessary, snow chains.
Only in this way will the driving safety systems
described in this section work as effectively as
possible. ABS (Anti-lock Braking System)
General information ABS regulates brake pressure in such a way that
the wheels do not lock when you brake. This
allows you to continue steering the vehicle when
braking.
The �% ABS warning lamp in the instrument
cluster lights up when the ignition is switched
on. It goes out when the engine is running.
ABS works from a speed of about 5 mph
(8 km/h), regardless of road-surface conditions.
ABS works on slippery surfaces, even when you
only brake gently.
Important safety notes
i Observe the "Important safety notes" sec-
tion ( Y
page 64).
G WARNING
If ABS is faulty, the wheels could lock when
braking. The steerability and braking charac-
teristics may be severely impaired. Addition-
ally, further driving safety systems are deac-
tivated. There is an increased danger of skid-
ding and accidents.
Drive on carefully. Have ABS checked imme-
diately at a qualified specialist workshop.
When ABS is malfunctioning, other systems,
including driving safety systems, will also
become inoperative. Observe the information
on the ABS warning lamp ( Y
page 229) and dis-
play messages which may be shown in the
instrument cluster ( Y
page 204).
Braking X
If ABS intervenes: continue to depress the
brake pedal vigorously until the braking sit-
uation is over. X
To make a full brake application: depress
the brake pedal with full force.
If ABS intervenes when braking, you will feel a
pulsing in the brake pedal.
The pulsating brake pedal can be an indication
of hazardous road conditions, and functions as a
reminder to take extra care while driving.64
Driving safety systems
Safety
Page 73 of 334

Deactivating/activating ESP ®
(Mercedes ‑ AM G vehicles )Important safet y notes
i Observ e th e "Important safet y notes" sec -
tion ( Y
page 64).
You can selec t between th e followin g states of
ES P ®
: R
ES P ®
is activated.R
SPORT handlin g mode is activated.R
ES P ®
is deactivated.
G WARNING
Whe n SPORT handlin g mode is activated,
there is a greater ris k of skidding and acci-
dents .
Only activat e SPORT handlin g mode in th e sit -
uation s described in th e following.
G WARNING
If you deactivat e ES P ®
, ES P ®
no longer sta-
bilizes th e vehicle. There is an increase d ris k
of skidding and an accident.
Only deactivat e ES P ®
in th e situation s descri-
bed in th e following.
! Avoid spinnin g th e driven wheels fo r an
extended period wit h ES P ®
deactivated. You
could otherwise damage th e drivetrain .
In th e followin g situations, it may be bette r to
activat e SPORT handlin g mode or deactivat e
ES P ®
: R
when usin g snow chain sR
in dee p snowR
on san d or grave lR
on specially designated roads when th e vehi-
cle's own oversteering and understeering
characteristics are desire d
Spinning th e wheels result s in a cutting action
whic h provides bette r grip.
Driving in SPORT handlin g mode or without
ES P ®
require s an extremely qualified and expe-
rienced driver .
i Activat e ES P ®
as soo n as th e situation s
described abov e no longer apply . ES P ®
will
otherwise no t be able to stabilize th e vehicle if th e vehicle start s to skid or a whee l start s to
spin.
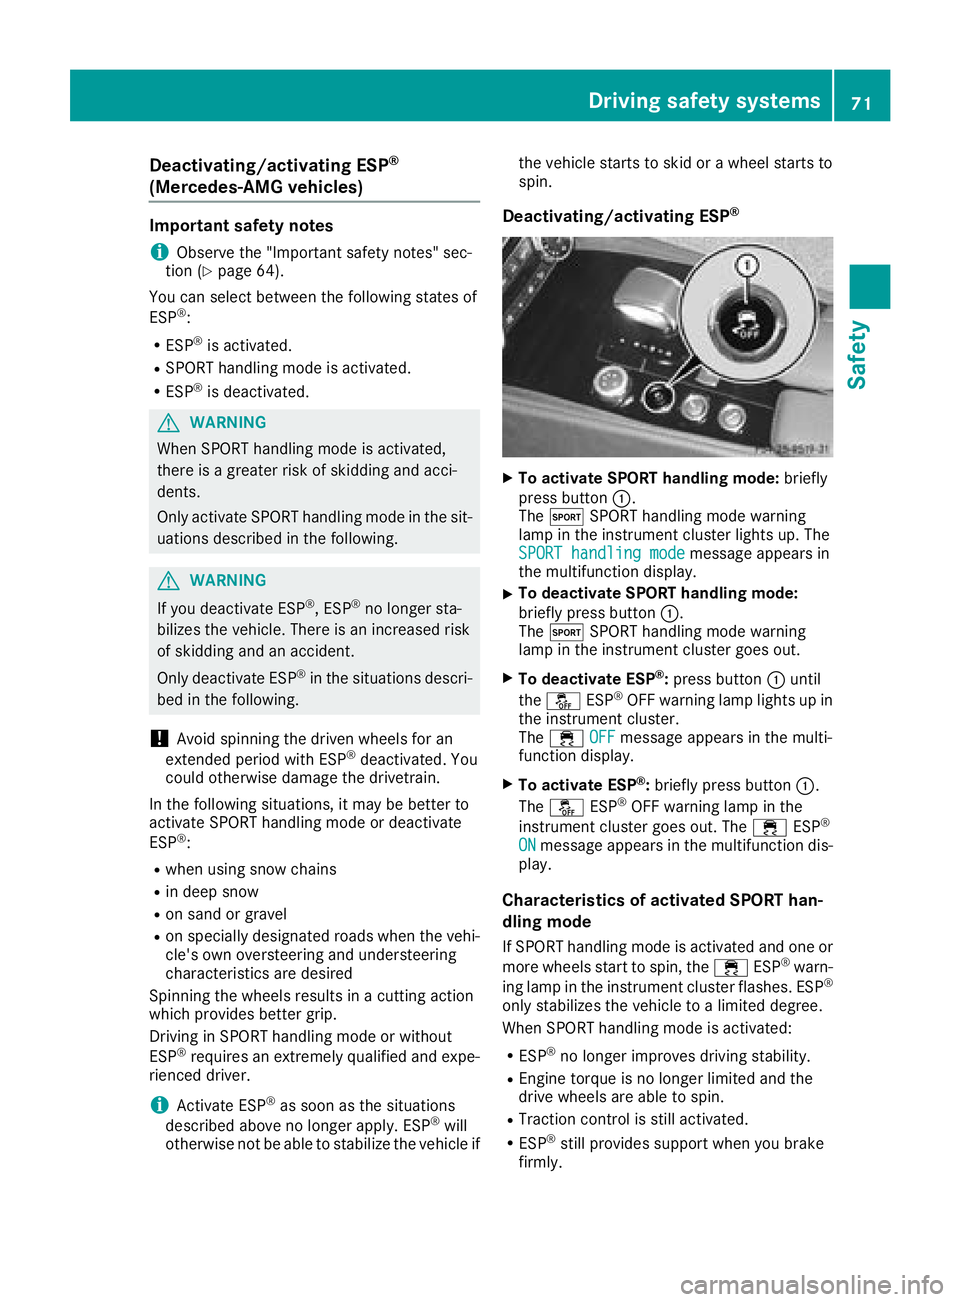
Deactivating/activating ESP ®
X
To activate SPORT handling mode: briefly
press butto n �C .
The �t SPORT handlin g mode warnin g
lamp in th e instrumen t cluster lights up. The
SPORT handling mod e
messag e appears in
th e multifunction display. X
To deactivate SPORT handling mode:
briefly press butto n �C .
The �t SPORT handlin g mode warnin g
lamp in th e instrumen t cluster goe s out .X
To deactivate ESP ®
: press butto n �C until
th e �
Page 103 of 334

Mirrors
Exterior mirrors
Adjusting the exterior mirrors
G WARNING
You could lose control of your vehicle if you do
the following while driving: R
adjust the driver's seat, head restraint,
steering wheel or mirrors R
fasten the seat belt
There is a risk of an accident.
Adjust the driver's seat, head restraint, steer-
ing wheel and mirror and fasten your seat belt
before starting the engine.
G WARNING
The exterior mirror on the front-passenger
side reduces the size of the image. Visible
objects are actually closer than they appear.
This means that you could misjudge the dis-
tance from road users traveling behind, e.g.
when changing lane. There is a risk of an acci-
dent.
For this reason, always make sure of the
actual distance from the road users traveling
behind by glancing over your shoulder.
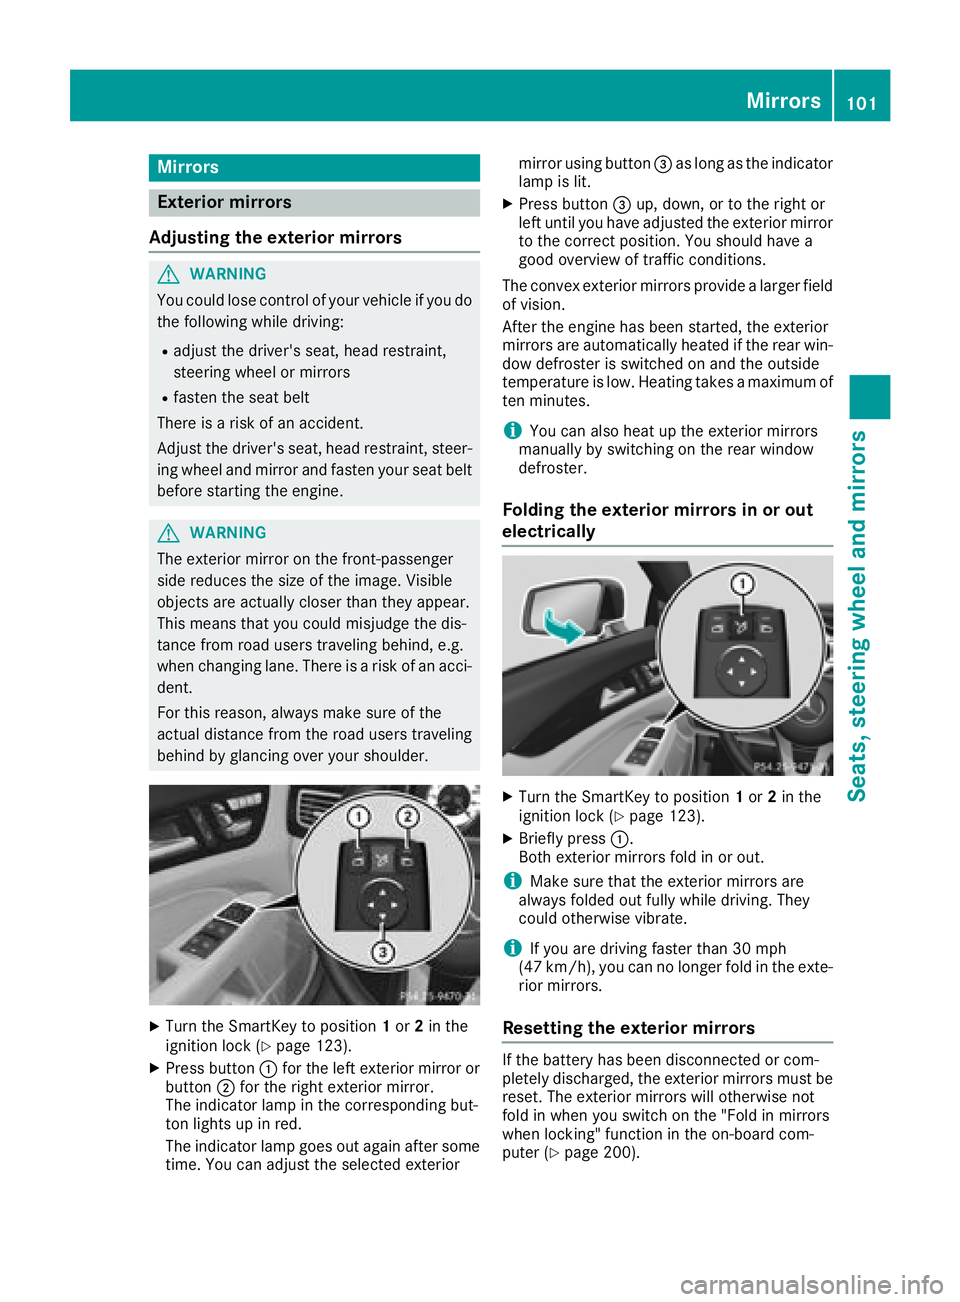
X
Turn the SmartKey to position 1 or 2 in the
ignition lock ( Y
page 123).X
Press button �C for the left exterior mirror or
button �D for the right exterior mirror.
The indicator lamp in the corresponding but-
ton lights up in red.
The indicator lamp goes out again after some
time. You can adjust the selected exterior mirror using button �
Page 107 of 334

Exterior lighting
General notes USA only: if you wish to drive during the daytime
without lights, switch off the Daytime run‐
ning lamps function via the on-board computer
( Y
page 198).
Setting the exterior lighting
Setting options Exterior lighting can be set using: R
the light switch ( Y
page 105)R
the combination switch ( Y
page 106)R
the on-board computer ( Y
page 198)
Light switch Operation
�G �c
Left-hand standing lamps�H �d
Right-hand standing lamps�I �`
Parking lamps, license plate and
instrument cluster lighting�J �X
Automatic headlamp mode, controlled
by the light sensor
�K �X
Low-beam/high-beam headlamps
If you hear a warning tone when you leave the
vehicle, the lights may still be switched on. X
Turn the light switch to �X .
The exterior lighting (except the parking/stand-
ing lamps) switches off automatically if you: R
remove the SmartKey from the ignition lock R
open the driver's door with the SmartKey in
position 0 in the ignition lock Automatic headlamp mode
G WARNING
When the light switch is set to �X , the low-
beam headlamps may not be switched on
automatically if there is fog, snow or other
causes of poor visibility due to the weather
conditions such as spray. There is a risk of an
accident.
In such situations, turn the light switch to
�X .
The automatic headlamp feature is only an aid.
The driver is responsible for the vehicle's light-
ing at all times.
�X is the favored light switch position.
The light setting is automatically selected
according to the brightness of the ambient light,
but not in the event of poor visibility due to
weather conditions such as fog, snow or spray. R
With the SmartKey in position 1 in the ignition
lock: the parking lamps are switched on/off
automatically depending on the brightness of
the ambient light. R
If you have switched on the Daytime run‐
ning lamps function in the on-board com-
puter, the daytime running lamps or the park-
ing lamps and low-beam headlamps are
switched on or off automatically while the
engine is running, depending on the bright-
ness of the ambient light. X
To switch on the automatic headlamps:
turn the light switch to the �X position.
Canada only: the daytime running lamps
improve the visibility of your vehicle during the
day. The daytime running lamps function is
required by law in Canada. It cannot therefore
be deactivated.
When the engine is running and the vehicle is
stationary: if you move the selector lever from a
driving position to P , the daytime running
lamps/low beam headlamps go out after three
minutes.
When the engine is running, the vehicle is sta-
tionary and in bright ambient light: if you turn the
light switch to the �` position, the daytime
running lamps and parking lamps switch on.
If the engine is running and you turn the light
switch to the �X position, the manual settings
take precedence over the daytime running
lamps.Exterior lighting 105
Lights and windshield wipers Z
Page 108 of 334

USA only: the daytime running lamps improve
the visibility of your vehicle during the day. To do
this, the Daytime running lamps
function
must be switched on using the on-board com-
puter ( Y
page 198).
If the engine is running and you turn the light
switch to the �` or �X position, the manual
settings take precedence over the daytime run-
ning lamps.
Low-beam headlamps
G WARNING
When the light switch is set to �X , the low-
beam headlamps may not be switched on
automatically if there is fog, snow or other
causes of poor visibility due to the weather
conditions such as spray. There is a risk of an
accident.
In such situations, turn the light switch to
�X .
Even if the light sensor does not detect that it is
dark, the parking lamps and low-beam head-
lamps switch on when the ignition is switched on
and the light switch is set to the �X position.
This is a particularly useful function in the event
of rain and fog. X
To switch on the low beam headlamps:
turn the SmartKey in the ignition lock to posi-
tion 2 or start the engine.X
Turn the light switch to the �X position.
The green �X indicator lamp in the instru-
ment cluster lights up.
Parking lamps
! If the battery charge is very low, the parking
lamps or standing lamps are automatically
switched off to enable the next engine start.
Always park your vehicle safely and in a well lit
area, in accordance with the relevant legal
stipulations. Avoid using the �` parking
lamps over a period of several hours. If pos-
sible, switch on the right-hand �d or left-
hand �c standing lamps.X
To switch on the parking lamps: turn the
light switch to the �` position.
The green �` indicator lamp on the instru-
ment cluster lights up. Standing lamps Switching on the standing lamps ensures the
corresponding side of the vehicle is illuminated. X
To switch on the standing lamps: turn the
SmartKey to position 0 in the ignition lock or
remove the SmartKey. X
Turn the light switch to the �c (left-hand
side of the vehicle) or �d (right-hand side of
the vehicle) position.
Combination switch
�C
High-beam headlamps �D
Turn signal, right �
Page 145 of 334

X
To apply: depress parking brake �D firmly.
When the engine is running, the �' (USA
only) or �M (Canada only) indicator lamp
lights up in the instrument cluster. X
To release: depress the brake pedal and keep
it depressed. X
Pull release handle �C .
When the ignition is switched on or the engine
is running, the �' (USA only) or �M (Can-
ada only) indicator lamp goes out in the instru-
ment cluster.
Parking the vehicle for a long period If you leave the vehicle parked for longer than
four weeks, the battery may be damaged by
exhaustive discharging.
If you leave the vehicle parked for longer than six
weeks, the vehicle may suffer damage as a
result of lack of use. X
Visit a qualified specialist workshop and seek
advice.
i You can obtain information about trickle
chargers from a qualified specialist work-
shop.
Driving tips
General notes
Important safety notes
G WARNING
If you switch off the ignition while driving,
safety-relevant functions are only available
with limitations, or not at all. This could affect,
for example, the power steering and the brake
boosting effect. You will require considerably
more effort to steer and brake. There is a risk
of an accident.
Do not switch off the ignition while driving.
G WARNING
If you operate mobile communication equip-
ment while driving, you will be distracted from
traffic conditions. You could also lose control
of the vehicle. There is a risk of an accident. Only operate this equipment when the vehicle
is stationary.
Observe the legal requirements for the country
in which you are driving. Some jurisdictions pro-
hibit the driver from using a mobile phone while
driving a vehicle.
If you make a call while driving, always use
hands-free mode. Only operate the telephone
when the traffic situation permits. If you are
unsure, pull over to a safe location and stop
before operating the telephone.
Bear in mind that at a speed of only 30 mph
(approximately 50 km/h), the vehicle covers a
distance of 44 ft (approximately 14 m) per sec-
ond.
Drive sensibly – save fuel Observe the following tips to save fuel: X
The tires should always be inflated to the rec-
ommended tire pressure. X
Remove unnecessary loads. X
Remove roof racks when they are not needed. X
Warm up the engine at low engine speeds. X
Avoid frequent acceleration or braking. X
Have all maintenance work carried out as
indicated by the service intervals in the Main-
tenance Booklet or by the service interval dis-
play.
Fuel consumption also increases when driving in
cold weather, in stop-start traffic and in hilly ter-
rain.
Drinking and driving
G WARNING
Drinking and driving and/or taking drugs and
driving are very dangerous combinations.
Even a small amount of alcohol or drugs can
affect your reflexes, perceptions and judg-
ment.
The possibility of a serious or even fatal acci-
dent is greatly increased when you drink or
take drugs and drive.
Do not drink or take drugs and drive or allow
anyone to drive who has been drinking or tak-
ing drugs. Driving tips 143
Driving and parking Z
Page 147 of 334

change dynamically at the beginning of the
journey. On longer journeys, there are fewer
changes. For more dynamic changes, carry
out a manual reset.
For further information on the ECO display, see
( Y
page 191).
Braking
Important safety notes
G WARNING
If you shift down on a slippery road surface in
an attempt to increase the engine's braking
effect, the drive wheels could lose their grip.
There is an increased danger of skidding and
accidents.
Do not shift down for additional engine brak-
ing on a slippery road surface.
Downhill gradients
! On long and steep gradients, you must
reduce the load on the brakes by shifting to a
lower gear in good time. This allows you to
take advantage of the engine's braking effect.
This helps you to avoid overheating the
brakes and wearing them out excessively.
When you take advantage of engine braking, a
drive wheel may not turn for some time, e.g.
on a slippery road surface. This could cause
damage to the drive train. This type of damage
is not covered by the Mercedes-Benz war-
ranty.
Change into a lower gear in good time on long
and steep downhill gradients. This is especially
important if the vehicle is laden.
Heavy and light loads
G WARNING
If you rest your foot on the brake pedal while
driving, the braking system can overheat. This
increases the stopping distance and can even
cause the braking system to fail. There is a
risk of an accident.
Never use the brake pedal as a footrest. Never
depress the brake pedal and the accelerator
pedal at the same time. ! Depressing the brake pedal constantly
results in excessive and premature wear to
the brake pads.
If the brakes have been subjected to a heavy
load, do not stop the vehicle immediately, but
drive on for a short while. This allows the airflow
to cool the brakes more quickly.
Wet roads If you have driven for a long time in heavy rain
without braking, there may be a delayed reac-
tion from the brakes when braking for the first
time. This may also occur after the vehicle has
been washed or driven through deep water.
You have to depress the brake pedal more
firmly. Maintain a greater distance from the
vehicle in front.
After driving on a wet road or having the vehicle
washed, brake firmly while paying attention to
the traffic conditions. This will warm up the
brake discs, thereby drying them more quickly
and protecting them against corrosion.
Limited braking performance on salt-
treated roads If you drive on salted roads, a layer of salt resi-
due may form on the brake discs and brake
pads. This can result in a significantly longer
braking distance. R
In order to prevent any salt build-up, apply the
brakes occasionally while paying attention to
the traffic conditions. R
Carefully depress the brake pedal and the
beginning and end of a journey. R
Maintain a greater distance to the vehicle
ahead.
Servicing the brakes
! The brake fluid level may be too low, if: R
if the red brake warning lamp lights up in
the instrument cluster and R
you hear a warning tone while the engine is
running
Observe additional warning messages in the
multifunction display.
The brake fluid level may be too low due to
brake pad wear or leaking brake lines. Driving tips 145
Driving and parking Z