2018 MERCEDES-BENZ CLA display
[x] Cancel search: displayPage 166 of 326
Parking Pilot
General notes Parking Pilot is an electronic parking aid with
ultrasound. It measures the road on both sides
of the vehicle. Ap arking symbol indicates as uit-
able parking space. Active steering intervention
and brake application can assist you during
parking and when exiting ap arking space. Park-
ing Assist PARKTRONIC is also available
( Y
page 161).
Important safety notes Parking Pilot is only an aid. It is not ar eplace-
ment for your attention to your immediate sur-
roundings. You are always responsible for safe
maneuvering, parking and exiting ap arking
space. Make sure that no persons, animals or
object sa re in the maneuvering range.
When Parking Assist PARKTRONIC is deactiva-
ted, Parking Pilot is also unavailable.
G WARNING
While parking or pulling out of ap arking
space, the vehicle swings out and can drive
onto areas of the oncomin gl ane. This could
result in ac ollision with another road user.
There is ar isk of an accident.
Pay attention to other road users. Stop the
vehicle if necessary or cancel the Parking Pilot
parking procedure.
! If unavoidable ,y ou should drive over obsta-
cles such as curbs slowly and not at as harp
angle. Otherwise, you may damage the
wheels or tires.
Parking Pilot may also display spaces not suita-
ble for parking, e.g.: R
where parking or stopping is prohibited R
in front of driveways or entrances and exits R
on unsuitable surfaces
Parking tips: R
On narrow roads, drive as close to the parking
space as possible. R
Parking spaces that are littered or overgrown
might be identified or measured incorrectly. R
Parking spaces that are partially occupied by
trailer drawbars might not be identified as
such or be measured incorrectly. R
Snowfall or heavy rain may lead to ap arking
space being measured inaccurately. R
Pay attention to the warning messages of
Parking Pilot PARKTRONIC during the parking
procedure ( Y
page 162). R
You can intervene to correct the steering pro-
cedure at any time. Parking Pilot will then be
canceled. R
When transporting al oad that protrudes from
your vehicle, you must not use Parking Pilot. R
Never use Parking Pilot when snow chains are
mounted. R
Make sure that the tire pressures are always
correct .T his has ad irect influence on the
parking characteristics of the vehicle.
Use Parking Pilot for parking spaces that are: R
that are paralle loratr ight-angles to the direc-
tion of travel R
on straight roads, not bends R
on the same level as the road, e.g. not on the
pavement
Detecting parking spaces Object sl ocated above the detection range of
Parking Pilot will not be detected when the park-
ing space is measured. These are not taken into
account when the parking procedure is calcula-
ted, e.g. overhanging loads, truck overhangs or
loading ramps. Parking Pilot may therefore
guide you into the parking space too early.
Parking Pilot does not assist you parking in
spaces perpendicular to the direction of travel if: R
two parking spaces are located directly next
to one another R
the parking space is directly next to al ow
obstacle such as al ow curbR
you forward-park
Parking Pilot does not assist you parking in
spaces paralle lorp erpendicular to the direction
of travel if: R
the parking space is on ac urbR
the system reads the parking space as being
blocked, for example by foliage or grass pav-
ing blocks R
the area is too small for the vehicle to maneu-
ver into R
the parking space is bordered by an obstacle,
e.g. at ree, ap ost or at railer
For further information on the detection range
( Y
page 161).164
Driving systems
Driving and parking
Page 168 of 326
X
Let go of the multifunction steering wheel. X
Back up the vehicle ,b eing ready to brake at all
times. When backing up, drive at as peed
belo wa pproximately 6m ph (10 km/h). Oth-
erwise, Parking Pilo tisc anceled immediately.
Parking Pilo tb rakes the vehicle to as tandstill
when the vehicle approaches the rear border
of the parking space.
Maneuvering may be required in tight parking
spaces.
The Parking Pilot Active Select D
Observe Surroundings messag ea ppears in
the multifunction display. X
Shift the transmission to position �[ while
the vehicle is stationary.
Parking Pilo ti mmediately steers in the other
direction.
The Parking Pilot Active Accelerate
and Brake Observe Surroundings mes-
sage appears in the multifunction display.
i You wil la chieve the best results by waiting
for the steering procedure to complete before
pulling away. X
Drive forward sa nd be ready to brake at all
times.
Parking Pilo tb rakes the vehicle to as tandstill
when the vehicle approaches the front border
of the parking space.
Maneuvering may be required in tight parking
spaces.
The Parking Pilot Active Select R
Observe Surroundings messag ea ppears in
the multifunction display.
As soon as the parking procedure is complete,
the Parking Pilot Finished message
appears and aw arning tone sounds. The vehicle
is now parked.
The vehicle is kept stationary withou tt he driver
having to depres st he brake pedal. The braking
effect is canceled when you depres st he accel-
erator pedal.
Parking Pilo tnol onger supports you with steer-
ing interventions and brake applications. When
Parking Pilo tisf inished ,y ou must steer and
brake again yourself. Parking Assist
PARKTRONIC is still available.
Parking tips: R
The way you rv ehicle is positioned in the park-
ing space after parking is dependent on vari-
ous factors. These include the positio na nd
shape of the vehicle sp arked in front and behind it and the conditions of the location. It
may be the case that Parking Pilo tg uides you
too far into ap arking space, or not far enough
into it. In some cases, it may also lea dy ou
across or onto the curb. If necessary ,y ou
shoul dc ancel the parking procedure with
Parking Pilot. R
You can also preselect transmission position
�[ .T he vehicle redirects and does not drive
as far into the parking space. Should the
transmission change take place too early, the
parking procedure is canceled. As ensible
parking positio nc an no longer be achieved
from this position.
Exitin gap arking spaceIn order for Parking Pilo ttos upport you when
exiting the parking space: R
you need to have parked using Parking Pilot. R
the border of the parking space must be high
enough at the front and the rear. Ac urb stone
is too small ,f or example. R
the border of the parking space must not be
too wide, as the positio noft he vehicle must
not exceed an angle of 45° to the starting
positio nasitism aneuvered into the parking
space. R
am aneuvering distance of at least 3.3 ft
(1.0 m) must be available.
Parking Pilo tc an assist you with exiting ap ark-
ing space only if you have parked the vehicle
parallel to the direction of travel using Parking
Pilot.
i If Parking Assist PARKTRONIC detects
obstacles, Parking Pilo tb rakes automatically
whilst the vehicle is exiting the parking space.
You are responsible for braking in good time. X
Start the engine. X
Release the electric parking brake. X
Switch on the turn signal in the direction you
wil ld rive out of the parking space. X
Shift the transmission to position �[ or �^ .
The Start Parking Pilot? Yes: OK No:
�8 messag ea ppears in the multifunction
display. X
To cancel the procedure: press the �8
button on the multifunction steering whee lo r
pul la way.
or166
Driving systems
Driving and parking
Page 170 of 326
for safe maneuvering and parking. Make sure
that there are no persons, animals or objects in
the maneuvering area while maneuvering and
parking in parking spaces.
Under the following circumstances, the rear
view camera wil ln ot function, or wil lf unction in
al imited manner: R
if the trunk lid is open R
in heavy rain, snow or fog R
at night or in very dark places R
if the camera is expose dtov ery bright lightR
if the area is lit by fluorescent bulbs or LED
lighting (the display may flicker) R
if there is as udden change in temperature,
e.g. when driving into ah eated garage in win-
ter R
if the camera lens is dirty or obstructed.
Observe the notes on cleaning
( Y
pag e2 65)R
if the rear of you rv ehicl eisd amaged. In this
case, have the camera position and setting
checked at aq ualified specialist workshop
The fiel dofv ision and other functions of the rear
view camera may be restricted due to additional
accessories on the rear of the vehicl e( e.g.
license plate holder, rear bicycle rack).
Activating/deactivating the rear view
camera X
To activate: make sure that the SmartKey is
in position �H in the ignition lock.X
Make sure that the Activation by Rg ear
function is selected in the multimedi as ystem;
see the Digita lO perator's Manual.X
Engage reverse gear.
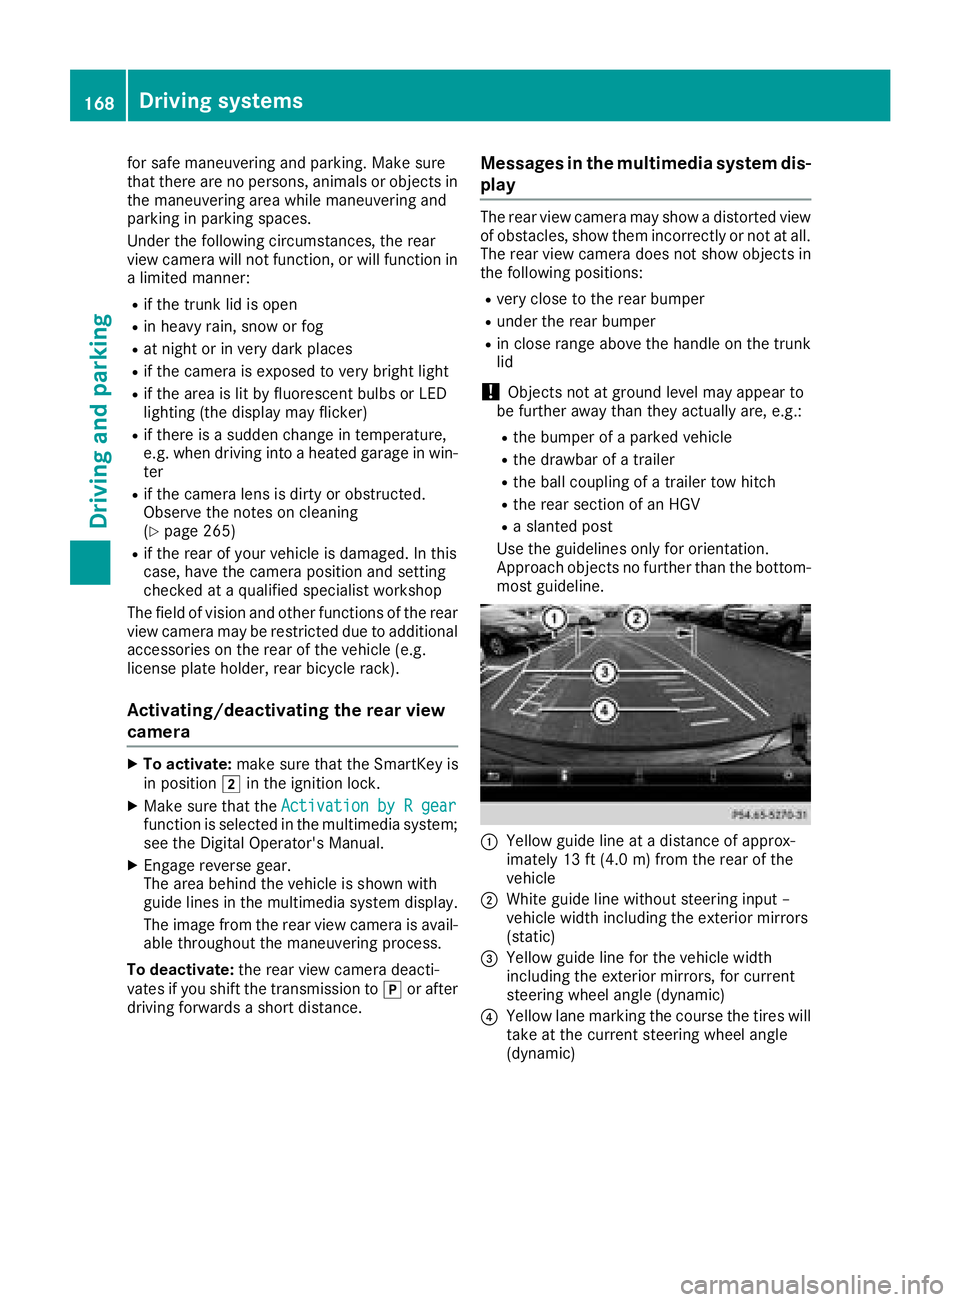
The area behind the vehicl eiss how nw ith
guide lines in the multimedi as ystem display.
The image from the rear view camera is avail-
abl et hroughou tt he maneuvering process.
To deactivate: the rear view camera deacti-
vates if you shift the transmission to �] or after
driving forwards as hort distance. Messages in the multimedia system dis-
play The rear view camera may show ad istorted view
of obstacles, show them incorrectly or not at all.
The rear view camera does not show objects in
the following positions: R
very close to the rear bumper R
under the rear bumper R
in close range above the handl eont he trunk
lid
! Objects not at ground leve lm ay appear to
be further away than they actually are, e.g.: R
the bumper of ap arked vehicleR
the drawbar of at railerR
the bal lc oupling of at railer tow hitchR
the rear section of an HGV R
as lanted post
Use the guidelines only for orientation.
Approach objects no further than the bottom-
most guideline.
�C
Yellow guide line at ad istance of approx-
imately 13 ft (4.0 m) from the rear of the
vehicle �D
White guide line without steering inpu t–
vehicl ew idth including the exterior mirrors
(static)
�
Page 175 of 326
Any unauthorized modification to thi sd ev ice
could voi dt he user’ sa ut hority to operate the
equipment.
Radar sensors The rada rs ensors for Blind Spo tA ssist ar ei nte-
grated into the rea rb um per. Make sure tha tt he
bumpers ar ef re ef rom dirt, ice or slush. The
sensors must not be covered ,f or exampl eb y
cycle racks or overhanging loads. Following a
severe impact or in the event of damage to the
bumpers, have the functio noft he rada rs ensors
checked at aq uali fied specialist workshop.
Blind Spo tA ssist ma ynol on ge rw or kp roperly.
Monitorin gr ang eoft he sensorsIn particular, the detection of obstacle sc an be
impaired if: R
ther eisd ir tont he sensors or anything else
covering the sensors R
ther eisp oo rv isibility ,e .g .d ue to fog ,h eavy
rain or snow R
an arrow vehicl et raveling in front, e.g .a
motorbike or bicycle R
the roa dh as ver yw id el an esR
the roa dh as narrow lanesR
yo ua re not driving in the middl eoft he laneR
ther ea re barriers or othe rr oa db ou ndaries
Vehicles in the monitoring range ar et hen not
indicated.
Blind Spo tA ssist monitors the area up to 10 ft
(3 m) behind your vehicl ea nd directl yn ext to it.
If the lanes ar en arrow ,v ehicles driving in the
lane beyond the lane next to your vehicl em a y be
indicated ,e specially if the vehicles ar en ot driv-
ing in the middl eoft hei rl an e. Thi sm ay be the
cas eift he vehicles ar ed riving on the inne rs id e
of thei rl an e.
Due to the nature of the system: R
warning sm ay be issued in error when driving
close to crash barriers or similar solid lane
borders. R
warning sm ay be interrupte dw he ny ou are
driving alongsid ep ar ticularly long vehicles,
such as trucks, for ap rolonge dt ime. Warning display
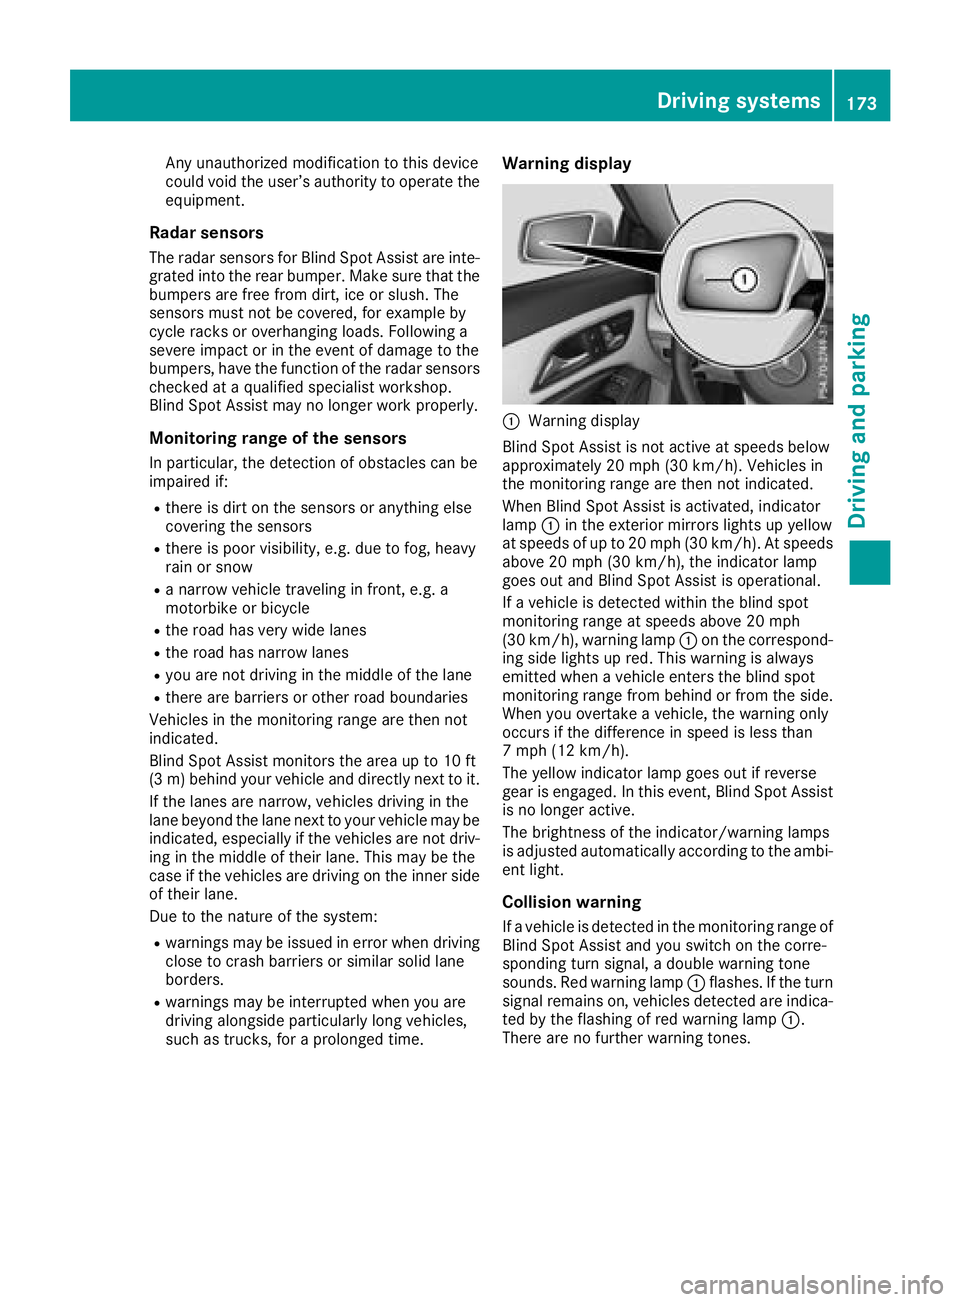
�C
Warning display
Blind Spo tA ssist is not active at speed sb elow
approximatel y20m ph (30 km/h). Vehicles in
the monitoring range ar et hen not indicated.
Whe nB lind Spo tA ssist is activated ,i ndicator
lamp �C in the exterio rm irrors lights up yellow
at speed sofupto20m ph (30 km/h). At speeds
above 20 mph (30 km/h), the indicator lamp
goe so ut and Blind Spo tA ssist is operational.
If av ehicl eisd et ecte dw it hi nt he blind spot
monitoring range at speed sa bo ve 20 mph
(30 km/h), warning lamp �C on the correspond-
ing side lights up red .T hi sw ar ning is always
emitted when av ehicl ee nters the blind spot
monitoring range from behind or from the side.
Whe ny ou overtake av ehicle, the warning only
occurs if the difference in speed is less than
7m ph (12 km/h).
The yellow indicator lamp goe so ut if reverse
gear is engaged .Int hi se vent, Blind Spo tA ssist
is no longe ra ctive.
The brightness of the indicator/warning lamps
is adjusted automaticall ya ccording to the ambi-
ent light.
Collisio nw ar ning
If av ehicl eisd et ecte dint he monitoring range of
Blind Spo tA ssist and yo us wi tch on the corre-
sponding turn signal, ad ouble warning tone
sounds. Re dw ar ning lamp �C flashes. If the turn
signa lr emains on, vehi cles detecte da re i ndica-
ted by the flashing of red warning lamp �C .
There ar enof ur the rw ar ning tones.Driving systems 173
Driving an dp arking Z
Page 178 of 326
Important safety notes
G WARNIN G
If you operate information systems and com-
munication equipmen ti ntegrate dint he vehi-
cle when driving ,y ou may be distracte df ro m
th et ra ffic situation .Y ou could also lose con-
trol of th ev ehicle. Ther eisar is kofana cci-
dent.
Only operate this equipmen tw hen th et ra ffic
situation permits. If you are no ts ur et ha tt hi s
is possible ,p ark th ev ehicl ep ayin ga ttention
to traffic condition sa nd operate th ee quip-
men tw hen th ev ehicl eiss ta tionary.
You must observ et he legal requirements for th e
country in whic hy ou are currentl yd riving when
operating th eo n-bo ard computer.
G WARNIN G
If th ei nstrumen tc luste rh as faile dorm al-
functioned, you may no tr ecognize function
restriction sins ystems relevan ttos afety. The
operating safet yofy our vehicl em ay be
impaired .T her eisar is kofana ccident.
Drive on carefully. Hav et he vehicl ec hecked
at aq ualified specialist workshop immedi-
ately.
The on-board computer only shows message so r
warning sf ro mc ertai ns ystems in th em ultifunc-
tion display. You should therefor em ak es ur e
your vehicl eiso perating safely at all times .
If th eo perating safet yofy our vehicl ei s
impaired ,p ull ove rass oo nasitiss af etodos o.
Contac taq ualified specialist workshop.
Fo rano verview, see th ei nstrumen tp anel illus-
tration ( Y
page 33).
Display sa nd operation
Instrumen tc luster lighting
The ligh ts ensor in th ei nstrumen tc luste ra uto -
matically control st he brightness of th em ulti-
function display. In daylight, th ed isplays in th e
instrumen tc luste ra re no ti lluminated. The lighting in th ei nstrumen tc luster, in th ed is-
plays and th ec ontrols in th ev ehicl ei nterior can
be adjusted usin gt he brightness control knob.
The brightness control knob is locate dont he
botto ml ef toft he instrumen tc luste r
( Y
page 33). X
Turn th eb rightness control knob clockwise or
counter-clockwise.
If th el igh ts witch is set to th e �X , �` or
�X position ,t he brightness is dependen t
upon th eb rightness of th ea mbien tl ight.
Speedometer with segments The speedometer is divided int os egments on
vehicles wit hD istance Pilot DISTRONIC.
The segments in th es peedometer indicat e
whic hs pee dr ange is available. R
Distanc eP ilot DISTRONI Cisa ctivated
( Y
page 151):
On eort wo segments in th es et spee dr ange
ligh tu p. R
Distanc eP ilot DISTRONI Cd etects av ehicl ei n
fron tm oving mor es lowly than th es to re d
speed:
The segments between th es pee doft he vehi-
cle in fron ta nd th es to re ds pee dl igh tu p.
Tachometer
! Do no td riv eint he overrevving range, as this
could damag et he engine.
The red ban dint he tachometer indicates th e
engine's overrevving range.
The engin eisl imite dw ithin ar ange to protect
th ee ng in ew hen th er ed ban disr eached.
Outsid et emperatur ed isplayYou should pay special attention to road condi-
tion sw hen temperatures are aroun df re ezing
point.
Bea rinm in dt ha tt he outside temperature dis-
play indicates th et em perature measured and
does no tr ecord th er oad temperature.
The outside temperature display is in th em ulti-
function display ( Y
page 179).176
Display sa nd operation
On-boar dc omputer and displays
Page 179 of 326
There is as hort delay before ac hange in outside
temperature appears in the multifunction dis-
play.
Coolant temperature gauge
G WARNING
Opening the hood when the engine is over-
heated or when there is af ire in the engine
compartment could expose you to hot gases
or other service products. There is ar isk of
injury.
Let an overheated engine cool down before
opening the hood. If there is af ire in the
engine compartment ,k eep the hood closed
and contact the fire department. ! Ad isplay message is shown if the coolant
temperature is too high.
If the coolant temperature is over 248 ‡
(120 †), do not continue driving. The engine
will otherwise be damaged.
The coolant temperature gage is in the instru-
ment cluster on the right-hand side ( Y
page 33).
The H marking in the coolant temperature gauge
corresponds to ac oolant temperature of
approximately 248 ‡( 120 †).
Under normal operating conditions and at the
correc tc oolant level, the coolant temperature
gauge may rise to the H marking.
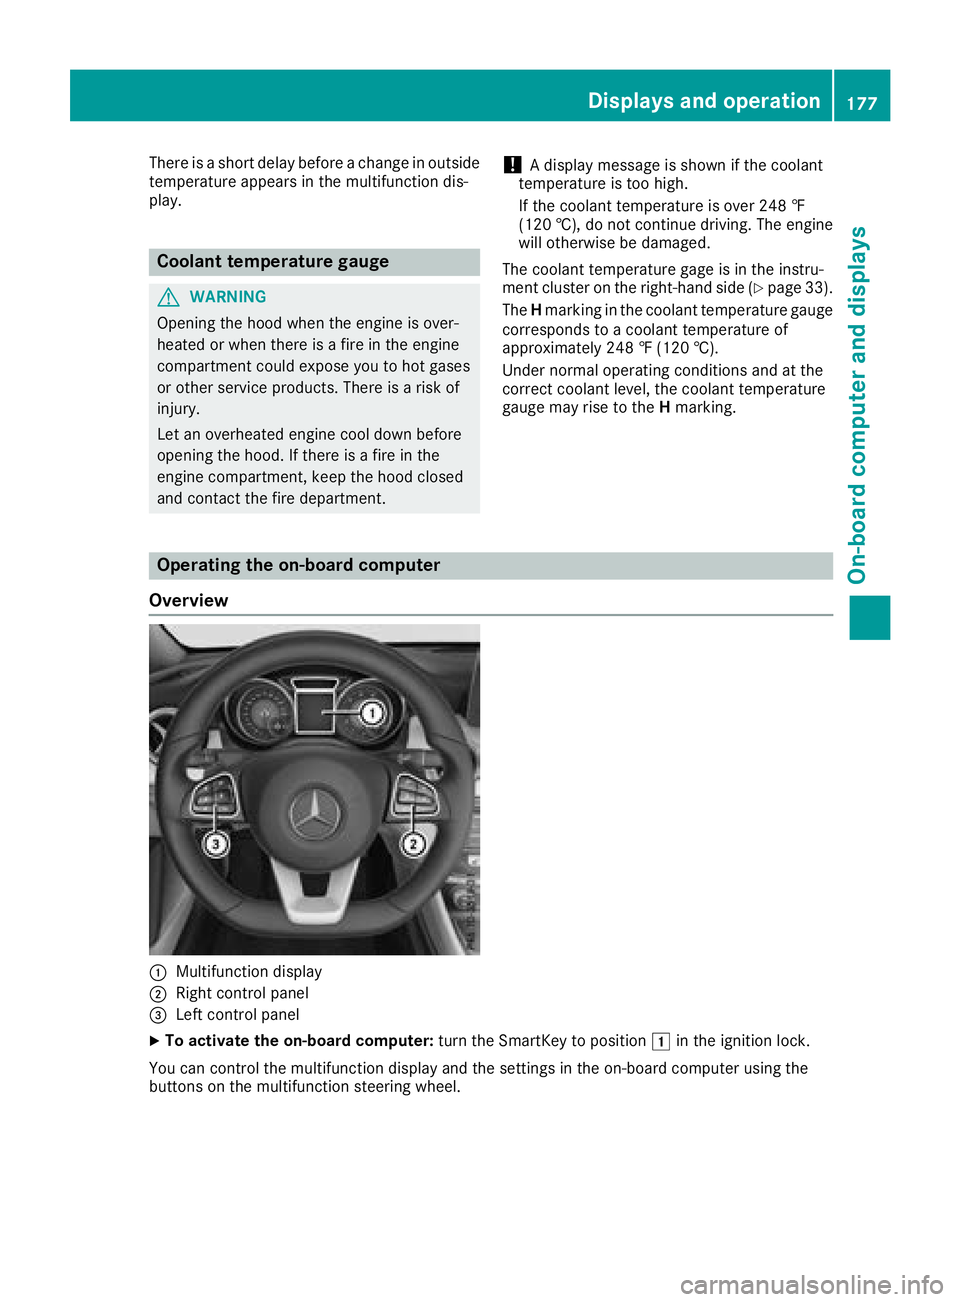
Operating the on-board computer
Overview
�C
Multifunction display
�D
Right control panel
�
Page 181 of 326
�v R
Rejects or ends ac allR
Exit st he telephon eb ook/redial memory
�a R
Makes or accept sac allR
Switches to th er edial memory
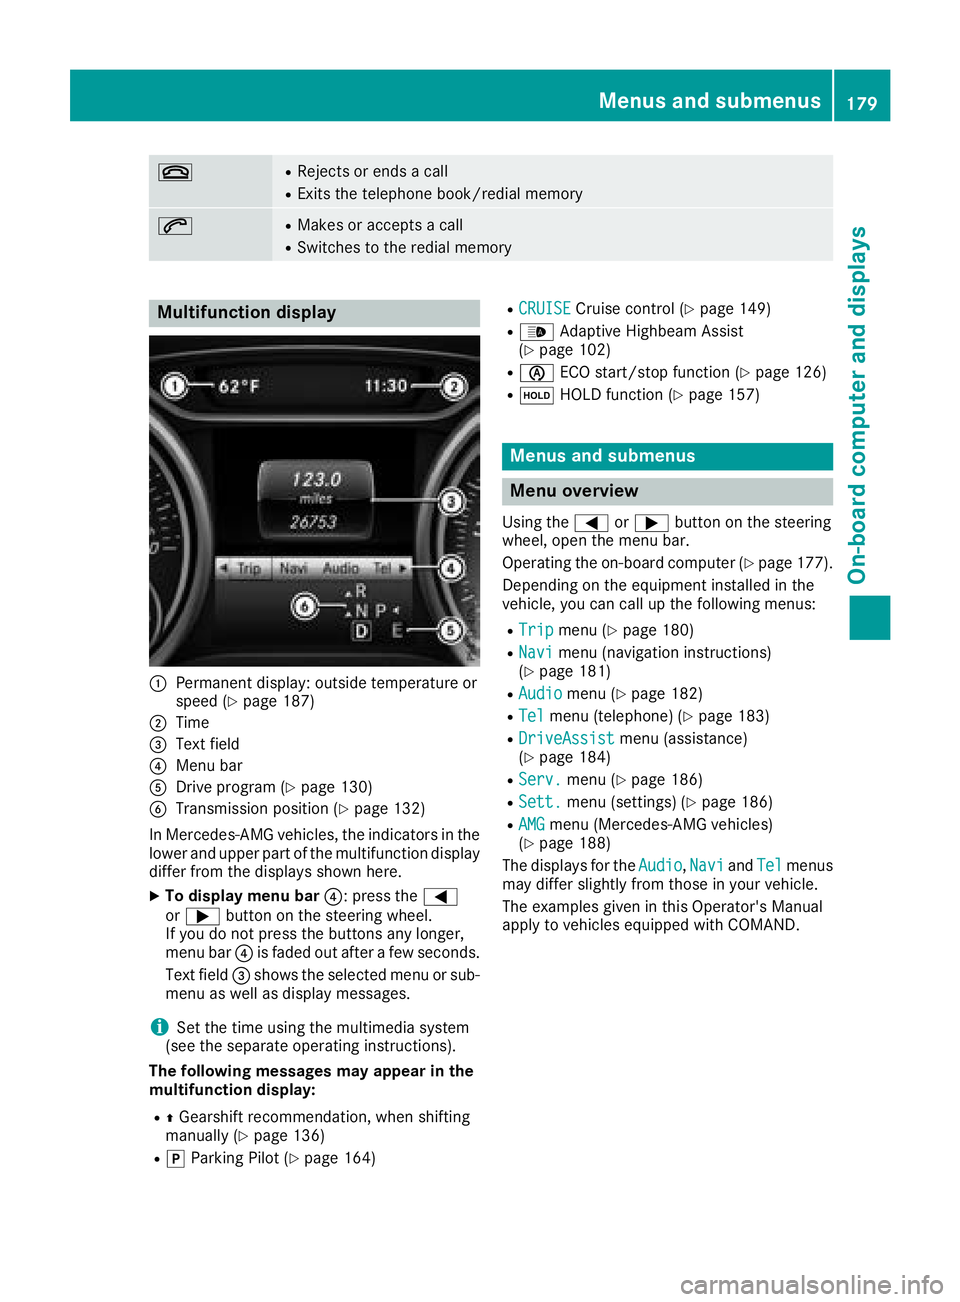
Multifunction display
�C
Permanen td isplay: outside temperature or
spee d( Y
page 187)�D
Tim e�
Page 182 of 326
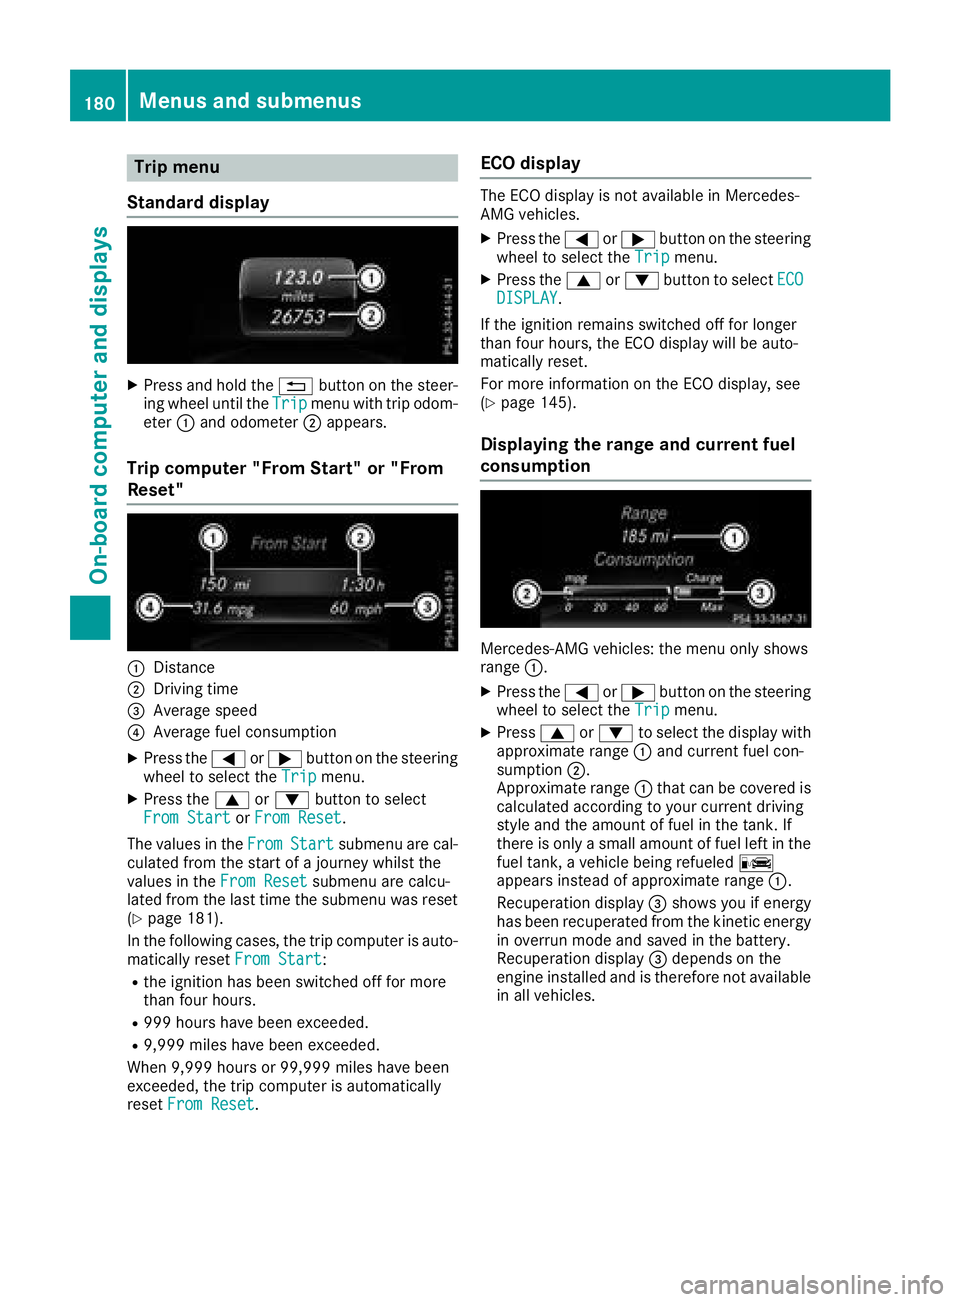
Trip menu
Standard display X
Press and hol dt he �8 button on the steer-
ing whee lu nti lt he Trip menu with trip odom-
eter �C and odometer �D appears.
Trip compute r" Fr om Start" or "From
Reset"
�C
Distance�D
Driving time�