2018 MERCEDES-BENZ CLA steering
[x] Cancel search: steeringPage 48 of 326

Objects in the vehicle interior may prevent
an air bag from functioning correctly. Before
starting your journey and to avoid risks resulting
from the speed of the air bag as it deploys, make
sure that: R
there are no people, animals or objects
between the vehicle occupant sa nd an air bagR
there are no object sb etween the seat, door
and B-pillar R
there are no hard objects, e.g. coat hangers,
hanging on the grab handles or coat hooks R
no accessories, such as cup holders, are
attached to the vehicle within the deployment
area of an air bag, e.g. to doors, side windows,
rear side trim or side walls R
no heavy, sharp-edged or fragile object sa re in
the pocket sofy our clothing. Store such
object sinas uitable place
G WARNING
If you modify the air bag cover or affix objects
such as stickers to it, the air bag can no longer
function correctly. There is an increased risk
of injury.
Never modify an air bag cover or affix objects
to it.
G WARNING
Sensors to control the air bags are located in
the doors. Modification sorw ork not per-
formed correctly to the doors or door panel-
ing, as well as damaged doors, can lead to the
function of the sensor sb eing impaired. The air
bags might therefore not function properly
anymore. Consequently, the air bags cannot
protec tv ehicle occupant sast hey are
designed to do. There is an increased risk of
injury.
Never modify the doors or parts of the doors.
Always have work on the doors or door pan-
eling carried out at aq ualified specialist work-
shop.
Front air bags
! Do not place heavy object sont he front-
passenger seat. This could cause the system
to identif yt he seat as being occupied. In the
event of an accident ,t he restraint systems on the front-passenger side may be triggered
and have to be replaced.
Driver's air bag �C deploys in fron toft he steer-
ing wheel. Front-passenger fron ta ir bag �D
deploys in fron tofa nd above the glove box.
When deployed, the fron ta ir bags offer addi-
tional head and thorax protection for the occu-
pants in the fron ts eats.
The PASSENGER AIR BAG OFF indicato rl amp
inform sy ou about the status of the front-
passenger fron ta ir bag ( Y
page 41).
The front-passenger fron ta ir bag will only
deploy if: R
the system, based on the OCS weight sensor
readings, detect st hat the front-passenger
seat is occupied ( Y
page 47). The
PASSENGER AIR BAG OFF indicato rl amp is
not lit ( Y
page 48) R
the restraint system control unit predict sa
high accident severity
Knee bags
Driver's knee bag �C deploys under the steering
column and front-passenger knee bag �D under
the glove box. The driver's and front-passenger
knee bags are triggered together with the front
air bags.46
Occupant safety
Safety
Page 62 of 326
G WARNING
If the child restraint system is subjected to
direct sunlight, parts may get very hot. Chil-
dren may burn themselves on these parts,
particularl yont he metal parts of the child
restraint system. There is ar isk of injury.
If you leave the vehicle, taking the child with
you ,a lway se nsure that the child restraint
system is not expose dtod irect sunlight. Pro-
tect it with ab lanket, for example. If the child
restraint system has been expose dtod irect
sunlight, let it cool dow nb efore securing the
child in it. Never leave children unattended in
the vehicle.
Child-proof locks for the rear doors
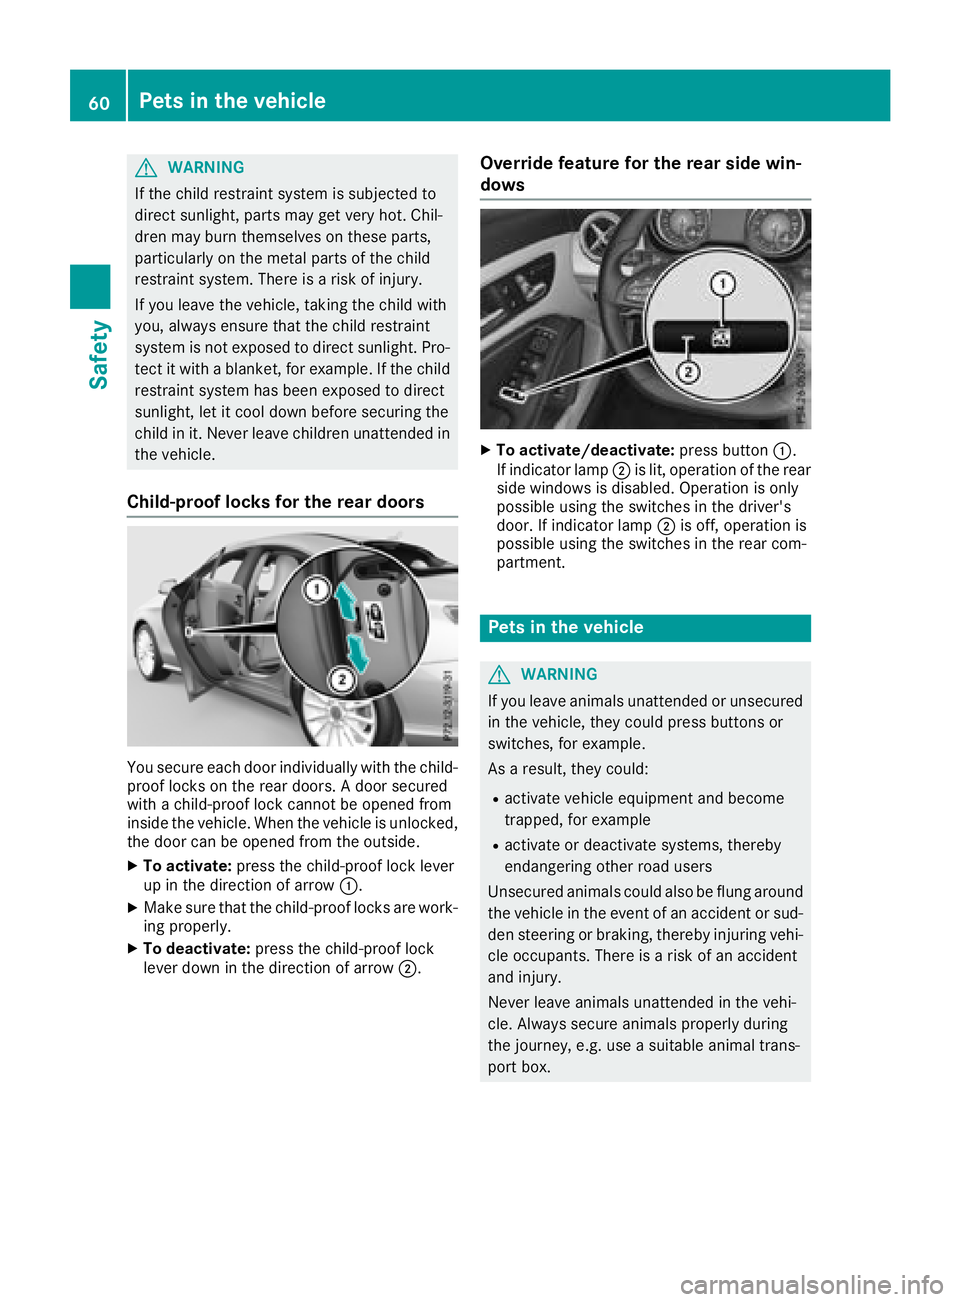
You secure each door individually with the child-
proof locks on the rear doors. Ad oor secured
with ac hild-proof lock cannot be opened from
insid et he vehicle. When the vehicl eisu nlocked,
the door can be opened from the outside. X
To activate: press the child-proof lock lever
up in the direction of arrow �C .X
Make sure that the child-proof locks are work-
ing properly. X
To deactivate: press the child-proof lock
leve rd ow nint he direction of arrow �D . Override feature for the rear side win-
dows X
To activate/deactivate: press button �C .
If indicator lamp �D is lit, operation of the rear
side windows is disabled. Operation is only
possible using the switches in the driver's
door. If indicator lamp �D is off, operation is
possible using the switches in the rear com-
partment.
Pets in the vehicle
G WARNING
If you leave animals unattended or unsecured
in the vehicle, they coul dp ress buttons or
switches, for example.
As ar esult, they could: R
activate vehicl ee quipment and become
trapped, for example R
activate or deactivate systems ,t hereby
endangering other road users
Unsecure da nimals coul da ls obef lung around
the vehicl eint he event of an accident or sud-
den steering or braking, thereby injuring vehi-
cle occupants. There is ar isk of an accident
and injury.
Never leave animals unattended in the vehi-
cle. Always secure animals properly during
the journey ,e .g. use as uitable anima lt rans-
port box.60
Pets in the vehicle
Safety
Page 63 of 326

Drivin gs af et ys ystems
Overview of drivin gs af et ys ystemsIn this section ,y ou will fin di nformati on about
th ef ol lowin gd rivin gs afet ys ystems :R
AB S( A nti-lock B rakin g S ystem)
( Y
page 61) R
BA S( B rak e A ssist S ystem) ( Y
page 61)R
Active Brak eA ss is t( Y
page 62 )R
ES P ®
( E lectronic S ta bility P ro gram)
( Y
page 64) R
EB D( E lectroni c B rak ef orce D istribution )
( Y
page 67 )R
ADAPTIV EB RAKE ( Y
page 68 )R
STEE RC ONTROL ( Y
page 68)
Important safet yn otesIf you fail to adapt your drivin gs ty le or if you are
inattentive ,t he drivin gs afet ys ystems can nei-
ther reduce th er is kofana cciden tn or override
th el aws of physics. Driving safet ys ystems are
merely aids designed to assist driving. You are
responsible fo rm aintainin gt he distanc etot he
vehicle in front, fo rv ehicle speed, fo rb raking in
goo dt im e, and fo rs ta yin ginl ane. Always adapt
your drivin gs ty le to suit th ep revailin gr oa da nd
weather condition sa nd maintain as af ed istanc e
from th ev ehicle in front. Drive carefully.
The drivin gs afet ys ystems described only wor k
as effectively as possible when there is ade-
quat ec ontac tb etween th et ir es and th er oa d
surface. Please pay special attention to th e
note sont ir es ,r ecommended minimum tire
tread depths, etc. ( Y
page 288).
In wintr yd rivin gc onditi ons, always use winte r
tires (M+ St ir es )a nd if necessary ,s now chains.
Onl yint hi sw ay will the driving safety systems
describe dint hi ss ection work as effectively as
possible.
ABS (Anti-lock Brakin gS ystem)
General information
ABS regulate sb rake pressure in such aw ay that
the wheels do not lock when yo ub rake. This
allows yo utoc ontinue steering the vehicl ew he n
braking. The �% ABS warning lamp in the instrument
cluster lights up when the ignition is switched
on. It goe so ut when the engine is running.
ABS works from as peed of abou t5m ph
(8 km/h), regardless of road-surface conditions.
ABS works on slippery surfaces, eve nw he ny ou
onl yb rake gently.
Important safety notes
i Observe the "Important safety notes "s ec-
tio n( Y
page 61).
G WARNING
If ABS is faulty ,t he wheels could lock when
braking .T he steerability and braking charac-
teristic sm ay be severely impaired .A ddition-
ally ,f urther driving safety system sa re deac-
tivated .T here is an increased danger of skid-
ding and accidents.
Driv eonc arefully. Hav eA BS checked imme-
diately at aq uali fied specialist workshop.
Whe nA BS is malfunctioning ,o the rs ys tems,
including driving safety systems, will also
become inoperative. Observe the information
on the ABS warning lamp ( Y
page 220 )a nd dis-
play messages which ma ybes hown in the
instrument cluster ( Y
page 192).
Braking X
If ABS intervenes: continue to depress the
brake peda lv igorously unti lt he braking sit-
uatio ni so ver. X
To make af ul lb rake application: depress
the brake peda lw it hf ul lf orce.
If ABS intervene sw he nb raking ,y ou will fee la
pulsing in the brake pedal.
The pulsating brake peda lc an be an indication
of hazardou sr oa dc onditions, and functions as a
reminder to take extra car ew hile driving.
BAS (Brak eA ssis tS ystem)
General information
BAS operates in emergency braking situations.
If yo ud ep ress the brake peda lq ui ckly, BAS
automaticall yb oo sts the braking force ,t hus
shortening the stopping distance.Driving safety systems 61
Safety Z
Page 70 of 326
You should therefore adapt your drivin gs tyle
to the differen th andlin gc haracteristics. Have
the brak es yste mc hecked at aq ualified spe-
cialist workshop.
Please observ et he information on warnin ga nd
indicator lamps ( Y
page 220)
( Y
page 220) as well as on display messages
( Y
page 194).
ADAPTIVE BRAKE ADAPTIVE BRAKE enhances braking safet ya nd
offers increased braking comfort .Ina ddition to
the braking function ,A DA PTIVE BRAKE also has
the HOL Df unction ( Y
page 157) and hill start
assist ( Y
page 125).
STEER CONTROL
Genera li nformationSTEER CONTROL helps you by transmitting a
noticeable steerin gf orc etot he steerin gw heel
in the direction required for vehicle stabilization.
This steerin ga ssistanc eisp rovided in particular
if: R
both right wheels or both left wheels are on a
wet or slippery road surfac ew hen you brakeR
the vehicle begins to skid
Important safet yn otes
i Observe the "Importan ts afet yn otes" sec-
tion ( Y
page 61).
No steerin ga ssistanc eisp rovided from STEER
CONTROL, if: R
ESP ®
is malfunctioningR
the steerin gism alfunctioning
If ESP ®
is malfunctioning, you will be assisted
further by the electrical power steering.
Protection against theft
Immobilizer
The immobilizer prevent sy our vehicle from
being started without the correc tS martKey. X
To activat ew ith th eS martKey: remove the
SmartKey from the ignition lock. X
To activat ew ith KEYLESS-GO start-func-
tion or KEYLESS-GO: switc ht he ignition off
and open the driver's door. X
To deactivate: switc hont he ignition.
When leaving the vehicle, always tak et he
SmartKey with you and lock the vehicle. Anyone
can star tt he engin eifav alid SmartKey has been
left inside the vehicle.
i The immobilizer is always deactivate dw hen
you star tt he engine.
In the even tt hat the engin ec annot be started
(yet the vehicle's battery is charged), the sys-
tem is not operational. Contact an authorized
Mercedes-Ben zC enter or call
1-800-FOR-MERCedes (in the USA )o r
1-800-387-010 0( in Canada).
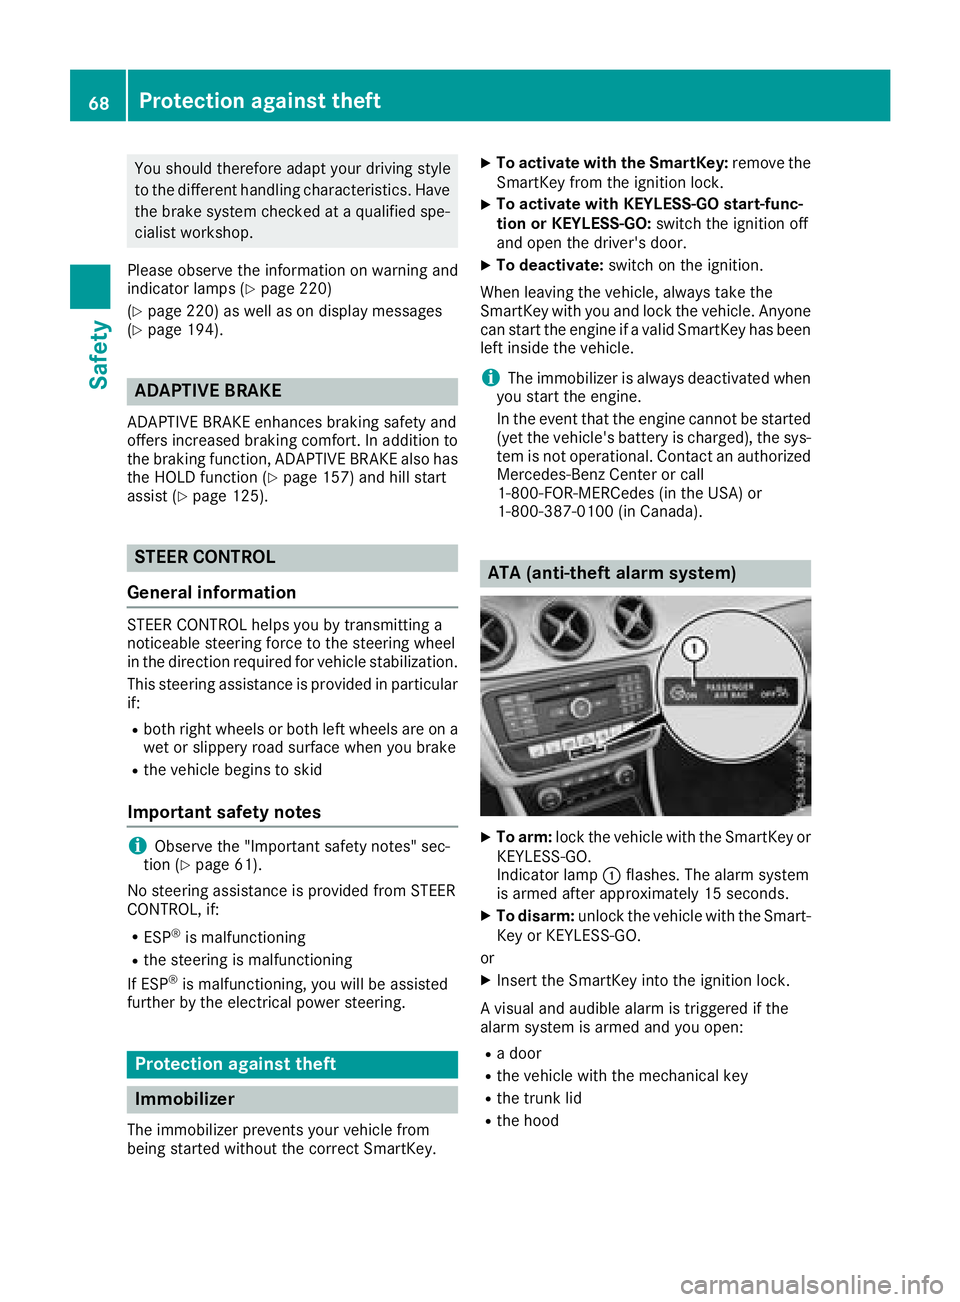
ATA (anti-theft alar ms ystem)
X
To arm: lock the vehicle with the SmartKe yo r
KEYLESS-GO.
Indicator lamp �C flashes. The alarm system
is armed after approximately 15 seconds. X
To disarm: unlock the vehicle with the Smart-
Key or KEYLESS-GO.
or X
Insert the SmartKe yi nt ot he ignition lock.
Av isual and audible alarm is triggered if the
alarm system is armed and you open: R
ad oor R
the vehicle with the mechanical key R
the trun kl id R
the hood68
Protection against theft
Safety
Page 92 of 326
Correct driver's seat position
G WARNING
You coul dl ose control of your vehicle if you do
th ef ollowin gw hile driving:R
adjust th ed river' ss eat ,h ead restraint,
steering wheel or mirrors R
fasten th es eat belt
Ther eisar is kofana ccident.
Adjust th ed river' ss eat ,h ead restraint ,s te er-
ing wheel and mirror and fasten your seat belt
before starting th ee ng ine.
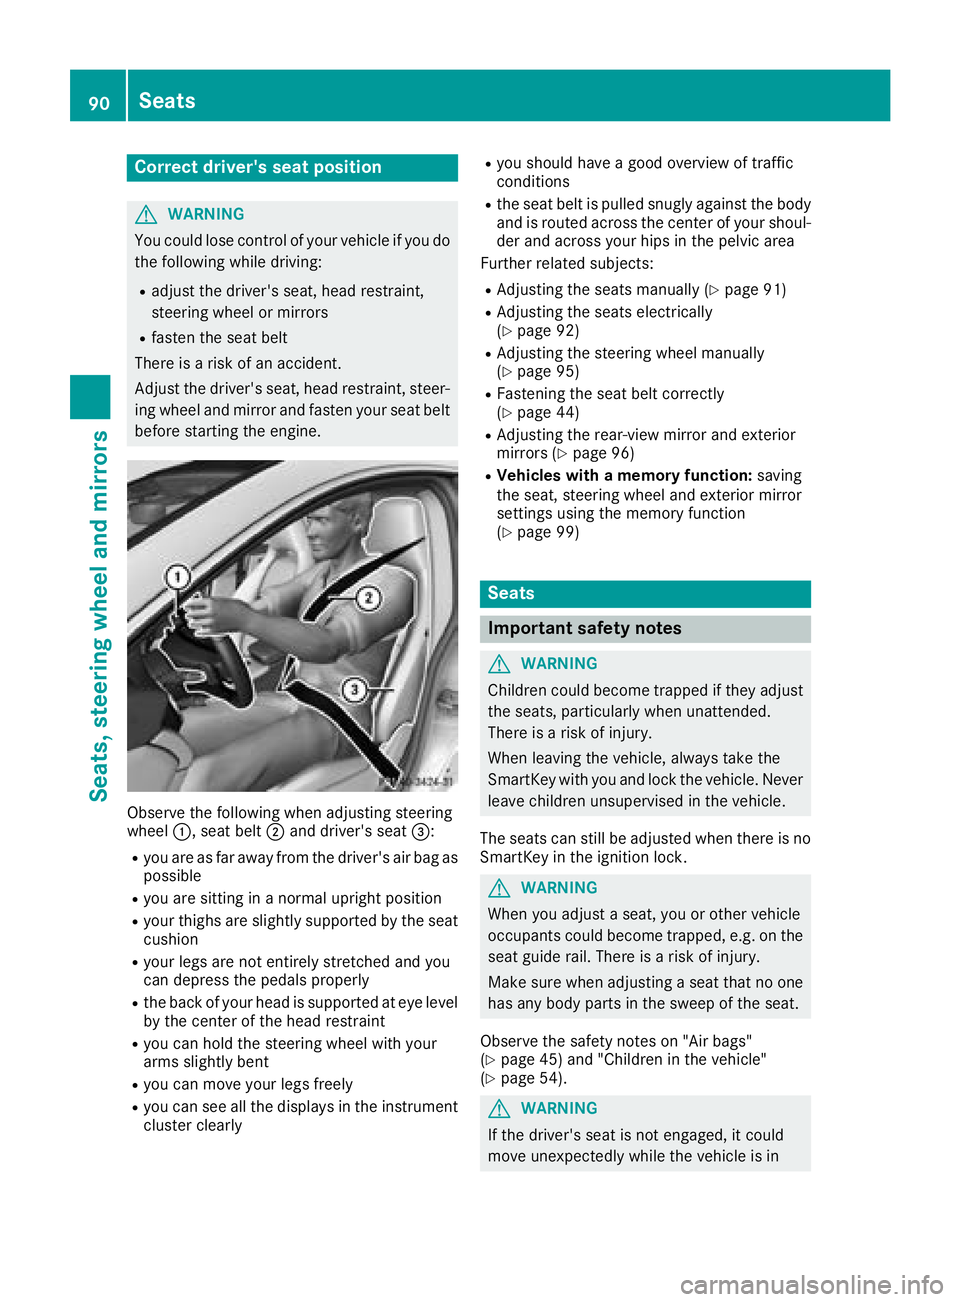
Observ et he followin gw hen adjusting steering
wheel �C ,s eat belt �D and driver' ss eat �
Page 93 of 326
motion. This could cause you to lose control of
the vehicle. There is ar isk of an accident.
Always make sure that the driver' ss eat is
engage db efore starting the vehicle.
G WARNING
You could lose control of you rv ehicl eify ou do
the following while driving: R
adjust the driver' ss eat, head restraint,
steering whee lorm irrorsR
fasten the seat belt
There is ar isk of an accident.
Adjust the driver' ss eat, head restraint, steer-
ing whee la nd mirror and fasten you rs eat belt
before starting the engine.
G WARNING
If you adjust the seat height carelessly ,y ou or
other vehicl eo ccupants could be trappe da nd
thereby injured. Children in particular could
accidentally press the electrica ls eat adjust-
ment buttons and become trapped. There is a
risk of injury.
Whil em oving the seats, make sure that your
hands or other body parts do not get under the
lever assembly of the seat adjustment sys-
tem.
! To avoi dd amage to the seats and the seat
heating, observe the following information: R
keep liquid sf rom spilling on the seats. If
liquid is spilled on the seats, dry them as
soon as possible. R
if the seat covers are damp or wet, do not
switch on the seat heating. The seat heat-
ing should als on ot be used to dry the seats.R
clean the seat covers as recommended;
see the "Interior care" section. R
do not transport heavy loads on the seats.
Do not place sharp objects on the seat
cushions, e.g. knives, nail sort ools. The
seats should only be occupied by passen-
gers, if possible. R
when the seat heating is in operation, do
not cover the seats with insulating materi-
als ,e .g. blankets, coats, bags ,s eat covers,
child seats or booster seats. ! Make sure that there are no objects in the
footwel lu nder or behind the seats when mov-
ing the seats back. There is ar isk that the
seats and/or the objects could be damaged.
i Further related subjects: R
cargo compartment enlargement (folding
down the rear seats) ( Y
page 240)
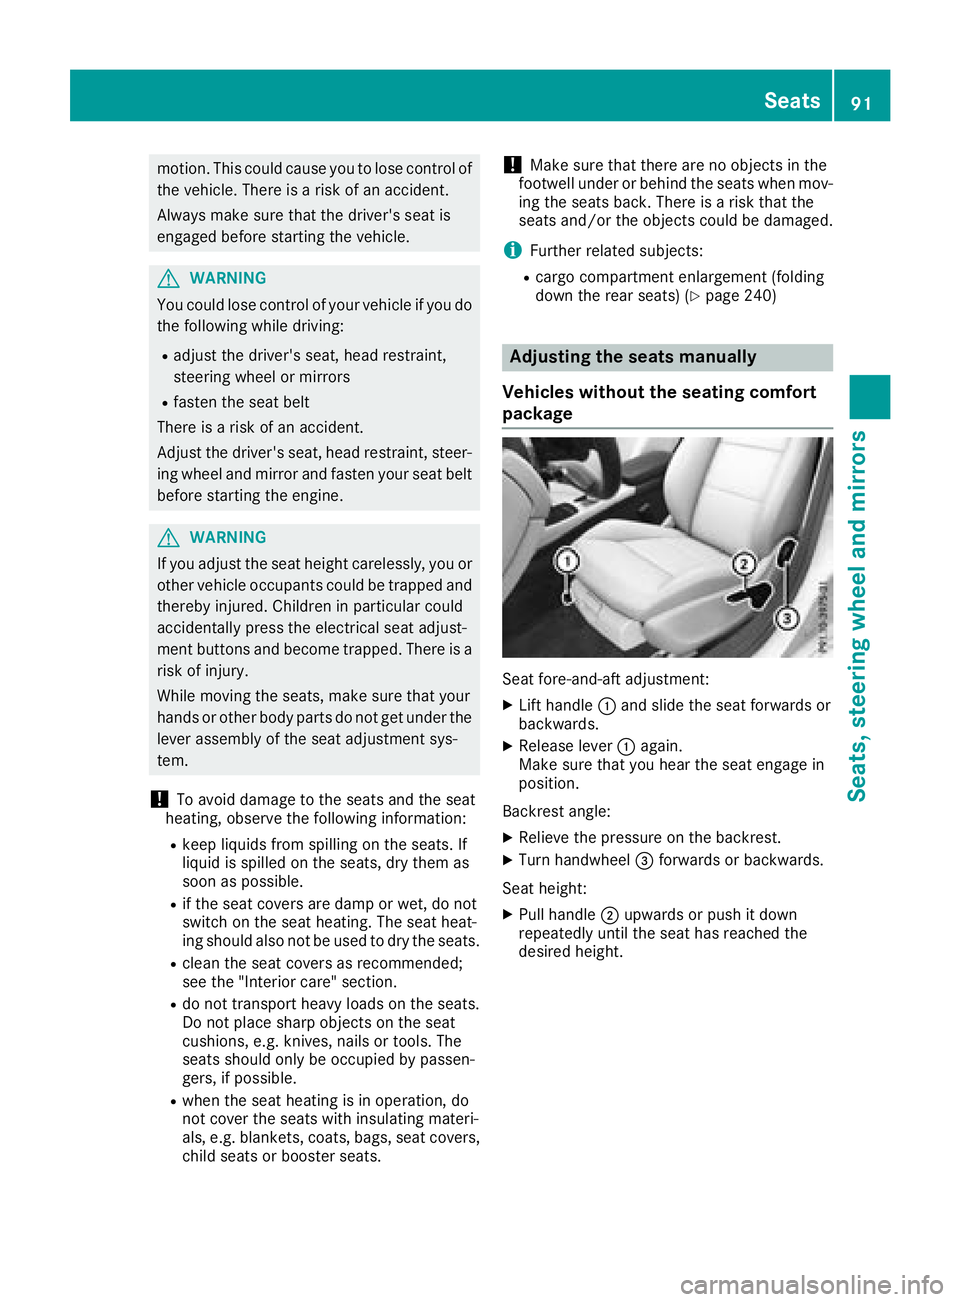
Adjusting the seats manually
Vehicles without the seating comfort
package
Seat fore-and-aft adjustment: X
Lift handle �C and slid et he seat forwards or
backwards. X
Release lever �C again.
Make sure that you hear the seat engage in
position.
Backrest angle: X
Relieve the pressure on the backrest. X
Turn handwheel �
Page 95 of 326
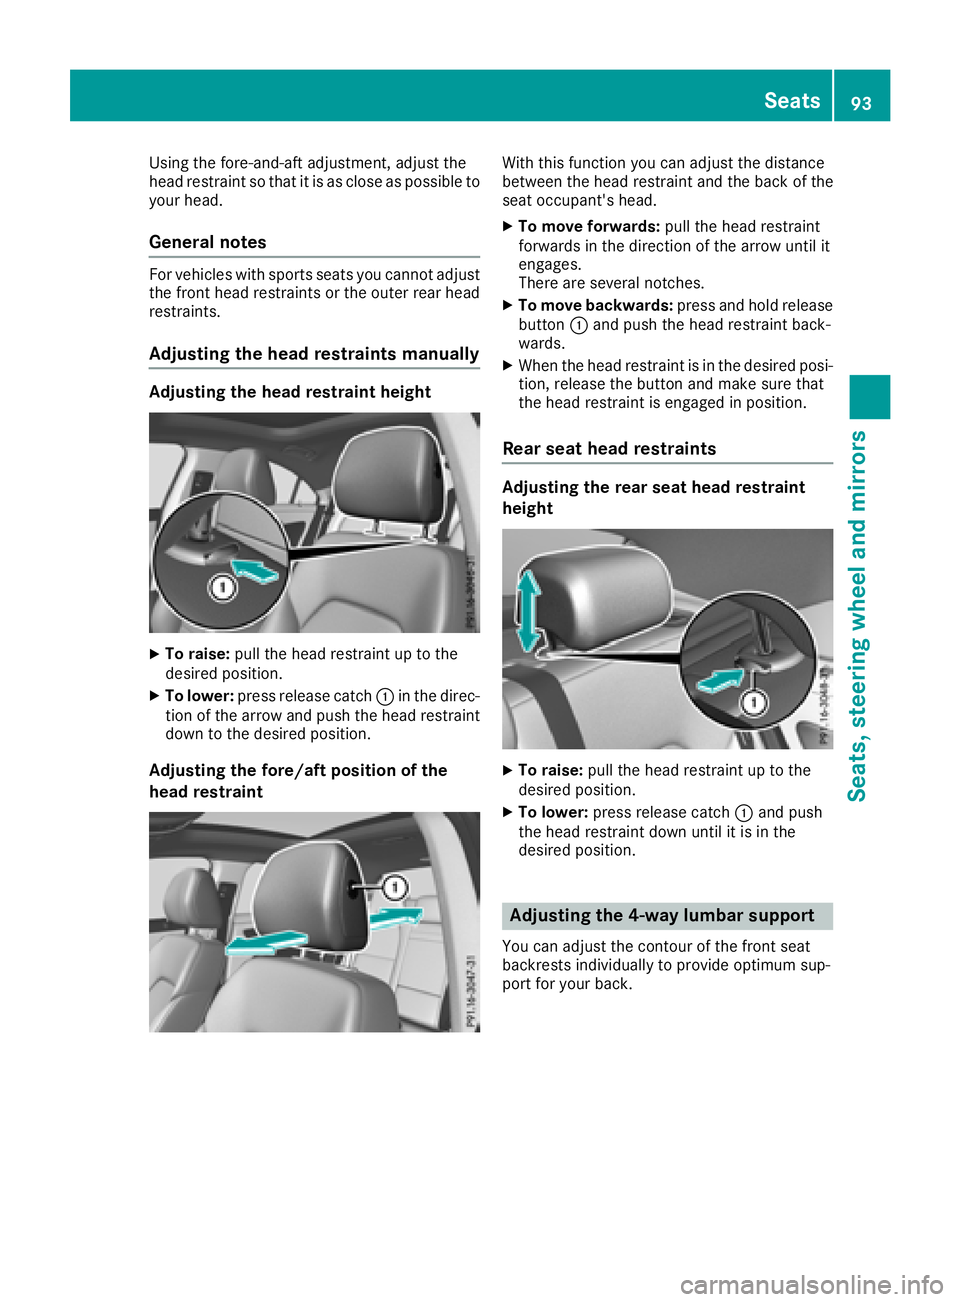
Using the fore-and-aft adjustment, adjust the
head restraint so that it is as close as possible to
your head.
General notes For vehicles with sports seats you cannot adjust
the front head restraints or the outer rear head
restraints.
Adjusting the head restraints manually Adjusting the head restraint height
X
To raise: pull the head restraint up to the
desired position. X
To lower: press release catch �C in the direc-
tion of the arrow and push the head restraint
down to the desired position.
Adjusting the fore/aft position of the
head restraint With this function you can adjust the distance
between the head restraint and the back of the
seat occupant's head. X
To move forwards: pull the head restraint
forwards in the direction of the arrow until it
engages.
There are several notches. X
To move backwards: press and hold release
button �C and push the head restraint back-
wards. X
When the head restraint is in the desired posi-
tion, release the button and make sure that
the head restraint is engaged in position.
Rear seat head restraints Adjusting the rear seat head restraint
height
X
To raise: pull the head restraint up to the
desired position. X
To lower: press release catch �C and push
the head restraint down until it is in the
desired position.
Adjusting the 4-way lumbar support You can adjust the contour of the front seat
backrests individually to provide optimum sup-
port for your back. Seats 93
Seats, steering whee la nd mirrors Z
Page 97 of 326

Problems with the seat heating Problem
Possible causes/consequences and �P Solutions
The seat heating has
switched off prematurely
or cannot be switched
on. The on-board voltage is too low because too many electrical consum-
ers are switched on. X
Switch off electrical consumers that you do not need, such as the
rear window defroster or interior lighting.
Once the battery is sufficiently charged, the seat heating will switch
back on automatically.
Steering wheel
Important safety notes
G WARNING
You could lose control of your vehicle if you do
the following while driving: R
adjust the driver's seat, head restraint,
steering wheel or mirrors R
fasten the seat belt
There is ar isk of an accident.
Adjust the driver's seat, head restraint ,s teer-
ing wheel and mirror and fasten your seat belt
before startin gt he engine.
G WARNING
Children could injure themselves if they
adjust the steering wheel. There is ar isk of
injury.
When leaving the vehicle, always take the
SmartKey with you and lock the vehicle. Never
leave children unsupervised in the vehicle.
Adjusting the steering wheel
G WARNING
If the steering wheel is unlocked while the
vehicle is in motion, it could change position
unexpectedly. This could cause you to lose
control of the vehicle. There is ar isk of an
accident.
Before startin go ff, make sure the steering
wheel is locked. Never unlock the steering
wheel while the vehicle is in motion. �C
Release lever �D
Adjust st he steering wheel height�